Even though I live on Lake Superior, I haven’t embraced “nautical” decor – but the tides might be turning because check out the DIY nautical accent table Handy Hubby and I whipped up!

This DIY nautical accent table is easier to make than it looks and I’m going to show you how to build it, but first I should explain how I got roped into making this (haha). The folks at Rust-Oleum sent myself and 7 other bloggers a mystery box containing Varathane products, truly random bits and bobs, and a small budget to makeover or build something cool. Here’s what I was sent:


I chose the wire, rope, and sack of marbles, simply because I like a challenge (marbles?!?). In fact, I went out and bought 100 more feet of rope so I could create a bold, DIY nautical accent table. Go big or go home right? I also stepped outside my comfort zone and refrained from adding my signature aqua.
Supplies for Making a Square Wood Table:
- Three 1.5″ x 1.5″ pine lumber pieces (8 foot lengths)
- Two 3/4″ x 1.5″ pine lumber pieces (6 foot lengths)
- One 3/4″ x 3/4″ pine lumber piece (6 foot length)
- Scrap piece of pine 3/8″ plywood
- Piece of wallpaper (click for similar)
- 50-75 feet of rope
- Wire
- Handful of round blue marbles
- Epoxy to secure marbles
- Wood glue
- Air nailer and 3/4″ air nails (14 gauge)
- Circular saw and mitre saw
- Brushes, rags, gloves etc. for stain application
- Varathane Ultimate Wood Stain – Chocolate
- Varathane Professional Clear Finish – Satin
- Varathane Bar and Table Finish
Why use pine?? I didn’t particularly want pine, but I didn’t want to have to rip larger boards. I wanted to purchases the exact dimensions and just cut the lengths. The sizes I wanted were available in a few different kinds of wood, but if I wanted them all the same, pine was my only option. Because everything was pine, it took the stain more evenly than if I had mixed woods.

How to Make a Basic Square Wood Table:
After some pondering and scheming, we started with one of our wonky little sketches:
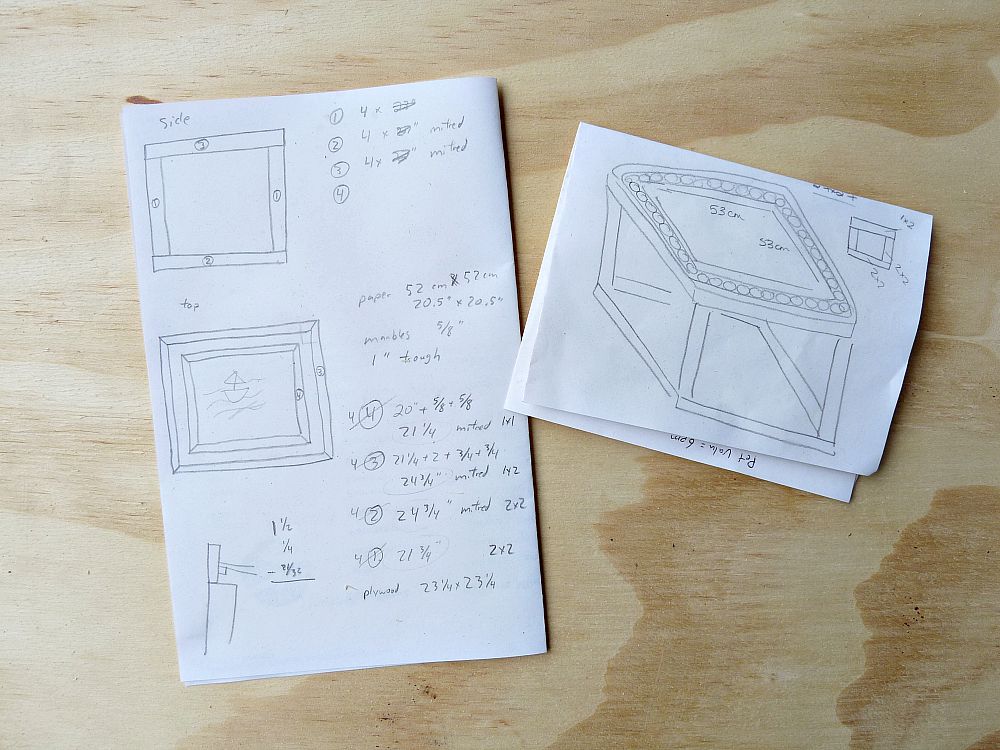
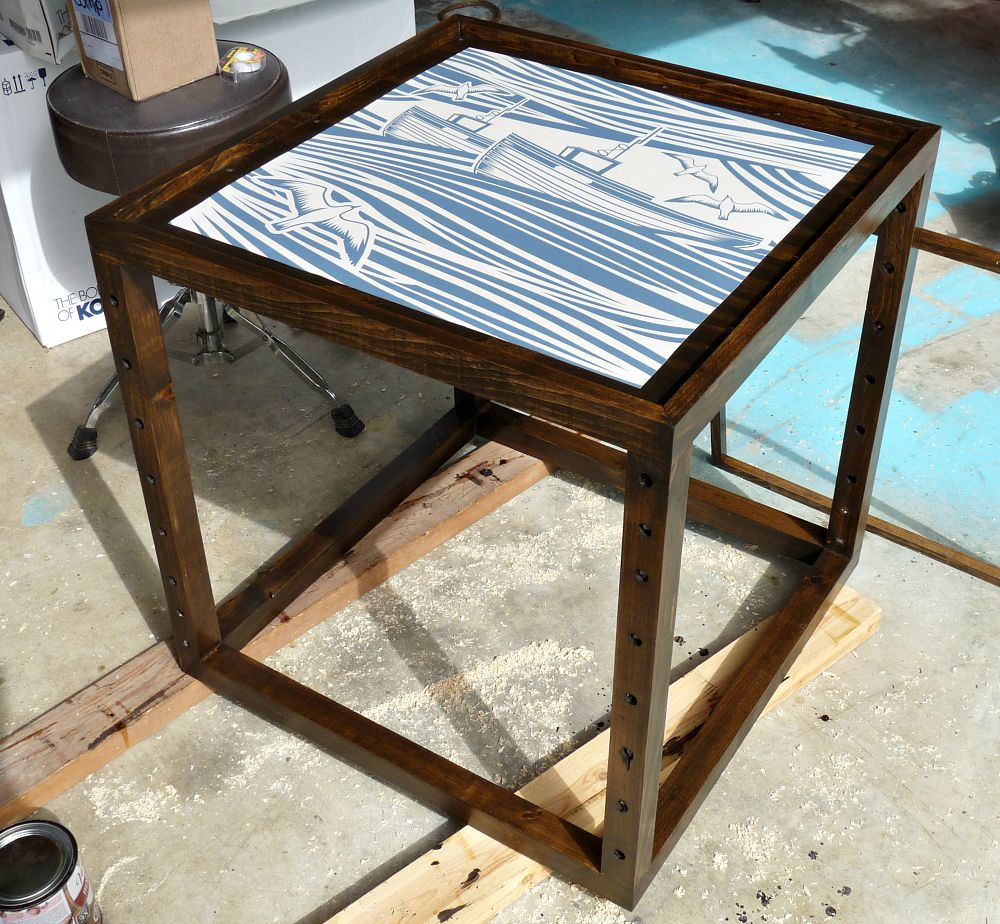
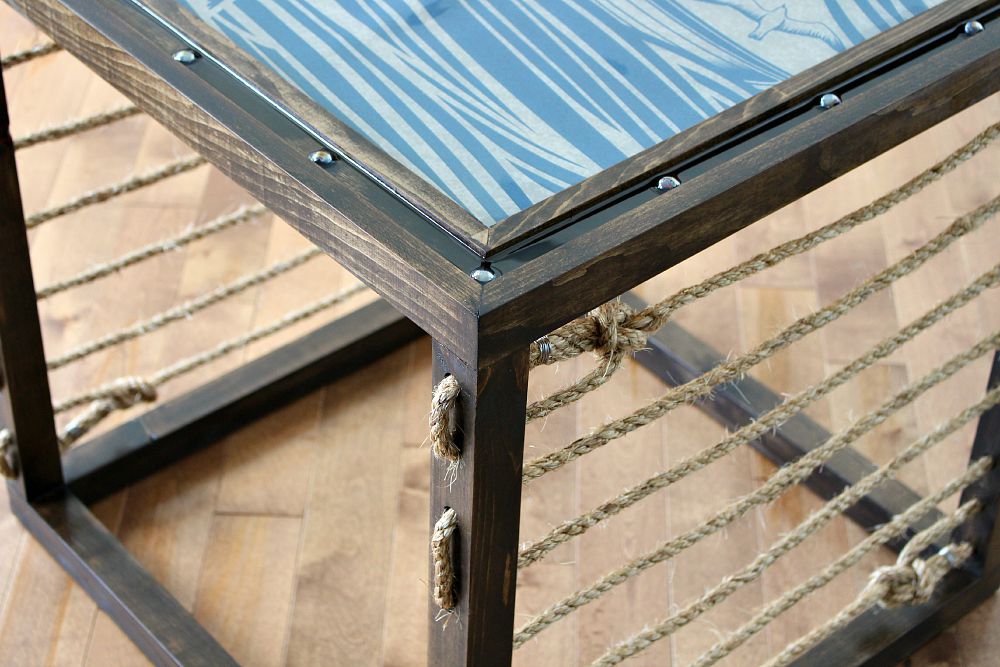
Once we had a sketch of the design and figured out our desired measurements, we cut all of the pieces to length using a mitre saw. The frame for the top and bottom were cut with mitred corners, while the vertical pieces that make up the legs were just butt jointed. We also cut the smaller square “frame” for the top, to create a channel for the marbles. Finally, to make the table surface, we cut a scrap of plywood to size (leftover from the Ikea credenza hack!) using our circular saw with a straight edge – which we use as a table saw stand-in.
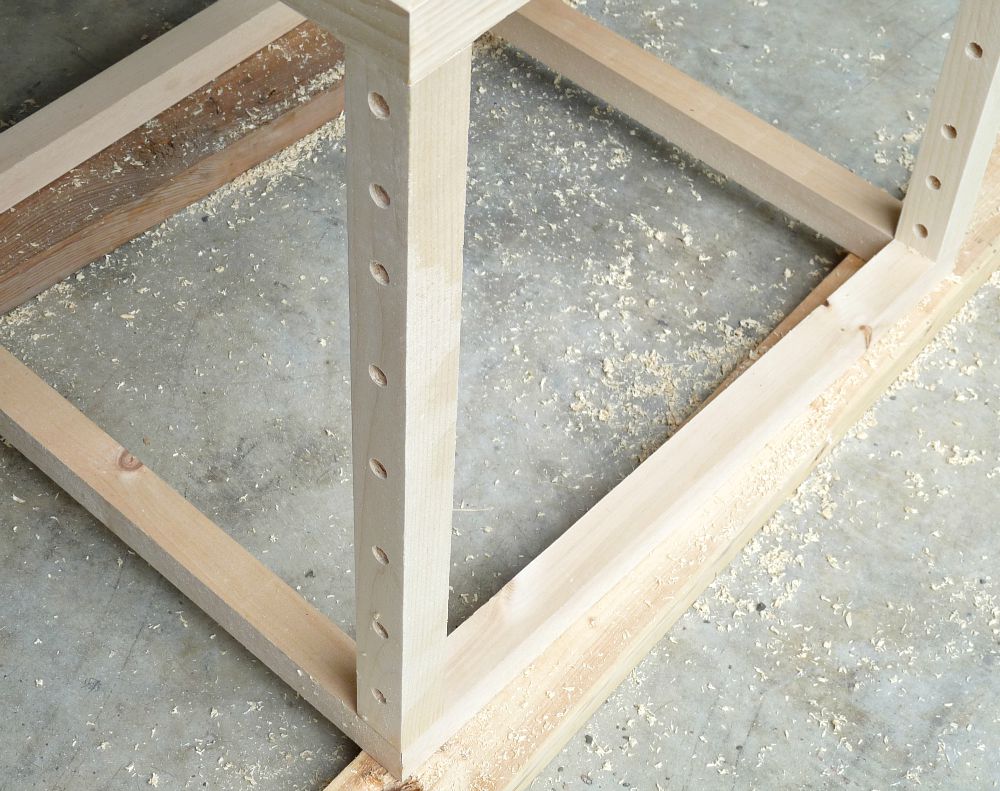
With the cutting done, we formed the square base and top by butt gluing the ends together with wood glue, securing them while they dried. We also glued together the small inner frame. Once those pieces were dry, we glued the plywood into the frame, securing it on the bottom as well. Finally, we glued the four legs onto the top and bottom, completing the cube shape. Here’s a peek at the table before stain (the inner frame hasn’t been attached yet):

Pretty, right? It took so little time that now I have this weird compulsion to make a bunch of these cube cuties. Anyone need a table?
How to Make a DIY Nautical Accent Table:
To drill the holes for the rope, first we plotted out the spacing – enter another wonky drawing:

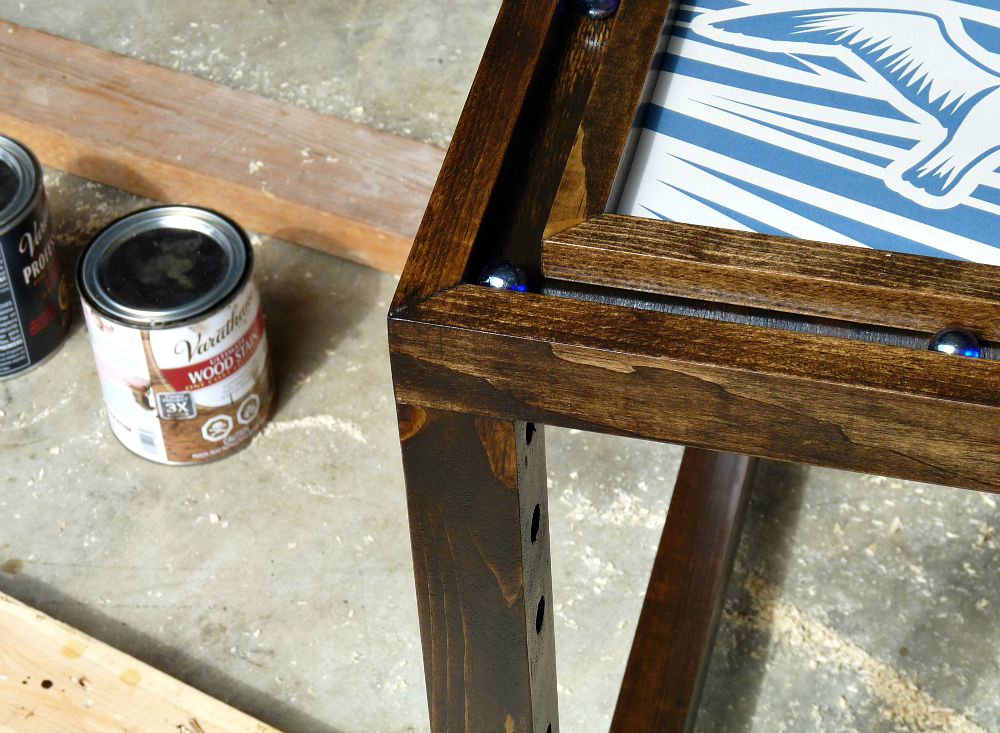
Then we worked our way around the table, laying the table on its side, with a piece of scrap wood underneath. All of the holes are drilled in equal distance, except for the first and last (for the rope to double back and be tied). We used a 1/2″ drill bit for our rope.

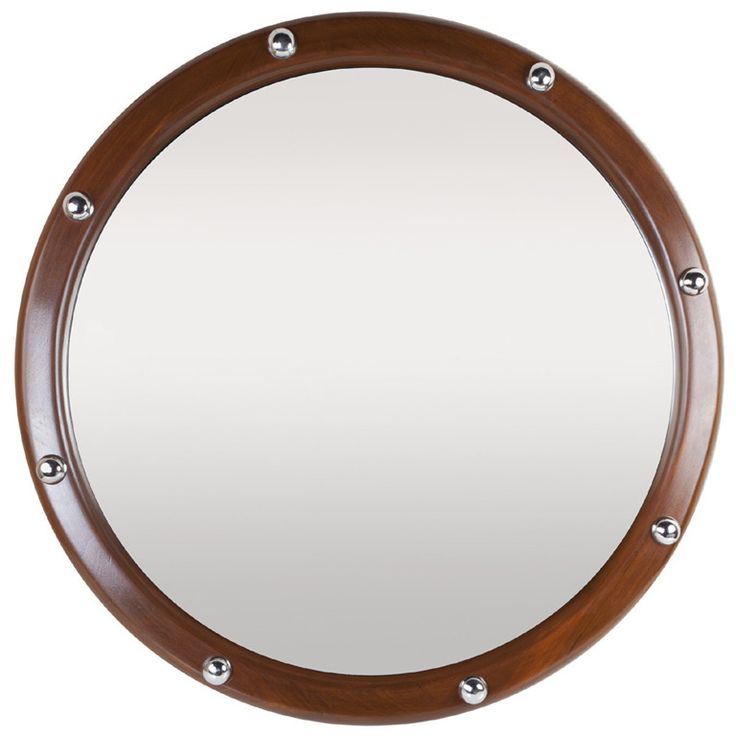
Next we figured out where the marbles would be placed. Inspired by the rivets on this nautical mirror available on 1st dibs, I spaced the marbles around the perimeter of the table top of my DIY nautical accent table, holding them down with tape while I fiddled with the arrangement until I was happy.
To create dents for the marbles to sit in, we measured, marked, and simply drilled a partial hole with a 1/4″ drill bit (you could also use a counter sink bit, which we don’t have).


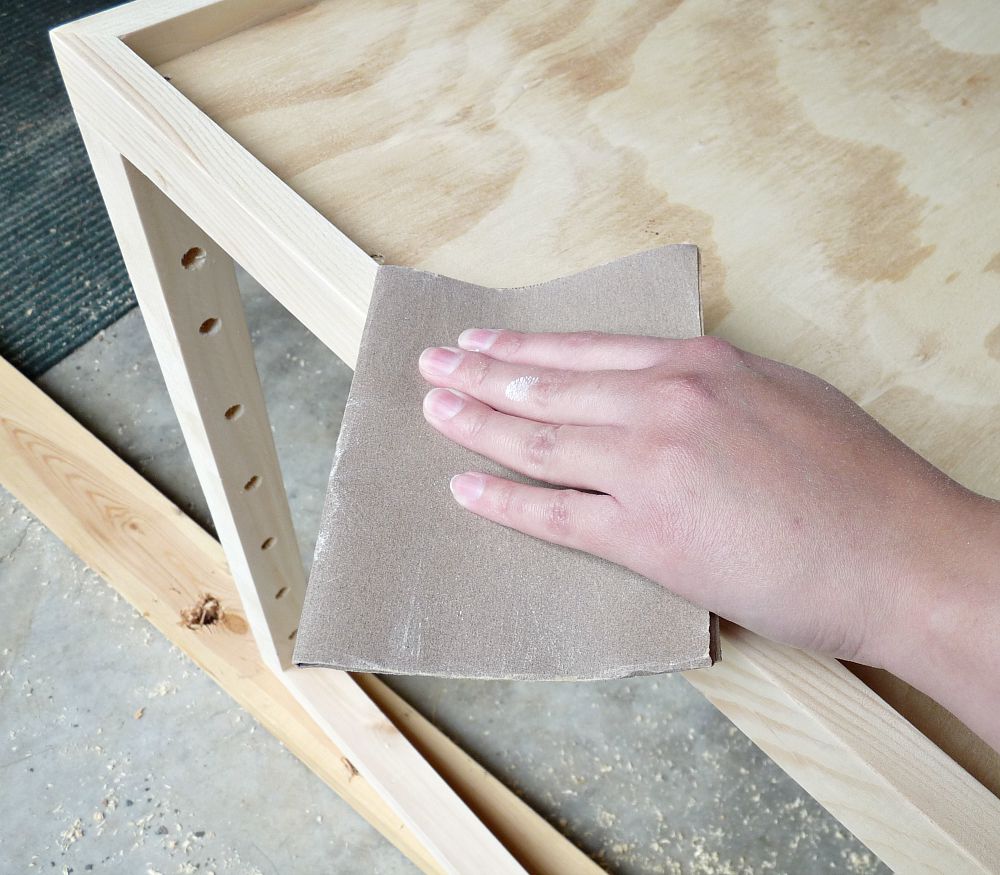
With the table assembled and the holes drilled, we lightly sanded the entire piece with 220 grit sandpaper – paying attention to where the holes had been drilled on the legs. We sand after construction because sharper cuts make for cleaner construction. Once it’s assembled, we sand rough areas smooth and also round corners a tiny bit, which makes it look good but also makes it less susceptible to chips and dings – sharper edges are more vulnerable.
Once it was sanded smooth, we wiped it with a tack cloth to remove any dust and debris, and then it was time for stain! In my mystery package, I received Varathane Ultimate Wood Stain in Chocolate and Varathane Professional Clear Finish:

The stain went on very easily and smoothly and, as promised, only took one coat! It did, however, take longer to dry than indicated, which could be attributed to humidity in the air. I ran out of daylight and ended up letting it dry overnight before applying the clear coat with a brush. The nice thing about an oil-based stain as opposed to the water-based stains I’ve used before is that this didn’t raise the grain – which makes for much less work!

Next I cut a piece of wallpaper I’ve been swooning over – the Whitby pattern by Mini Moderns, available from Wallpaper Direct – which was perfect for my DIY nautical accent table!
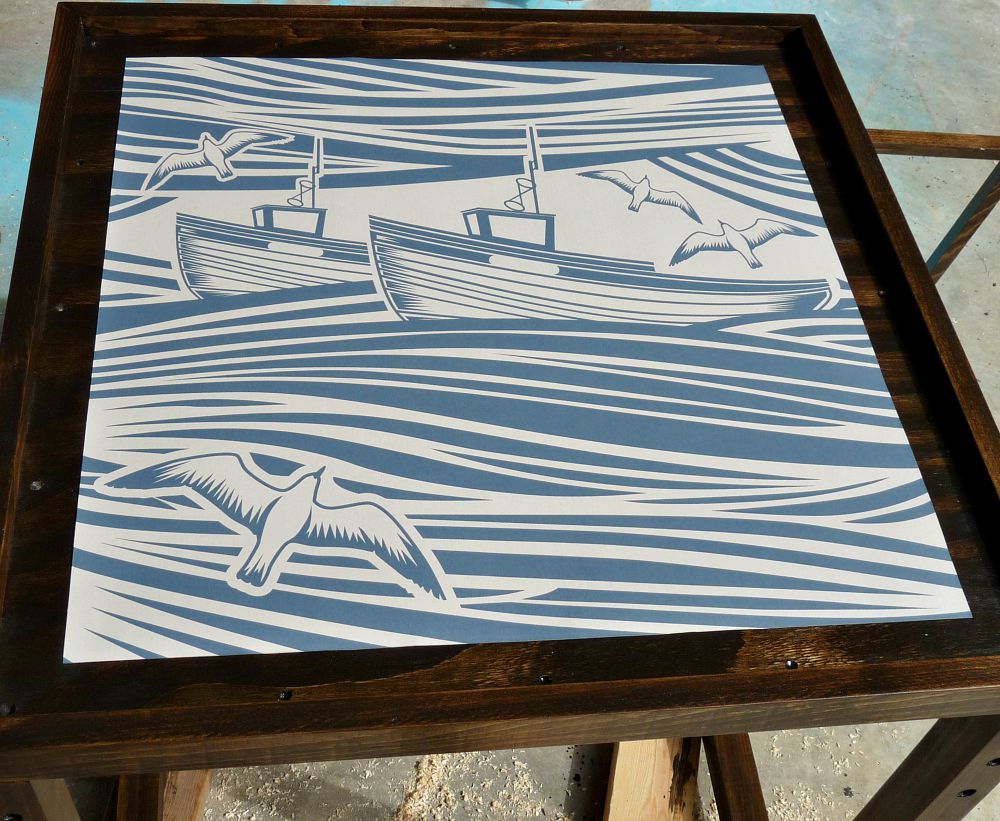
I really wanted the aqua but ordered the washed denim blue because I knew it would look better with the blue marbles (it was so weird to be running around town with a sack of marbles, trying to find complementary elements for my table!). You can’t even imagine how long I agonized over this decision and how much it pained me to order the denim blue. We used double sided tape to affix the paper to the plywood top (not the best idea – I’ll tell you why), and then installed the inner frame on top of it, using wood glue and air nailing it from the bottom.

We used our go-to fixative to affix the marbles, adding a dab of epoxy to each marble and pressing it down gently. The marbles held tight and definitely could have been left, as-is.
Then it was time for the scary bit: resin!! I’ve been itching to try using resin on furniture (after pinning a bunch of cool projects) and thought this contest would be a great reason to experiment. With a prize on the line, why not try using a product you’ve never used? Better still, try it at 10pm, the night before the project is due… I would have fared well on Trading Spaces – I clearly live dangerously and can pull a DIY all-nighter without breaking a sweat.
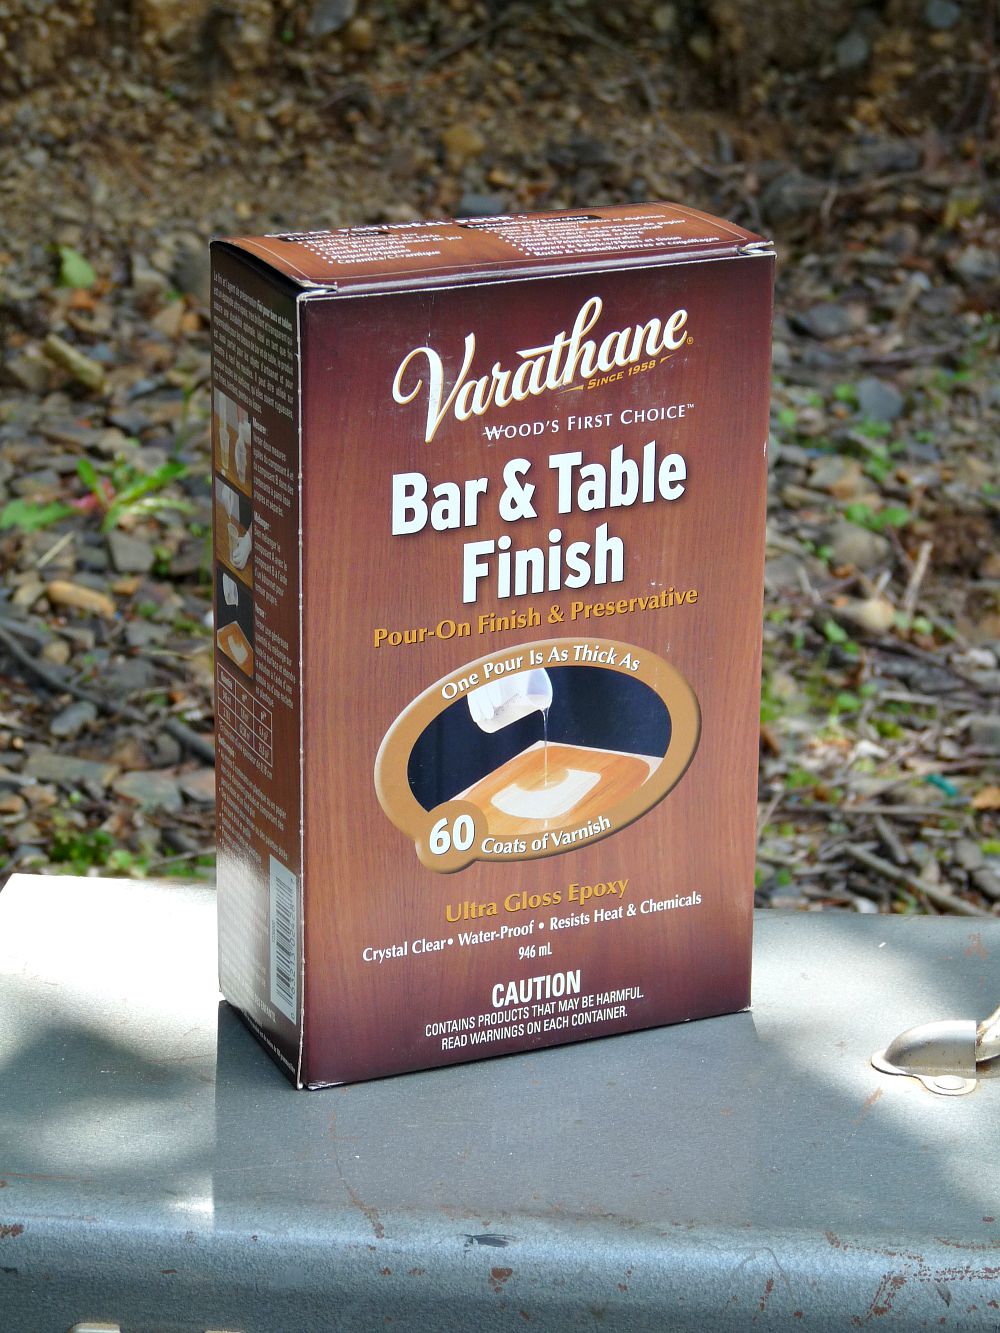
Using the Varathane Bar and Table Varnish:
We followed the instructions – mostly – and although there are warning signs on every page of the instruction pamphlet, it was actually easy to use! We applied it to the channel we created for the marbles and also over the wallpaper. Now, the instructions suggest laminating papers to be embedded, but it was too late for that so I went ahead! I only got the product a couple of days before, and if I hadn’t been on a deadline I would have done that extra step – or, as per my genius last minute revelation: done a glass top for the surface and then epoxy for just the marble channel! The wallpaper was changed a bit from the moisture of the epoxy and lost some crispness. But, even though we deviated from the instructions and poured it on very thickly, it cured and dried in time. I just love how glossy it is and how it reflects light. So, playing fast and lose with instructions, you win some and you lose some.
Finally, we created a bowline knot and threaded the rope back and forth through the holes we drilled, securing the bitter end (I’m studying for my boater’s exam) with the wire. And, that’s it!!
My DIY nautical accent table using rope, marbles, and wire – plus chocolate stain, a satin clean coat, and epoxy:


I love how this DIY nautical table turned out!

Thanks to Rust-Oleum and Varathane for sponsoring such a fun challenge and helping me create this DIY nautical accent table. And special thanks to Wallpaper Direct for providing the wallpaper (I keep thinking about wallpapering my powder room in the aqua. The AQUA!)

LOVE this! such a unique idea!
Thanks!! I had a lot of fun trying to use the marbles – they weren't even flat on the bottom, for easy gluing… 🙂
PS headed over to vote. 😉
Awesome, I appreciate it!!
This rules!! I have been obsessing over that powder room done with this wallpaper pattern that has been on my pinterest board forever. Voted!
Thanks so much for your vote!! 😀 Maybe we need a support group for people who can't stop thinking about that wallpaper…
I like it, it's too cute and very nautical! Did I miss the part about why the double sided tape was a bad idea? I'm guessing you could see it once you applied the resin?"You can't even imagine how long I agonized over this decision and how much it pained me to order the denim blue." lmaoooooo this made me laugh out loud!! MAKE ALL THE THINGS TURQUOISE!!
Thanks!! And I knew you'd understand how difficult it was to click "denim blue" when there was aqua. I suffer for my art ;)Sorry – you're right, I'm so unclear. I meant to say that taping it down just wasn't sufficient. As per the instructions, the paper really should be laminated before being embedded in the resin because it reacts a bit funny (given that it's porous). I'll try and re-word that a bit so I make more sense. You'd make a great editor!
P.S. Did you vote for me?? 😀
I did so bad in English class in high school, how funny is that. lol. Ah, but I understand now. I have watched some resin craft videos on youtube and they laminate the paper stickers they put in them with packing tape so they don't get that wet look because the paper soaks it up. But I guess the wall paper is so thick, and made to hold up to water that it held up better. I actually came back now to find the link to vote, doing it now. 🙂
Thanks for voting :)I optimistically hoped that wallpaper would hold up 100% because in the application process it sees moisture, but I think it's a totally different kind of fixative. Now that I've worked with it, though, this resin epoxy stuff is SO easy! I'd love to try another furniture project with it.
I love how resin is back in style. Back when I was a kid furniture with resin was pretty popular. I remember my dad making a kidney bean shaped coffee table that had resin with glitter in it lol. And my mom's boyfriend had this table that was tree slice and it was covered in resin. I have been planning to cover a table in pennies and wanted to do resin over top but thought it was pretty expensive and was just gonna put the existing glass panel back on top…..but I am such a procraftinator. lol
Haha, procraftinator – I love that. Resin is a bit pricey – I was surprised. I've seen such cool vintage resin pieces – like a table with agate slices embedded that I think you'd like too. Your dad's glitter table sounds amazing. It is funny how everything old is new again.
ooooooh I bet that would be super pretty.
Nicely done! I don't know how you come up with such clever ideas to a random bunch of stuff.I'm off to see what others did and place my vote for yours. Good luck!
Thanks for your vote – I really appreciate it!! It is weird how my brain works but I think about things really hard, look at inspiration photos, jot down ideas and then let things just simmer. I go about my day and then ideas pop into my head! Sometimes nothing like an inspiration photos, but it's like those got the creative energy flowing. And I'll think of things at the most random times. I guess some part of my brain is always churning out ideas – it's just a shame I can't use them all. Then I'll chat with someone, often Hubs or my Mom, and they'll often help refine my ideas or help me narrow them down. When I came up with the Expedit hack (the swinging canvas doors), I was at work, concentrating, and this random idea popped into my head! I quickly sketched it out and hid the paper before anyone could see. Or what that a rhetorical question…? :)Yes – go see the hole line up because there are SO many great ideas there!
The table is fantastic, what an awesome job you did and sounds like a super fun challenge!
Thanks April! It was a fun challenge – I never turn down an opportunity to get a little creative.
Love it (and voted :))! I've been eyeing that wallpaper, too. I saw someone use it in an Airstream the other day…it looked fabulous.
Thank you, I appreciate the vote! I saw the same airstream, I think! They used the aqua, right? If you wallpaper a room with it, I'll be so jealous 😀
Love this! I love the colour of that stain. I want nautical everything haha. Definitely got my vote 🙂
Is nautical addictive? I find myself pinning more and more nautical and coastal rooms and projects… Thanks so much for your vote! If you have any projects of your own, I really do recommend the stain because it went on so easily. It definitely cut down project time, which I liked.
You did an amazing job! Love the wallpaper and rope. And the unique way you used the marbles!Hugs, Jamie
Thanks Jamie!!