I’ve seen some neat re-purposed jewellery displays, but if you can’t find something to makeover here’s how to build a jewellery display from scratch! You might be wondering WHY I made this jewellery display, when I have a super duper mini armoire for jewellery? This is a gift! A friend of mine has been storing her necklaces and bracelets on lamp shades and mirrors, because she doesn’t like things tucked away in drawers or jewellery boxes. I wanted to make her a jewellery display that kept everything organized the way she likes to store things – that could be wall mounted or just set on her dresser.

Supplies:
- 1 x 6 pre-sanded pine (approx 7 foot length)
- 1/4″ plywood
- Circular saw
- Table saw (optional)
- Belt sander (orbital sander works too)
- Wood glue or construction adhesive
- Nail gun and compressor
- Sand paper
- Wood filler
- Primer
- Paint
- Small angled paint brush
- Small foam roller and paint tray
- Cup hooks
How to make a jewellery display from scratch:
We used 1 x 6 pre-sanded pine and 1/4 inch plywood for this project – partly because we already had it, and partly because 6″ is a good depth for this to sit nicely on a surface and not wobble or tip. We created a size and design based on the supplies we already had, so feel free to make up whatever measurements you prefer. We used a circular saw to cut the pine to length and, because we don’t have a table saw (no space!), Hubs used a handheld circular saw for the plywood too. You could have your cuts made at the lumber yard or use a hand saw for cutting the pine to length. Once cut, we dry fit the pieces to form a box with butt joints:

When we were sure everything fit well, we applied some construction adhesive (leftover from the mirror project) and then used a nail gun and compressor to hold it all together, including the plywood back. You can also use wood glue and clamp the box.

Then we had to deal with the issue of a rough edge:

Not to worry! You can use edge banding to cover edges like this, but a little belt sanding followed by some hand sanding made all the joints and edges super smooth. We also used some wood filler to fill in any gaps/dents, especially from the nails. Then lightly sanded those filled areas again.

I brushed on two coats of primer (the bare wood really soaked it up), and it already looked pretty cute:

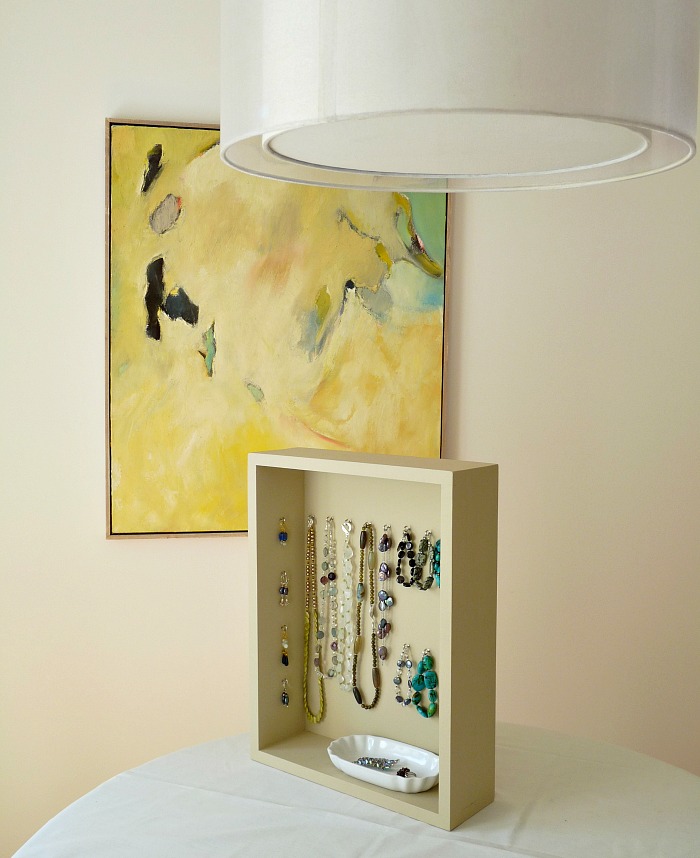
My friend has an electric blue bedroom, bright green kitchen and a beige living room. I chose to paint this jewellery display beige, because I didn’t want it to compete for attention in her space but, because her living room is this colour, I knew she’d still like it. Does the colour look familiar? Using a brush for the corners and a small foam roller for the rest, I gave it two coats of paint. Then I added some small hooks leftover from my artful Expedit Hack. These cup hooks are perfect for anything from earrings to bracelets and more! I tried to space them so there’s enough room above each hook for a hand to comfortably fit – so my friend doesn’t end up draping things over a lampshade again. There are quite a few hooks for her to hang her jewellery, but we have room to add lots more if she needs the storage. I styled it with the DIY jewellery I’ve been making, to show you how it looks when it’s in use!


For extra storage of hard to hang things (like brooches), we attached a small ceramic dish with the same adhesive we used for the construction.

I like it sitting on a surface, but we plan on adding some sawtooth picture hanging hardware so my friend has some flexibility and can also hang it on a wall.


And, for scale, hopefully this photo helps:
How do you store your jewellery? Out in the open, tucked away? If you say “draped on a lampshade,” I’m making you one of these too!
P.S. Don’t Forget to Pin for Later!


I like this. I made a jewelry organizer out of a corkboard but this is fancier. I like the hooks. I also didn't realize there was an acceptable alternative way to to spell jewelry!
Awww thanks! I tried to make it pretty because it's a gift :)"Jewellery" is the British English spelling. Some Canadians spell it this way, but others use the American English spelling, "jewelry". I don't consistently use one system of spelling, but "jewellery" just looks better to me 😉
Mine are draped on a lampshade….. (have you started to make mine yet?). Kidding! But I really like this simple design. I don't have much jewellery; except for a few perennial faves, I purge it once in awhile when I tire of it since it's nothing too valuable. To store/display, I have an empty cubby space in our closet organizer with a couple of dishes for watches/bracelets, a small ceramic elephant for rings (on his trunk) and a gargoyle to hang necklaces (on his wings)- doesn't everyone have a gargoyle in their bedroom? But building this from scratch is motivating. Yesterday, I saw a photo on design sponge of IKEA boxes used to create a stacked bookcase and I was inspired to do this for my workspace (I love all those raw, patina-ed studio/office/workspaces I see on DS, dotted with obscure, vintage treasures). But alas, IKEA no longer has those boxes- but now that I see this, I'm want to make my own boxes and create this stacked crate style bookcase.Nicely done!
Haha! I'll get started right away ;)I love that you have room in your closet organizer! I'm jealous. I wish our closet was more spacious. Because we don't have a dresser at all, all our clothes (minus shoes, coats and my purses) live in our smallish bedroom closet. I'd like room for a gargoyle.It should definitely be pretty straightforward to make a crate type cubby with these same steps. I love the idea of a randomy-stacked bookcase. P.S. If the trunk if facing up, it's good luck right?
(let's try again without typos- seriously)Yep, trunk up is apparently good luck. No, our closet organizer is not envy worthy but it works for us- I'm just a dork for that kinda thing and we keep the clothes pared down to fit- more than I'd care to ; ).We are seriously lacking in closets in our house and my hubby is not the most neat guy when it comes to clothes. So rather than a dresser for folded clothes, cubby storage was better for keeping clothes from becoming a jumbled mess in a single drawer. And instead of building a closet- placement would be tricky in our oddly sized/shaped room- I built my own closet organizer using 2 cheap 8-cubby bookcases. I stood one vertical, one horizontal (fashioned into an upside down L) screwed together & mounted. I attached a rod under the horizontal one for low hanging and another rod at the end & to the wall for full length items and boxed it in with cheapo wood, painted white with 4 large canvas bins on top for out of season clothes & decor items. It's dreadfully shy of hanging space but with 16 cubbies, I can spare one for jewellery & sundries; displayed in my dorky fashion to make me feel like I have a luxuriously large walk-in. I have room for everything in a separate space- my jeans, my tops, hub's tees, workout clothes, DIY clothes, etc- I like it all sorted out.Cubbies aren't large but suit my items fine- but I had to make my own t-shirt folder (see? dork!) out of foam board so that hubby's shirts fit nicely. I geek out over our now perfectly folded shirts all neatly stacked.Our 'closet' is workable because we have a laundry closet (note: not even a full room) with a rod over the machines- this is where I hang my husband's work clothes- I can take shirts straight from the dryer and hang. Geez- I must hold the record for longest comments on your blog.
I LOVE reading your comments!! I wish you had a blog so I could see – is that creepy? Your closet sounds genius!! You're being modest. I like how you always seem to come up with innovative ideas that meet your needs. We also have to keep things pared down to fit, which sometimes I hate, but sometimes appreciate. I love your nerdy t-shirt folder too. I wish I was tidier that way. My folder is atrocious even though I try. They are never the same width. I find I am hanging more and more things and in the future, might reserve folded space only for sweaters because even tank tops and t's have been hanger bound recently.
It looks great!! 🙂 http://sueandcolours.blogspot.sk/
Thanks Sue!
This is a fantastic tutorial! I'm looking for DIY jewelry display ideas and this might be a little more substantial than what I need for next week, but it's a great tutorial!Natashalh
Thanks so much!! That's so kind of you to say 🙂