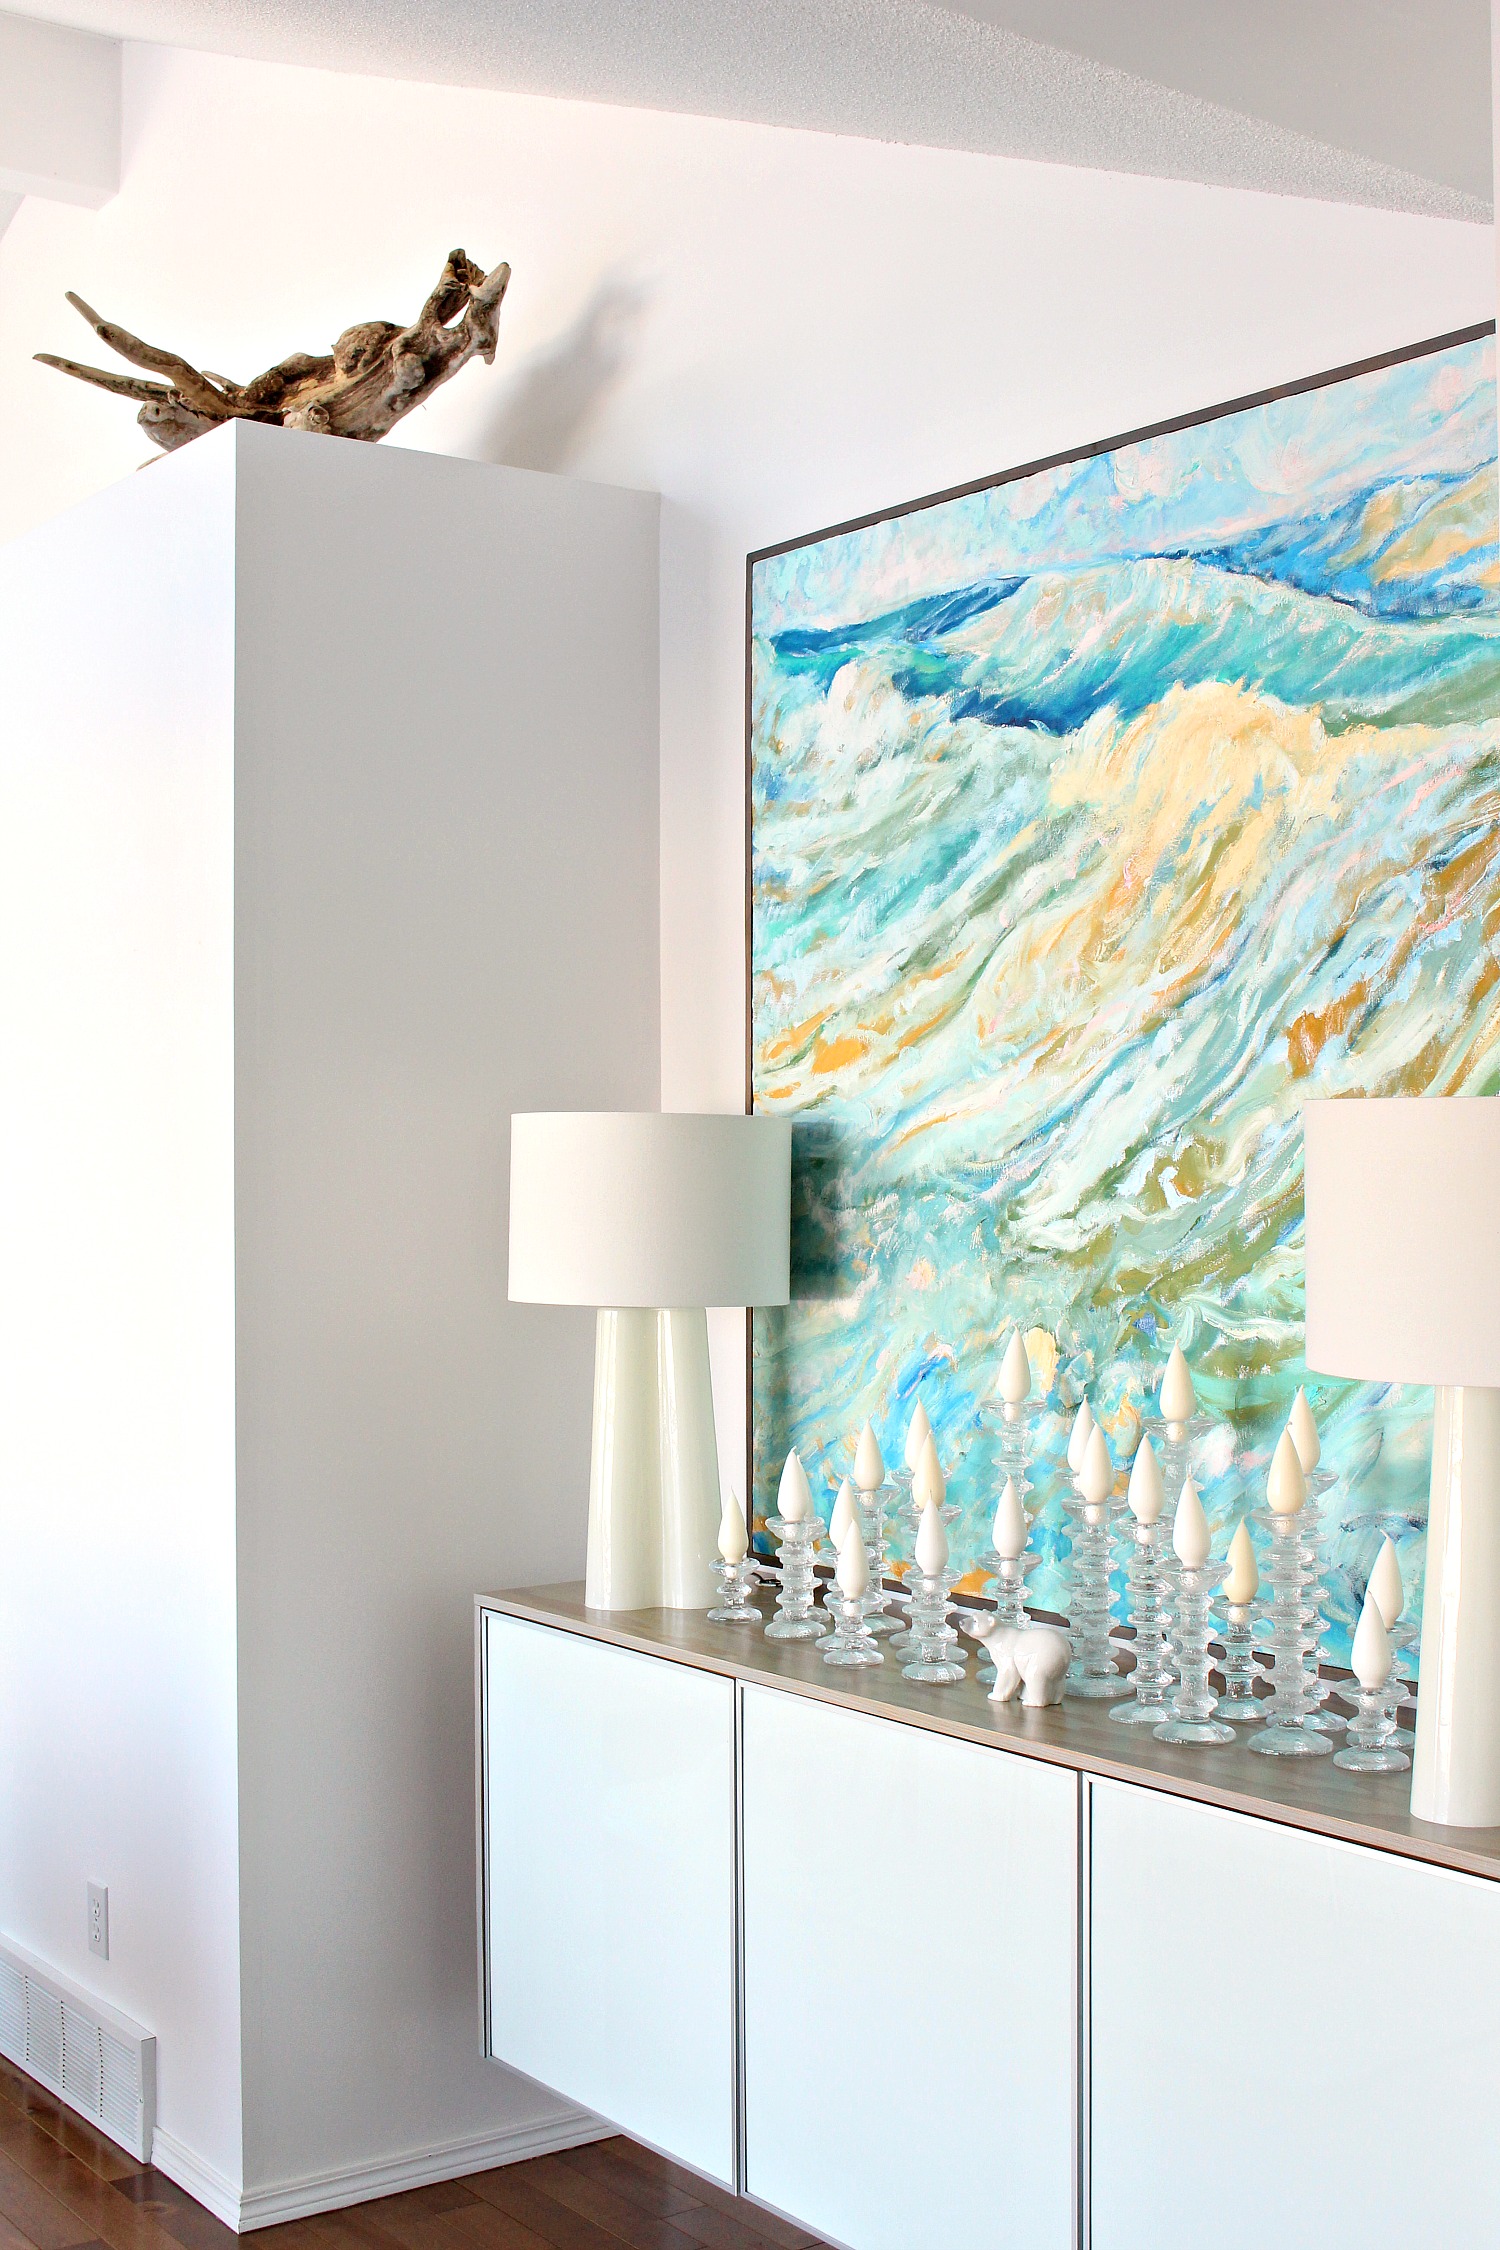
This DIY plywood topped IKEA hack floating credenza is my new favorite piece of furniture. Keep reading for the easy IKEA Besta top panel hack you need to make your own simple DIY floating credenza with Besta cabinets. I’m going to show you how we made this IKEA fauxdenza, plus tips and tricks for applying edge tape to plywood and staining/varnishing wood.

How to Install Floating IKEA Besta Cabinets
The first step for turning three IKEA Besta cabinets into a floating credenza was to wall mount them. This was simple because Ikea sells “Besta suspension rail kits”. IKEA is always changing product URLs so I can’t link, but you can search that item and it will pop up. You just attach the suspension rail kit to the wall studs. The rail has several holes, which makes it easy to attach it directly to a stud for strength. Then you hang the frame on the rail. Easy peasy:

We used the IKEA Besta “extension units.” The links change often, but I think these are the same. The floating IKEA Besta credenza looked cute already, but the seams gave away that this is a group of IKEA cabinets shoved together:

Why Add Wood Top to IKEA Besta?
The plywood top we built nicely disguises the fact that our “credenza” is really three wall-mounted Ikea Besta units. It makes it look more custom, I think. I waffled about what color to stain it, but ultimately decided on a driftwood grey. I chose glass doors for the Besta cabinets because I’m working towards a mid-century meets beachy vibe in my house. The grey was a neutral choice, while still provided a bit of contrast with the white walls, cabinets, and lamps.


Why Choose Plywood for an IKEA Besta Top Panel Hack?
There were lots of options for an IKEA Besta top panel: solid wood, laminated solid wood, veneered plywood, etc. Solid wood was ruled out because of cupping/warping concerns (the Besta units are fairly deep). We didn’t have the steam to make a laminated wood top after making our DIY wood kitchen counters – too much labor!! Veneered plywood won my heart because it was the easiest and cheapest solution. There are so many beautiful plywood options out there: teak, walnut, rosewood. Because I was staining the wood, we chose a grain we liked: good-one-side Caribbean Pine. It only came in 5/8″ thick, but that worked perfectly for this IKEA Besta top hack.

How to Make an IKEA Besta Top Panel:
Materials:
- 5/8″ thick sheet of good one side veneered plywood
- Edge tape (pre-glued, in a wood grain and width to match your plywood of choice)
- Old iron
- Edge tape cutting tool (we used a double edge trimmer)
- Stain
- Varnish
- Brush and lint-free rags
- PL Premium construction adhesive
- 220 grit sandpaper
- Screws
- Drill
- Clamps
- Hole saw
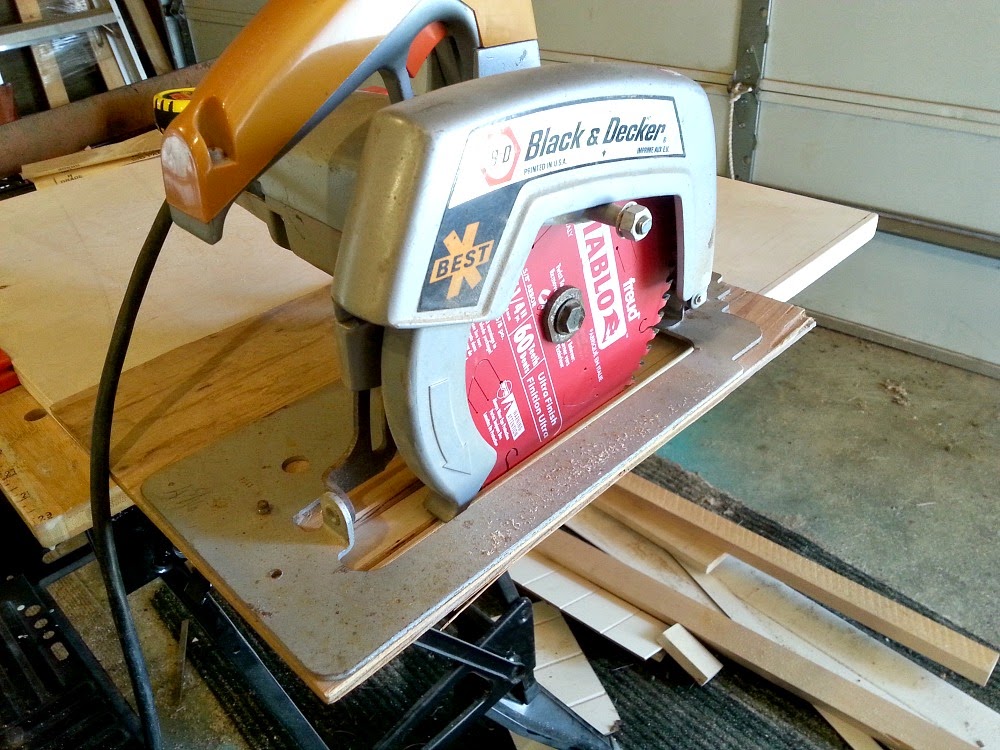
How to Cut Plywood Without a Table Saw:
If you don’t have a table saw, you can clamp a straight edge next to a circular saw as a guide (photo below, when we made the DIY kitchen pantry shelves). You can also invest in something like this. Even better, a lot of lumber yards will cut wood for you! When we did this IKEA credenza hack, we hadn’t gotten our table saw yet so we brought the measurements of the credenza to the local wood supplier where we sourced the plywood, and the resident carpenter cut everything in minutes! It felt like cheating. We had a piece cut for the top, and then two pieces for the sides as well.
How to Hide the Unfinished Edge of Plywood:
Raw plywood will have an unfinished look with layers of material. You can hide this and sort of fake the look of solid wood with veneer edge banding. It comes pre-glued, so you can use an old iron (thrift one – don’t use the one you use for clothes!) to apply it. We applied edge tape to the front of the pieces that run along the side of the credenza, and across the front and both side edges of the top. Because this isn’t a free standing piece of furniture, we did NOT apply edge banding to the back of the pieces of plywood.


How to Attach Edge Banding to Plywood:

Cut your edge banding to a length that is a few inches longer than the side of the plywood you’re working with. Using the maximum heat setting on your iron (typically “cotton”), hold the edge banding onto the edge of plywood and slowly press along it with the heated iron. The edge banding should adhere right away – don’t linger too long in one spot. But if it’s not stuck on, pass over the area again. You’ll get a feel for it right away! It basically sticks or it doesn’t. Make sure the edges are adhering well – you don’t want it to lift up later.

Once you’ve applied the edge banding, there will be some excess to trim. A knife works, but a specific trimmer for edge banding will produce a cleaner end result.
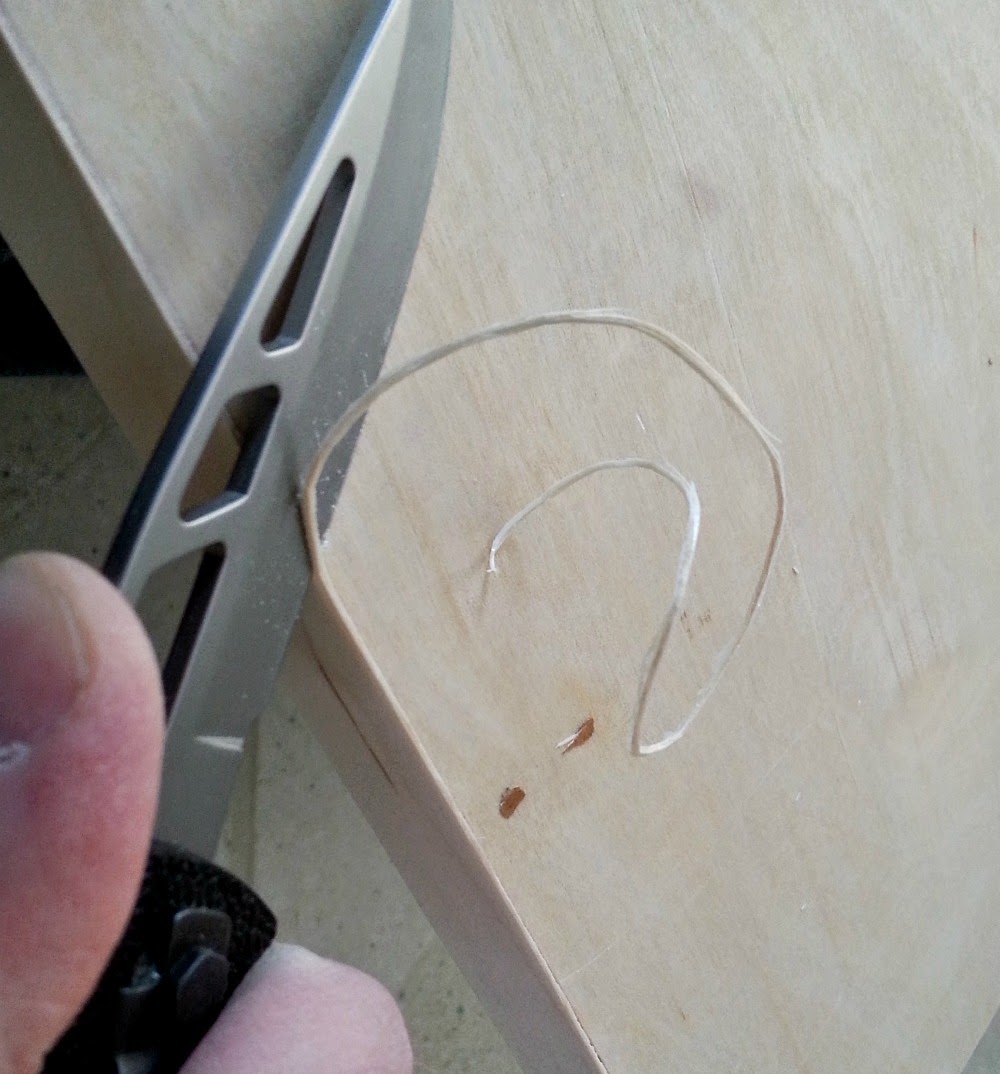
Although we have muddled through trimming edge banding with a knife on past project, this time we trimmed the sides using a double edge trimmer. I wish we had bought the tool sooner because it was faster with zero risk of making a mistake (although as you can see in the photo above, Hubby is a pro at trimming edge banding with a knife).

How to Stain + Varnish an IKEA Besta Wood Top Panel:
We gave the whole piece a very light sand with 220 grit sandpaper to smooth any lingering roughness, especially between the ply and the edge tape. Be careful not to sand too aggressively as veneer can be delicate, especially around the edge banding. Then I applied the stain, using an old brush. I applied it quickly and kind of messily (not wanting it to accidentally dry in really definitive brush lines), waited a few minutes, and then wiped off the excess with a clean rag. I used a gel stain and found it had great coverage so I got away with one coat.


I let the pieces dry overnight and then applied a quick-dry clear varnish, using a clean brush.

As per the instructions, it dried within one hour but for sanding between coats it’s recommended it dry overnight. I patiently waited, and the next morning gave it a light sand with 220 grit sandpaper to smooth any raised grain. Then I applied another thin coat and let it dry.
One tip: don’t forget that the edges might show when the credenza is opened, so stain and clear coat those spots too!

How to Cut Holes for Cords in IKEA Cabinets:
Installation was simple, but we added a step: cutting holes for the lamp cords. We’ve rigged it up so the cords disappear through the top and meet inside, at the back, where we cut out a hole to the outlet. We first laid the top piece on the credenza and placed the lamps to position the cord holes, marking them in place. Using a 1.5″ hole saw Hubby cut the holes first through the plywood top, and then through the top of the credenza. He sawed through half from one side, then flipped and finished the hole from the other direction.


How to Affix a Wood Top to IKEA Besta:
Finally, we affixed the plywood top to the IKEA Besta floating credenza. To do this Hubby pre-drilled some holes in the credenza to be able to drive some screws up from the inside into the bottom of the new top. He did the same on the sides, drilling from the inside. Drilling from the inside reduced tear-out visible inside the unit.

Starting with the top, we ran a bead of PL Premium construction adhesive all over the credenza surface, ensuring not to go too close to the edges so it didn’t squish out. We put the top in place and drove the screws (two per credenza section) up from the inside to tighten the wood in place. Obviously, make sure the screws are short enough that they won’t come up through the plywood top you’ve made! Once the adhesive is dry, the screws will probably not do much. They are basically there clamp it tight during the drying process – although we did use an extra clamp on a place where the screw didn’t grab perfectly. A little scrap of wood kept the metal clamp from damaging the freshly finished surface.

With the top in place, we repeated the process with the two side panels. The sides are not actually attached to the top panel, only the credenza itself. We opted for a butt joint instead of a mitered corner because it’s easier and quicker to do.

With the IKEA Besta top panel installed, and the holes drilled for the lamp cords, all we need now are furniture grommets to disguise the credenza holes we cut and make them look finished (the same way grommets hide a hole in fabric). They are directly behind the lamps and difficult to spot anyway, but I think that extra detail will make sure this IKEA credenza hack looks polished.

How to Hide Cords Inside Cabinets:
In these photos the holes are raw but check out my post on how to hide lamp cords inside furniture to see in more detail how we hid the cords and made the holes look tidier with furniture grommets. If I do say so myself, the cord situation (or lack there of) is nothing short of incredible. It’s long plagued me: “what to do with the darn cords???” Home decor magazines rarely answer this burning question (and sometimes even monkey around with cords, hiding them or photoshopping them out for photos). Now ours are permanently hidden!


UPDATE: Here’s how the floating IKEA Besta cabinet looks with the IKEA Besta top panel hack these days, with the furniture grommets and some different styling.

P.S. We did the same kind of Ikea hack to another Besta we re-purposed to hide the screw holes on the top. We had previously used these Besta cabinets in a different way, as a Besta TV wall unit. But when we stopped using the top part, the screw holes showed. We got more mileage out of this old IKEA Besta cabinet with this little Besta cabinet top panel hack. So wrapping IKEA furniture in plywood is a great way to hide previous damage or reconfigure IKEA furniture and hide previous holes from installation – in addition to looking nice and making IKEA furniture look more custom.


I dont usually like grey stains, but this came out lovely and the credenza looks super polished now!
Thanks! Grey is so tricky!! I kissed a lot of frogs before finding this one (some were too brown, too dull, too blue) and then, in the end, it turned really purple on my especially pink maple – I tested it on maple in the store, but that maple was more yellow. Argh. In the end, it was about finding the right wood. I'd recommend grey because it's a pretty neutral but it does take a little extra experimenting.
Can you PLEASE tell me where you got your stain and what brand/color? I am looking for a stain just like this, thanks!
I'm sorry, a local paint Store custom mixed it for me. But I'm trying Rustoleum's weathered grey this weekend on another project and I'm hoping it's similar!
I am totally in love with this solution. I love that you went with a blond/light wood to finish it off. What a great idea to drill the holes for the cords. Your credenza looks incredible! Pinned!
Thank you! It thrills me when I have a project worthy of a pin – it totally makes me smile.
This looks great! I normally lean towards the darker stains, but I'm really loving the gray stain. Also, the grain of that wood is beautiful.
Thanks Haley!! It took me ages to pick this piece out (even when I narrowed it down to a type of wood). Hubby got a real workout sliding out piece after piece of heavy ply, lol. But I wanted something that would mimic the look of water, is that a weird goal? I'm so happy with the outcome – it was worth the hassle.
Hi Tanya, I'm really in awe of your talents. This in no way looks 'DIY' or faux!
Thanks Patricia, you're making us blush! It was definitely a collective effort between Hubs, myself and the fabulous carpenter at the lumber yard. His cuts were so perfect!
Looks great!
Thank you!!
this came out wonderfully- I think the grey stain was definitely the right choice! Also, I just noticed your new header, woo hoo! 🙂
Thanks Stephanie. Haha, I NEEDED a new header so badly because the old one was photos of the townhouse and it was totally confusing. When I have time I'll sit down and make something fancier but for now it's simple and not misleading – that's the best I can do, lol.
I agree, the grey stain looks great! This makes me want to start another project just to try this out.
Thanks Sarah! I'm itching to stain something else, too, especially since I found malachite green and turquoise stains. I'm really eager to try them out!
That looks really good! Love the stain you chose!
Thank you Nicki! I'm so pleased it turned out well. I've got a lot of wood – white stained maple counters, walnut stained maple floors, teak and walnut furniture. The grey is soft enough that it doesn't compete with all of the other finishes.
Very pretty! I like the grey stain, especially because the whole thing really lets that beautiful painting be the star of the show.
You read my mind, Amelia! We held up various samples of finishes to get a feel for the look before committing and this was one that didn't fight the painting (or bright kitchen!) for attention. If I had really simple artwork and a white kitchen, I might have chosen a bolder stain to make it a focal point.
I love it Tanya! Looks fantastic! Great tutorial too! I also really like how the silver edging on the door fronts plays off the grey tone of the stain – well done!
Thank you! Good eye – I think the silver with the grey stain is what helps it look like a cohesive unit, not a tacked on piece of wood.
Elaine beat me to the punch- the stain and silver edge are what caught my eye. I just love grey stain. I have a soft spot for driftwood stain- I discovered it when I was buying hardwood for my first house. I had already priced and selected my flooring but I saw the driftwood hardwood and loved it. However, I'd already had a plan and changing mid- stream would have altered too many other choices. But I've never forgotten- I need to incorporate aomething with that look. The credenza looks fabulous- and the grain of plywood is perfect. You chose well, a tighter grain wouldn't have the beautiful contrast. Love it
Whoa…that's some fierce DIYing. Excellent outcome!
Awww, thanks! You know, this was one of our more straightforward projects. It was super easy because it was cut in the store so we really just did some staining and glued it on. I was surprised how polished it looked – I was worried the edge taping would look cheap but the right tool made the difference and resulted in a perfect, clean edge. But I promise this was really simple – and relatively inexpensive too.
oh goodness! this is perfect! it looks great in your home. I would have probably stained the top the same color as the floors because i am all matchy matchy about things, but it really works perfect with your style. great job!!
Thanks! I definitely was tempted by a walnut stain but knew I'd never get a perfect match and it would likely end up in the too-close-but-not-close enough category. I think if someone took the time to get a stain that's a really good match, it could be a very polished look!
Love love it! Did you ever contemplate just 'framing' it by putting wood on the bottom too? I think that would have looked equally nice! Just curious for your thought process! I loved John & Sherry from YHL hack that they did to an Ikea Expedit (I believe) they put a walnut type look wood all around and turned it on the side and voila…. changing table! It's GORGEOUS. And I am debating trying something like that on a little shelf I have that is 2 boxes wide and 3 high… just not sure where to put it…. thinking of re-designing my 3 year old's room but no idea yet if he will stay upstairs or go down… but overall, I love me a waterfall countertop! I like the butt-joint… if you did a miter do you think humidity would've been a problem and caused the joint to become 'un-perfect'? We don't realy like selling mitered doors at my work!
Thanks! I love what Sherry and John did with that Expedit – I know exactly which project you're talking about and it would be such a great idea. There's two reasons I chose not to wrap it. First, I have pined for the waterfall look for a bit and even wanted it for the kitchen counters but the position of the bar area and the dramatic drop in flooring heights there made that impossible so I wanted to have it somewhere. Also, right now we reach under to open the doors. We bought this hardware from Ikea so we can just push to open but it doesn't fit their own doors!! We need to rig up a hack to make it work but on the off chance it doesn't, I'm happy I can access the doors. That is a stupid reason, my first one is much better. Having said that, it's a genius idea and I hope you wrap yours!! I'd love to see it because it's such a beautiful way to de-Ikea a piece and a much more "fresh" idea than the waterfall, which has been done to death. I just wanted to give it a go. By the time we do our second kitchen remodel, I'm sure it will be really over, lol.I don't know how much humidity would impact plywood. Solid wood would definitely shift a bit but as I understood, plywood shouldn't have much wood movement. But I'm not sure about that. Our only reason was fussing with fitment (butt is easier) and looks – we never chatted about problems with a miter. We've made frames for my paintings from solid wood with mitered corners and have experienced so shifting, but that wood was thin…why don't you like selling them at work? Do they shift? I'm getting weirdly interested in learning more about how wood cooperates (or doesn't).
all your answers make sense! I just was curious!!! Yeah wood does shift especially in a climate where our iwnters are SO cold and SO dry and So long!!!!! Things shift… 🙂
Tanya just wonderful – I enjoy watching you make this lakehouse your lakehome! You truly have a decorating talent and it is so nice to hear about your latest diy's with the hubster. Do you miss Ottawa at all? (I'm an Ottawa valley import previously living in the city's southend)
Thanks JoAnn, you're too kind. I think I'm passionate about my home looking (and feeling) nice but I have so much to learn about decorating. The blog has been fun for that because I've learned so much from readers – you've all had some great ideas! And been so encouraging 🙂 It's given me confidence to be more brave. I don't think I would have had the courage to paint my kitchen cabinets aqua without people rooting for me.I DO miss Ottawa. I miss my friends, of course. I miss the National Gallery of Canada and free Thursday night admission, lol. I miss the abundance of thrift shops and antique stores. I miss the short commute to so many fun towns and cities. I miss Costco – a lot! I just miss our routines and little haunts there. It's been a surreal adjustment because Thunder Bay, our hometown, is familiar but also unfamiliar because so much has changed. It's smaller with less variety. It's been hard to decorate with such limited selection. I've had to turn to mail order for simple things (like white curtain rods) and that's been a headache. But we've gained a lot: we're close to family, we're right on the lake, and we finally have a yard! We spend more time re;axing and less time running around the city. It's been a trade off and we're ultimately really happy here but Ottawa will always be special to me.Do you love Ottawa?
Sure I like Ottawa but I've always liked the suburb kind of life – I enjoy the slower pace of being in Renfrew and I'm on the downward slope of my career so looking forward to exploring more of the valley…. when I get to retire.
I have to admit, the slower pace appeals to me too. I didn't ever spend time in Renfrew. If I'm back in the area, what do you recommend?
Congrats! Another beautiful job : ) Patty/NS
Thank you!
Long time lurker, first time (I think) commenter. One thing that always impresses me about your projects is that they're not in the least slap-dash. You take the time to do things right and address all the finishing touches.Here's my question: did you need to address any inconsistencies in either the wall surface or its "straightness" relative to other walls the in room? If so, how did you do that? I don't think there's a right angle anywhere in our house, and one of the things that worries about about doing this type of DIY is that the first place your eye will go is to the one corner that's not straight relative to something else.
Thanks Colleen, this is such a kind and thoughtful comment. Thanks for taking the time to leave me something so nice :)That's a really good question. We have, in both of our homes, had to contend with rooms that aren't square. The worst experience was putting in hardwood flooring in the townhouse, which made it so obvious! Luckily, in the lakehouse, that particular dining room wall is straight and so we didn't have to do anything special. If you have uneven walls but want to try this, you could use a belt sander to make the back of the board match the wonkiness of the wall. We did this to our counters in the townhouse so the backs of the counters are technically not even but because they match the unevenness of the wall, it looks perfect. We always like trim as a solution to hide gaps too. We put trim on the top of the paneling in the kitchen because the ceiling wasn't even and there were little gaps because the paneling was perfectly square. Super thin maple trim was flexible and we were able to install it flush to the ceiling, even where it was uneven, and so visually it looks straight but hides the gaps. Those are two ways you could make something like this and ensure that the top looks flush with the wall – even if the wall isn't straight. Another option could be a more rustic look – maybe with reclaimed barn boards or weathered planks. That way a little unevenness would look intentional, but I'm not sure if that's a look you'd like. I'm starting to really appreciate rustic spaces because they wear well and help disguise flaws!
HIExcellent work! Loved the finished project/product. What were the type of Besta cabinets you started with? The amount of Besta products on Ikea's website is mind boggling.Thanks,Nicole
Thanks Nicole. You're right – there are a lot of Besta units. We used the Besta shelf unit/height extension unit. It's got three adjustable shelves and it's measurements are 60x40x64 cm. We wall mounted it and added the glass front doors (you can choose from a variety of doors – the plain melamine ones are what people normally use). We purchased three. These are the exact same cabinets we use in our living room, but with different doors and glass shelves for part of it.
The credenza looks wonderful. I really like your idea of hiding the cords. How are the units mounted on the wall. Do the Besta units come with a mounting accessory.ThanksSameera
Hi Sameera, We bought the mounting hardware separately but it is all available at ikea and straightforward to install.
Hi there – beautiful project! Can you post a link to the actual Besta product you purchased? The Ikea website has so many different options and size units (single, double, half width, etc.) and style door fronts, it gets confusing! Thanks!
Thanks Megan. Sorry to be so vague. I answered the question above, but didn't edit the actual post – I have the memory of a goldfish sometimes. We used the Besta shelf unit/height extension units. Each unit (we used three) has three adjustable shelves and it's measurements are 60x40x64 cm: http://www.ikea.com/ca/en/catalog/products/00134052/.You can customize the shelves and doors. We chose the glass front doors after seeing them in store. I hope this is more helpful – please let me know if you have any other questions 🙂
And yes, oh my gosh is Ikea ever confusing! We originally thought about using kitchen cabinets but we got overwhelmed and decided that because we were familiar with that size besta, that's what we'd use. Truth be told, you can use whatever combination fits your space. I also rounded up a few other version of the "fauxdenza," so you might even find a combo you like better: http://dans-le-townhouse.blogspot.ca/2014/06/fauxdenza-credenza-bonanza.html
wow! Great project! The look is very clean and fresh, though sophisticated, congratulations! I'm thinking to do the same. I'm gonna use a Karlby top and besta beige front panels. I was thinking also to use cut front panel for the sides to have a uniform beige look.Stupid question: how did you hang it down the wall? did you use a bar or just screws and caps?Once again congratulationscheerspf
Hi! Thanks so much! I've been really happy with it and I've been impressed with the quality of the Ikea cabinets. I like your idea! I think that combo would look really good – and if you can have the sides uniform, that would be a nice touch. It's definitely not a stupid question – it's quite common, in fact. We bought a mounting kit from Ikea and used that. I wish I had thought to take better photos of the process. But someone at Ikea should be able to direct you to it. Once you've got the mounting hardware and instructions, it's really straight forward to do. Good luck with yours!
Where did you find that painting? It's gorgeous! The project is great, but I'd also love to find that artwork. Can you share your source? Thanks!
Thanks, Carmen! It's by my hubby's grandfather, Bert Weir. You can search "Bert Weir" in the search bar at the top right of my page to see all of the posts about him (and what other art of his we have) or check out his website: bertweir.com
Did you get the doors from Ikea too? I didn't see a link for them. Love the project!!
Thank you! The doors were from Ikea, but they no longer make this style. I kept updating the link but Ikea changed their website every five seconds and, eventually, this product disappeared. So when I was in a city with an Ikea, I ran in to double check and, sadly, no more doors like this! Such a bummer, a lot of people like these. BUT these do have some gorgeous designs with a sculptural quality so check out what they have, you might like the new doors better. Or try craigslist for glass Ikea besta doors – ya never know!
So lovely! How deep is your Besta? Did you use the cabinets that are made for walls/kitchens or the 15 1/2″ deep ones which are sold as a credenza or a TV stand? I think I bought the wrong units and am just realizing it now that it’s too late.
Author
I bought the ones for a TV stand but I’ve seen people use the kitchen ones too!
Hi! May I ask why you bought three separate extension units instead of the IKEA media unit that is three cubbies wide? I bought that and they said that I can’t hang it with suspension rails because it is too heavy. You
Author
I made this seven years ago and I don’t remember there being an IKEA media unit three cubbies wide but if there was, I probably picked this because of the dimensions. Or possibly because the larger unit, as you say, can’t as easily be wall mounted.