Today’s project – this DIY tea cup candle – is just the cutest and it even smells like earl grey tea! So light this candle, make yourself a DIY Earl Grey latte and bake some matcha shortbread for the perfect tea themed evening.
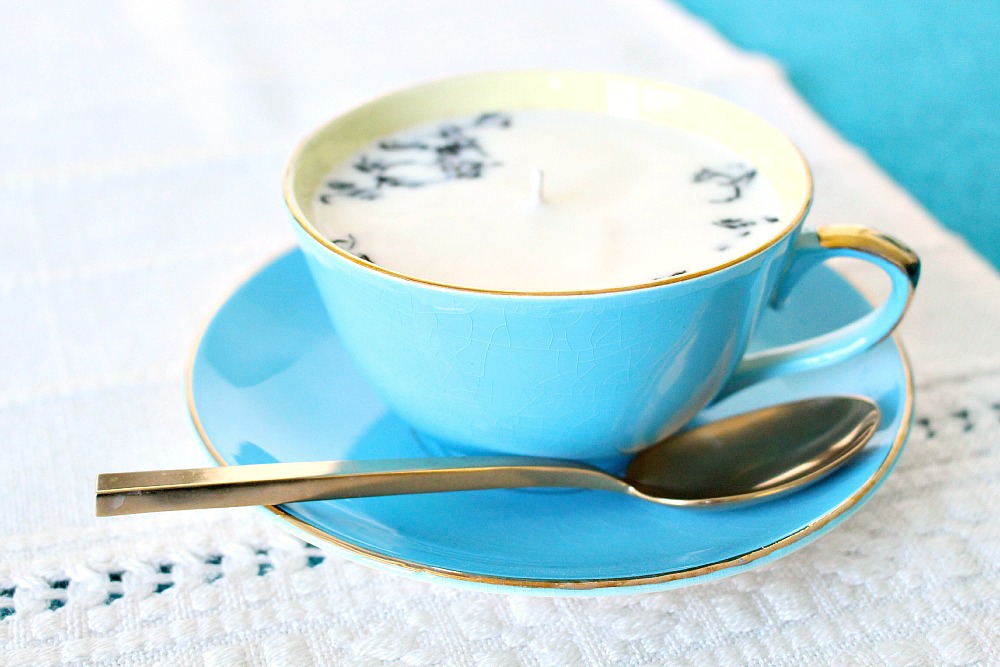
I know that DIY tea cup candles are not an original idea. Sometimes I invent craft ideas, sometimes I see things I want to try too. I am, at my core, just a crafter like you. Especially after making DIY soy candles with essential oil already, I couldn’t resist making myself a DIY tea cup candle. My Mom had some bergamot essential oil and it dawned on me that I could make a candle that smells like Earl Grey – my absolute favorite tea! At the last minute I sprinkled in some real, loose leaf Earl Grey, just for show (it doesn’t contribute to the scent), and the DIY tea cup candle turned out so adorably.

Candle making is quite the science and everything – from the temperature of the wax to the temperature of the room – can impact the success of a poured candle. I’d love to keep practicing to perfect my technique, but even my first few tries resulted in successful candles. Although they lack the smooth as glass surface of commercial candles, they burn really nicely!


Supplies for Making a DIY Tea Cup Candle:
- Soy wax flakes (I bought the exact flakes linked, in a 10 lb bag)
- Wicks (I bought these ones, which are now unavailable but these look good too)
- Hot glue gun (or wick stickers)
- Double boiler or candle making pitcher (I used an old Pyrex measuring cup in a pot of boiling water)
- Candy or candle thermometer (I used a meat thermometer)
- Stir stick (an old wooden spoon or paint stir stick will do the trick)
- Bergamot essential oil
- Tea Cup (safe for candle making/heat)
- Pinch of Loose Leaf Tea (optional)
- Food Scale
- Oven mitts
- Newspapers (to cover surfaces for easier clean up)

How to Make a Tea Cup Candle:
- Used a hot glue gun or wax sticker to affix a wick in the center of each tea cup.
- Measure out the wax flakes (I used a food scale).
- Set up your double boiler.
- Keep the water simmering and melt the wax, stirring occasionally.
- Heat the wax flakes to 185°F (approx. 30 minutes).
- Once the wax reaches 185°, let it cool to about 135°F.
- Add the essential oil at 135°F.
- Some candle making guides say to warm up the vessel beforehand, but I skipped that step…
- Once the wax cools to about 125°F, pour the wax into the tea cups.
- Secure the wick, so it stays upright after the wax has been poured.
- Let the candles sit overnight, undisturbed, until they harden completely.
- Once the soy has hardened, trim the wicks to 1/4″.
How to Make Candles in a Tea Cup – Detailed Tutorial:
How to Measure Wax for Soy Candle Making:
The first step is to measure out the wax. According to Candle Science, you can divide the volume of your container in ounces by 16 to figure out how many ounces of wax flakes you need to use for one container. For this candle I used about 200g of wax flakes. It shrinks quite a bit once melted down and I was making a whole bunch of them, so I would just melt as much as I could in my Pyrex cup. Then, once it melts a bit and there’s more room, I would add more flakes and keep melting.

How to Heat Soy Wax Flakes without a Double Boiler:
With the wax measured, I started heating it up in my “double boiler” (a pot with a glass Pyrex measuring cup inside). I filled the pot with a few inches of water, which I brought to a boil and kept simmering the whole time. The wax needs to reach 185F and that took about 30 minutes in my experience. I stirred it occasionally and although some lingering chunks took awhile to melt, eventually it all melted and resembled olive oil.

How to Secure Candle Wicks:
While I waited, I used a hot glue gun to affix the wick. You can also buy “wick stickers” but I wanted to keep costs low and I had a glue gun on hand already!

When to Add Essential Oils to Soy Candle Wax:
Once the wax heated to 185F I let it cool to about 135F before adding the essential oil. Add it too early and it will just evaporate! You can also purchase specialty candle fragrances. Generally folks tend to use approximately half an ounce of oil per pound of wax. If you’re buying a fragrance designed for candle making, there will be a usage guide on the label. I’ve read a little bit online about essential oils and candles and there is a lot of disagreement about the amount required for a good scent throw. Some essential oils are stronger than others, so you might need to experiment a little (and let me know how it goes!).

What Temperature to Pour Soy Wax into Candle Vessel:
Once it cooled to about 125F, I poured the wax into my cup, added a pinch of tea to the top (it sunk in a little bit) and then let the candle sit overnight. I poured mine somewhere where it could be left, undisturbed, until it hardened. The wax starts to harden really quickly, turning from a yellow oil to a solid white substance, before your eyes (if you’re patient).
How to Keep Candle Wicks Upright:
To keep the wick upright I created a grid with tape across the top, which trapped the wick upright but didn’t keep it as taught as I would have liked. A better solution is to use a clothespin to clamp the wick end, and then place that across the top – but I didn’t have long enough clothespins (mine aren’t the wood kind). Some candle making guides say to warm up the vessel beforehand, but I skipped that step.

How Short to Trim Wicks on DIY Soy Candles:
Once the soy hardened completely, I trimmed the wick to 1/4″.

When to Add Dyes to DIY Soy Candles:
I didn’t add any dyes to my DIY earl grey tea cup candle so it looks like a really milky cup of tea, but you could easily tint it tea-colored with dyes made for candles. Add any dyes while the wax is at 185F so it can melt and mix completely.
This DIY tea cup candle is adorable, right? I can now check “candle making” off the bucket list!


What a sweet idea! I love this and I think Earl Grey would be such a relaxing scent.
It would be so much fun to experiment with different tea cups and different tea-inspired scents…but the earl grey is lovely. Certainly there is more to earl grey than bergamot, but that's what I smell most and earl grey is immediately what it reminds me of!
I made some too and will again, but not soon.
It's hard work, isn't it? I am still saving neat vessels for another batch but I need some time to recuperate, lol. And I'm kind of tempted to buy a real candle making pitcher and maybe a better thermometer…
I'm inspired.
🙂
That's a tongue twister…..lovely vintage vessels, try saying that 3 times fast lol.This is so very cute! When I was a kid I used to melt crayons and make colorful candles that never lit because I used yarn as a wick……I had no clue what I was doing but they looked purdy lol.
Awwwww, your crayon candles sound adorable!!
So sweet!
NOOOOOOOOO Please please say it isn't so that your using a Pyrex bowl for a candle! LOL The candle looks adorable! But I do love the bowl too
Just for measuring, I promise! No pyrex was harmed in the making of this DIY, lol.
Ooh! I would also love to try this! and My Idiot Brother, cracks me up!!!
how did it burn? I’m worried that the tea leaves might not burn well. Do they give off a scent?
Author
It burned well! The tea leaves sort of floated into a wax puddle as the candle burned, and never caused a problem. The leaves were decorative, the scent came from the essential oil (bergamot) and it was so lovely! Smelled like real tea!
Hey all! Been doing candles during the pandemic and have really had some fun! As far as melting and the process that this hobby takes–I use a small rectangular crock pot that I’ve had for years with a thermometer to guage the different temps and ACTIONS that are needed. So far so good…and I can do some good size batches with different scents in one SITTING!
Author
Great tips and happy making!!