The reveal for my Fish Room, aka the new Craft Room makeover, is long overdue.
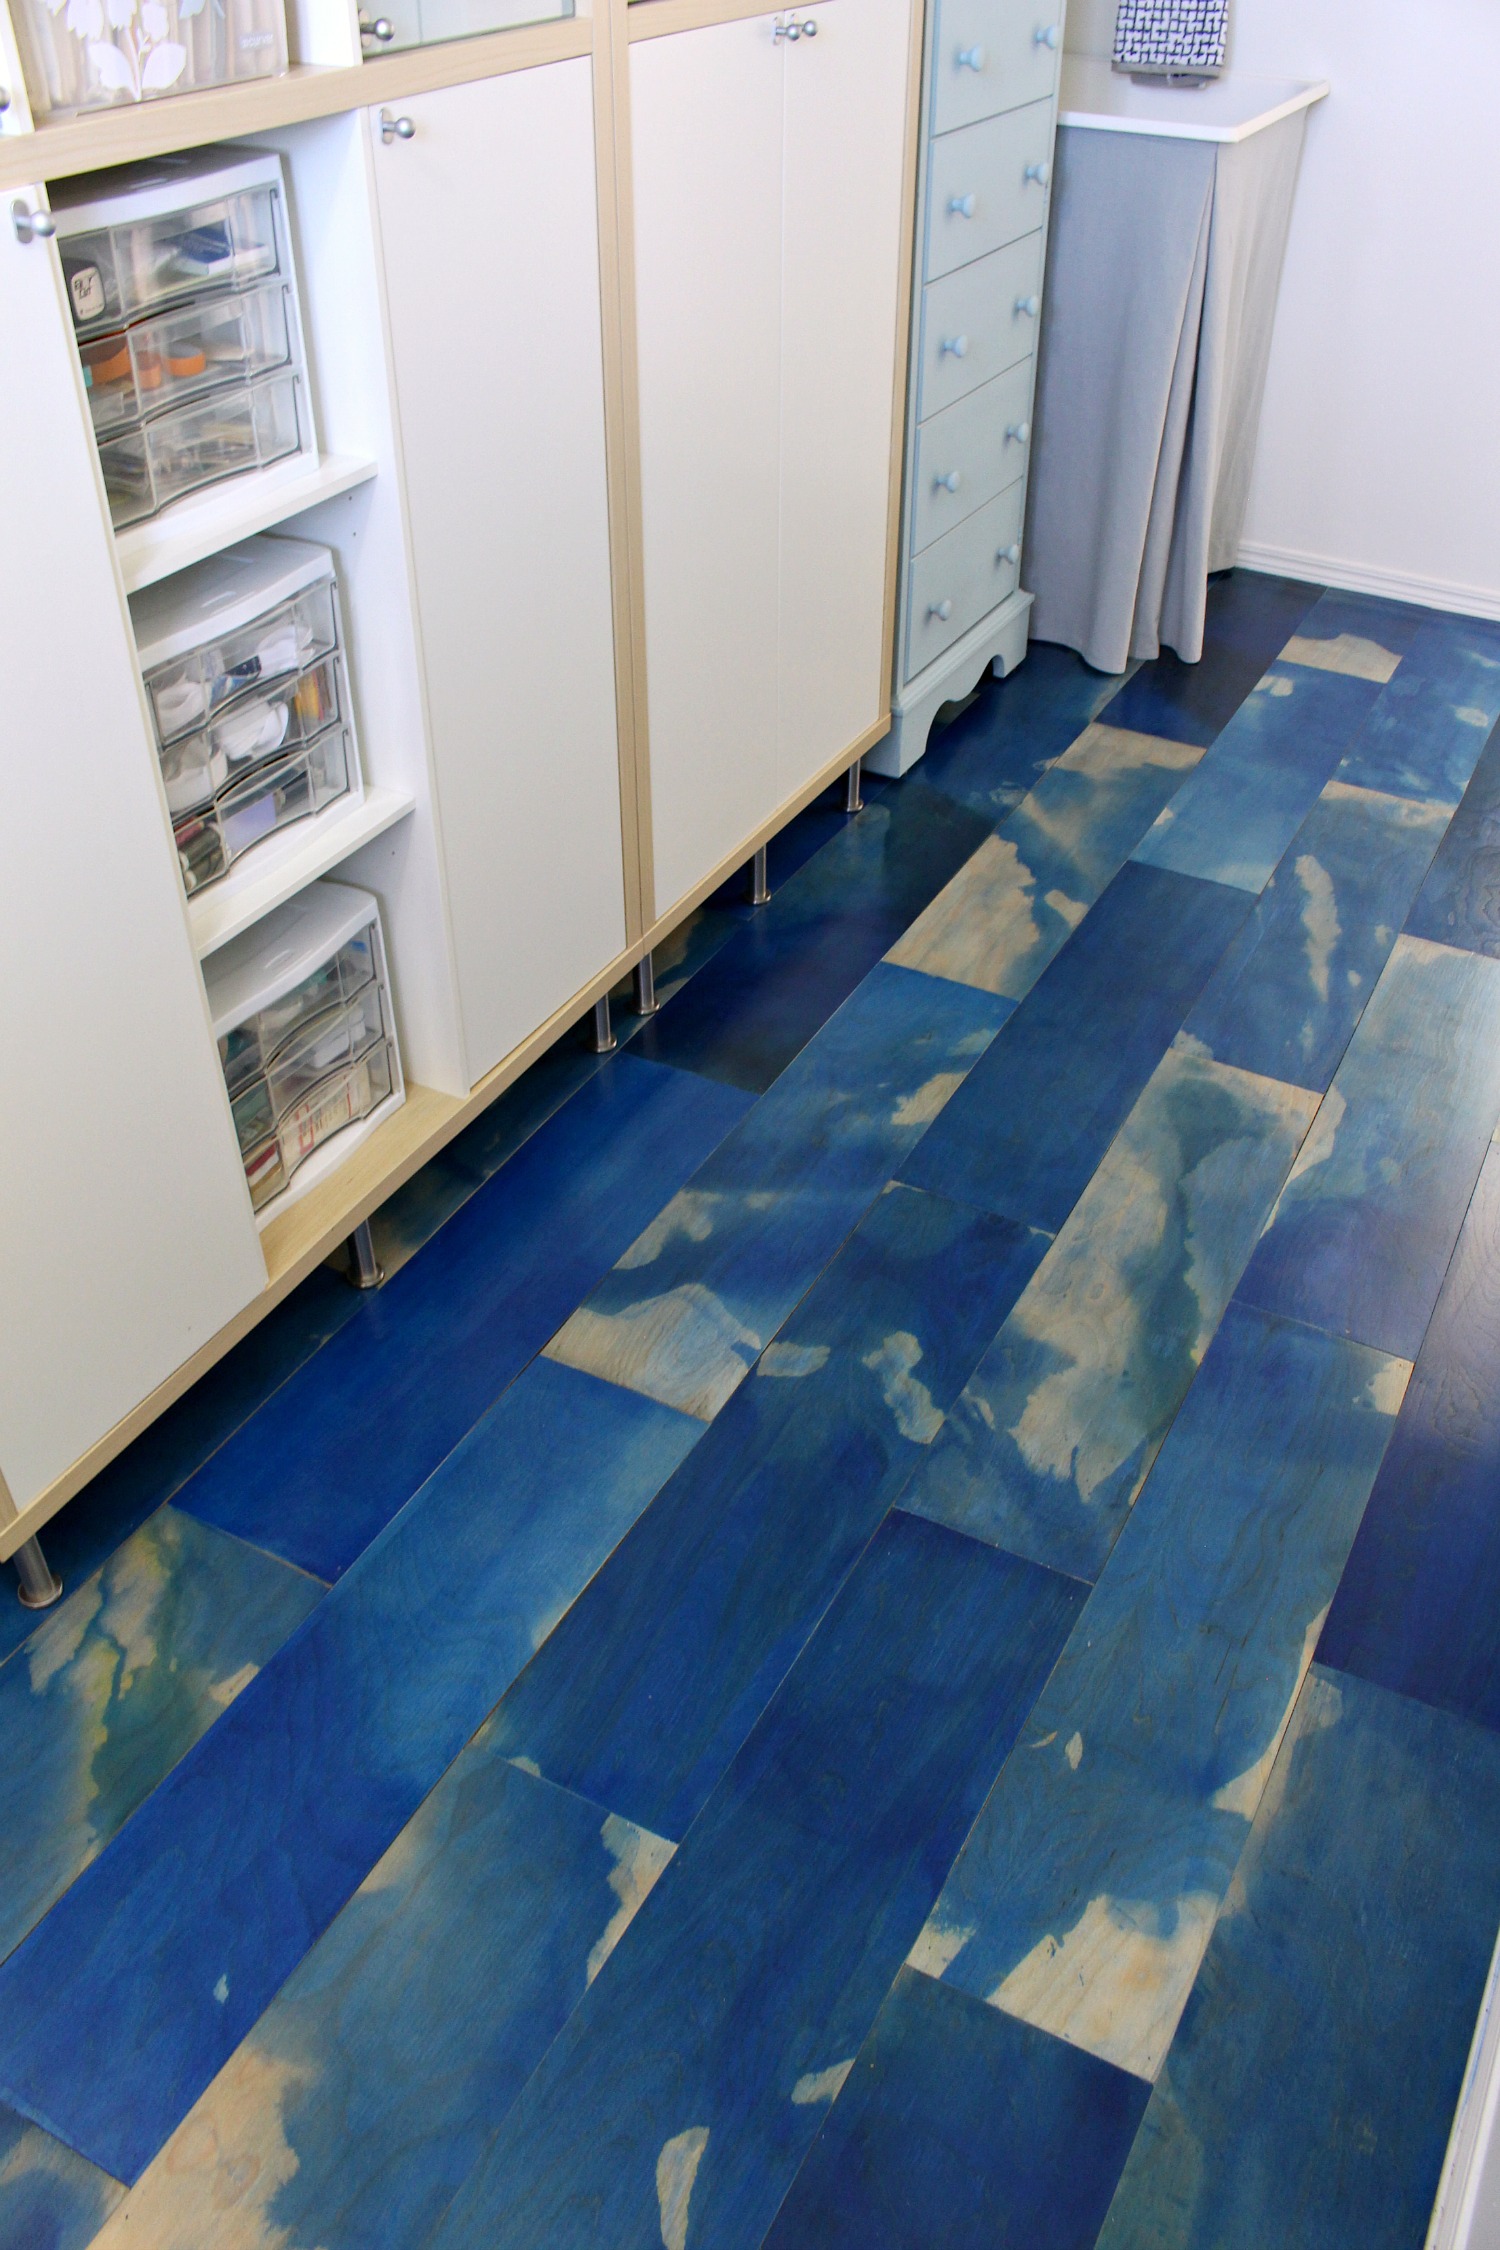
I finished this craft room makeover last December but by the time I finalized one or two last minute touches, it was too cold to photograph! Because it’s only accessible from the outside and it’s so small, I have to take most photos from the doorway and snow was blowing into the room like crazy. But I actually think that this delayed reveal is perfect because I can now tell you with confidence that our watercolor-inspired DIY plywood floors are awesome!! We load our firewood in through this room so all winter long we were trudging in and out wearing mucky, soggy boots. There is only one little dent where one of us dropped a log – hard – on a plywood floor plank. But the hardwood floors in the rest of our house have a million dents from much smaller objects, so I am seriously impressed with the durability of our DIY plywood floors. The finish held up perfectly too. Even with pretty rough use, these floors look exactly like when we installed them (which was always a little imperfect, but so damn cool).
Here’s a reminder of the old vinyl tile floor we covered up:

I wish you could see these plywood floors in real life because photos don’t capture how gorgeous they look. The blue wood stain is actually richer than it photographs and it really makes the wood grain pop. Thanks to the multiple coats of hard-wearing finish we applied, the wood has a beautiful luster. In photos the floors seem more faded and flat – and a little more denim blue…
You’ll just have to try this project and see for yourself!
I am so happy that I followed my heart with this nutty plan to stain plywood with a swirling, marbled design because this whole DIY flooring project just exceeded my expectations. When I walk into the formerly dreary fish room now, I just grin from ear to ear. I love this craft room makeover, for so many reasons!


But let’s backtrack a little: for all of my new readers, this craft room makeover was dubbed the “fish room makeover” for so long because this weird little room (with two exterior doors, no interior access to the house, and a sink) was designed for gutting and cleaning fish. It makes sense for this lakeside location, but not for us.

And here’s a look at that same angle now:

I almost forgot to snap a before from the other angle, so some of the cabinets had already been removed when I took this picture:

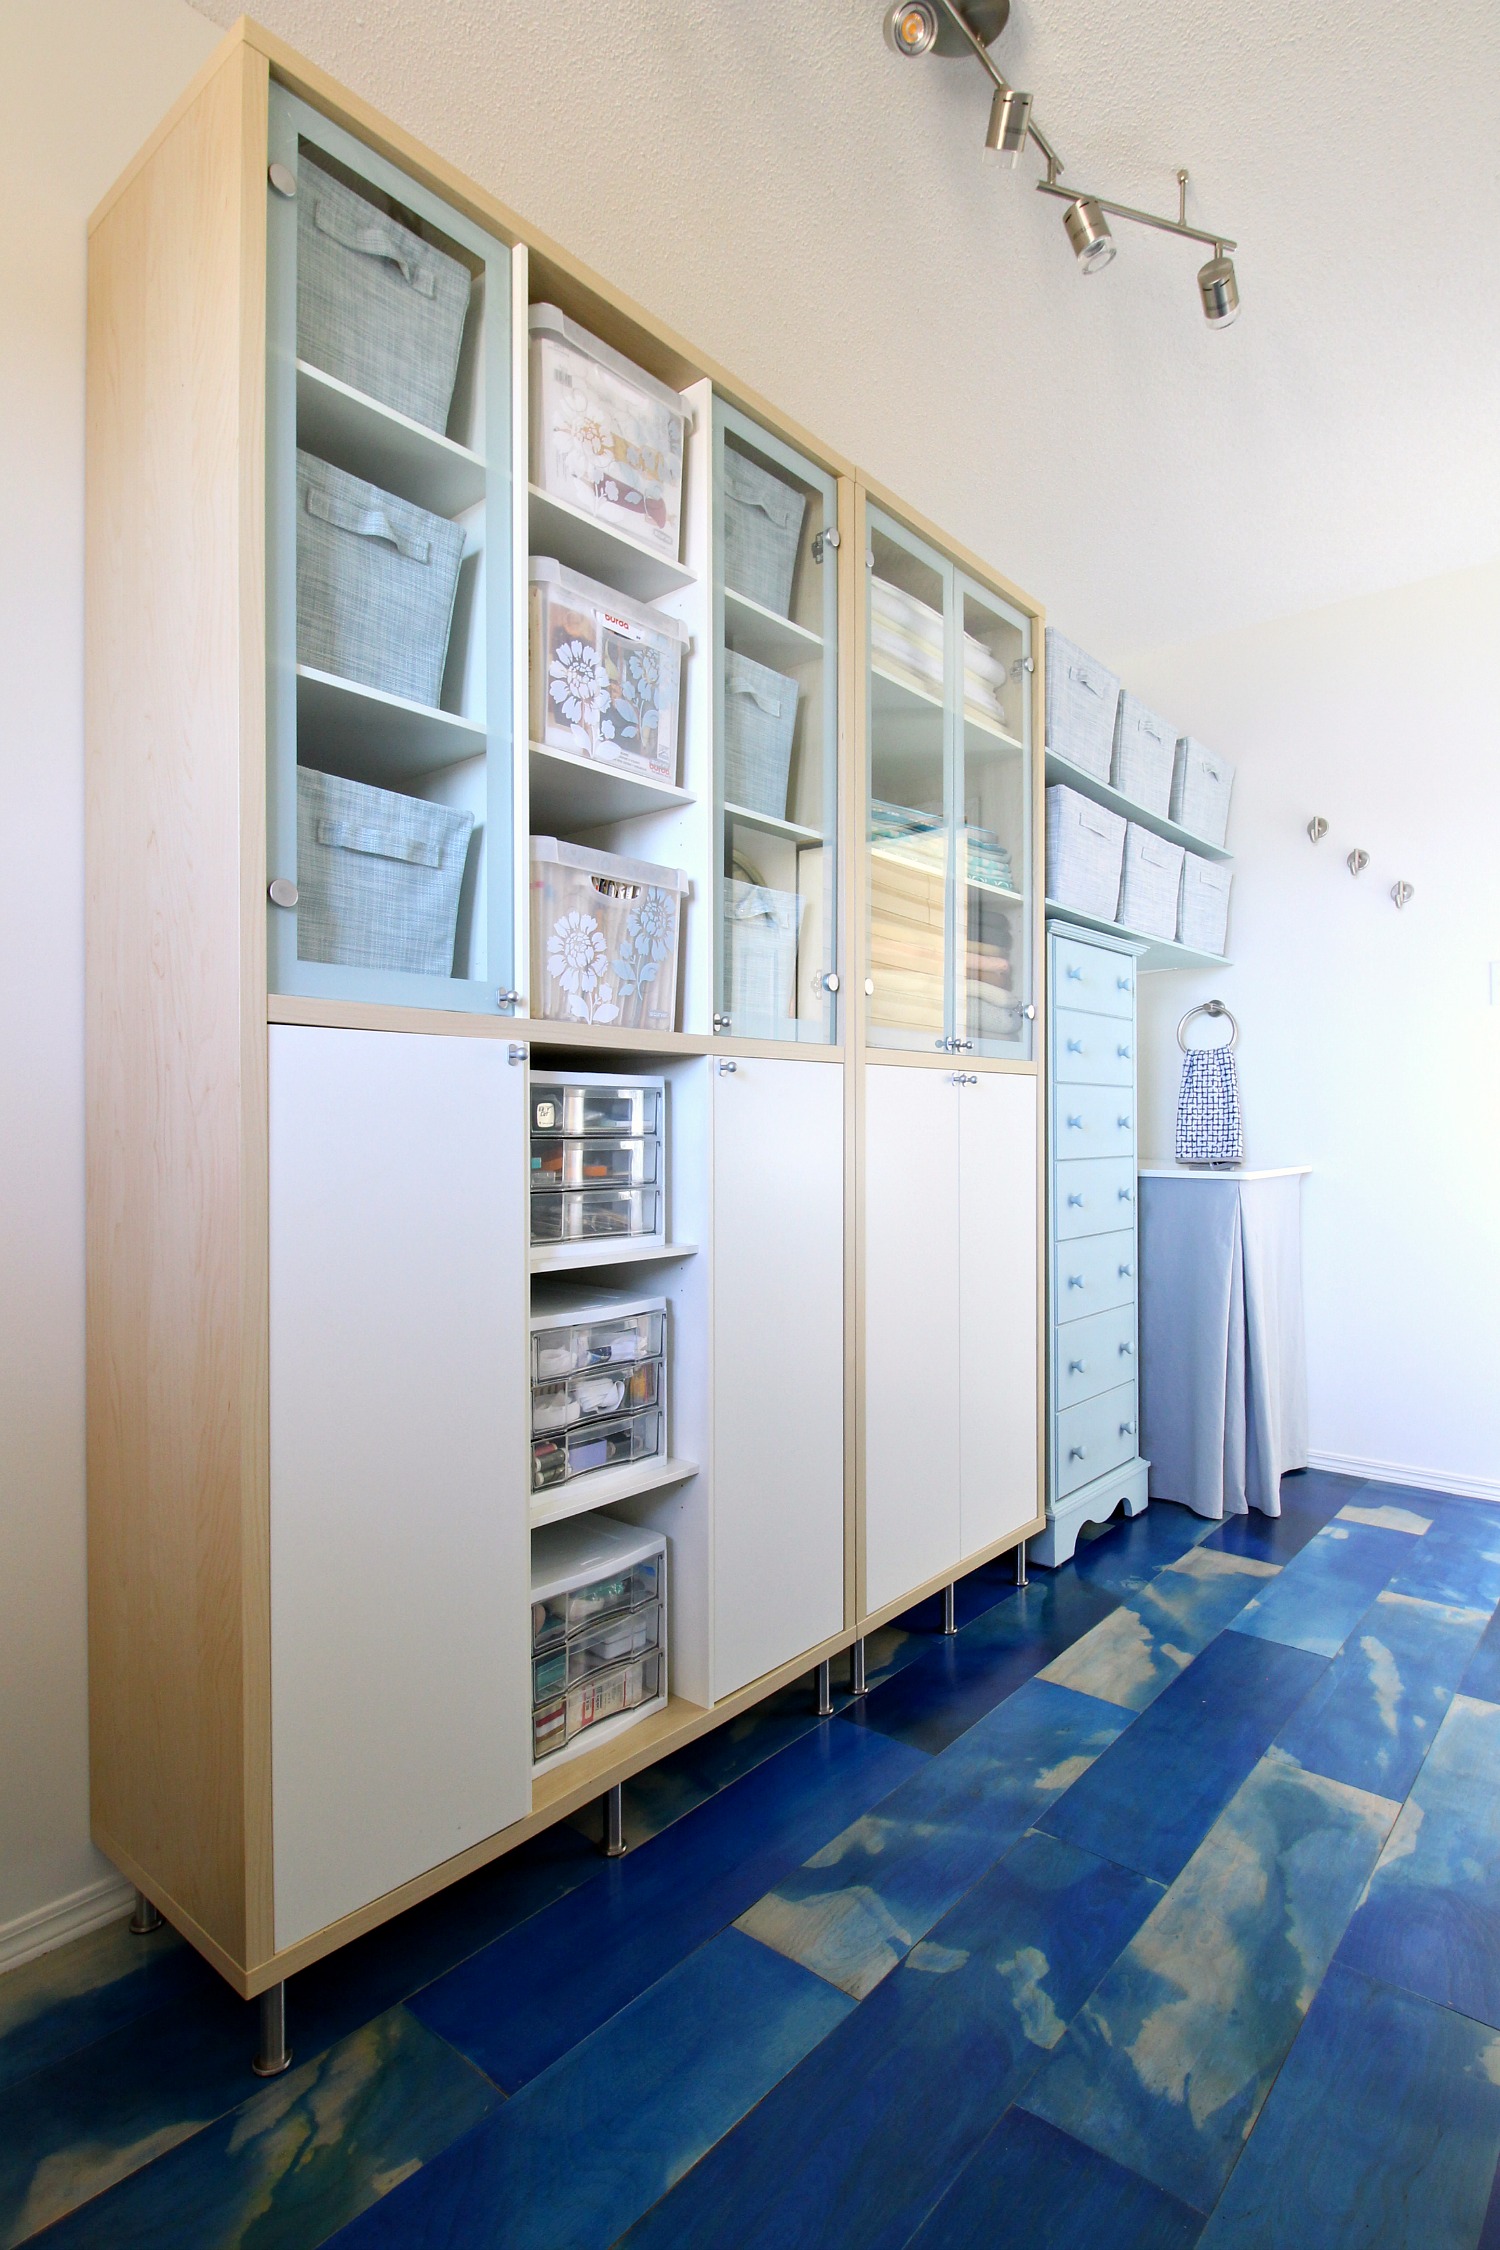
And now we have this:
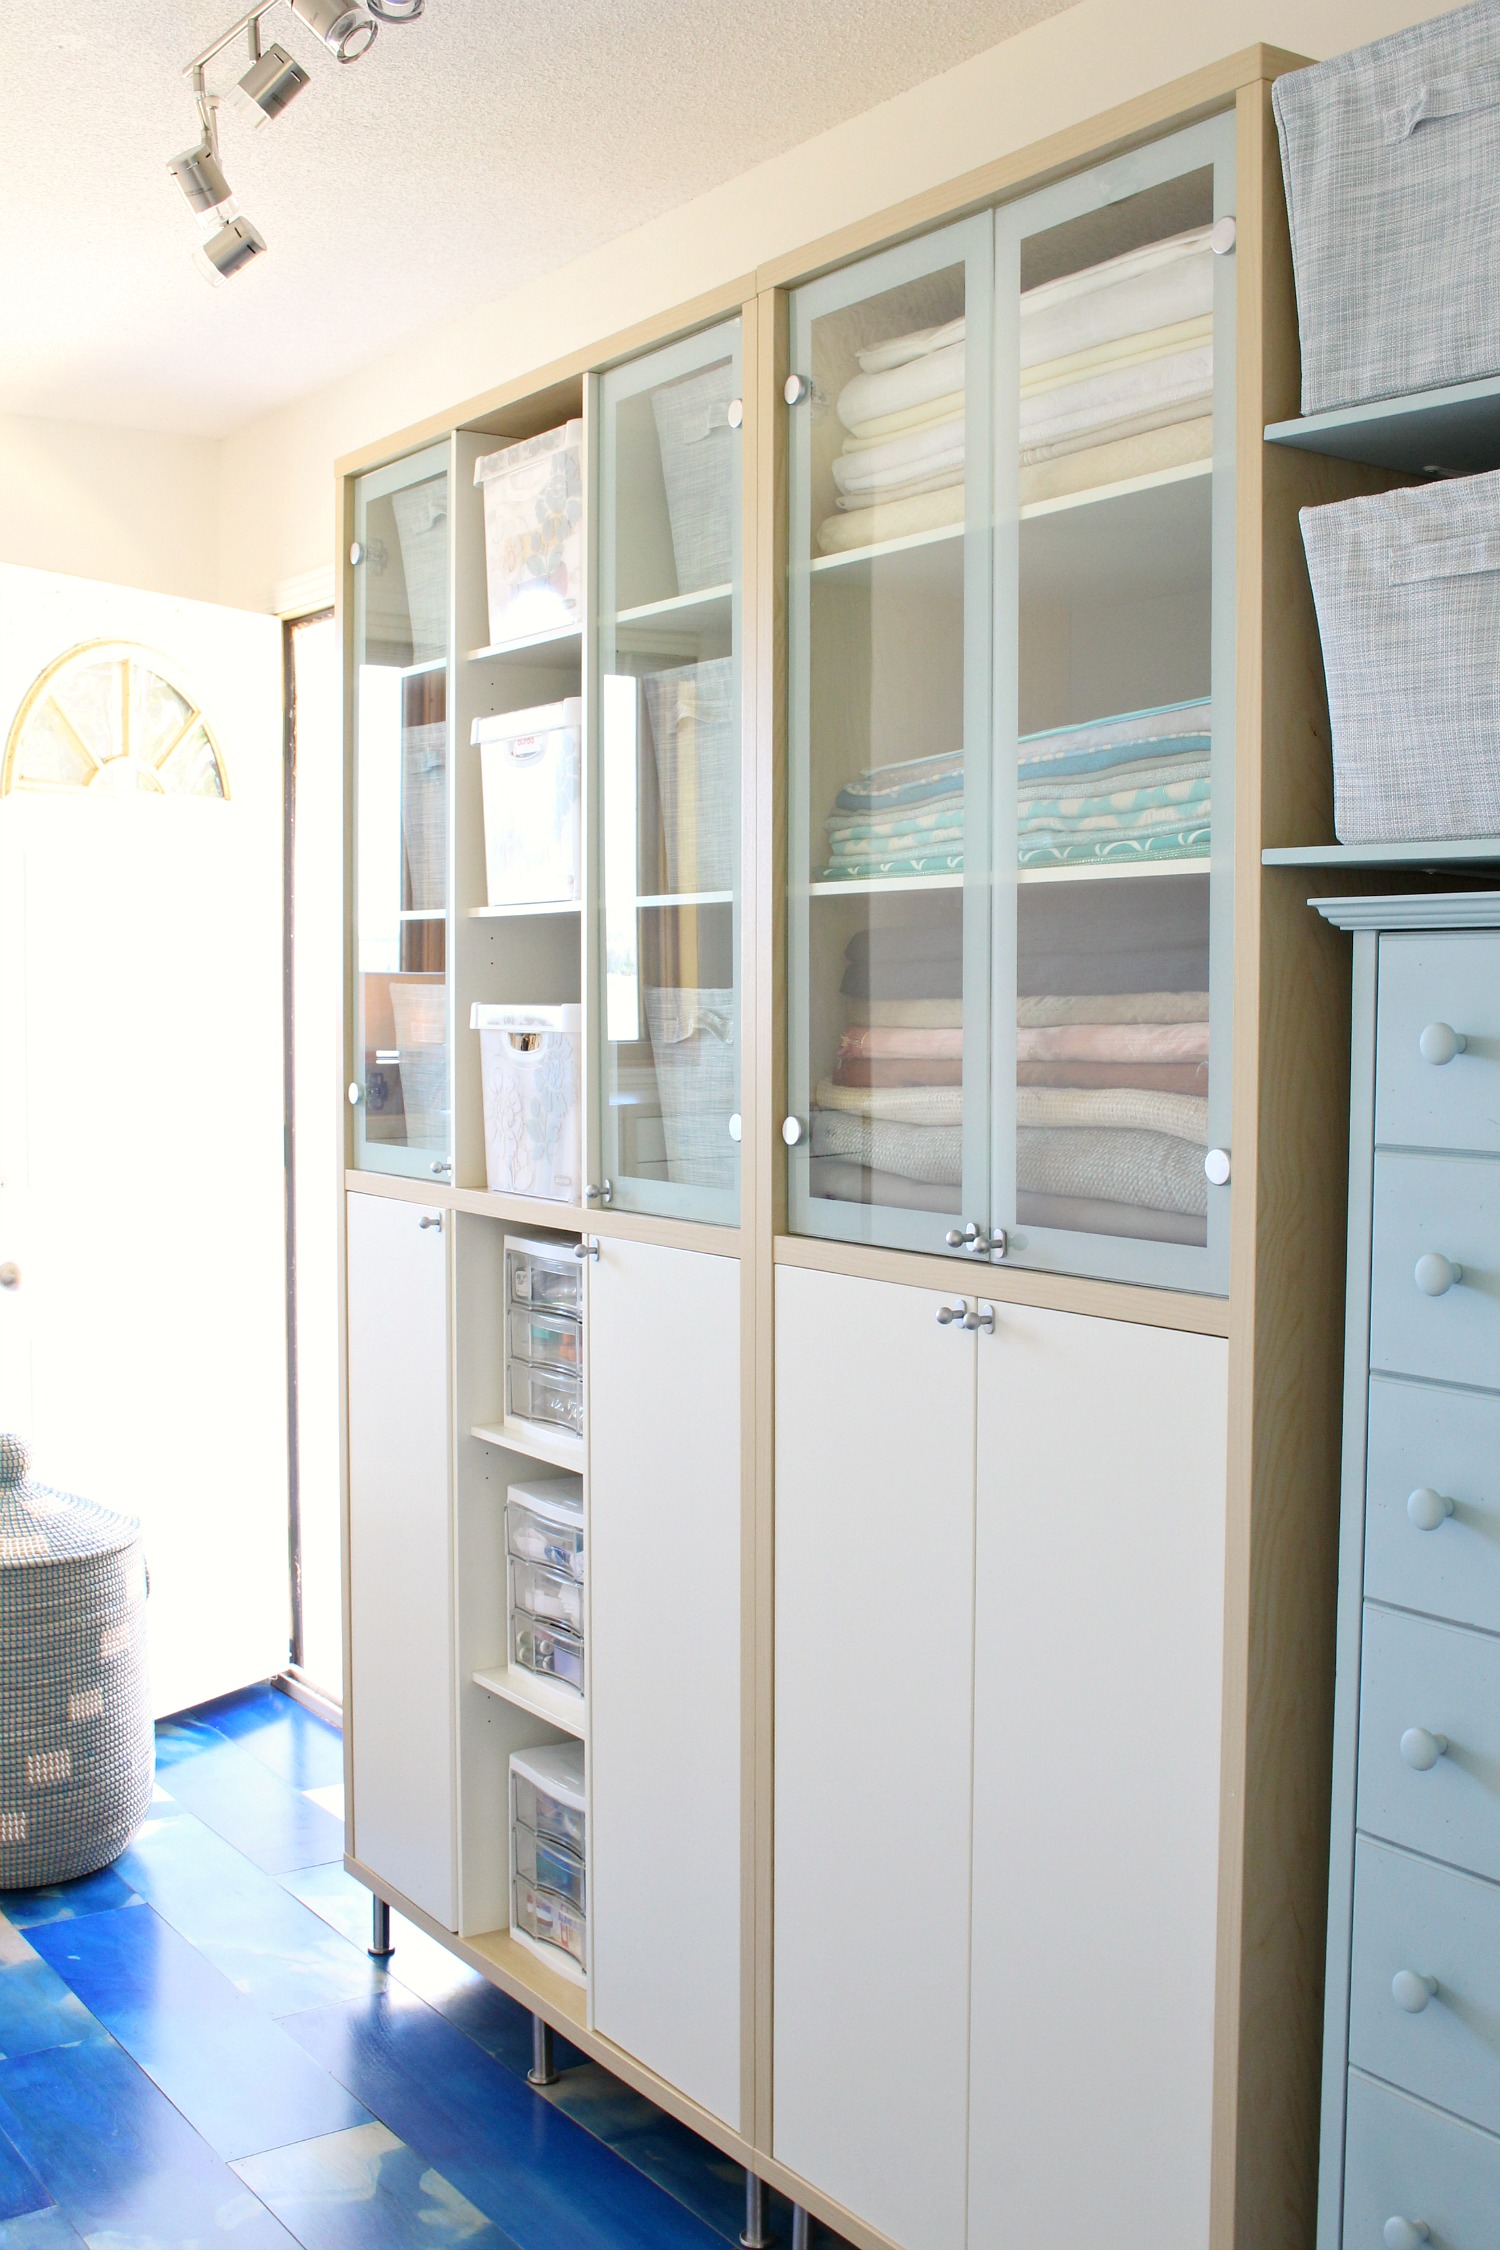
Although I have an ambitious renovation plan for this room (which you can read all about by clicking here), for now I wanted to reclaim this space as a room to hold DIY supplies. I wanted to keep this little craft room makeover as budget-friendly as possible, especially because it’s temporary(ish), so you’ll spot lots of money-saving ideas – although I have to admit that I did get lucky, not only with some blogger perks, but also kismet. My Mom was downsizing, so I snagged the old IKEA furniture from her. It was a little dinged up but fit so perfectly in this craft room makeover, that I’m convinced it was meant to be. But similar IKEA cabinets have flooded the classifieds everywhere, so I’m sure I could have purchased something similar for very little money.
The sink upgrade in this craft room makeover almost didn’t happen because at first I thought I could keep the cabinet and maybe scrub the sink…? Sometimes I’m a little too ambitious.

Luckily my Mom was here helping us tear out the old cabinets and at the last minute – the truck was already loaded up and ready to go – she hollered, “RIP IT OUUUTTTT” and so the three of us tore that sink and cabinet out. And you know what? Mom was right. I waffled so much on this decision because I wanted this room to cost approximately $0, but in the end I bought a new utility sink for like $50. So worth it!

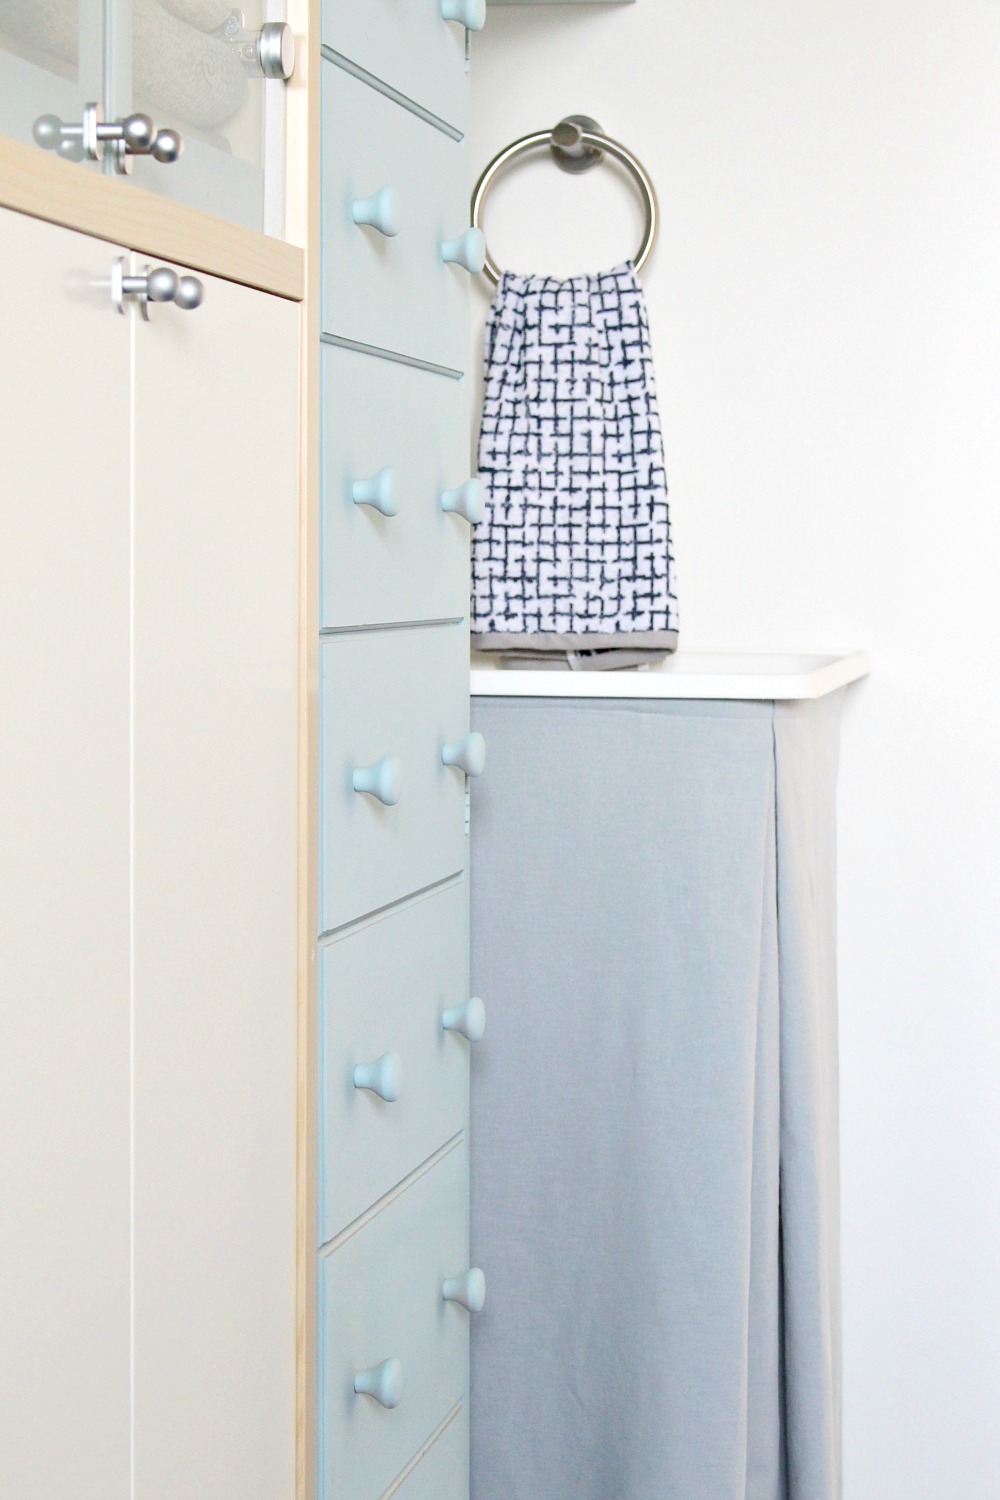
To hide the cheap legs, and create a little extra hidden storage for paint cans, my Mom and I cut up a linen shower curtain I was hoarding and sewed an easy DIY sink skirt that affixes with velcro. Delta provided the faucet, towel ring and hooks and now I can’t believe that I ever considered keeping the old sink!
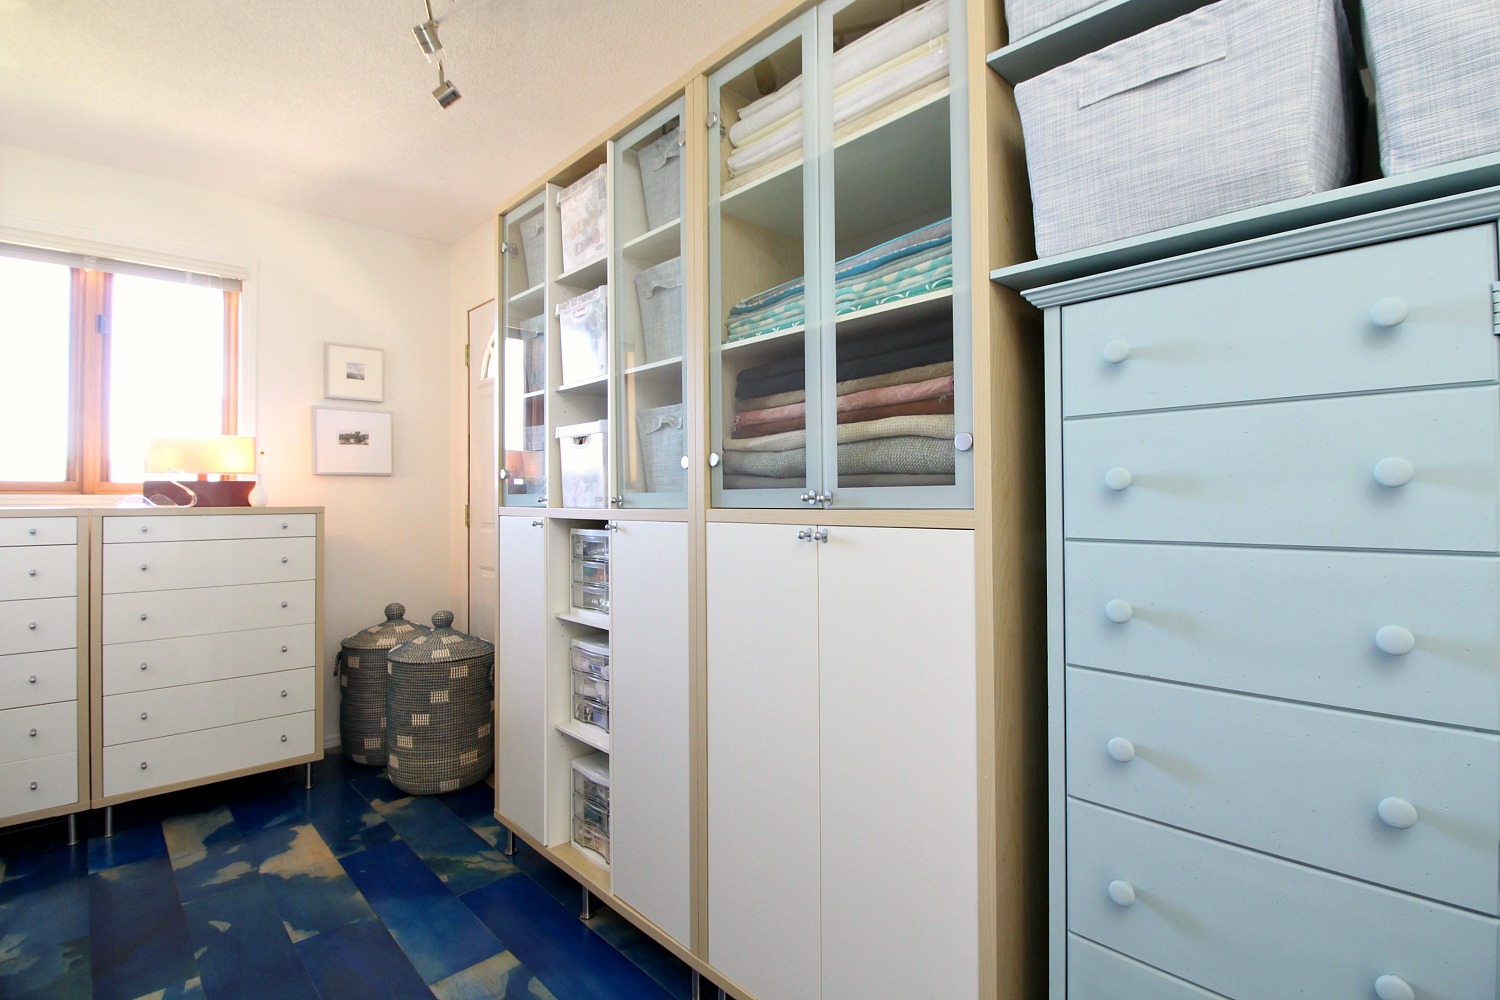
The dated pine cabinet was given a lakehouse-friendly makeover with Rust-Oleum “Chalked” paint in Serenity Blue. I chose that color because it echoes the pale blue trim on the IKEA glass doors, which helps the look feel less hodgepodge. Then I made (free!) DIY shelves using leftover plywood and edge banding – the previous owner had even left those brackets behind! I painted them white and installed the shelves so they line up with the IKEA cabinet shelving to keep the random assortment of furniture looking more like an intentional choice and less like I had to beg, borrow, and steal everything that’s in here.
You probably already noticed that the dirty beige walls and oak trim were freshened up with white paint (leftover from another room makeover). The creamy white instantly made this room feel brighter and cleaner.
On far end of the room, I removed the blind and scrubbed it outside before giving it a blast with a pressure washer. Turns out it was about eight shades lighter than I thought! I had planned to replace it but just scrubbing it clean gave it a new lease on life and saved me money. Here’s the view out that window:

I already had the little wood lamp and I love how it picks up the wood grain from the floor. I considered painting it Serenity Blue, but I like how it adds a little warmth to my typically cool color palette. The artwork you might recognize from the townhouse. The top etching is of Lake Superior (so it’s finally at home), and the bottom one is from Budapest, Hungary.

I added the lucite swan tray, which refused to sell in the Etsy shop. Apparently we have swans on Lake Superior so maybe this homage will lure some swans here and they can replace those horrible, horrible geese.
Around the corner was previously dead space, so with the two massive sets of drawers we added a ton of storage and then on the wall I hung a trio of Trigg wall pockets to keep some of our favorite (ahem, cutest) bits and bobs close at hand.


I’m planning to paint out the brass – I was on the fence but over the winter my heart said “Serenity Blue” (insanity later). The brass just doesn’t work in here and it’s not really my jam.
This room has a nice sized window but until we add an exterior door that lets in better light, it can be a little dim in here so we traded the old fluorescent light for a modern track light which really brightens up the space.


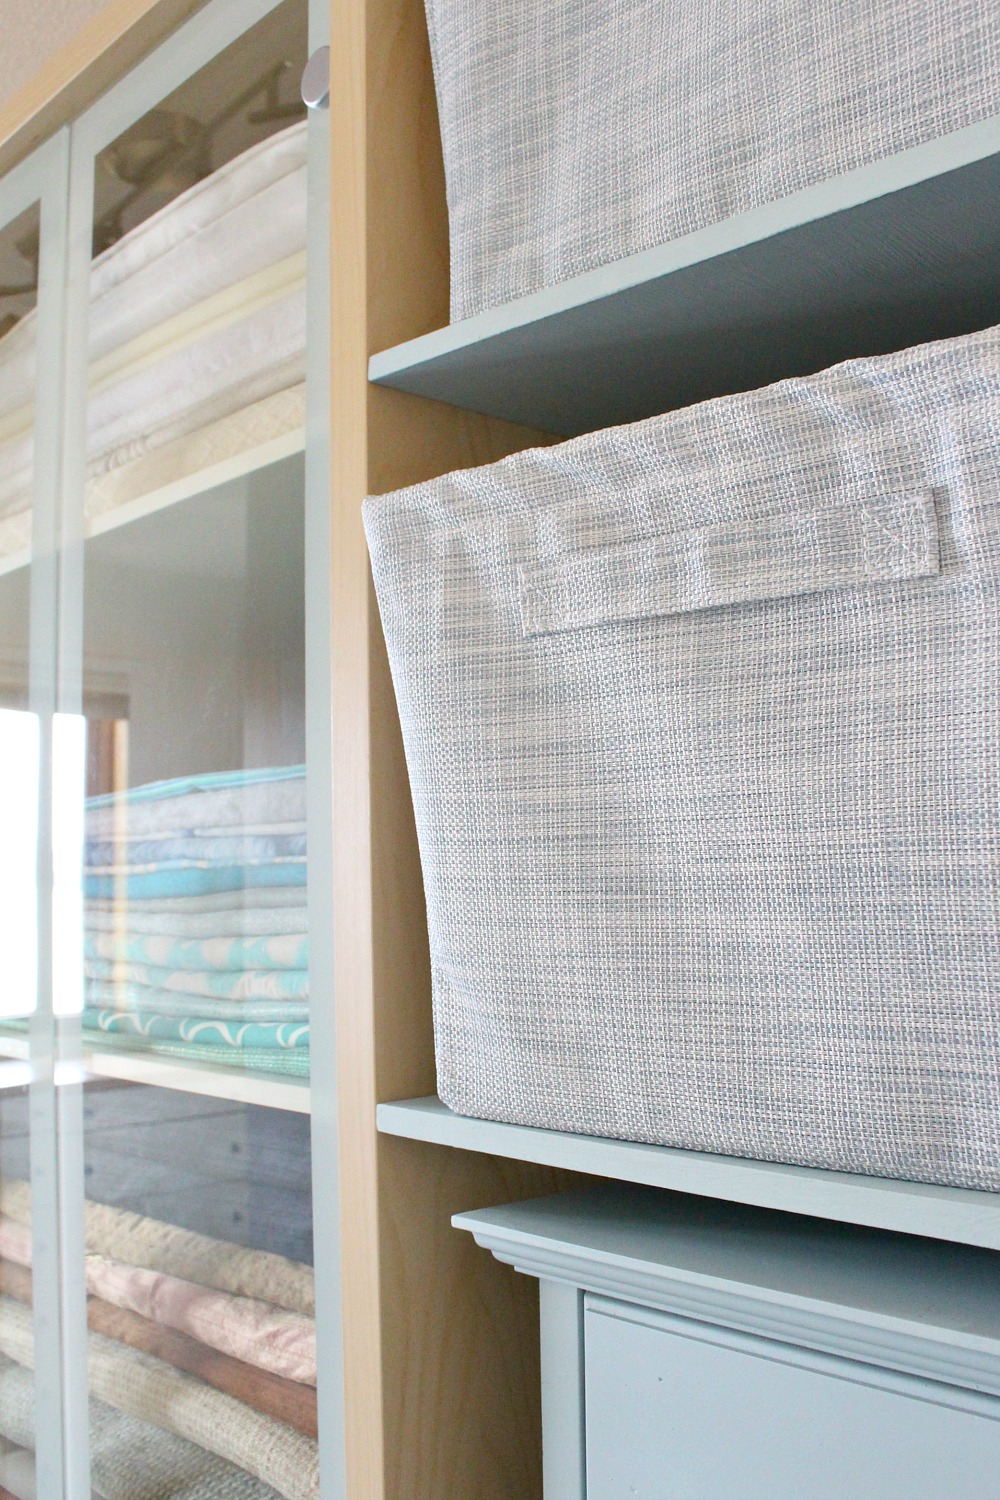
For textiles, I kept things simple so that the bold, blue watercolor floor can shine. The storage might have been the most expensive line item for my craft room makeover because I spent quite a bit on these matching storage bins – but the two sizes they came in happened to be the perfect sizes for the new shelving and the cabinets, plus the vintage-inspired fabric was really calling my name. I still love tweed (and anything with a similar texture) so much!

I decided to store my wool rovings in giant blue seagrass hampers (provided by Pier 1 Imports). I am getting obsessed with this style of woven, lidded storage hamper – we use two in the bathroom for laundry, two out here, one in the office for storing paper to shred, and then another one to hide the dog food bag in the mudroom. These blue ones are expensive, but it’s easy to find affordable woven hampers – they’re everywhere now!


We’re planning to seal off the second exterior door before our new siding goes up and then buy a new door for the remaining entrance – I want the same mid-century inspired exterior door we have for our front door to let in more light and keep a cohesive aesthetic outside. Other than those changes, this craft room makeover is done – until we renovate it into our laundry room and add our secret door…

I’m so thrilled with how my new craft room makeover turned out – especially because I managed to cobble this together on a really small budget, thanks to some hand-me-downs, some fun DIY projects, and a few sponsored perks (which I could have found really inexpensive replacements for, by trolling the classifieds and discount retailers like HomeSense). I love everything about the former Fish Room now, but those floors are my favorite feature because they’re such a unique DIY project.
Sources:
Wall Color: White on White c/o CIL | Cabinets: IKEA | Paint on Cabinet & Shelves: Chalked Serenity Blue c/o Rus-Oleum | Sink: Home Depot | Faucet, Towel Ring & Hooks: c/o Delta | Blue Storage Bins: Walmart | Evie Blue Seagrass Storage Hampers c/o Pier 1 Imports | Wood Lamp: HomeSense (but this one’s aqua) | Lucite Swan: Vintage (here’s a lucite sailboat though!) | Wall Pockets: Umbra c/o Lowe’s
DIY Project Tutorials:
Blue Plywood Floors | Aquarelle Inspired Stain for Floors | Cabinet Makeover | Sink Skirt


I love this post – always enjoy your tips and your craft room storage is great – but 20 separate ads within the post itself made it a little difficult to read. Do you not have any control over the amount per post? I appreciate why they’re there but the high number in this one in particular just seem to be working against your message.
Author
Yikes – someone else left a comment saying they got 27 on this post. That is way, way too many. My apologies. I’ve just tried to adjust the settings a little so hopefully they should be back to a normal, readable amount. Thanks for the feedback because on my end I don’t see that many when I view the blog. Let me know if they still keep bugging you and I can tweak a little more.
Hi Tanya – thanks for taking this on board. It’s down to 5 now which makes it much more readable, and doesn’t impact on the great content as much! Cheers, Susie.
Author
Thanks for checking again Susie, I appreciate it. I really do value the feedback. And thanks for being so understanding about the reason for keeping ads.
Hi! I love this makeover of this room! It’s amazing:) So inviting and clean compared to the “Before”, lol…………add a cozy chair and it could be a secret reading room. I was seeing a number of ads too……….that’s the only thing that bugs me on some blogs. I get it, you need your sponsors, but it’s super annoying to the reader that just wants to read the content:)
Author
So happy you like it! The former fish room worked for the former owner, but I’m so happy I could put my own spin on this weird little space.
Are you still seeing too many ads? After getting the feedback initially, I drastically reduced the number and the space between them. There should only be max 10 on desktop and less on mobile, with at least three paragraphs in between. I’ve had the same ad network for awhile so I’m not sure if there was a glitch…? It’s also based on length of post and this one was a long one, haha, so that might have really increased how many ads people were seeing.
I know ads aren’t fun, I hate them too! But as a blog reader, I personally prefer seeing ads as opposed to every single post being sponsored by some company – especially because you never know how much influence that brand had over content. These ads aren’t sponsors and they’re different for everyone – the best part is that they show up no matter what I write and I think that lends a little more authenticity than post after post after post starting with “brought to you by…” I still collaborate with brands in that way, but I have the luxury of being picky about those posts because of the revenue generated by display ads. If they’re still bugging you since the change on subsequent posts let me know and I can adjust more to find a happy balance! The honest to goodness truth is that I just can’t afford to produce content without ads and sponsors – the cost of keeping the website up and running from the technical end along with other hidden expenses (never mind the time and materials) is just too much to bear as a hobby. It’s got to be a job or I can’t do it, and I love creating content you want to read 🙂 I appreciate the feedback so I can keep Dans le Lakehouse a fun place to visit!
As a long-time drop-in reader, I was overwhelmed by the number of (motion) ads on this post – 27 total for me! I didn’t even bother to read the text, as paragraphs were broken up with ads. It’s really just too much. Not sure if it’s you or my browser, but not ideal for a reader.
Author
Yikes! That’s way too many ads and I didn’t realize they were breaking up paragraphs – how annoying, I’m so sorry. Thanks for the feedback. There shouldn’t be that many and they shouldn’t be breaking up paragraphs so I’ve tried to change that. It didn’t show up that ad-heavy for me, so I’m grateful you brought it to my attention.
I’m excited all over again about that floor! A hundred years ago, my parents re-floored a tiny bedroom in an old house we had with whitewashed plywood, and I loved that, but you’ve taken the idea many steps further and made a real work of art! The durability report is really welcome, too. We have a kitchen that is a trek-through from vegetable garden into the rest of the house, and the old vinyl is getting very battered. Your solution for your own kitchen was my first thought… but now I’m wondering about a plywood masterpiece. What do you think? Would you use this for a kitchen floor, Tanya? (I’m not going to get into how much I envy the idea of a craft room. Right now I have three projects spread out over living room, dining room, and bedroom. Sigh.)
Author
This floor wore SO well and the finish really held up, even to moisture and soil and dirt. So I’m confident now about recommending it pretty much anywhere (other than a humid bathroom). The only drawback is that it’s difficult to cut 100% perfect pieces so there are some small gaps. If you have a vacuum to clean those out every now and then (my kitchen floor gets a LOT of tiny debris dropped on it) that would be ideal. I don’t own a vacuum, so I drag the shop vac in there once a season, lol. Other than this, it has been so easy to mop and the swiffer glides across so smoothly.
Another option would be to paint the vinyl. We did that in our kitchen and that too has held up so well to shoes and dogs nails. Down the road, you won’t have to remove a zillion nails like you will from the plywood floor. http://danslelakehouse.com/2016/10/how-to-paint-vinyl-floor-diy-painted.html
But the plywood floor is way more fun and the busy pattern hides dirt much better! That’s always my goal when deciding on flooring haha.
I just went back and re-read the painted kitchen floor post, and you’ve about got me sold on that. The original floor in your house was suffering from the same injuries ours has, so I entirely understand why you wanted to make a change. While I love the dyed plywood, we don’t have your skill or equipment available, and I’m afraid we’d likely make a huge mess. Painting I can handle! Your step-by-step description is hugely helpful. So glad to know about being able to prime and then move the appliances back in before doing the final coat. I’m guessing this is not odorless paint? We’ll figure out a way to start the project in the summer, when we can keep the doors and windows open. Thanks again!
Author
I’d check with a local paint store and see if they carry something similar that’s low VOC because it’s been quite some time since we did this and maybe there are new products? We have since moved the appliances and just to be sure we put a piece of cardboard down to protect floor so don’t worry about that either. I thought it might scratch but so far so good – that might have been me worrying too much!
Happened across your site while on Pinterest. I thoroughly enjoyed this article and will definitely be following for future project’s, ideas and direction. So nice to meet you !
Author
Hi Maggie! So nice to meet you as well – thanks for taking the time to leave me such a nice comment!
This turned out SO BEAUTIFULLY. I’d love all the blue hues and textures you used. Gorgeous.
xo, Sincerely Colleen
Author
Thanks so much Colleen! That’s so lovely to hear!
great post – did I miss the source of the track lights?
Author
Thank you 🙂 The track lighting was from Lowe’s.
Beautiful! A very fun read while waking on the treadmill😁. Very inspiring and love your sensibility. 😉
Author
Thank you so much!