Today I’m going to show you how to build DIY wall cubbies – for me it’s a fresh take on kitchen open shelving, but I already had a lot of people message me on Instagram to say it’s a fun idea for book storage too. Honestly, once you start making DIY wall cubbies you will want them in every room (I do, haha!), because they’re an easy and inexpensive way to add some storage anywhere.

Before I show you how to build DIY wall cubbies, maybe I should explain why I wanted DIY wall cubbies when I had perfectly good open shelving. Truth be told, I kind of messed up that open shelving when we first tackled this kitchen makeover. Hubby wanted the brackets on studs because they were so weighed down with glassware. I wish we had just done blocking while the drywall was open (like we did for the floating bathroom vanity) and then we could have put the brackets wherever we wanted! But we didn’t because I was rushing, so we were tethered to the location of the studs, which resulted in the shelves and brackets being slightly off centered. My brain either needs full symmetry or total asymmetry – it can’t be at peace with one thing being slightly off. But because the turquoise kitchen makeover was intended to tide us over until we saved for a full reno, I didn’t want to sink more money into it.


The shelving always bugged me the tiniest bit though.

We did a major closet reorganization recently and I needed brackets for some storage shelving. I decided to steal the brackets from the kitchen and reuse the shelves – plus some extra wood – to make little DIY wall cubbies instead! It solved two problems: office closet storage and remedying the kitchen open shelving problem. Plus, after five years, I just craved a change because this temporary kitchen reno is going to be around for a little bit longer.

Along with adding paneling and painting just the dining room side of the cabinetry, the diy wall cubbies made this (still temporary, I swear!) kitchen feel brand new.

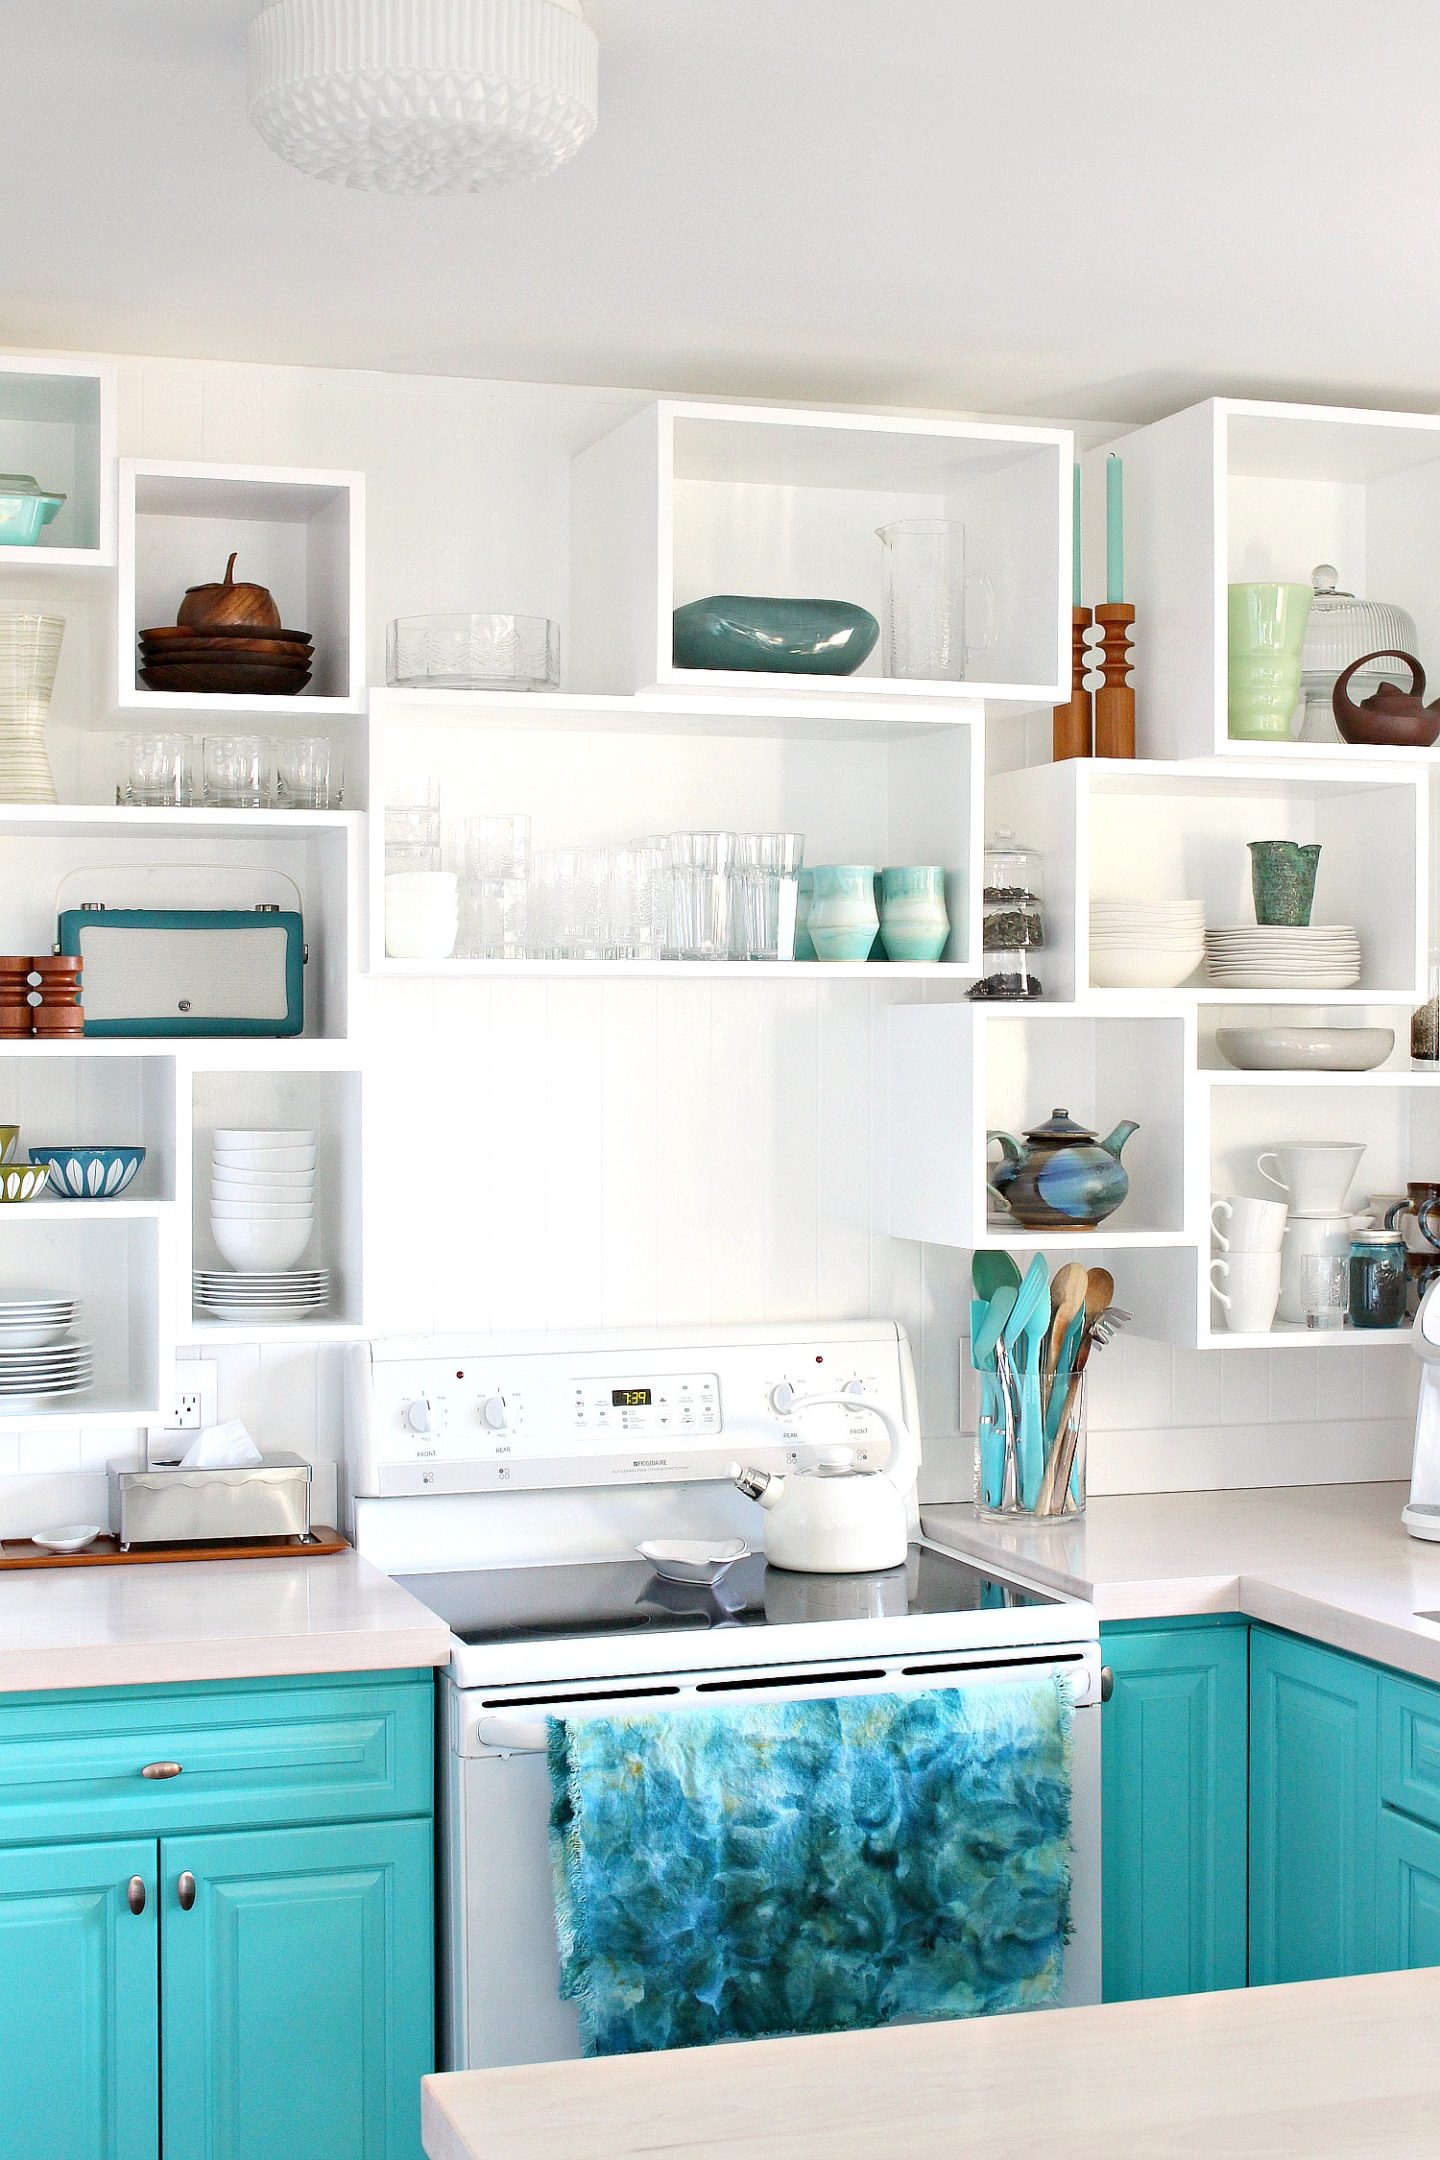
The DIY wall cubbies serve the same purpose as open shelving, except I could ditch the brackets because each cubby has at least a couple points of contact with a stud. But they’re still just a place to store my vintage kitchenwares, so this project was 100% for fun – the function didn’t change at all. Although it did sort of bring more things within reach – I only need a stepladder for maybe the cake stand and teal glasses at the top.

How to Build DIY Wall Cubbies

Supplies for DIY Wall Cubbies:
- Stud Finder
- Painter’s tape (try to get tape the width of the wood for accurate placement/size)
- Caulk
- Primer/Paint
- Small Roller
- 2″ Angled Brush
- 5/8″ Drywall Anchors
- Screws
- Drill
- Level
- Air Nailer and Nails
- Wood Glue
- Clamps (Optional)
- Belt Sander (Optional)
- Wood filler
- Sandpaper
- Plywood or Laminated Solid Wood Shelves (I Chose 3/4″)
- Miter saw or table saw
The First Step: Prep
Before doing anything, we took removed the kitchenware and took down the old shelves and brackets. I didn’t do this, but the smart thing would be to fill/patch the holes and paint at this point. Instead, I forged ahead with marking out my cubby sizes/placement with tape and then I didn’t want to take them down so I had to paint around the tape which was so annoying. So paint, then play with placement using painter’s tape. Sketching it out helps, but nothing beats seeing the placement to scale. I also roughly figured out sizes to make sure I had cubbies that could fit the basics: plates, bowls, mugs, tea pot, glasses, etc. Then we just figured out sizes that looked good and hoped for the best. At first I pictured cubbies with shelves but it was all wrong – I re-did it with singe cubbies and was much happier. At this point, we also used a stud finder and marked the studs and wires.

The space above the stove is to meet building code – check on that in your area before installing shelves. I had seen bloggers doing shelves all the way across so I did it like that at first, five years ago, until I realized that wasn’t to code so we had to chop them down and were left with a random gap. This time I worked that space into the “design”. Because I can’t put anything flammable above the stove so I’ll probably hang a metal or glass shelf/spice rack. I used to have art there but spices will be handier.

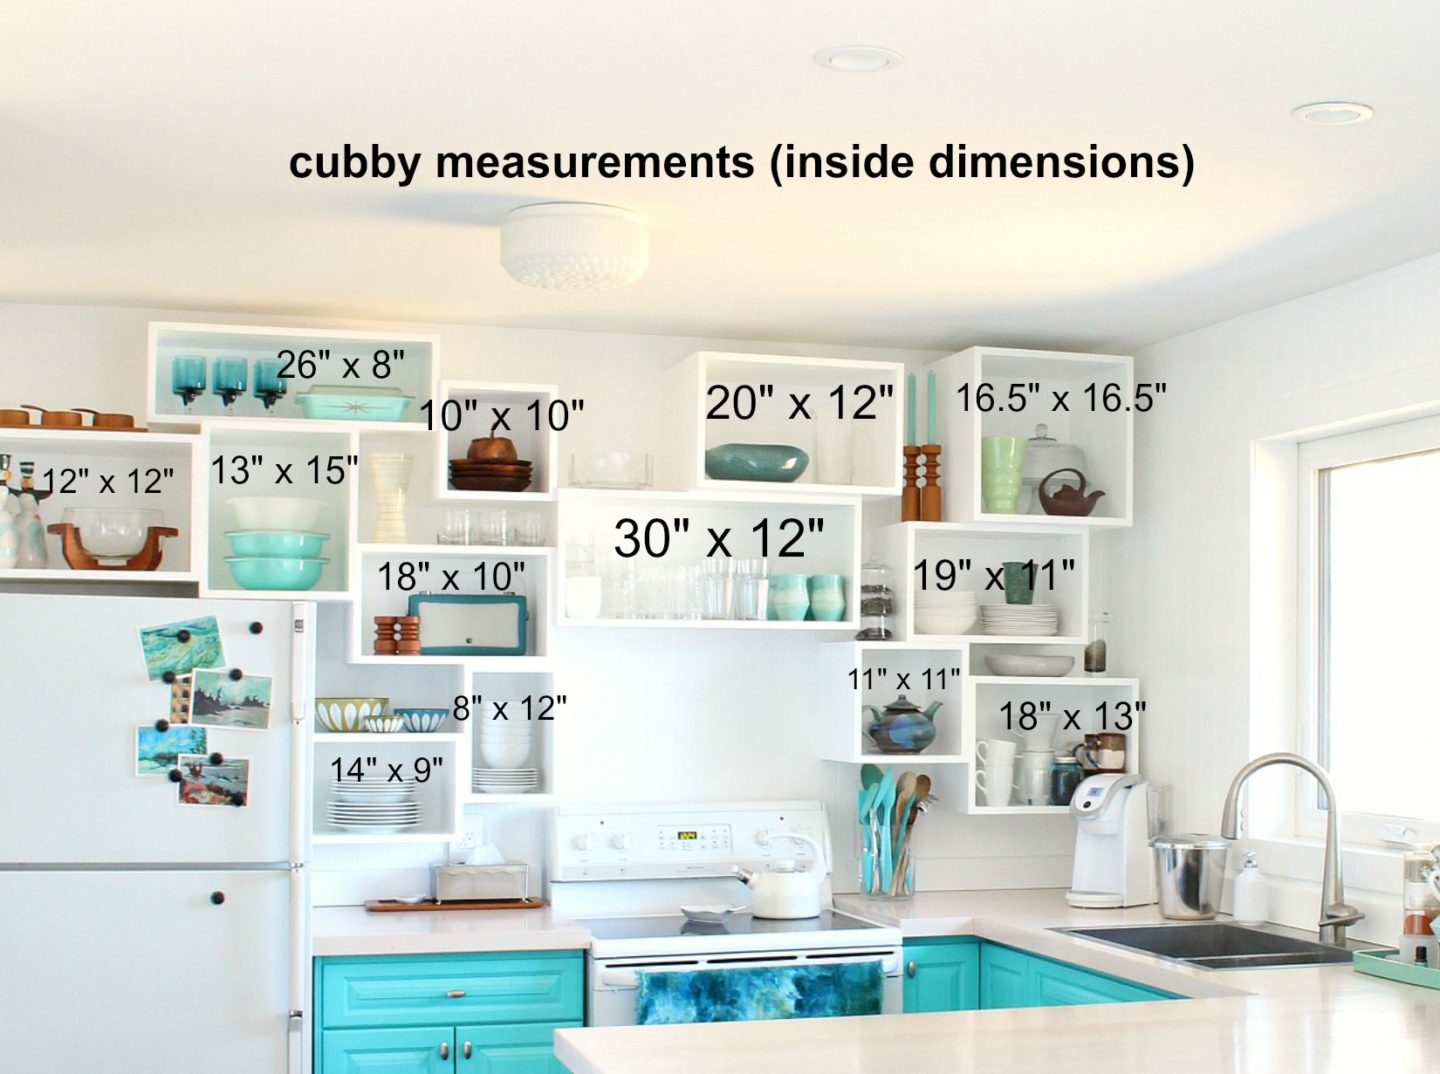
Here are the final measurements for the cubbies, just fyi (inside dimensions):
How to Build DIY Wall Cubbies: The Proces
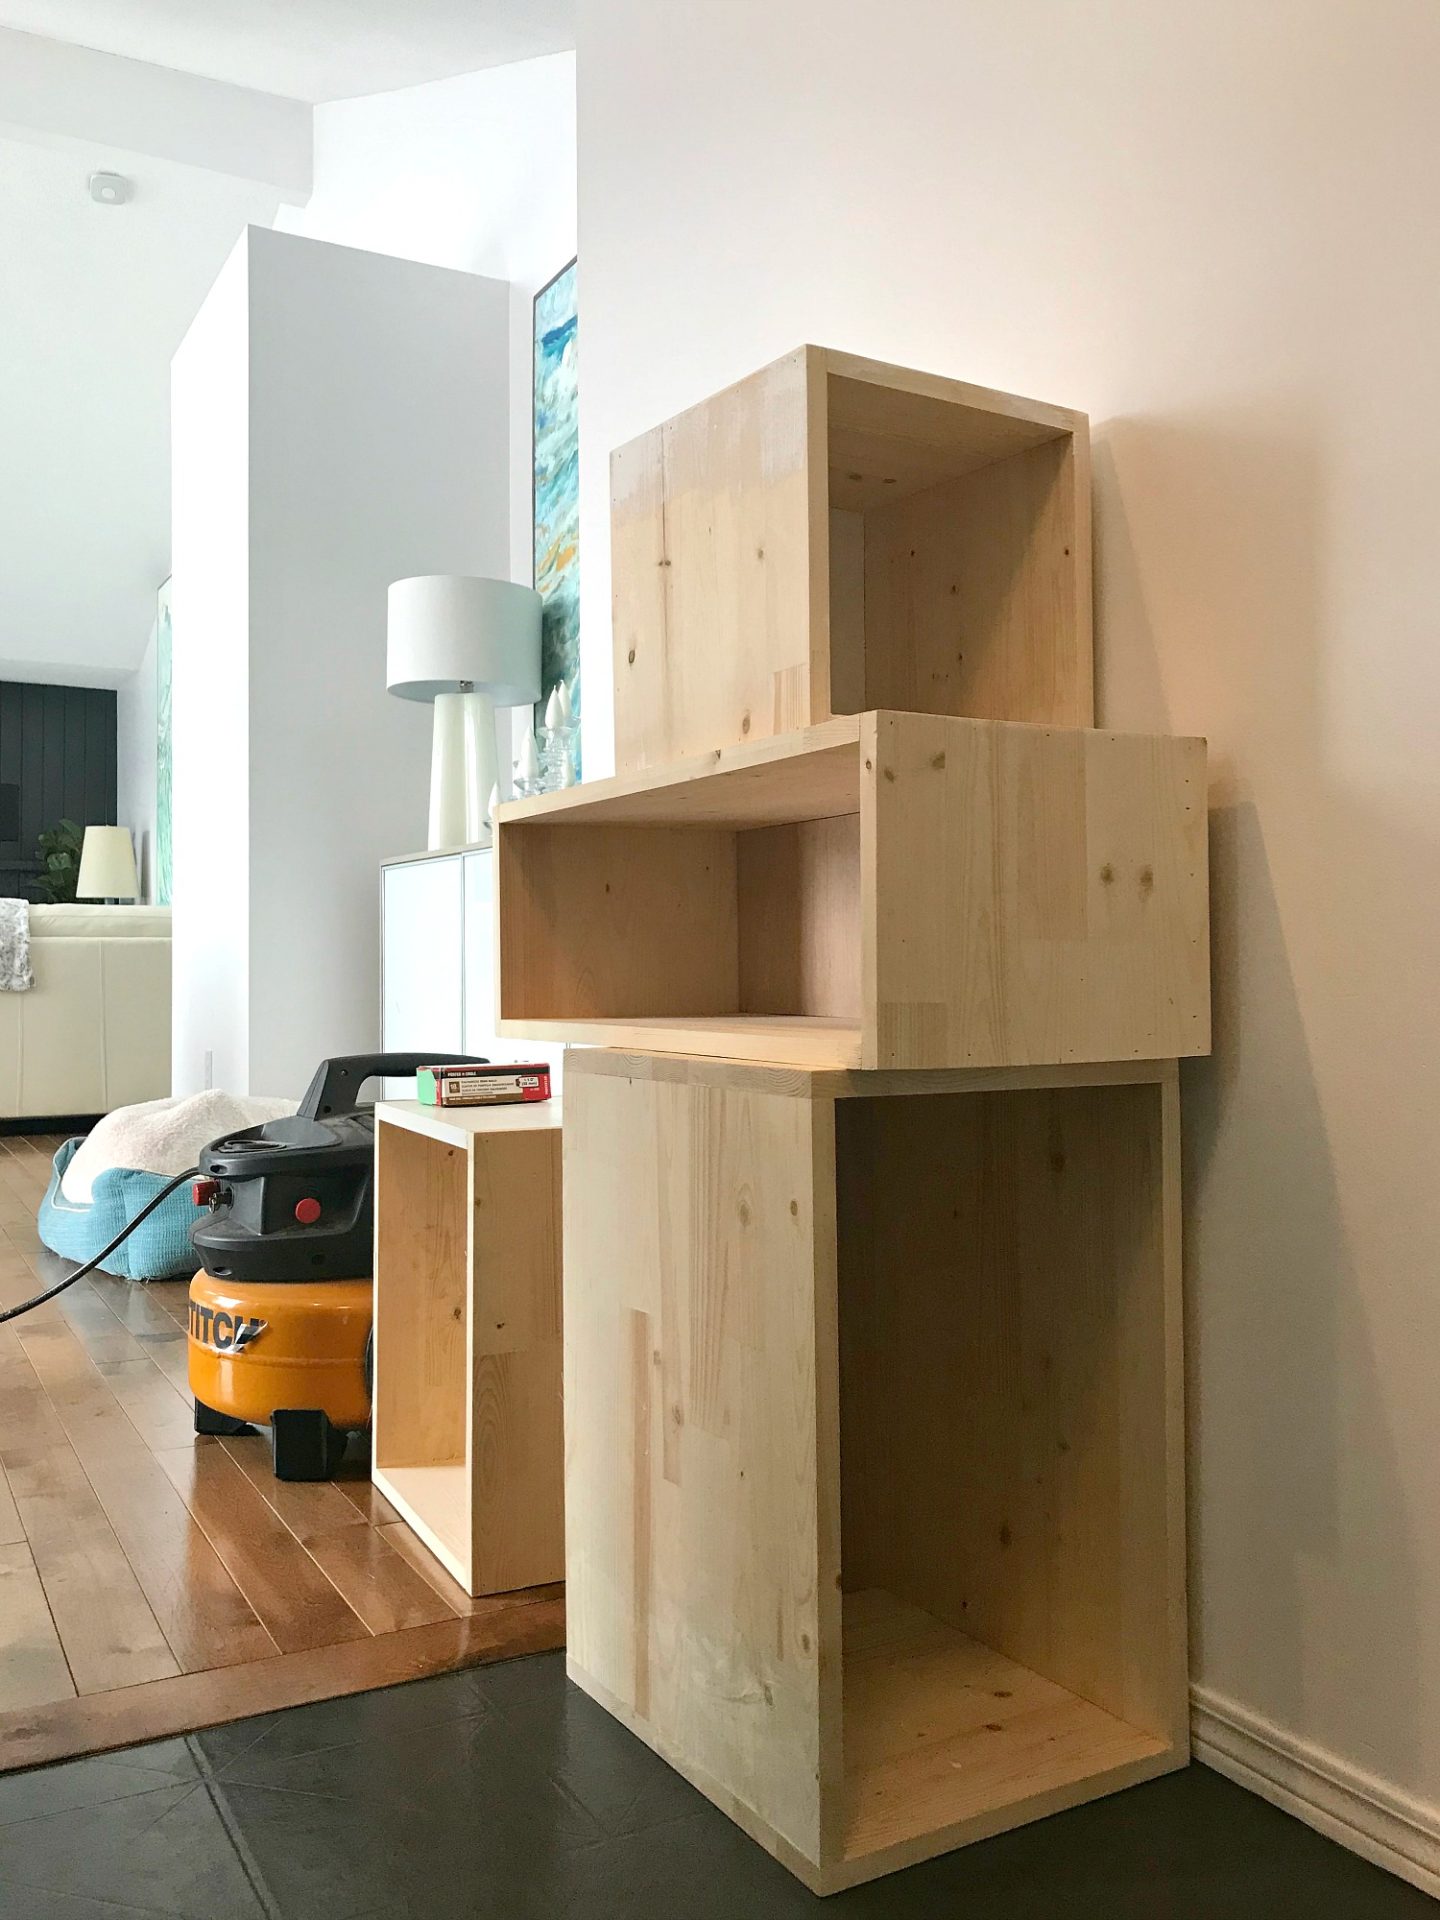
We re-used some of the old shelves and also bought new laminated pine shelves. We get them at Windsor Plywood and we bought 12″ and 16″ depths. We used these for the sides so we only needed to cut lengths (our table saw isn’t working right now). We used a sheet of plywood for the backs – but you could cut all sides and backs from plywood to save some money on supplies. After figuring out the sizes of our cubbies and making a cut list, we used the miter saw to cut our lengths. We used an easy butt joint and glued the sides together, using air nails and clamps to hold everything together while the glue dried.


Here’s a finished DIY wall cubby:

The wood was already planed but to smooth sides and round corners a touch – and remove any wood glue that squished out – Hubby ran the belt sander over them quickly.

How to Install the Wall Cubbies:
Installing was the tricky part and until the first “row” of cubbies was installed, it was a two-person job. Each cubby has two screws going into a stud and two held with drywall anchors.

Once we confirmed the location of a cubby, Hubby held the cubby in place and I pre-drilled through the cubby to mark the wall (double check with a small level first!). It helped to have hubby hold while I drilled. For higher boxes we could use the installed cubbies to take the weight and it became a one-person job. With the holes marked, we took down the cubby and installed the anchors in the locations marked by the drill. Then hubby held the box back in place again, so I could screw into the wall anchors we installed and then into to the stud. It’s tricky to find that wall anchor so screw that side first and then into the stud.

This took a surprisingly long time. We started around 8pm one evening. My father-in-law had come over for a chill dinner because his wife was at a meeting, and he was like, “watcha up to tonight?”. And, super casual, we said we were installing cubbies. Nevermined hubby was flying for work the next day. Nevermind the day after he arrived back home my mother-in-law was coming in from out of town and she’d be visiting for the first time since we moved here. Well, by 8AM, we gave up. We had literally pulled an all-nighter, realized how old we now were because pulling an all-nighter used to be easy, and called it. I finished painting the cubbies we had installed while Hubby was gone and reassembled the kitchen for Easter. After my in-laws left, we finally finished installing the rest of the cubbies which, somehow, went up so much faster!


Making the DIY Wall Cubbies Look More Polished:
After the cubbies were installed, I lightly sanded again (just with a fine grit sandpaper) to smooth any rough spots. I used wood filler to fill the air nail holes and any major imperfections in the wood. You can also cover the screws – or just paint over them if you want them easier to remove. I also went around the edges where the cubbies met up with the wall and ran a thin line of paintable caulk. I also caulked inside the cubbies where any seams were a bit large. Taking the time to do this made everything look so seamless! Don’t skip this step because it makes them look so much more polished.

When the caulk cured (minimum two hours) I painted the cubbies with a semi-gloss paint designed for cabinets and trim. I re-painted the paneling and DIY pantry in the same color and finish. It’s a brighter white than we had before and it really freshened up the space! I used a small 2″ angled brush and a small roller – a really short handled brush will be helpful if your cubbies are small. When the paint had dried, I ran the sandpaper quickly over the surfaces because the paint raised the grain a bit. I wiped off the dust with a damp cloth and got to work on the second coat. I wasn’t super impressed with my paint and ended up needed 3-4 coats, and I sanded lightly between each. Doing that resulted in a nice smooth finish.


I love how the cubbies look! I bought a better DSLR which I really need to start using because it’s getting so difficult to get a crisp photo with my old camera! I’ll be doing a summer house tour at the end of May and I think that will be my goal for using the new camera! These photos aren’t doing the space justice.


I liked the depth of my original open shelving but I did add four deeper (16″) cubbies because the fridge and pantry were always so much deeper than my shelves. Having some deeper cubbies balanced that out a bit, although I’d still love for a counter depth, vintage look fridge to drop from the sky. But this old one works and I hate to spend money on appliances if we’re (eventually, I swear) going to gut this room. Since the house exterior renovation tapped our home reno budget, it was nice to spruce up the kitchen to help tide me over while we save up again. I’m also planning a budget-friendly laundry room/powder room makeover – I might try doing the One Room Challenge in the fall!


I honestly can’t walk by the kitchen without smiling! I hope you found this tutorial for how to build DIY wall cubbies helpful. We just used cheap pine – but can you imagine these in walnut? Dreamy!


P.S. If you’re looking to track down anything like the vintage kitchenware on my shelves, this post goes into where I found pieces and has similar finds! You can also pop into my vintage Etsy shop where I share a lot of goodies (I only have so many cubbies haha).


I really, really LOVE it!!! It’s so smart how you used the two depths–and it ties in so nicely with the pantry as well. I’m almost itching for you to paint the rest of the lower cabinetry in the same darker colour as the back of the peninsula. But I also love the brighter paint. I’m torn. How can I be so invested in a kitchen that is not even mine? 🙂
Author
Thank you!! I’m so happy someone else notices the details of the cubby depths and the brighter paint. You know my plan WAS to repaint the entire kitchen but I couldn’t let that aqua go, haha. I was torn also! I love the inky teal and it helps the stools pops, but I just wasn’t ready to say good-bye to the turquoise. But I’m not very good at a big before/after. I kind of nudge my spaces along with little changes, bit by bit. So I might paint the lowers one day! I partly didn’t because it was full winter when I painted and I dreaded the idea of sanding down those doors in the cold. Summer might motivate me… 🙂
I’m the same way. Rarely will everything be “finished” in one go. But each stage is finished in and of itself, if you know what I mean.
Author
Yes, I know exactly what you mean! The house always looks put together – no wires, dangling bits – so it’s “done,” but I’m always working/scheming/plotting haha.
So gorgeous! And I have to say how much I love and envy the diy pantry, which looks even better now the cubbies are installed. The corresponding shapes are so visually appealing. Just one question: you mention laminated pine shelves… Were they for the closet project? At first I thought you may have used them for parts of the cubbies… I’m thinking about lining my base cabinets (old, pine, hard to clean) with laminate, so am interested in where and how you used it.
Author
Thank you! The pantry does look better now – with the fridge, that side of the room always looked “heavier”. Hoping to I balanced it out a bit.
Actually the laminated pine shelving was for both projects! That’s what we used for the original shelving, and I repurposed what we could. We bought some extra and used it for both these cubbies and the shelving I did in my office closet. It was a nice way to maximize materials and also they don’t warp. We did use plywood in the same thickness for some of the backs of the cubbies (the larger ones were too big to use the shelving material).
Laminated pine basically looks like mini butcherblock counter. Smaller strips of pine are cut and planed into strips and glued together to create a solid plank of wood. It doesn’t warp like a solid piece of wood and it’s cheaper. Laminated pine is a misleading term because it isn’t covered in laminate, they’re pieces of wood laminated together.
But you can buy sheets of the kind of laminate that cover laminate counters. My father in law is a woodworker and he has bought it. You could buy and cut sheets of it and use construction grade adhesive to adhere to your cabinets. Plywood also comes very thin and in good one side varieties. You could buy sheets of a thin plywood and stain/paint or seal with a waterproof sealant and then glue into place. I avoid places like Home Depot for this because their materials are construction grade and limited in selection. Head to a local lumber yard (I use Windsor Plywood) and you’ll find a ton of unique building materials. Your idea is very smart! I love the creativity.
Oh, heavens! Now you explain it, I see exactly what you mean, Tanya. The material the cubbies are made of looks wonderfully solid and long-lasting. Thanks for your patience answering my question. I clearly spend way too much time in the big box stores you mention, and not enough in our one true lumber yard, where I feel conspicuous among all the fine woodworkers. However… This conversation makes me realize that I need to get over myself and get better educated!
I’ve been admiring your kitchen since you moved in, so have to admit I feel a pang when you talk about it being temporary. The countertops are a special favorite for me. Sometime maybe discuss how they’ve worn over the years and whether you’re happy with the finish you used? I love the way you and your gifted family have made creative use of modest materials to pull together such a memorable room.
Author
I wrote this post late at night so I will definitely have to edit for clarity – sorry about the confusion. I am always happy to help because I’ve learned these things slowly and sometimes to hard way – if I can save someone time/effort/money I feel like I’m doing something right! The folks at my local lumber yard are so helpful. They always want to know my projects and sometimes I’m hesitant to share (because they’re nutty) but when I do, they never make me feel silly. I think most people who like building things like seeing other people build too – don’t be shy!
I should definitely do a kitchen update! I’ll give you a mini one now: the paint on the cabinets held up SO well. I had to fix a hinge because it caused the cabinet to rub so I did a tiny bit of touch up but otherwise they are still glossy and easy to clean. Our DIY counters still look good! A little loved, like a well used dining table, and one tiny spot of water damage near the sink where we didn’t seal properly. It turned a bit grey. We brushed the clear coat on there and sprayed everywhere else. I regret that! If we had sprayed all of the finish they would be perfect. But I’d give it a 8/10. We are ROUGH on the counters and they still look amazing. The painted vinyl floor has been outstanding! Honestly hasn’t worn or chipped. I’m stunned. All told, it looks pretty similar to Day One, save for a little bit of wear. No major damages or regrets (other than the brackets for shelves haha).
Reasons for renovating are to widen the U-shape by a few feet because it’s a bit cramped and there’s so much dead space between it and the dining room. I’d also like a new floor, that’s thicker so it transitions better with the hardwood. The painted vinyl is a good quick fix but I’d love a real floor. We’ll also go back to uppers again! Just for resale. And new appliances! I actually got an old dishwasher from a friend so that did tide us over but our appliances really need an upgrade. But it won’t happen soon. We can enjoy this together a little longer 🙂
Just saw your Instagram post and am smiling all over my face twice! Your encouragement is lighting a fire under me… this is the summer I do a Tanya on our kitchen! 😊
Author
Haha, I’m really happy to hear that!! I am SOOOO excited to see what you do.
This looks amazing! I would love to do something like this in our kitchen. Thank you so much for the inpiration and pictures
Author
Thank you, I’m so happy you like it! And that you feel inspired to try something like this – that made my day!
How did you do your wood countertops they look so sleek, you’d never know they are wood. I bought an old beautiful black walnut door that I am hoping to turn into my kitchen island. I have sanded it down and it’s great. The base of my counter is pale turquoise. I d love a white top on it, but also would love the grain to show. Would white washing look ok with a heavy duty marine weight varathane? Thanks for any help.
Author
Thank you! This post goes into how Hubby and his dad made them. And I talk about the stain and clear coat finish here in this post.
Your idea to turn a walnut door into a counter top is so clever – and of course I love the idea of pale turquoise 🙂
I have never white washed walnut before. My counters were originally maple so it was already a light wood. I’m sorry I can’t be of any help! If you’re nervous, you can always test on the underside. My inclination is always to leave walnut as-is, though. I have also never used a marine varathane – what we used is at the bottom of this post. But it sounds like a good idea to me. When in doubt, you can always contact the manufacturer and they can tell you about any potential problems using something differently than intended.
I’d love to see your project when it’s done!