This fire pit makeover and DIY ombre Adirondack chair project is a collaboration with The Home Depot Canada. All thoughts, opinions, and photos are my own.


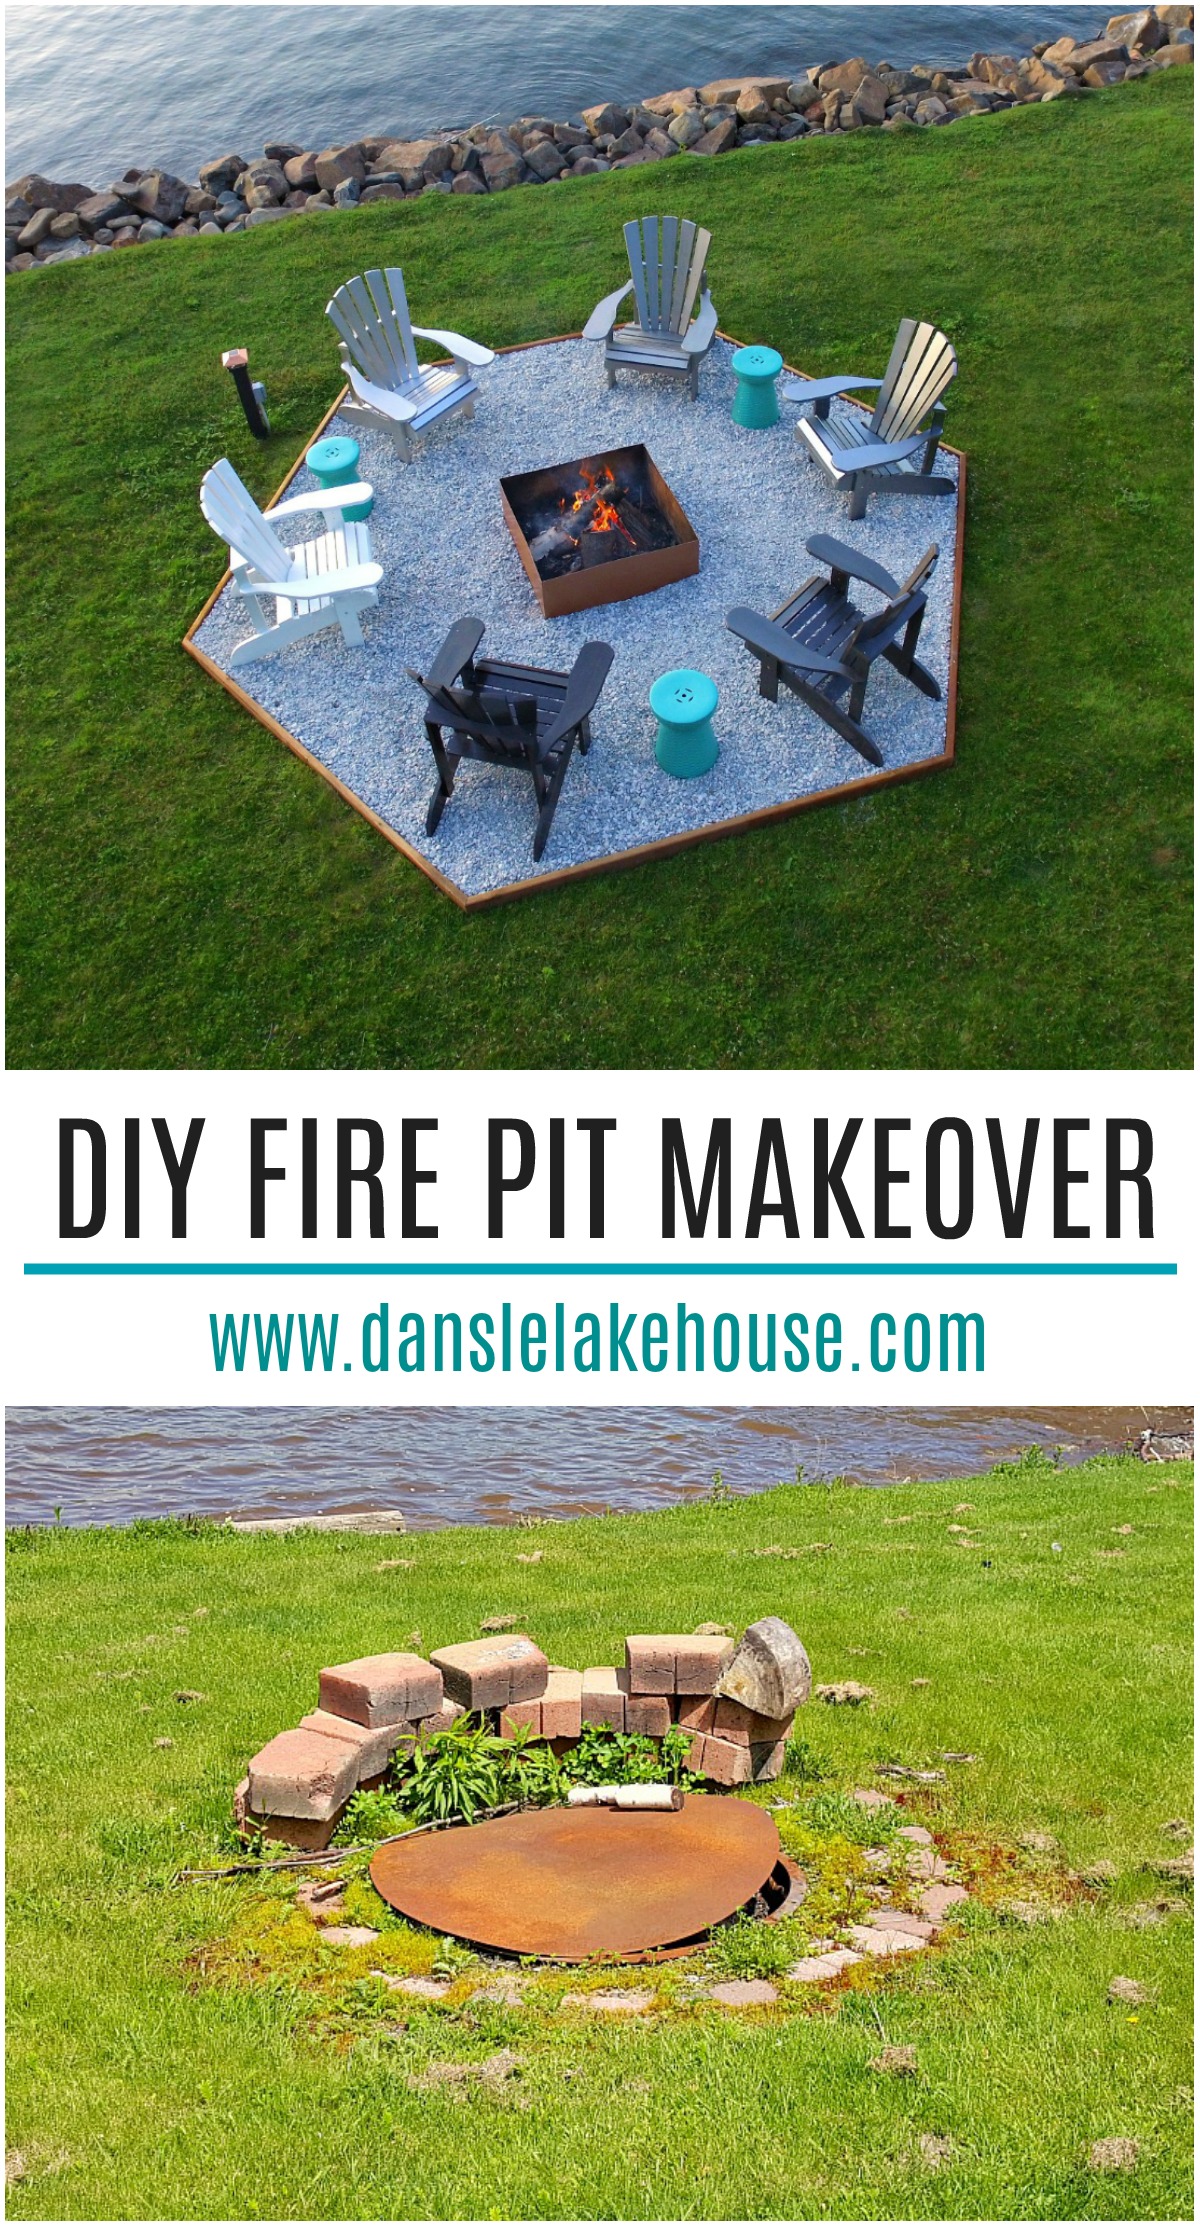
You might remember that a few years ago, Hubby and I gave our fire pit area a makeover. Here’s what it looked like when we bought the house:
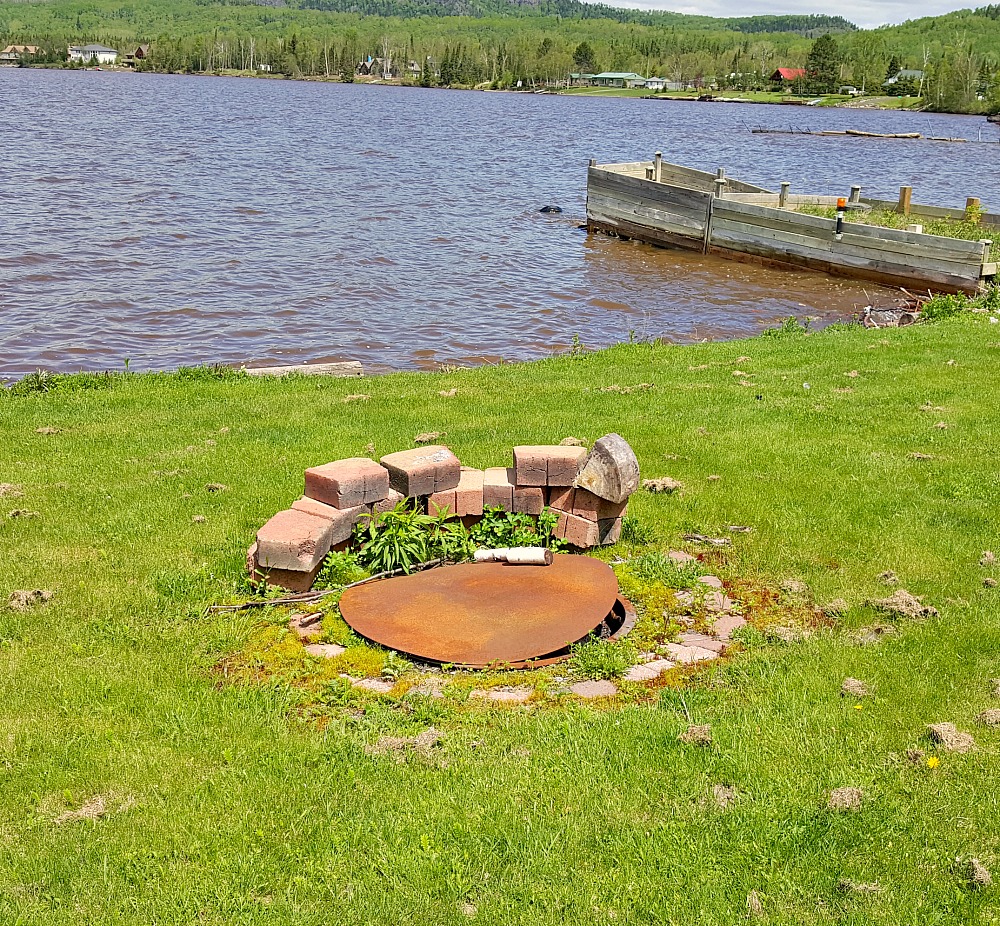
It was not really inviting. So we dug up what was there, welded our own modern fire pit and painted it copper. Then we carved out a square area from our lawn for a fire pit area. We framed it out with wood and laid down some landscaping cloth before we filled it with white dolomite gravel. It was such a simple project! To check out the DIY tutorial for creating the fire area and welding the fire pit, click here. The end result was a really big improvement:

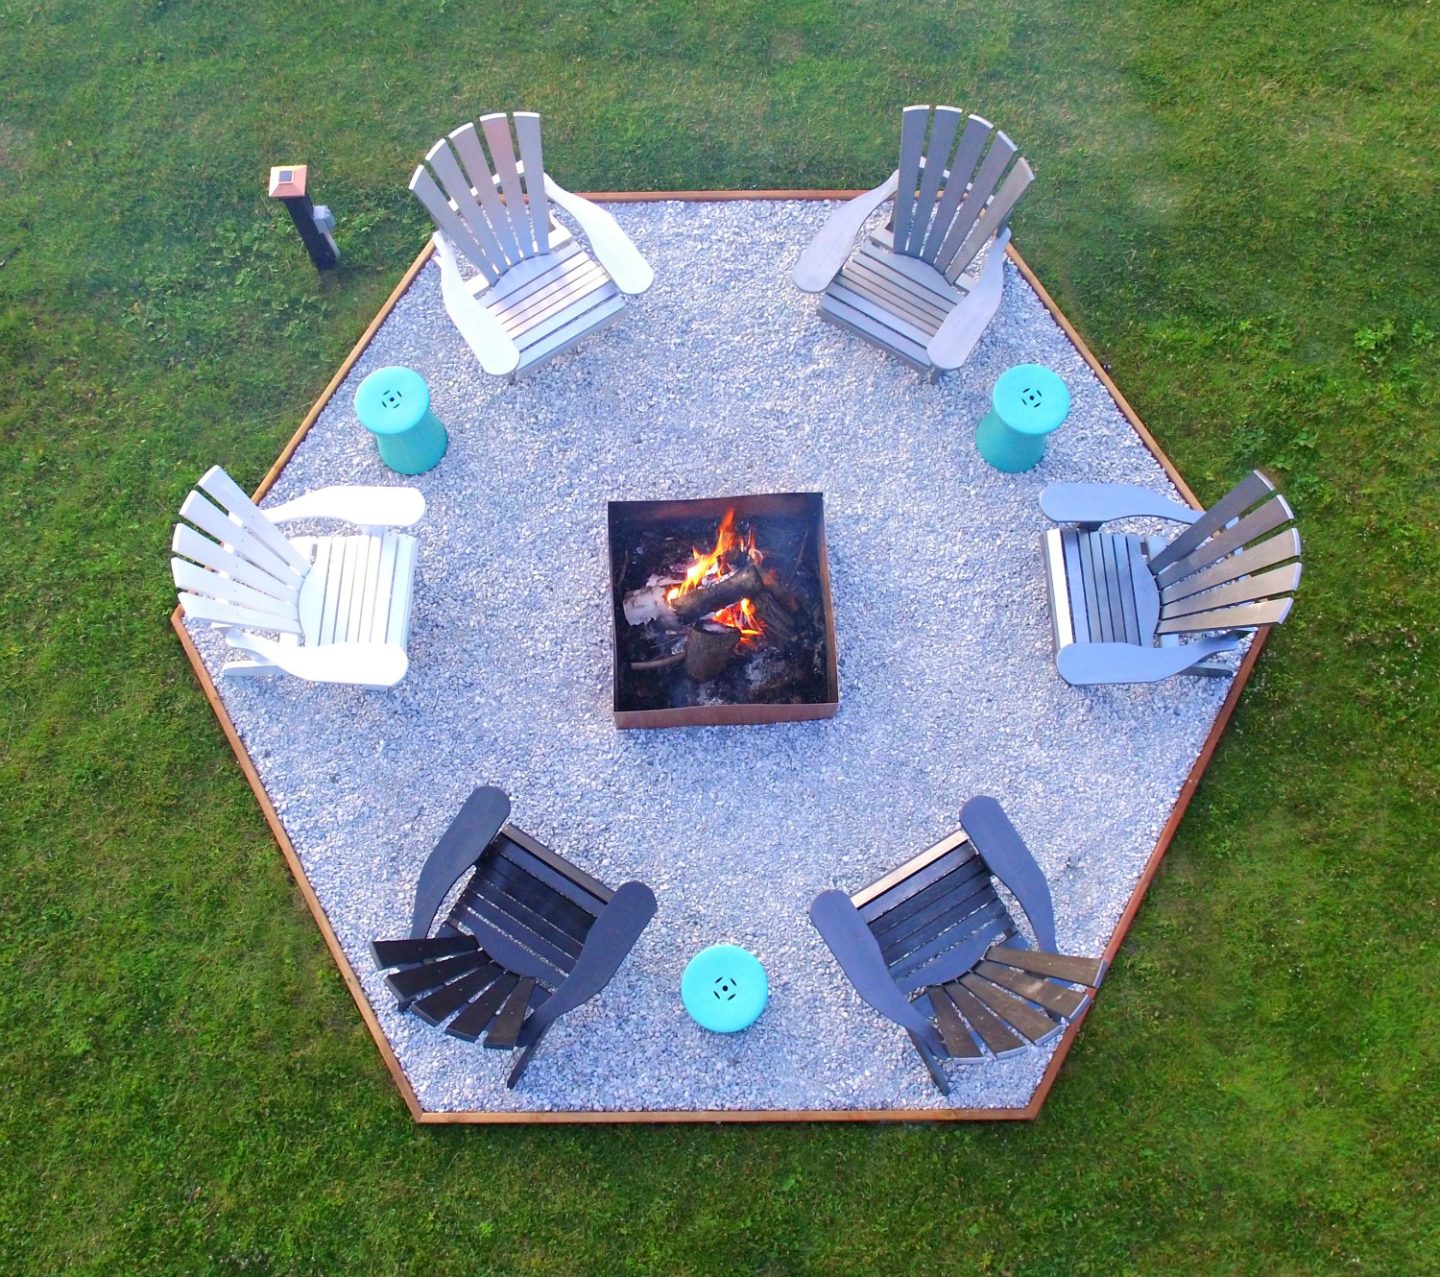
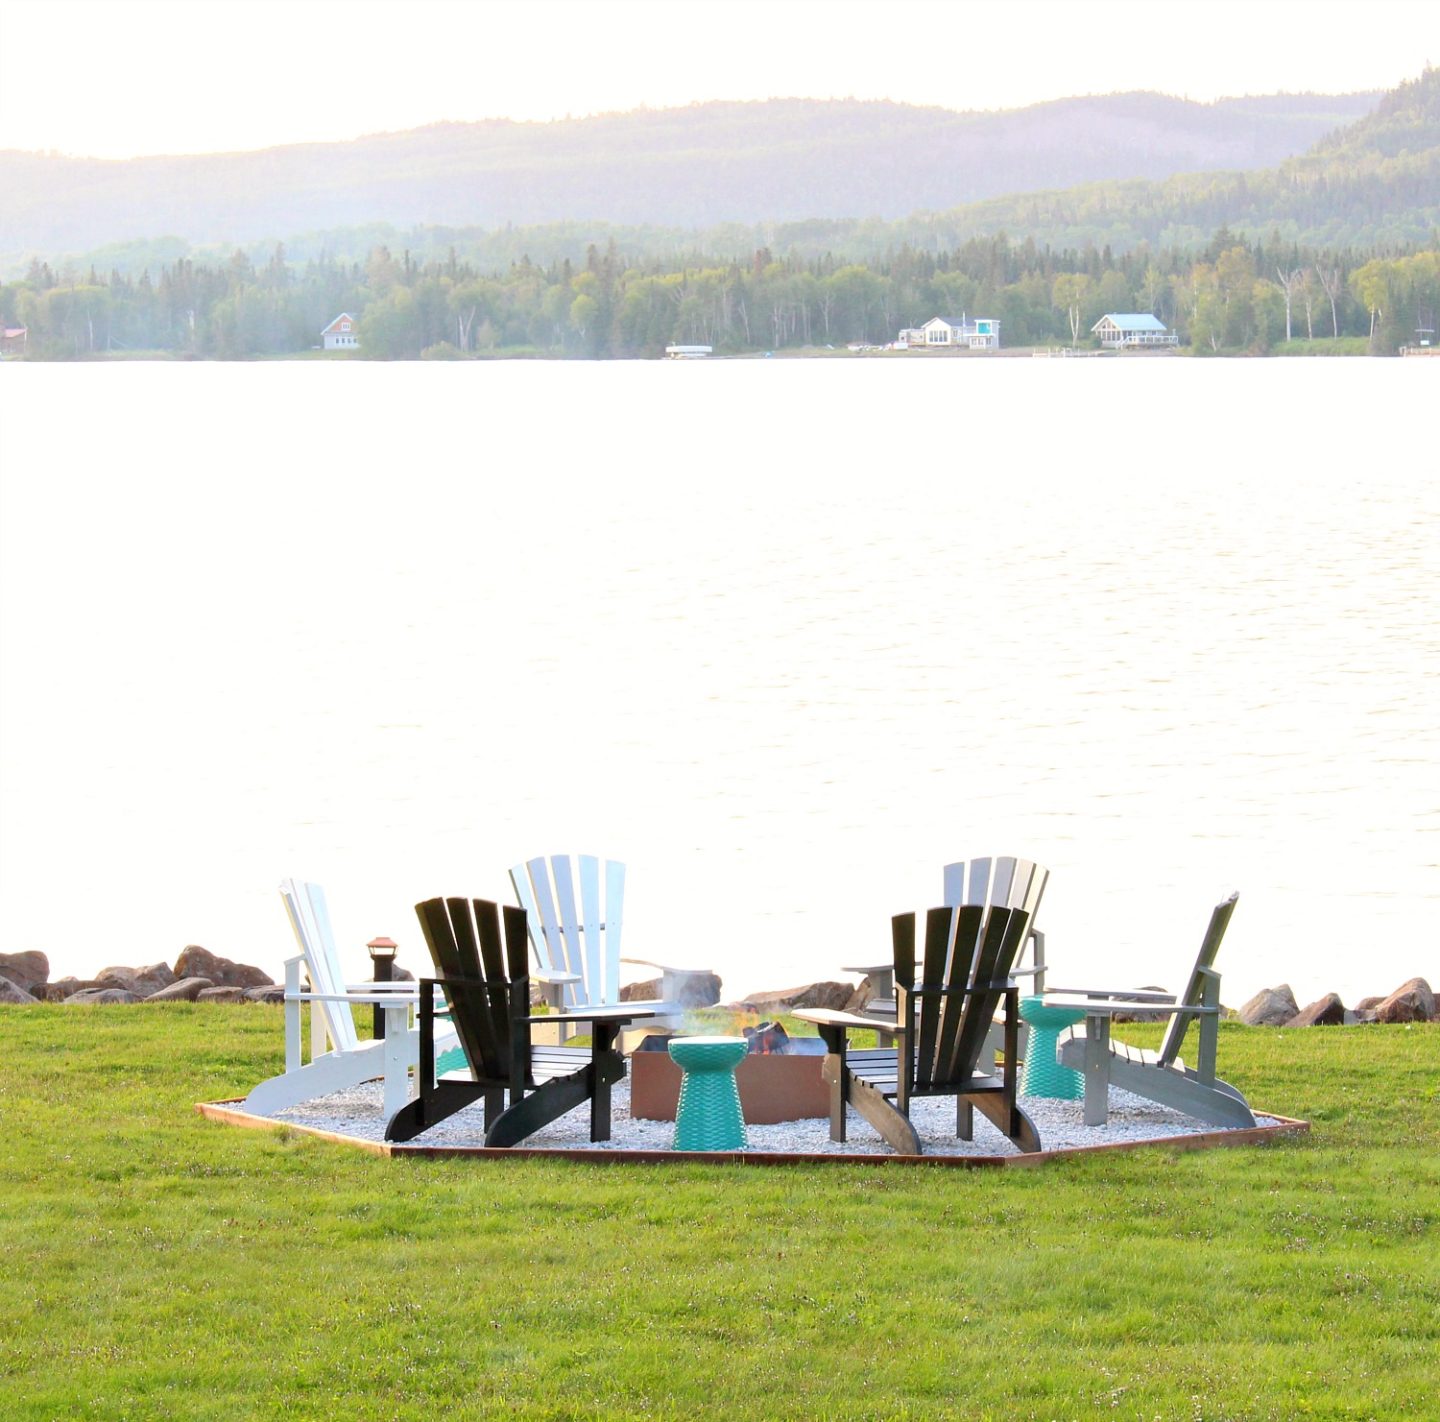
But it got a second upgrade this summer, and now it looks like this!


We always meant to get Adirondack chairs to complete the look, but time kind of seems to move more slowly and more quickly on Lake Superior. I actually can’t even believe that we did the original fire pit makeover way back in 2016! Temporarily, we used a really comfy set of chairs that belonged to our old patio dining table set (from our townhouse days!) and those just sort of stayed.

The problem was that every now and then an ember would land on the fabric, so we had singed huge holes in some of them. Oops! Plus they were so light, that the epic winds off the lake would toss them around. Admittedly, the patio dining chairs were also kind of the wrong “vibe” for around a fire pit…

It was finally time for some proper Adirondack chairs!

I chose these Cape Cod Wormy Maple Adirondack Chairs from The Home Depot Canada, because they’re really solid and heavy. I also love that they’re made in Canada! The kiln dried pine version of these Adirondack chairs are much more affordable, but also a bit lighter – but if wind isn’t an issue for you, they’re a really great choice for painting.
Although the wormy maple is beautiful, I wanted to paint them to complement our new dark and moody house exterior. But it was so difficult to decide on a color! At first I thought about doing all copper to match the roof, or maybe all black? Then I thought a mix of metallics (copper, gold, bronze, silver…) would be fun – or maybe just go with my fave: turquoise? Turquoise ombre? In the end, I decided that a graphic black to white ombre, in all metallic finishes, would look gorgeous! Here are the colors I chose (Pearl Mist is sheer, so I had to layer it over as a solid white):

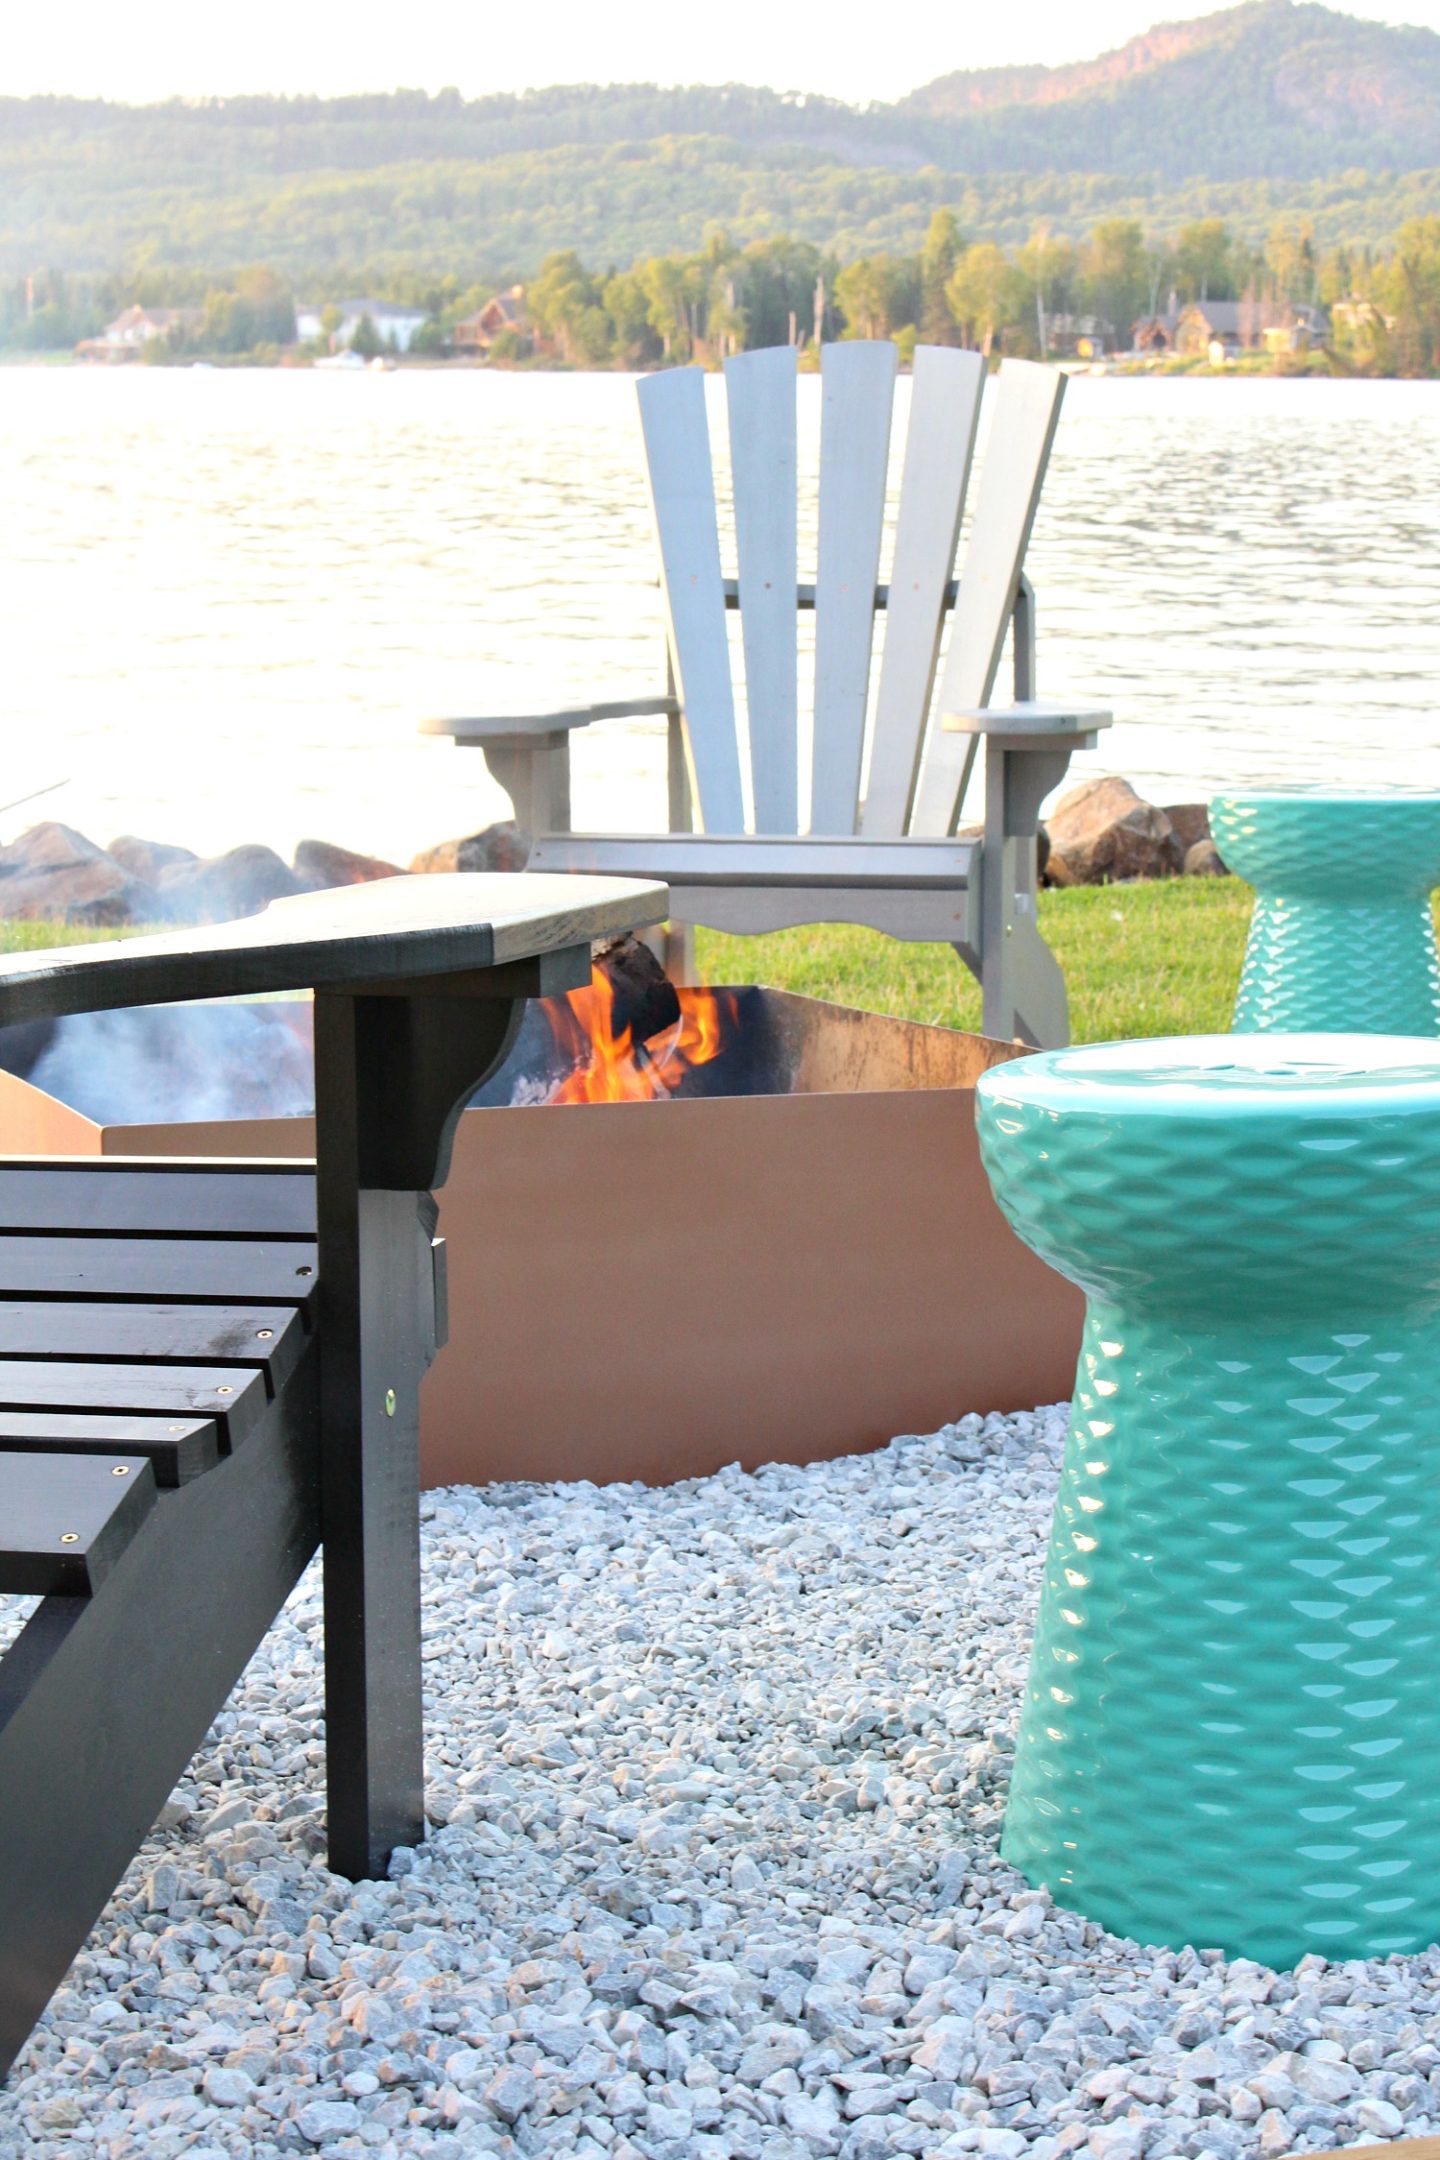
And here they are on the chairs! It’s difficult to capture in photos, but the metallic on these chairs really catches the light and just shimmers. 
To paint the Adirondack chairs, I lightly sanded and then laid out all of the pieces prior to assembling, which made it easier to create a factory-like finish. I sprayed a side, let it dry, and then flipped it over. When it was completely dry, I assembled each chair – this way the hardware stayed un-painted.

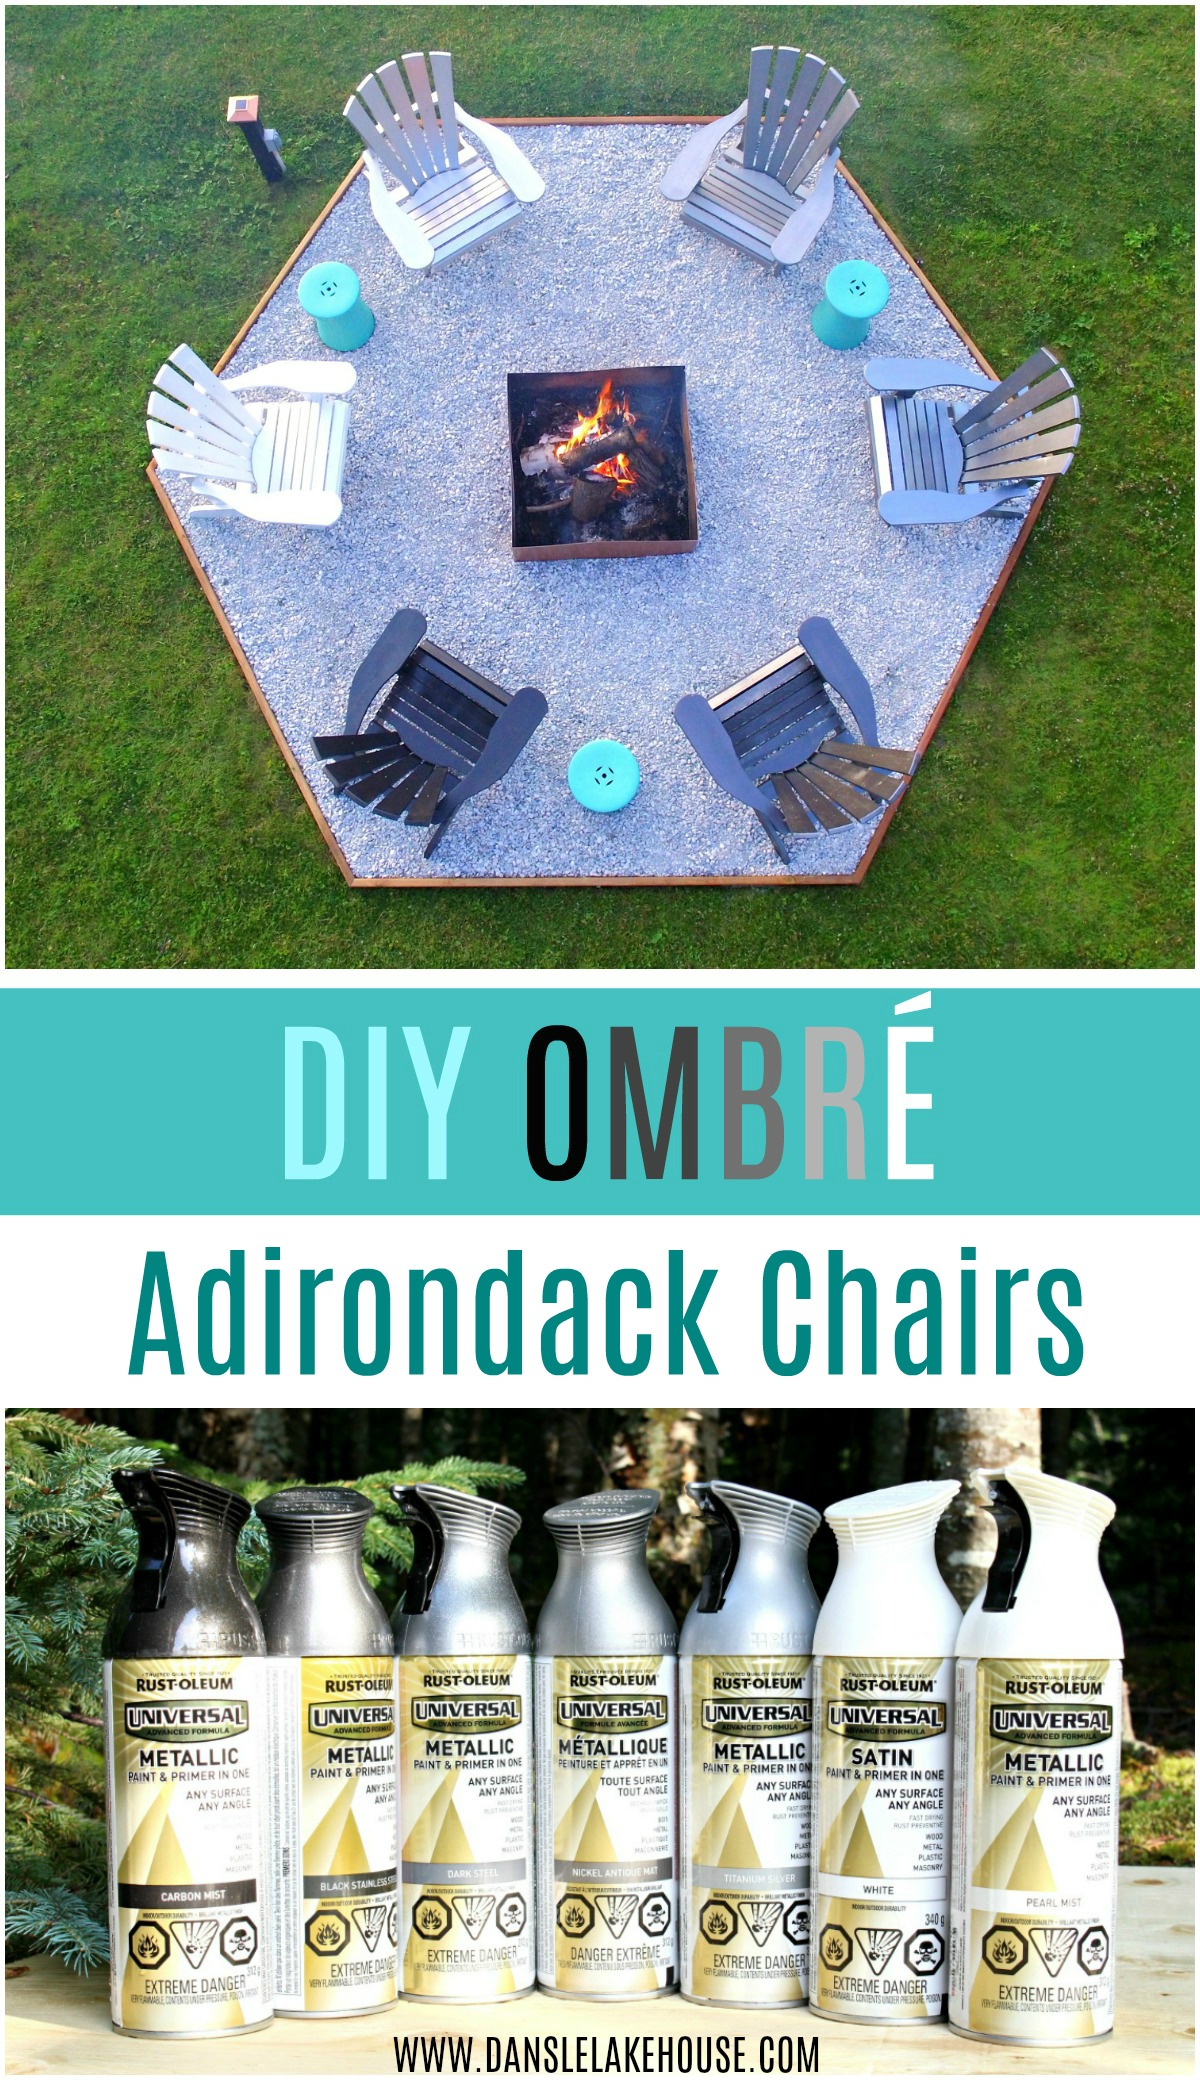
Because the ground had settled a bit (remember our shore erosion problems?), we decided to build up the gravel. And then the project blossomed, as all good projects do. We decided to turn the square fire pit area into a hexagon (Hubby’s excellent idea!) to better accommodate six chairs. So we built a new frame using pressure treated wood (Sienna pressure treated lumber in a 2 x 6 x 8′). Then we laid down some extra landscaping cloth where it was needed, and got a fresh truckload of white dolomite gravel. Don’t forget to check out the original DIY fire pit makeover to see more detailed instructions.

Shoveling a 3/4 tonne truckload of gravel is never fun, but it was worth it though because the new gravel is so bright and white – and clean! The whole area looks refreshed and it’s so much more fun to enjoy the sunset down by the shore now.
I completed the fire pit makeover with some accessories from The Home Depot Canada. Three Safavieh Daphne Patio Stools (in Aqua) provide each pair of chairs with a spot to set a drink or book. Of course I love the aqua hue, but I also thought the pattern looked a lot like the ripples on the water. Come winter, I’ll find spots for these inside as plant stands or end tables. The ceramic is heavy enough that the wind won’t toss them around outside, but it also lends a more sophisticated vibe so these can transition easily into indoor pieces.


I also added some Hampton Bay Bo Stripe outdoor cushions – but I don’t always remember to put them back out after a rainfall! I just couldn’t resist them because they completed my color scheme perfectly.

So that’s our fire pit makeover! What a difference a year makes! The house exterior is (mostly) done and the shore erosion rock wall is holding strong – now we have the perfect place from which to admire it all. Because this fire pit area is smack dab in the middle of the yard, the view from the house is greatly improved too! I love seeing this from the living room window, plus it kind of beckons us to come down and enjoy the lake sunsets.


Sources: Adirondack Chairs | Striped Outdoor Pillow | Turquoise Garden Stools | Fire Pit (DIY)
Huge thanks to The Home Depot Canada for collaborating with me on this fire pit makeover and ombre Adirondack chair project! I’ll be working with The Home Depot Canada on some other outdoor projects, so stay tuned.

That is so inviting to view the sunsets from. The hexagon shape really sets it off–great idea! And just the right touch of turquoise too. Really nice update, Tanya.
Author
Thank you! It was Hubby’s idea to create the hexagon shape and it was so smart. I’m so glad you like it, I was really excited to share this makeover.
Love this! The hexagon, the rocks, the chairs and the view! 🙂
Author
Thank you! It’s taken some time to work this area, making improvements bit by bit, but I’m really loving it now.
Hi there! This is wonderful! I’m having trouble locating the white gravel locally; just wondering if you think 2-4″ round stones would work for this purpose? How big is the gravel you used?
Author
Thank you! I think our dolomite is about 3/4″ (ish, there’s a lot of variety). My fear with 2-4″ round stone is that it won’t pack and settle properly – you’ll find it’s sort of rollie pollie to walk on. Something with a variety of sizes and not round is better for something like this because, like a gravel driveway, you want it to pack and settle. If you can’t find the dolomite, I’d try sources another smaller gravel of different sizes and overall smaller than 2″. Pea gravel is another type/name you might have more luck with as it is very common in landscaping.
Did you guys just screw the hexagon shape together or did you guys use fasteners to keep the shape sturdy?
Author
I’m not sure what you mean by fasteners? We used screws and it holds the shape perfectly 🙂
Hello, What are the lengths of each side of the hexagon? Is each side 8ft long?
Author
Yes, they’re 8 feet long.
Hi There!! This is such a wonderful idea to make it a hexagon shape. I have a square fire pit I purchased from Walmart some years ago and it looks wonderful in this shape. Thank You for sharing you idea!! Right on time for 4th July cookout..
Author
I’m so happy you like this idea. Thanks so much for leaving a comment to let me know. Hope you have a wonderful 4th of July celebration!!
This looks great! What is the distance from the boarder to the fireplace?
Author
Thank you! From the fire pit to the edge of the wood is 5’3″ at the narrowest spot and 5’11” at the widest. I would, if I could got back, make it a bit bigger because sometimes I make a really HOT fire and it’s almost too close to sit, lol. But we also have a HUGE fire pit and I burn big brush piles in it after I’ve cleared out the woods – not the usual small fire pit kind of thing. But just for a normal sized fire in the fire pit this distance is nice.
So beautiful and inspiring! Did you guys stain the wood used for the frame?
Author
Thank you! No, we used pressure treated wood. Because it sits in the ground, that will last longer.