Today I’m showing you how to paint cabinets, plus my Sherwin Williams Emerald Urethane Trim Enamel paint review. If you’re keeping track, this is the third time I’ve painted my wood kitchen cabinets! We keep having to push back the date for a real kitchen renovation, so in the meantime I’ve had a lot of fun tackling different DIY projects in my little beachy kitchen. Over the years, these are the DIY kitchen makeover projects Hubby and I have shared:
- How to make DIY wood counters from scratch
- How to Install easy wall paneling
- How to paint vinyl floors so it lasts
- How to install basic DIY open shelving
- How to make asymmetrical DIY cubbies
- How to paint cabinets with a paint sprayer
- How to install tongue and groove paneling to the backs of the cabinets
- How to repaint painted cabinets (this time teal which landed me TWO print magazine features!)
- How to strip painted cabinets back to wood
- How to paint wood cabinets – again
See a Look Back at All of the DIY Kitchen Versions Here
Click the link above to see every version of this DIY kitchen makeover – going all the way back to the before! It surprised even me to see how many changes I have made over the years…

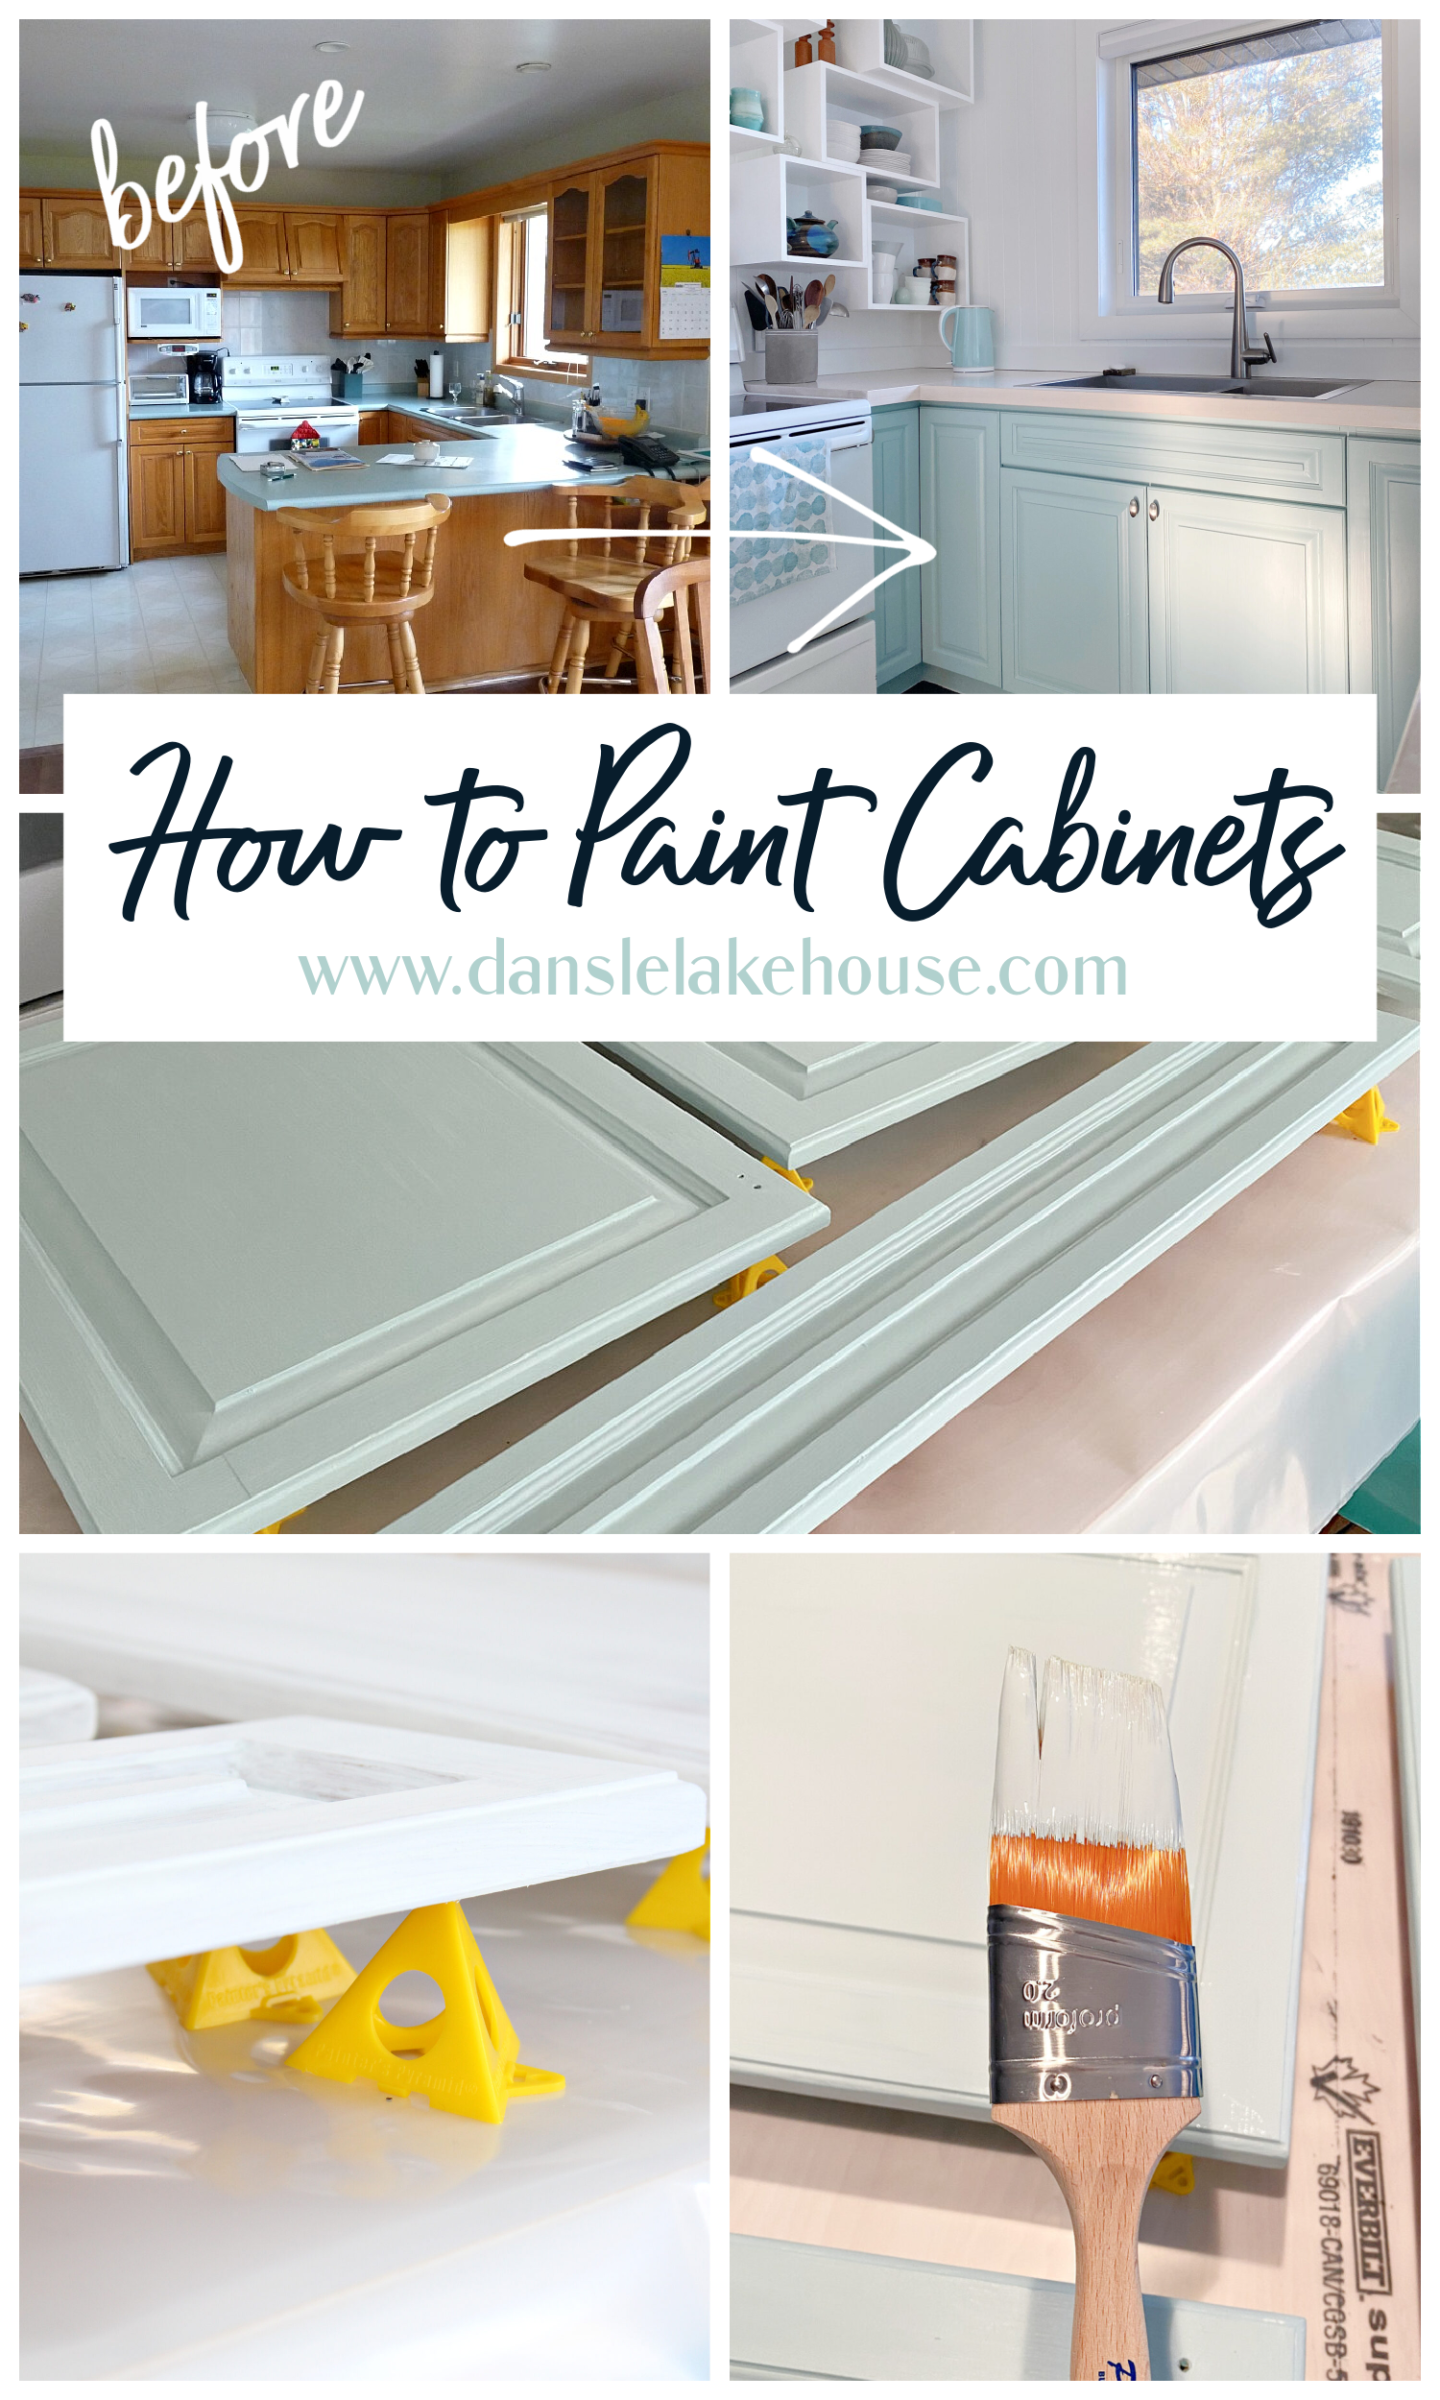
Wood Kitchen – BEFORE
What Paint Brands Have I Used to Paint Cabinets?
For the first version, I used Zinsser Primer with Premier Paint (held up SO well!!), for the second version I used Behr Cabinet & Trim Enamel (that was disappointing because it didn’t hold up to wear), and this time I used all Sherwin Williams brand primer/paint.
What is the BEST Paint for Painting Wood Cabinets?
Good preparation is key and will make or break any paint. For the first round painting cabinets, the Zinsser Primer with Premier paint held up VERY well. No chipping/peeling. It’s a more budget friendly option. But the Sherwin Williams Emerald Urethane trim enamel paint is really excellent quality. Sherwin Williams provided the paint for my Mom’s mid-century dining room and living room makeover and we LOVED it! It was a welcome upgrade because the Sherwin Williams paint has incredible coverage – way better than Behr, which was my go-to for the last couple of years. But I really didn’t know what I was missing! Honestly, I thought it was good quality paint but it’s watery compared to Sherwin Williams. To make sure I was unbiased, I decided to BUY my own Sherwin Williams paint for this cabinet makeover to make sure I loved it when I spent my own money. And let me tell you, I definitely did spend my money! The paint is expensive but the coverage was just as incredible as the paint we used on Mom’s walls and, and the finish is just perfection and it’s incredibly durable. I’m so thrilled! Although I had a bit of trouble with the primer, I LOVE the paint! Today I’ll show you how I primed and painted the cabinets – along with a couple of new products that made the job even easier (why didn’t I buy these earlier?).
Here’s What I Used to Paint My Cabinets:
- Sherwin Williams Exterior Oil Based Primer
- Sherwin Williams Emerald Urethane Trim Enamel Paint (color: Watery; finish: Satin)
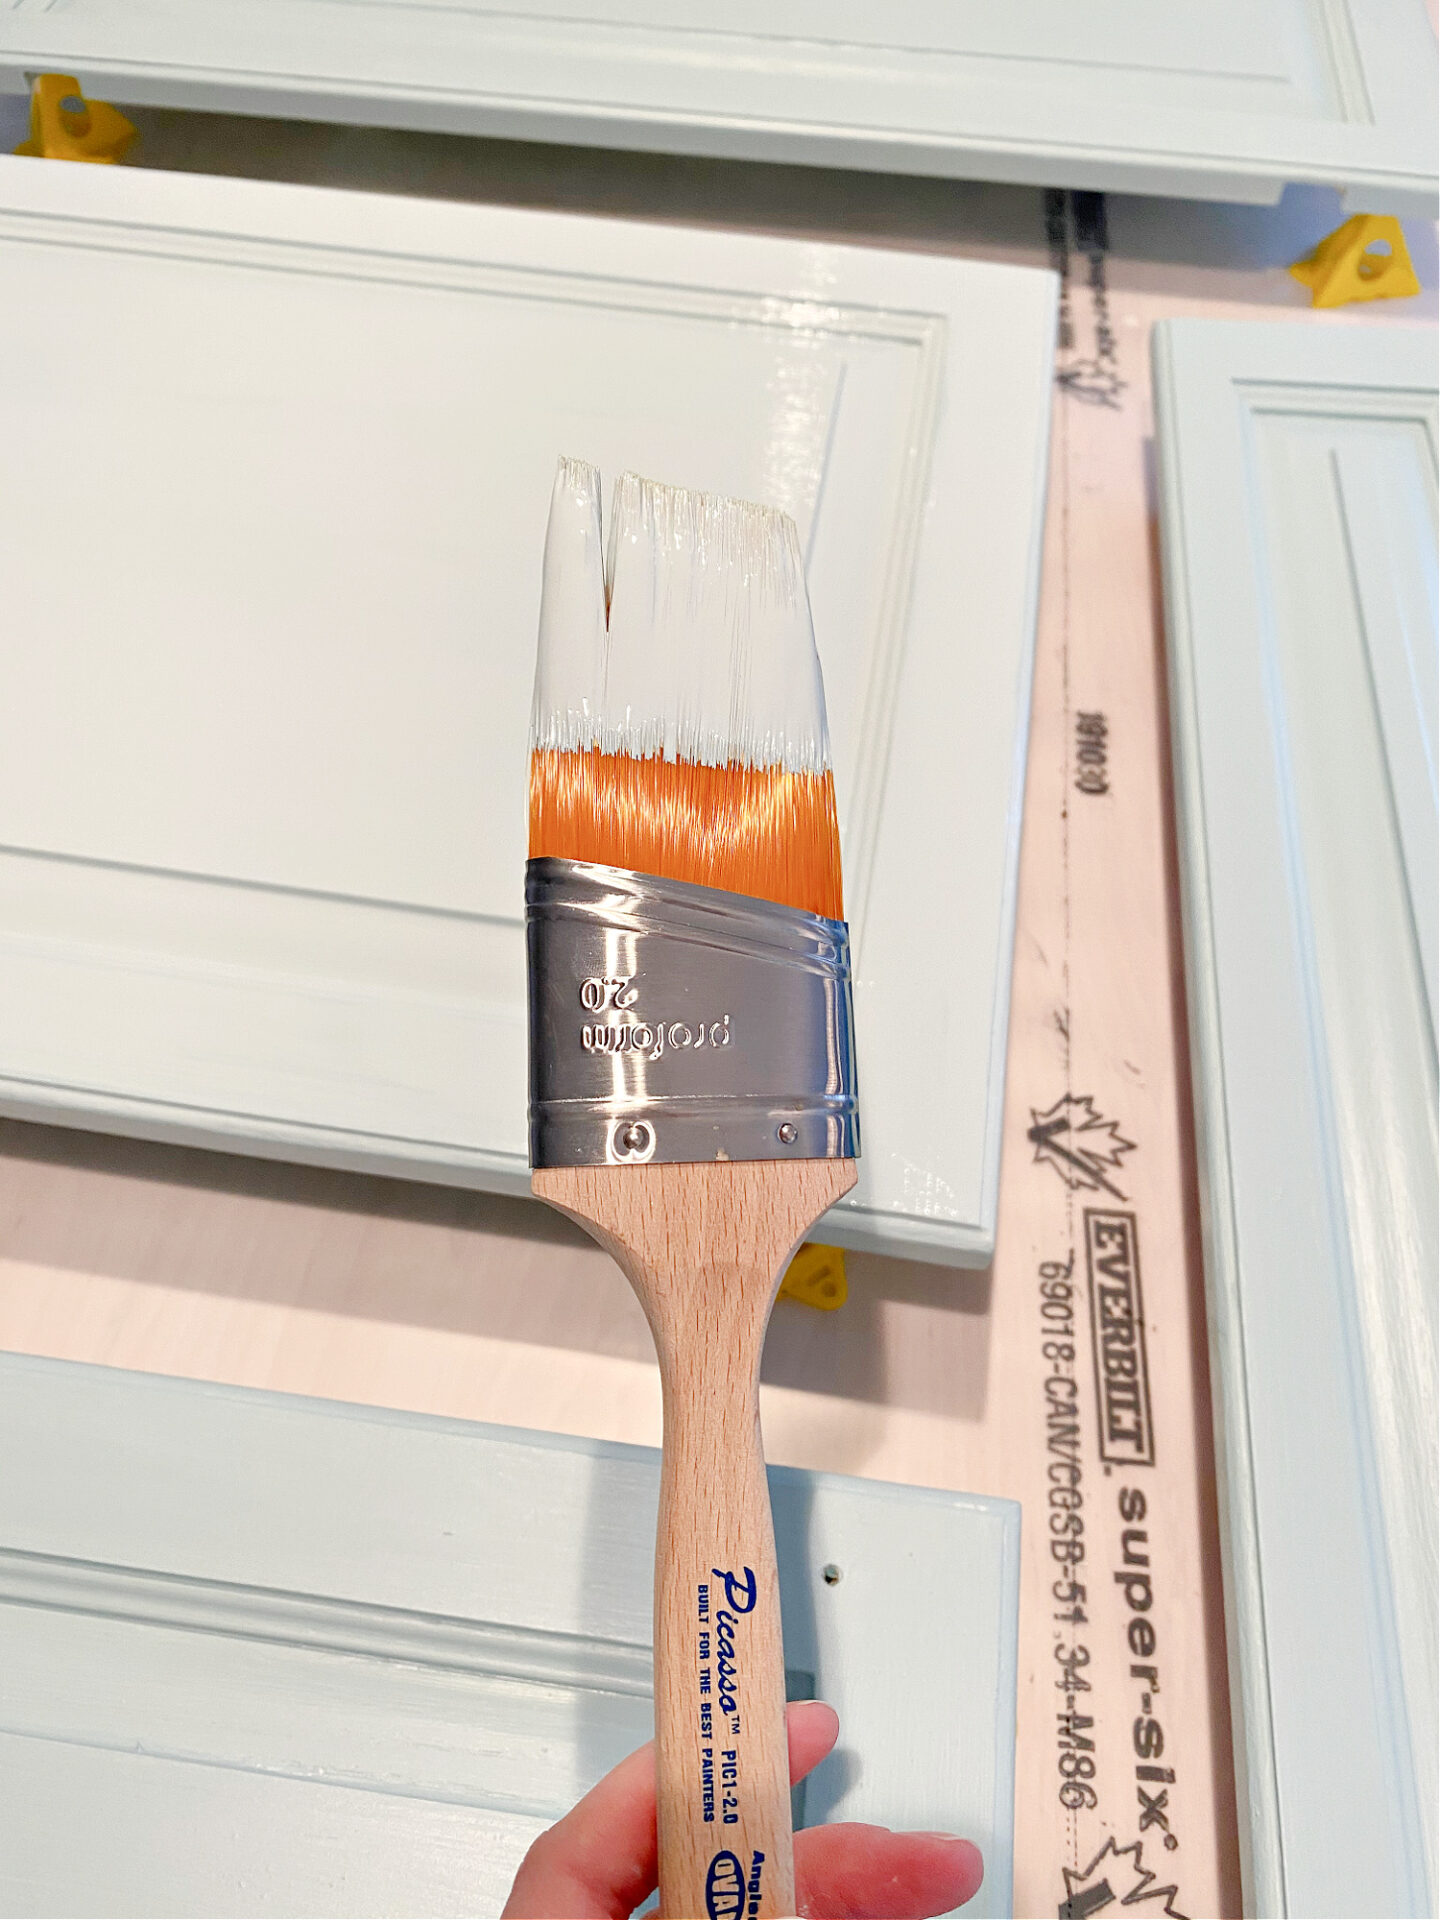
- Proform Technologies Picasso Oval Sash Paint Brush
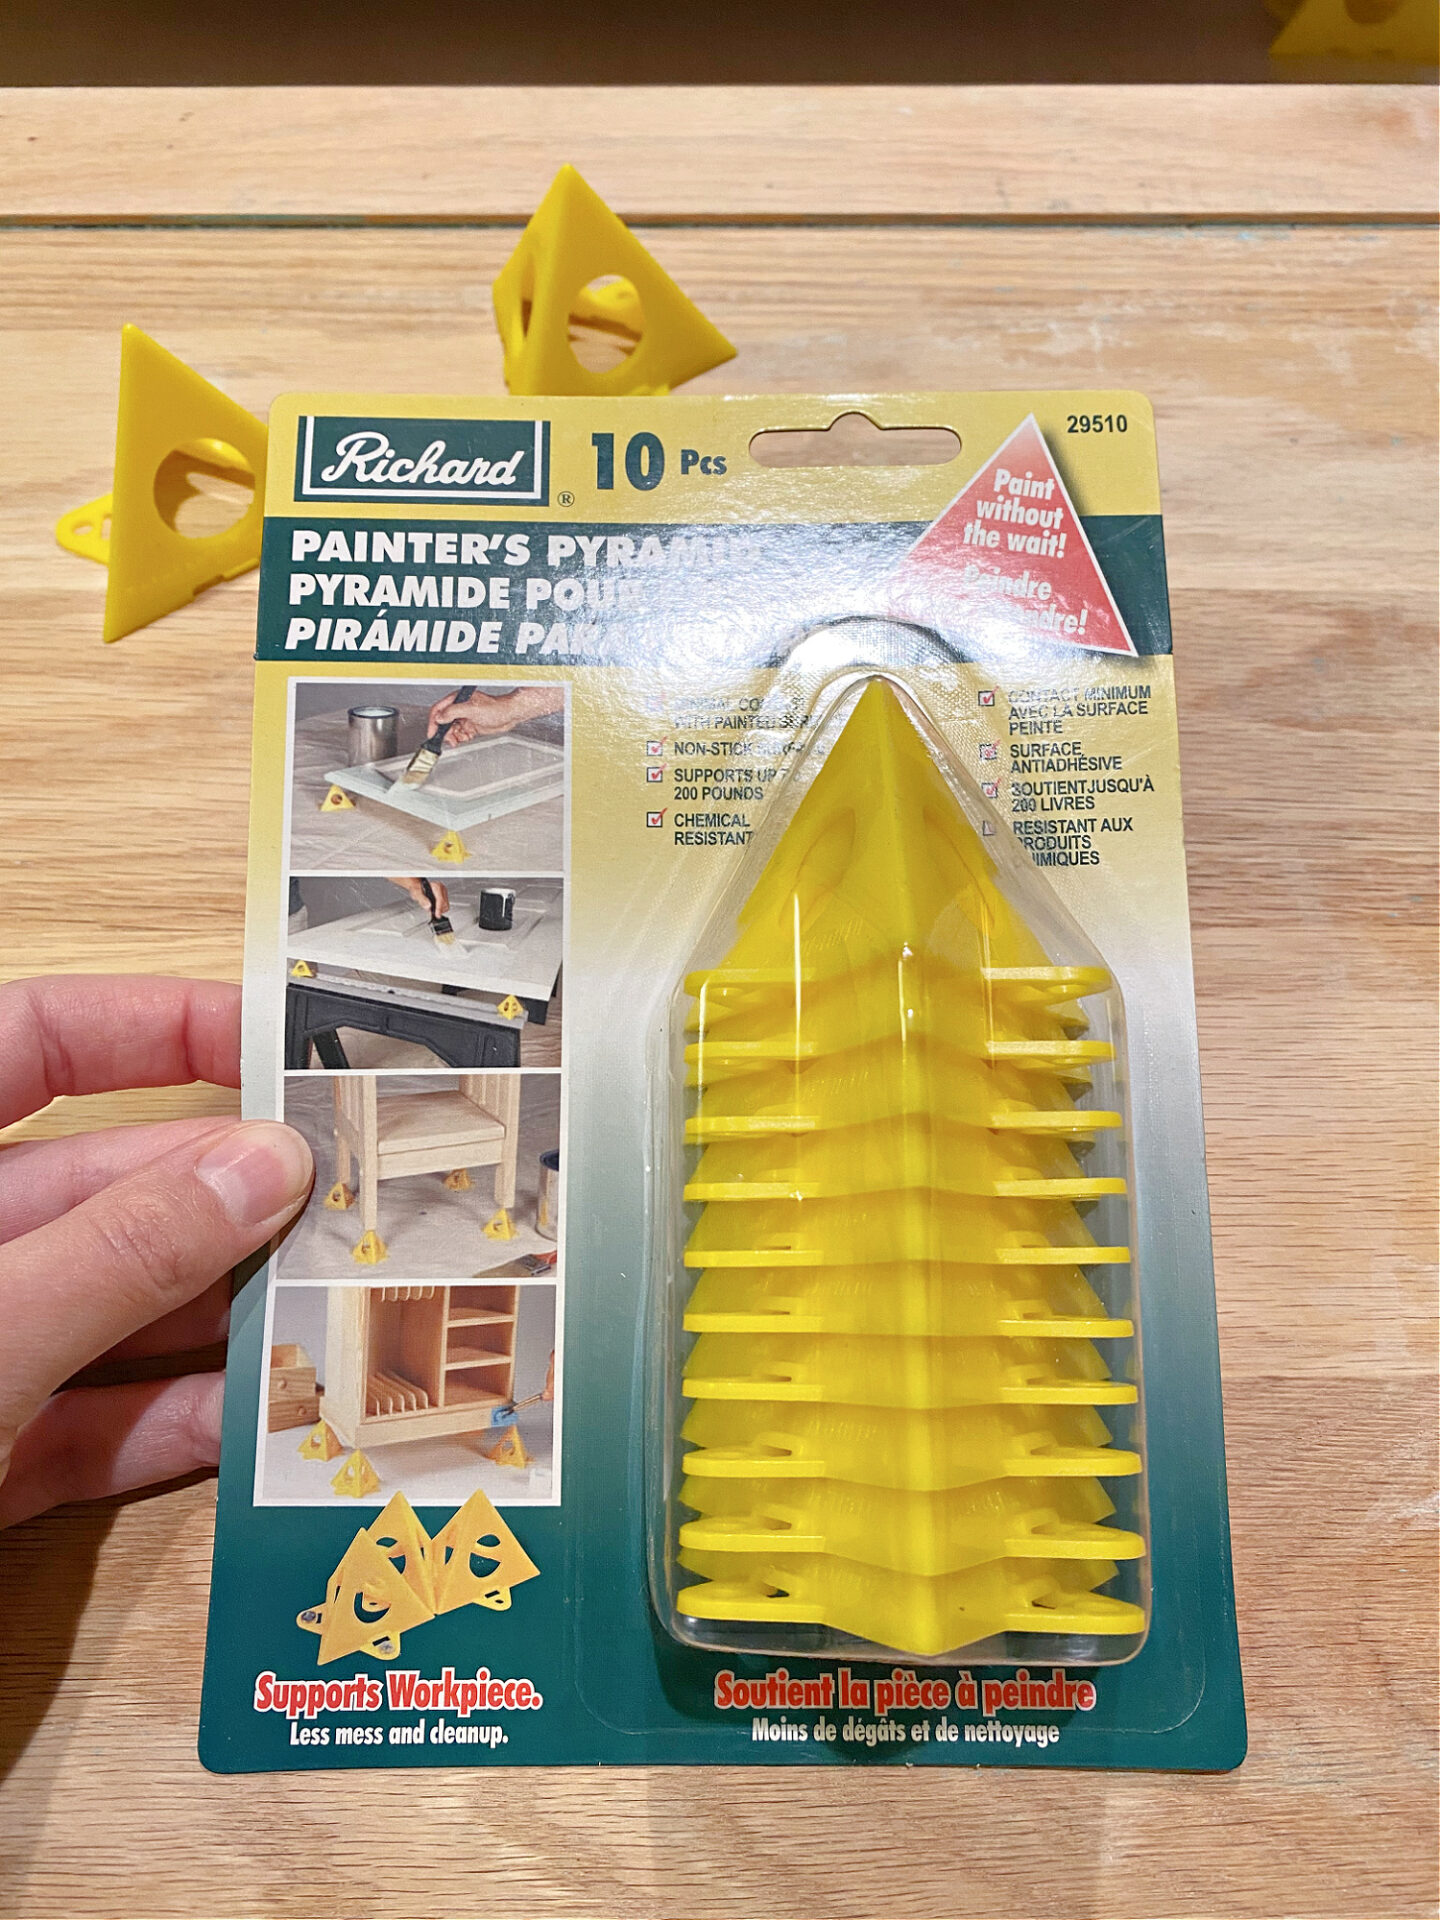
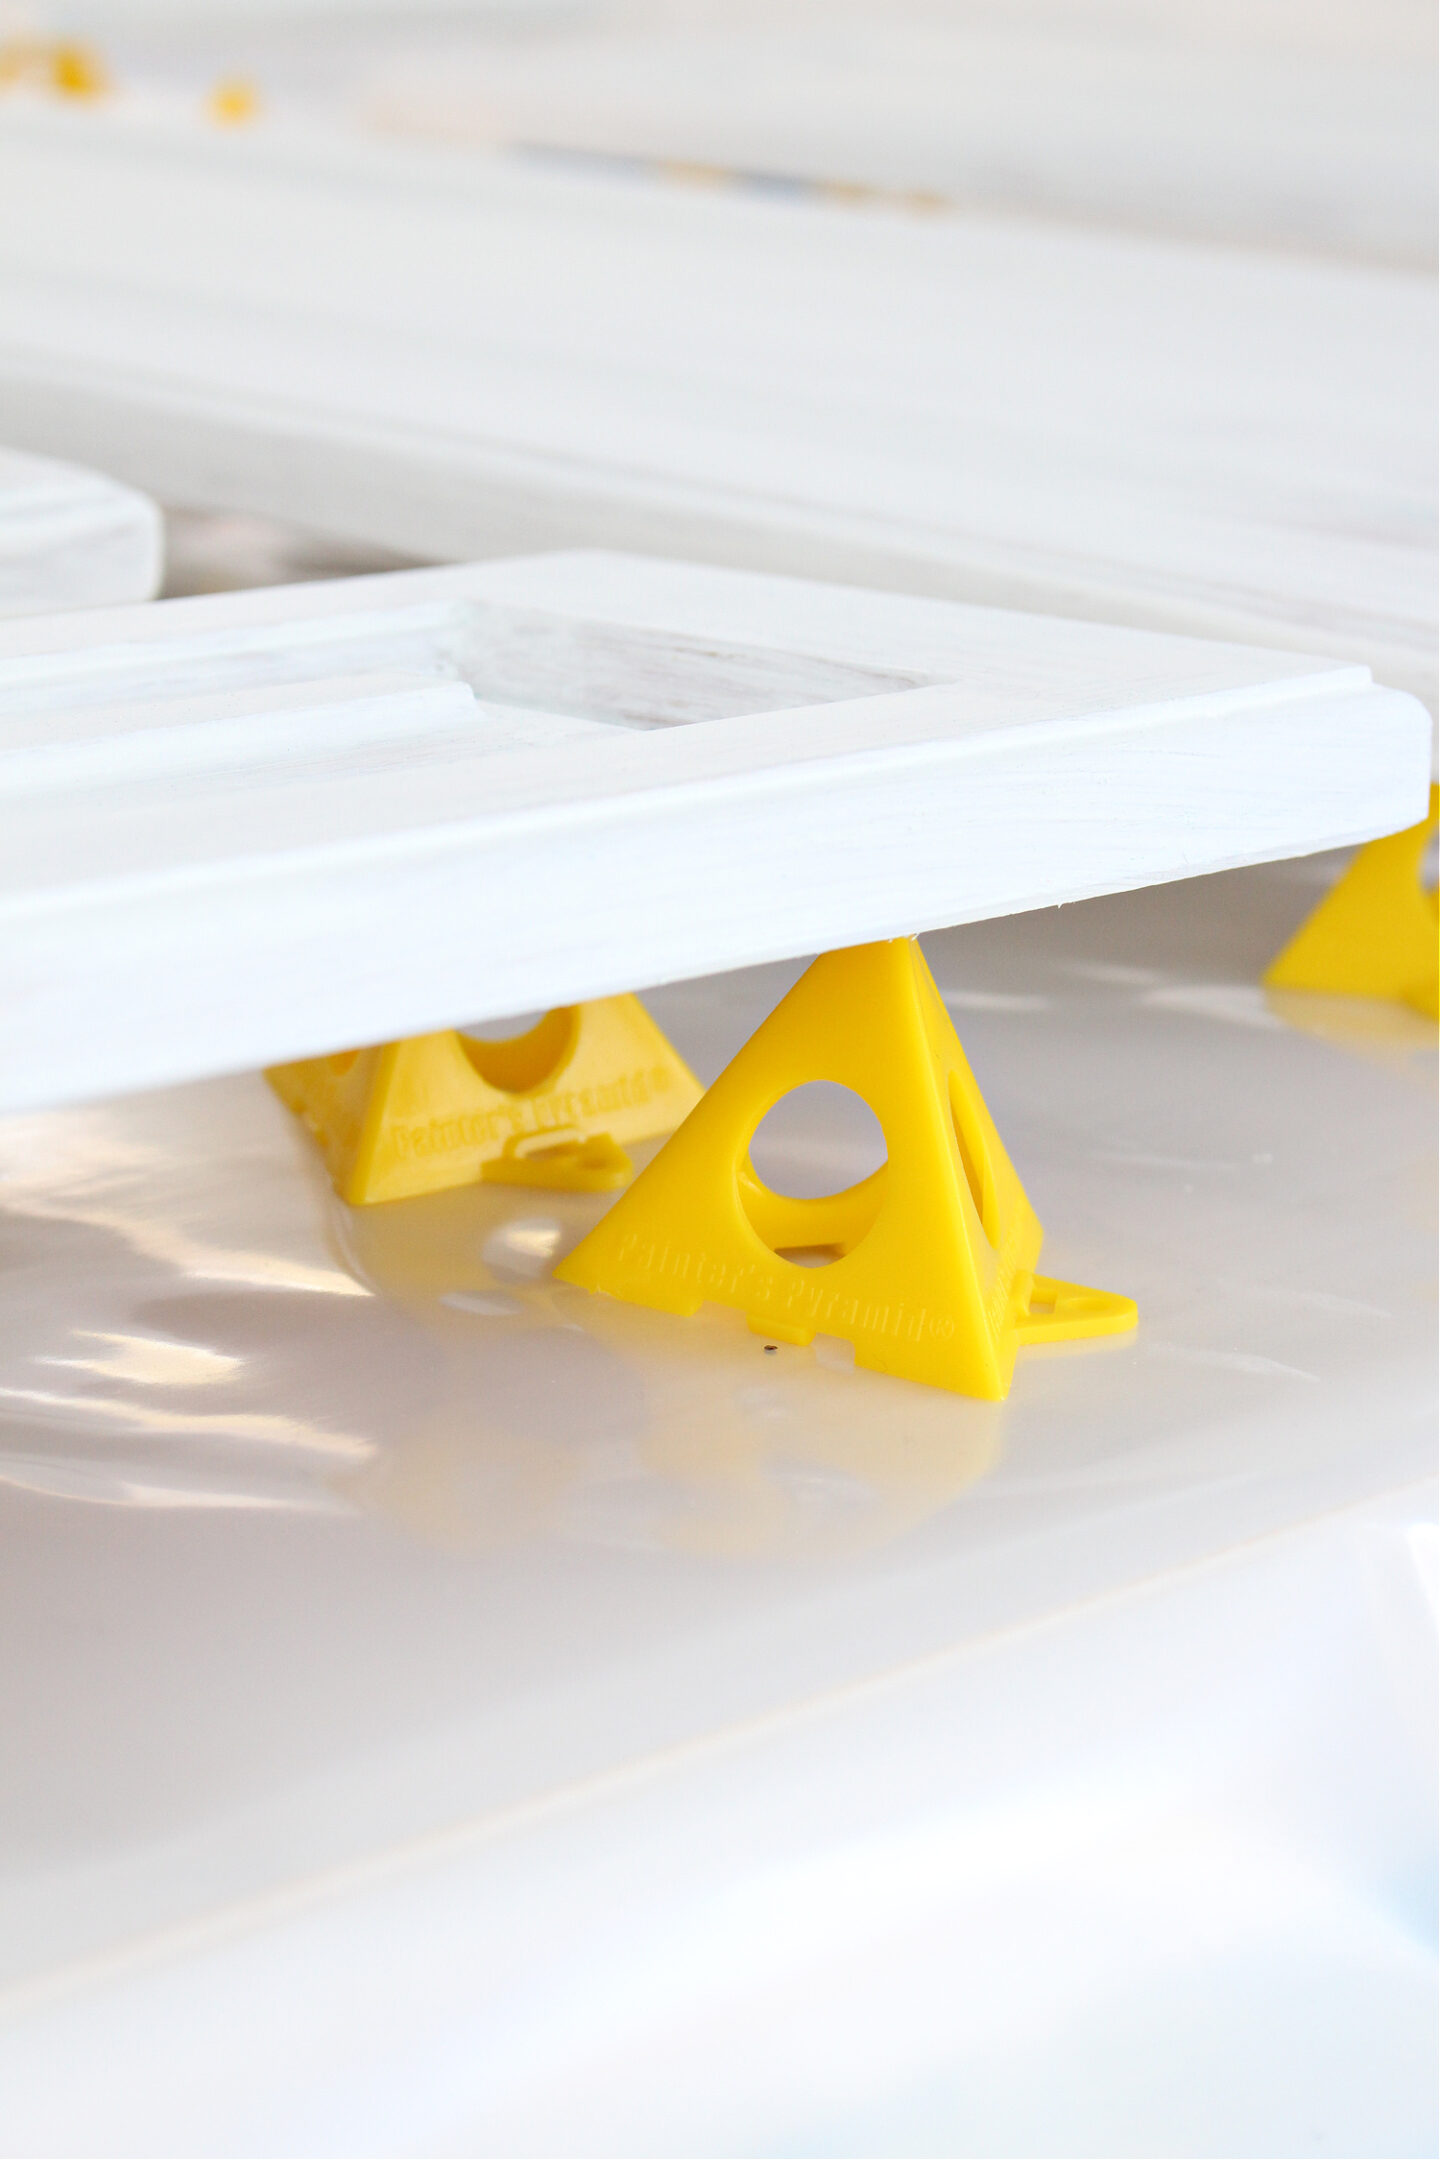
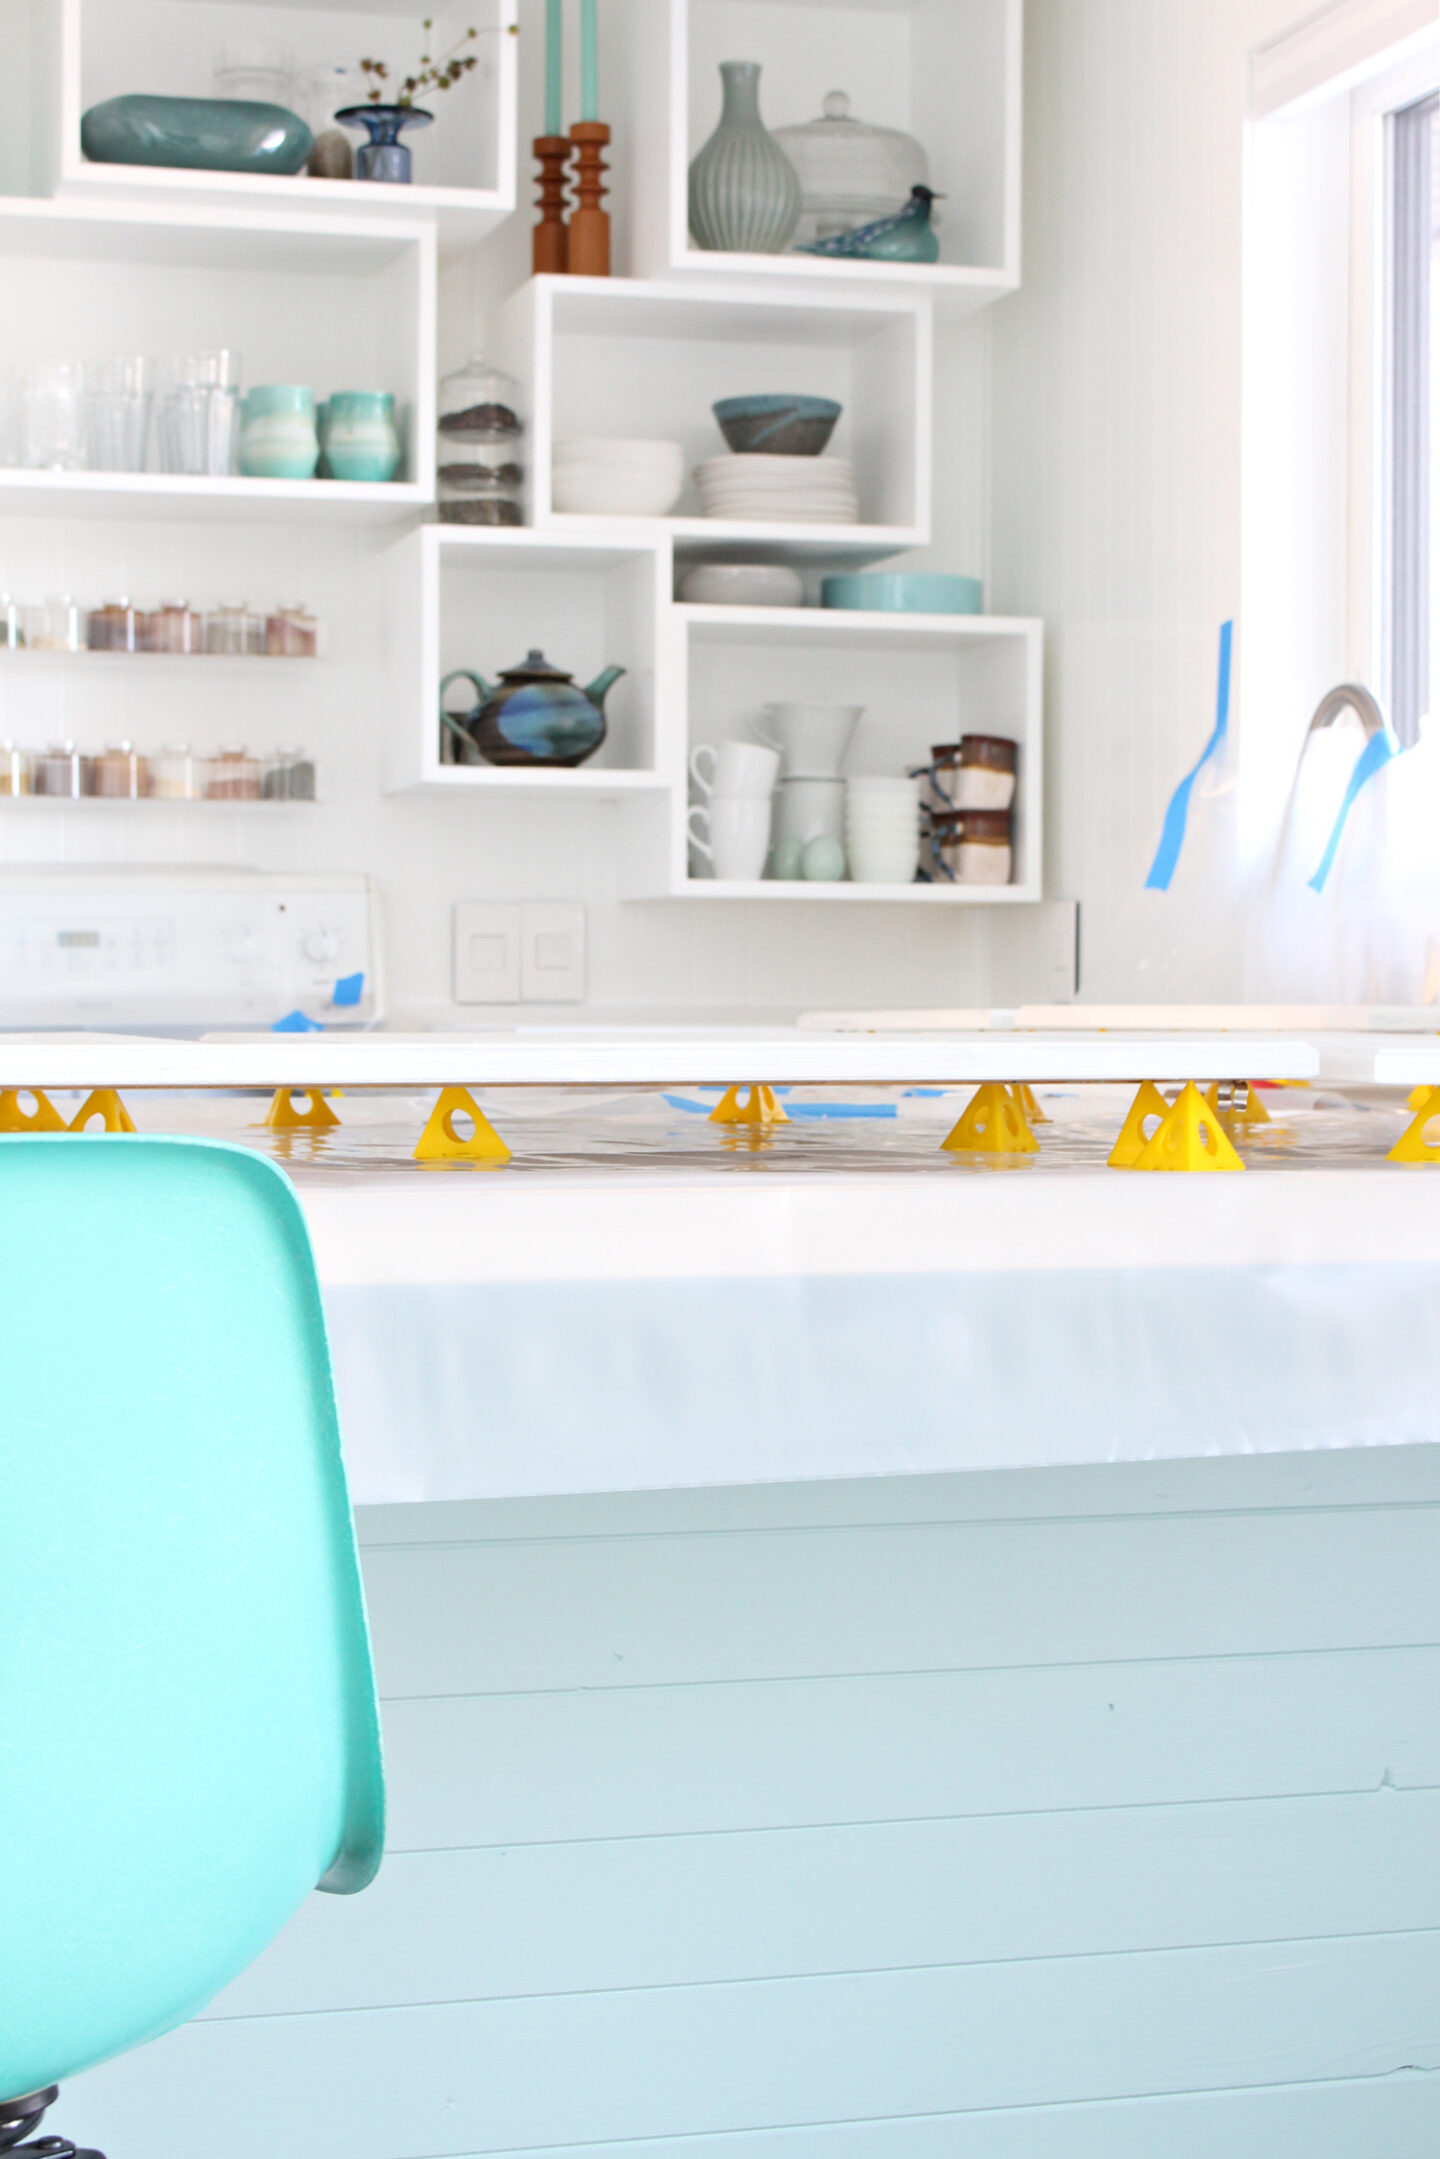
- Painter’s Pyramids
- Small Plastic Container
- Drop Cloths (I use old vapor barrier)
- Painter’s Tape (to secure drop cloths)
Here’s How I Painted My Cabinets with Sherwin Williams Emerald Urethane Trim Enamel Paint:
Painting Cabinet Door Tip #1: Allow Wood to Acclimate Before Painting
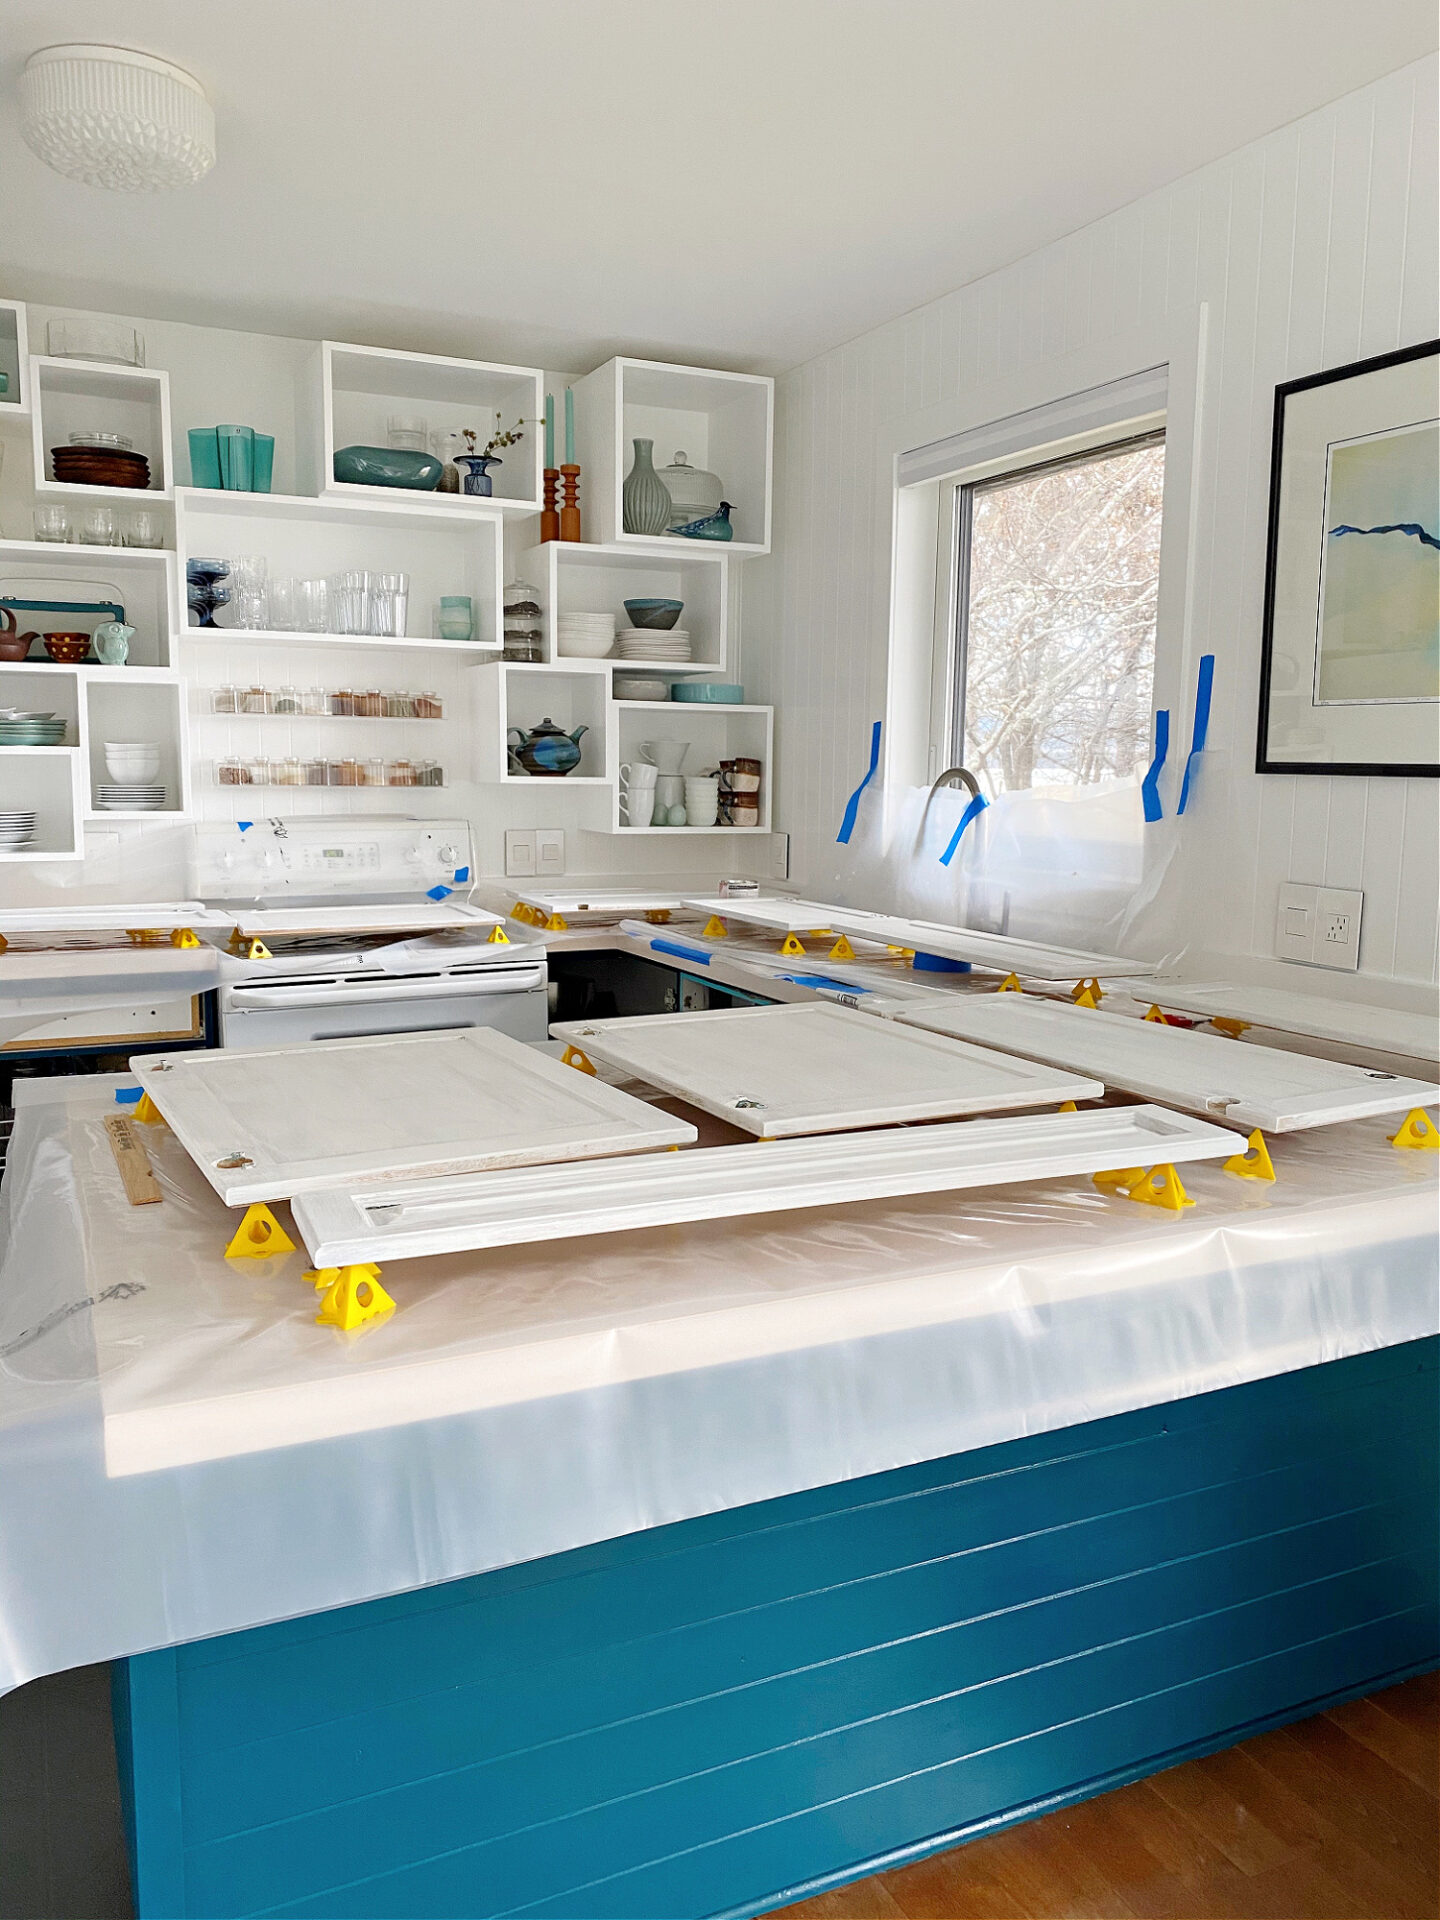
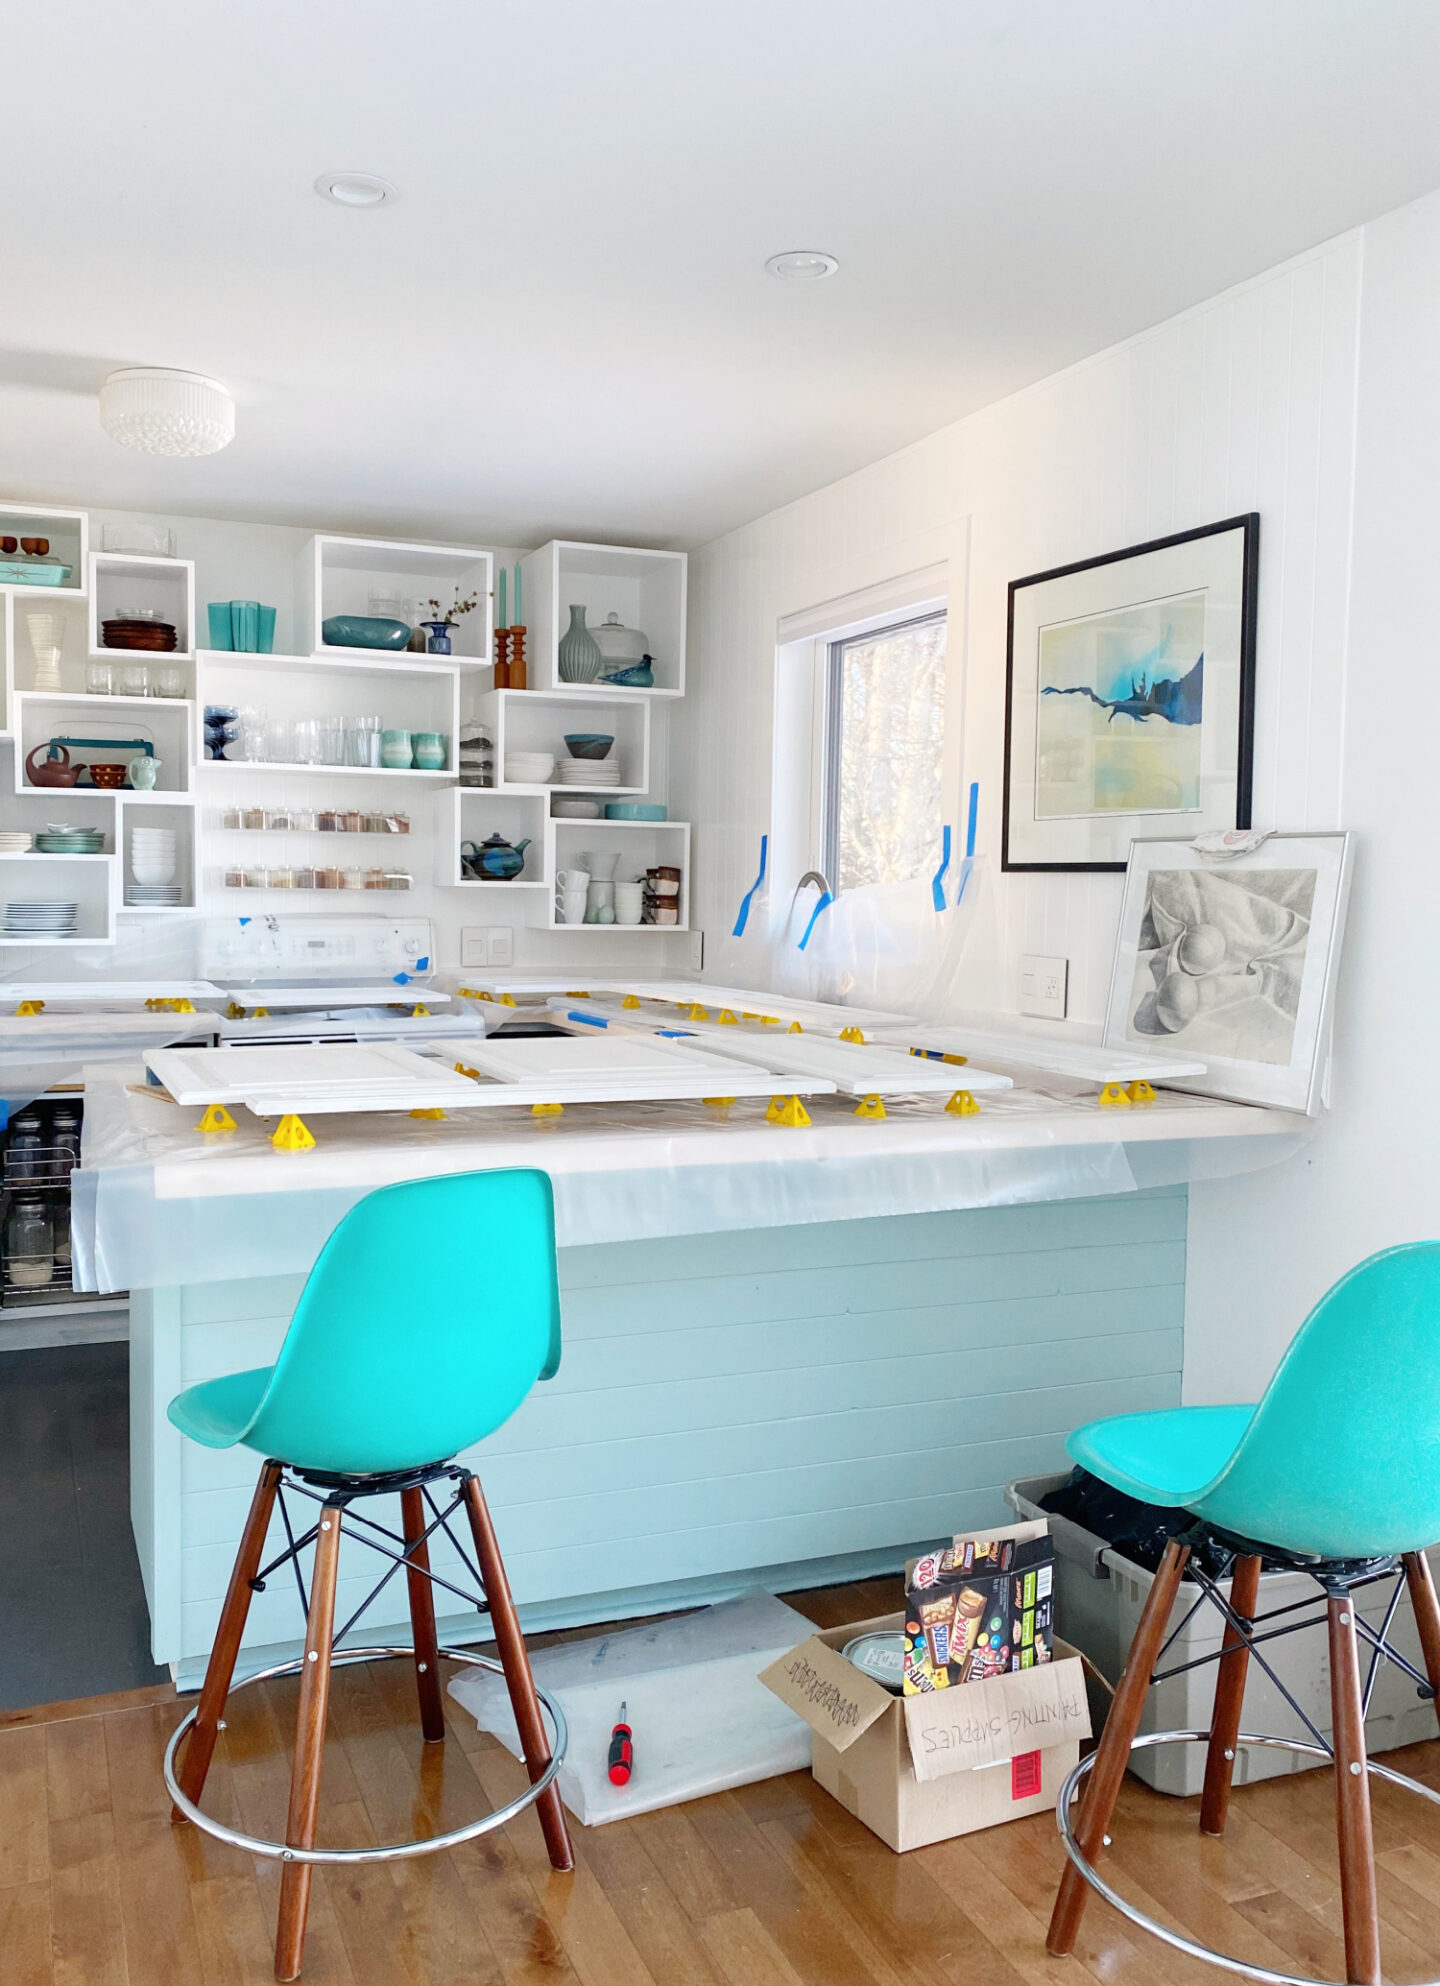
After stripping all of the primer and varnish from my cabinets, I brought the cabinet doors back inside and made sure to let them acclimate for a few days (it was a bit humid outside). When we painted the cabinets the first time, we did it on a warmer day and the wood had swelled. That first winter, the solid wood doors shrank a bit and revealed some unpainted wood I needed to touch up. No biggie, but if possible let wood acclimate before painting. I have a small house and it was too cold to work out in the garage, so I had to use my kitchen counters as my work surface (this also kept them away from my pup!). I placed an old shelf across my sink for extra work surface area (#genius).
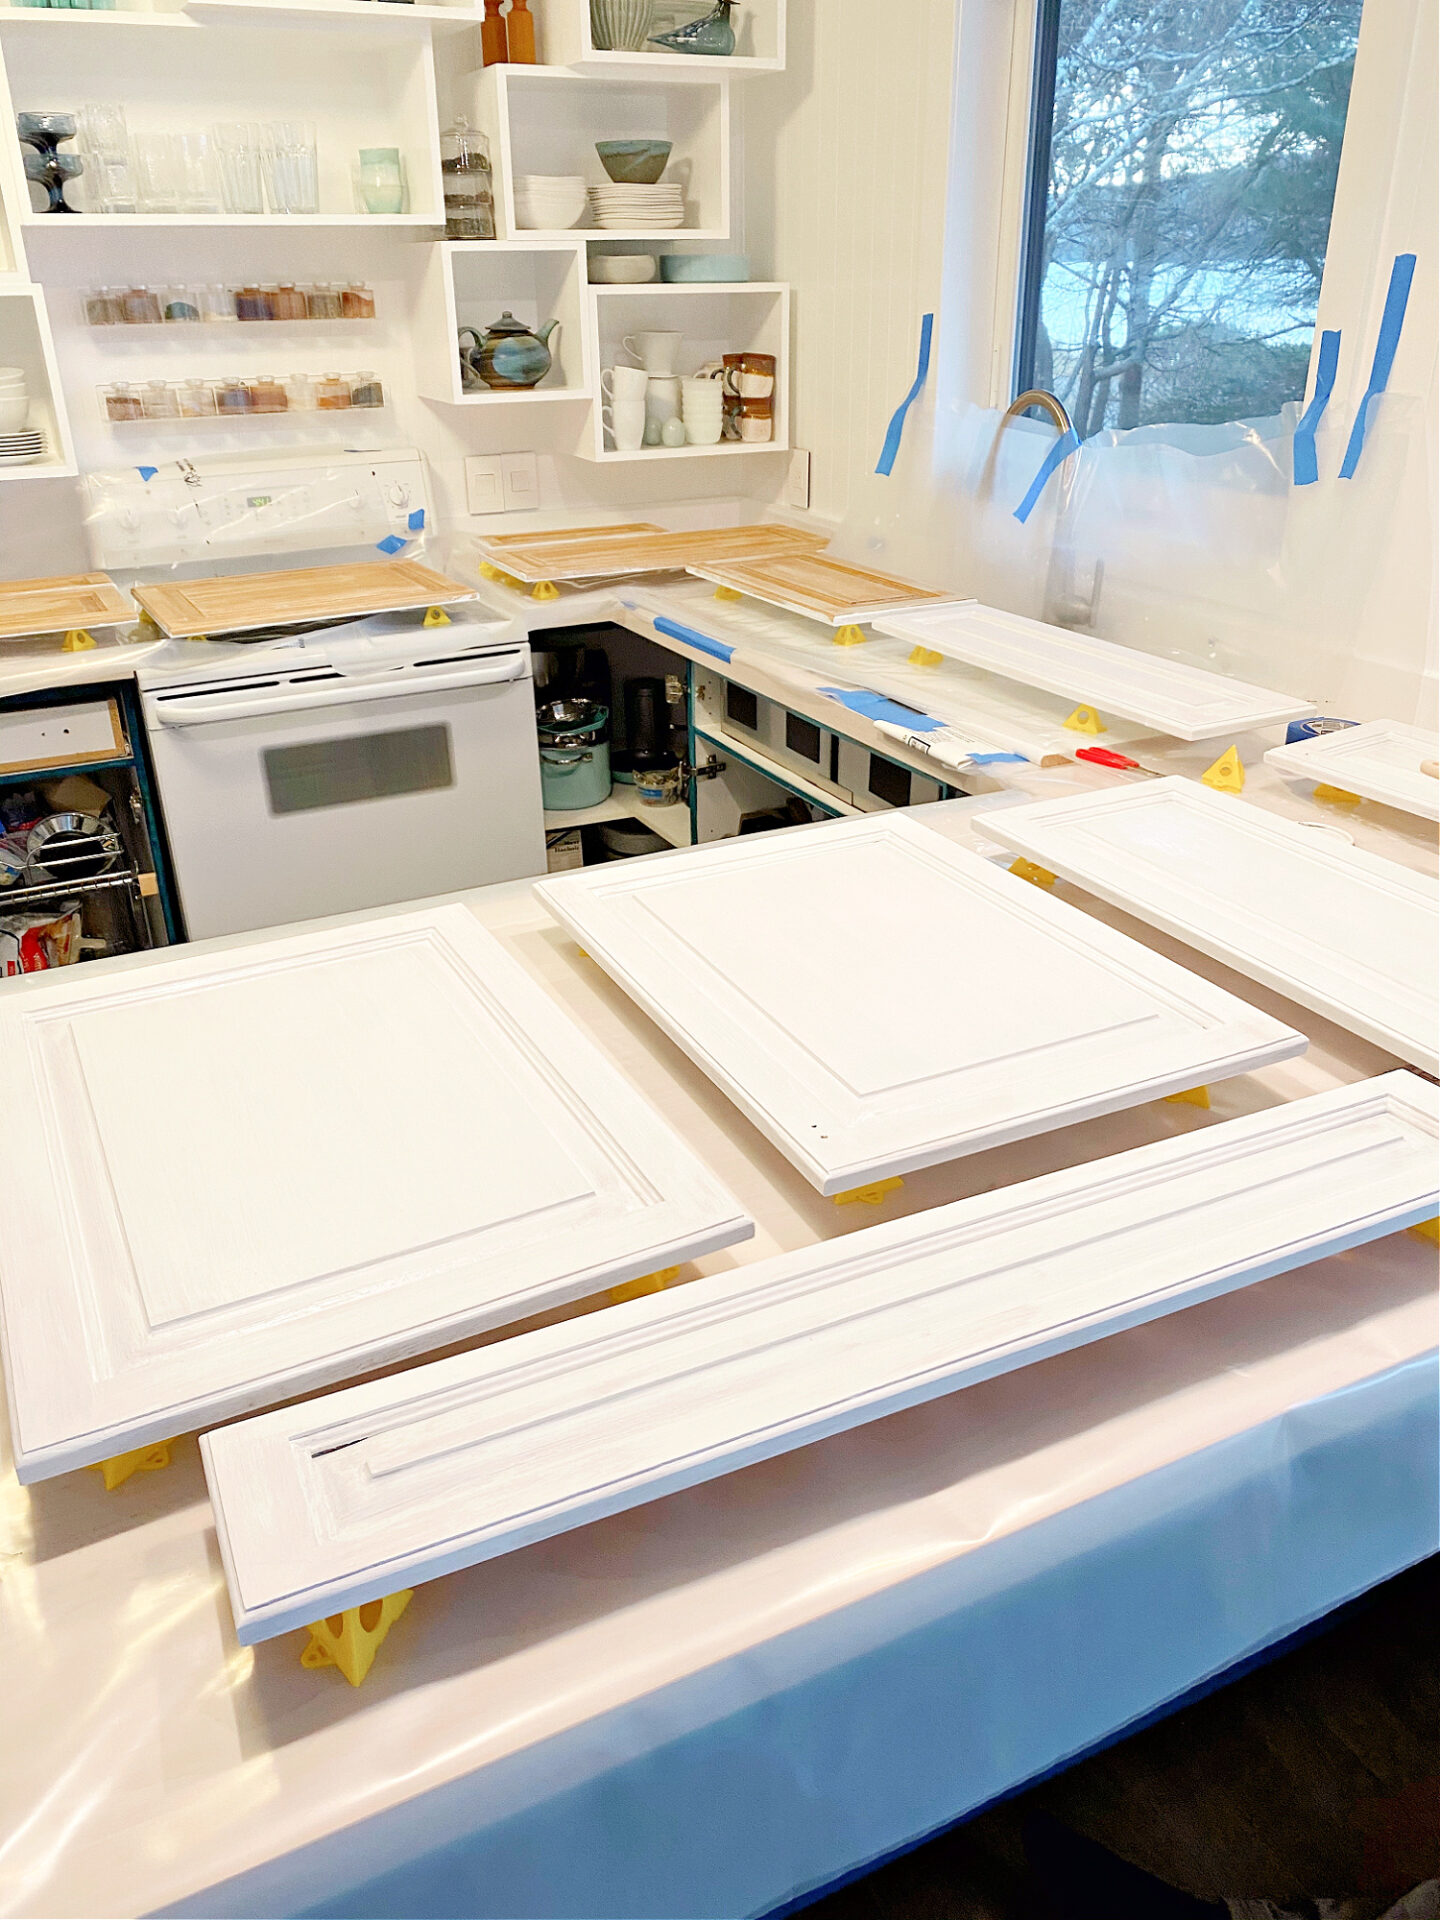
Painting Cabinet Doors Tip #2: Buy Painter’s Pyramids
I used old vapor barrier to protect my surfaces and then finally invested in these. I wish I’d bought these painter’s pyramids many cabinet makeovers ago! I will admit, they slide around a bit on the plastic and are really light and easy to knock over, but they do help and I recommend them. I just wish they were heavier and more solid.
Painting Cabinet Doors Tip #3: Start with the Backs
As you can see, I always start with the cabinet backs but I make sure not to paint the edges yet. I paint the cabinet edges when I’m painting the fronts so I can be sure to catch any drips and make sure it looks good. Alternatively, you can spray your cabinet doors – I’ve even seen people hang them to spray so they can spray both sides at once.
Painting Cabinet Doors Tip #4: Prep & Primer Matters!
You don’t need to sand cabinet doors right down. But you do need to do some prep: make sure the cabinets are CLEAN and free from grease and then either do a light sand or a chemical de-glosser. You want to give the primer and paint something to grip, the surface can’t be shiny if you want the best coverage. Once the cabinet surface is prepped with sanding, stripping, or de-glossing, apply a good quality primer. I have had good experiences with Zinsser, but my local Sherwin Williams store recommended this so I tried it this time:
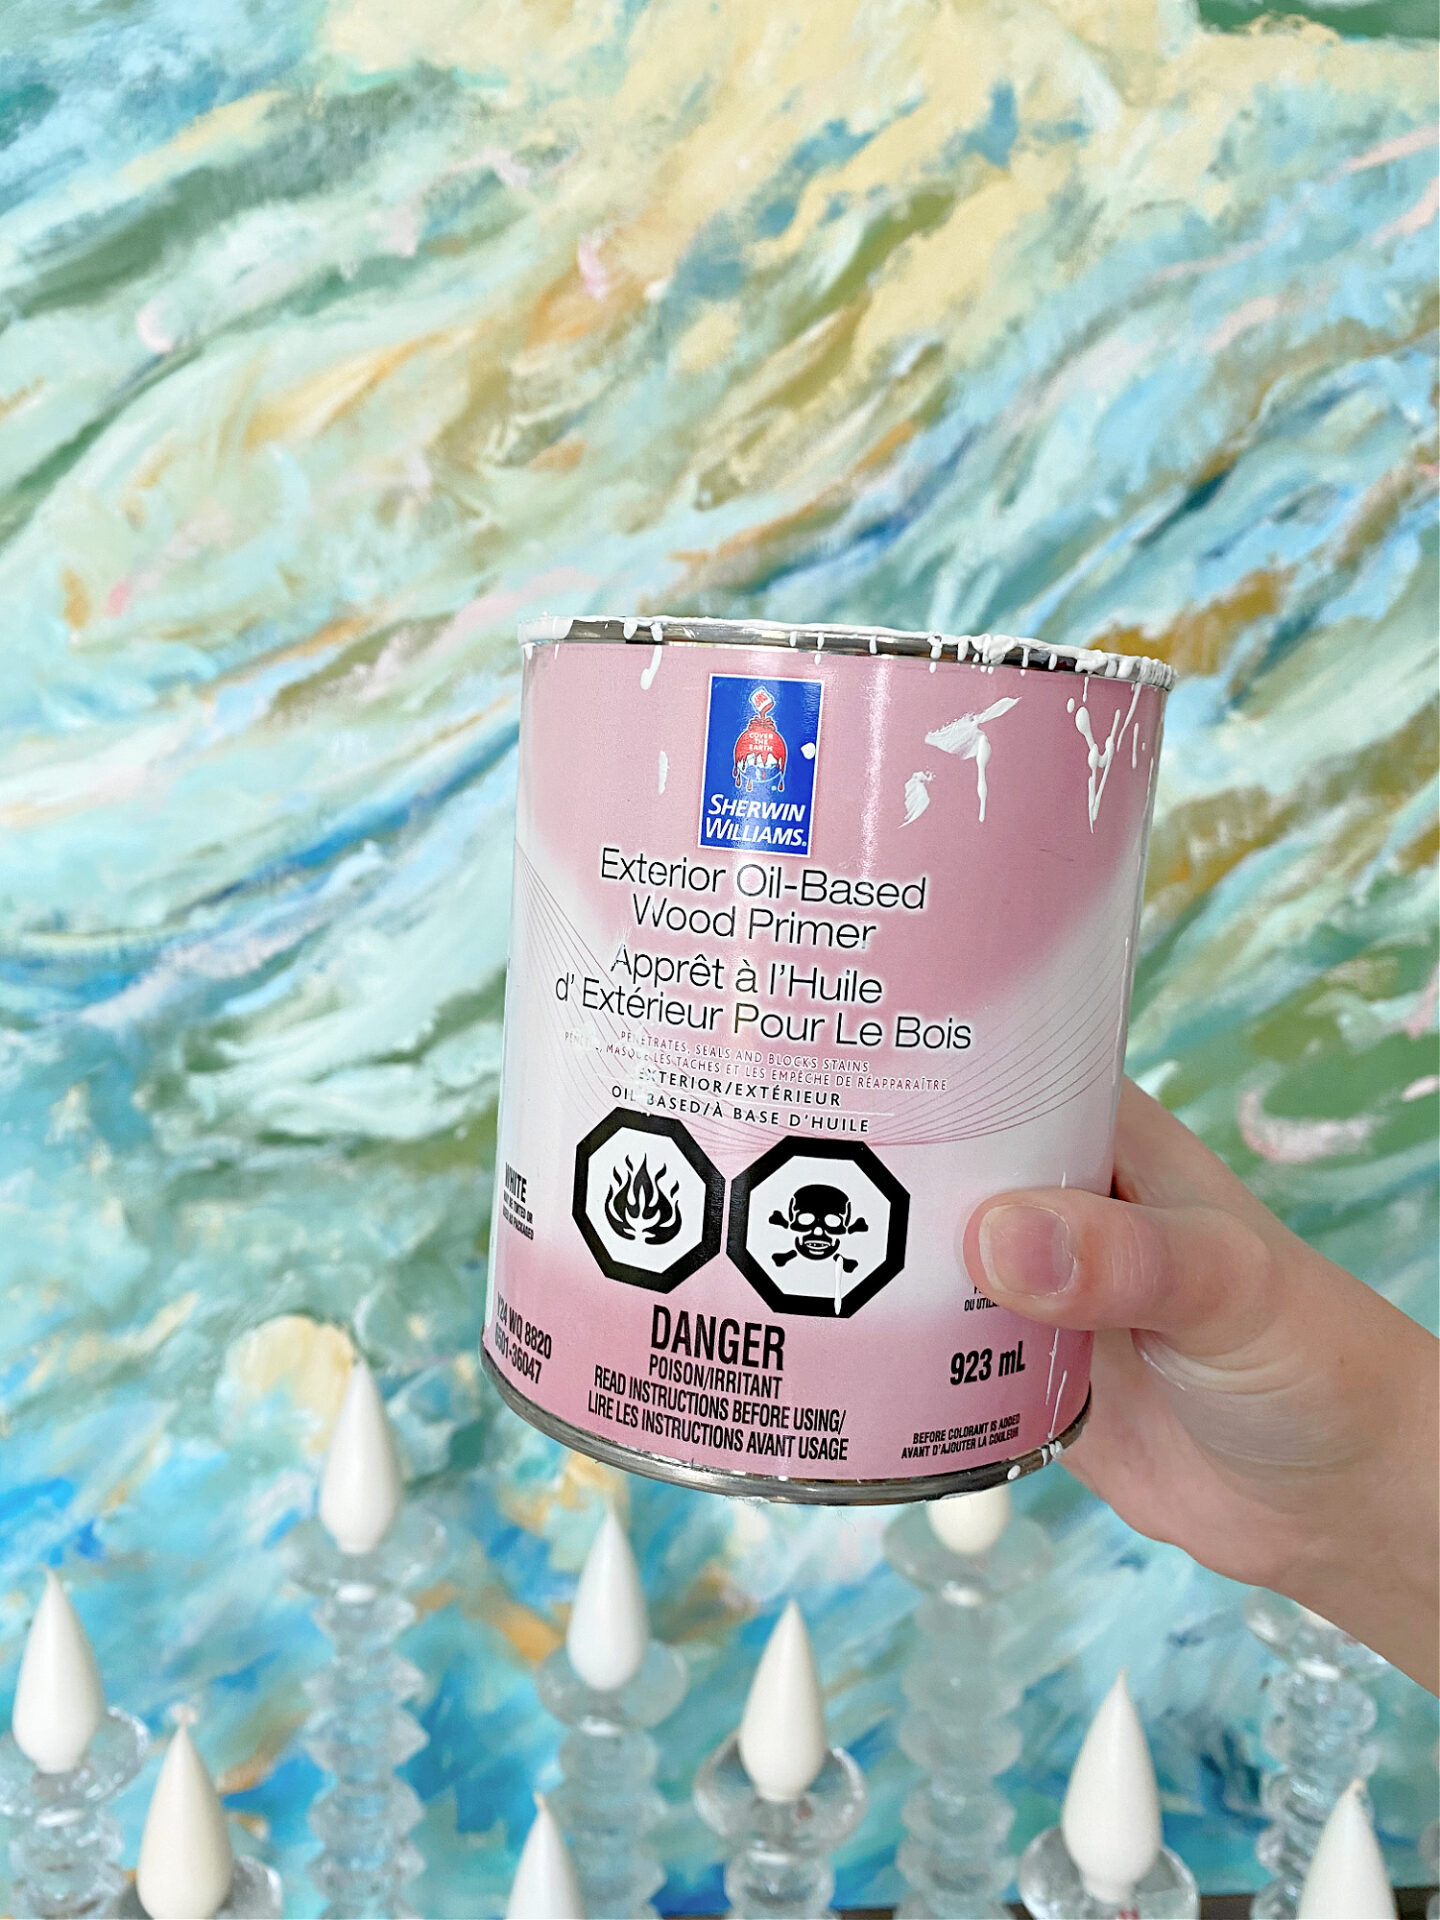
I was told it was the most durable primer for this project and would be perfect for my cabinets. Unfortunately, it took a long time to dry (and I have a pretty dry house, it’s not humid usually).
I painted the cabinets in the evening and by the next afternoon (almost 24 hours later – well beyond the dry to touch and re-coat times), they still left paint marks on my hands when I went to touch them:
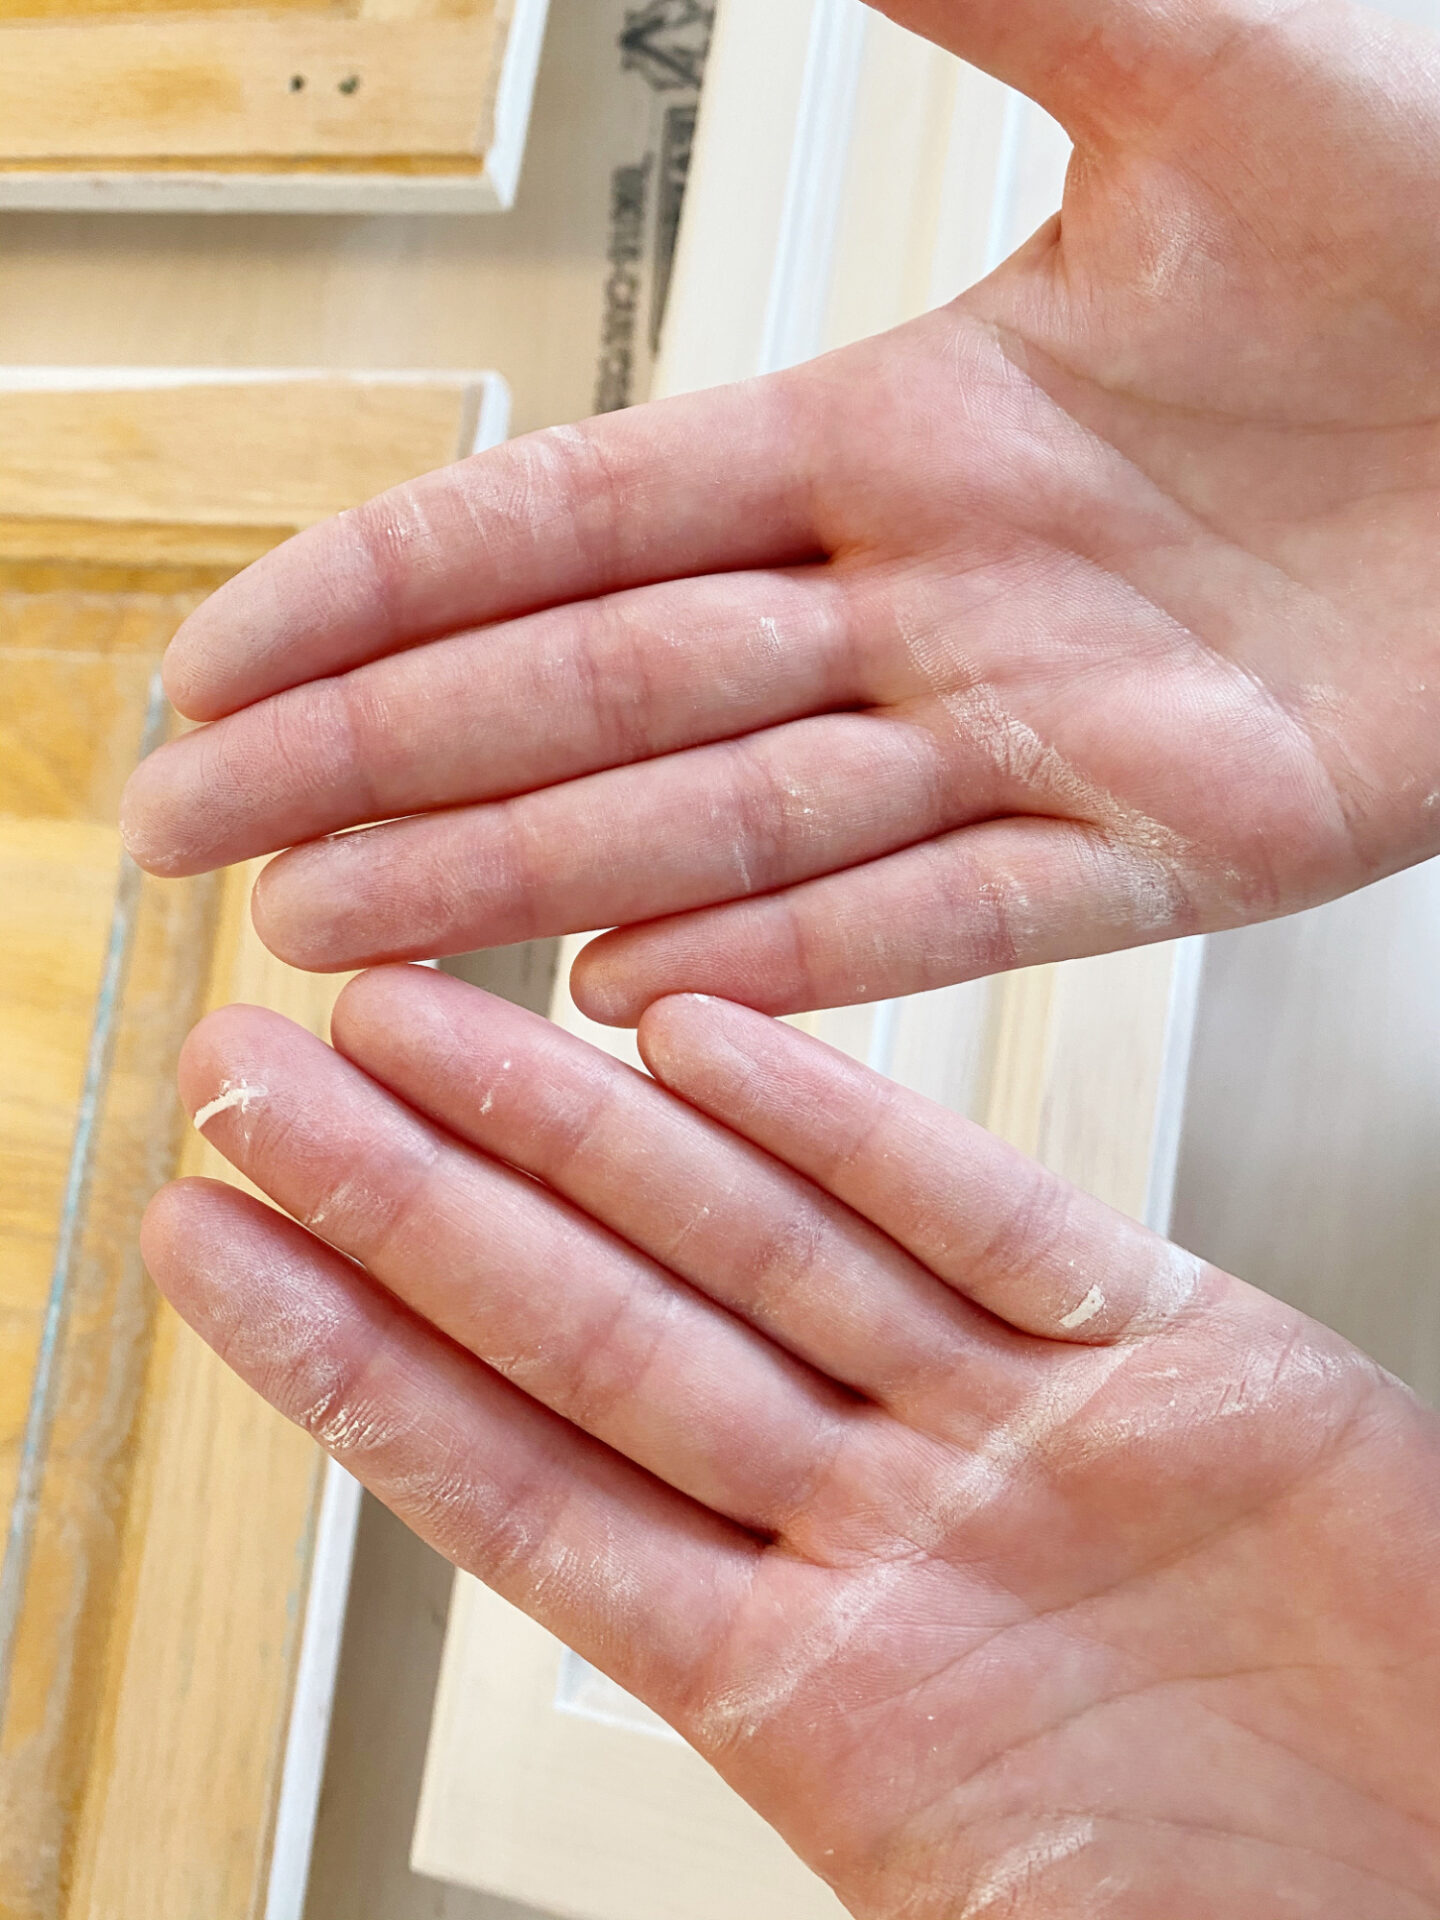
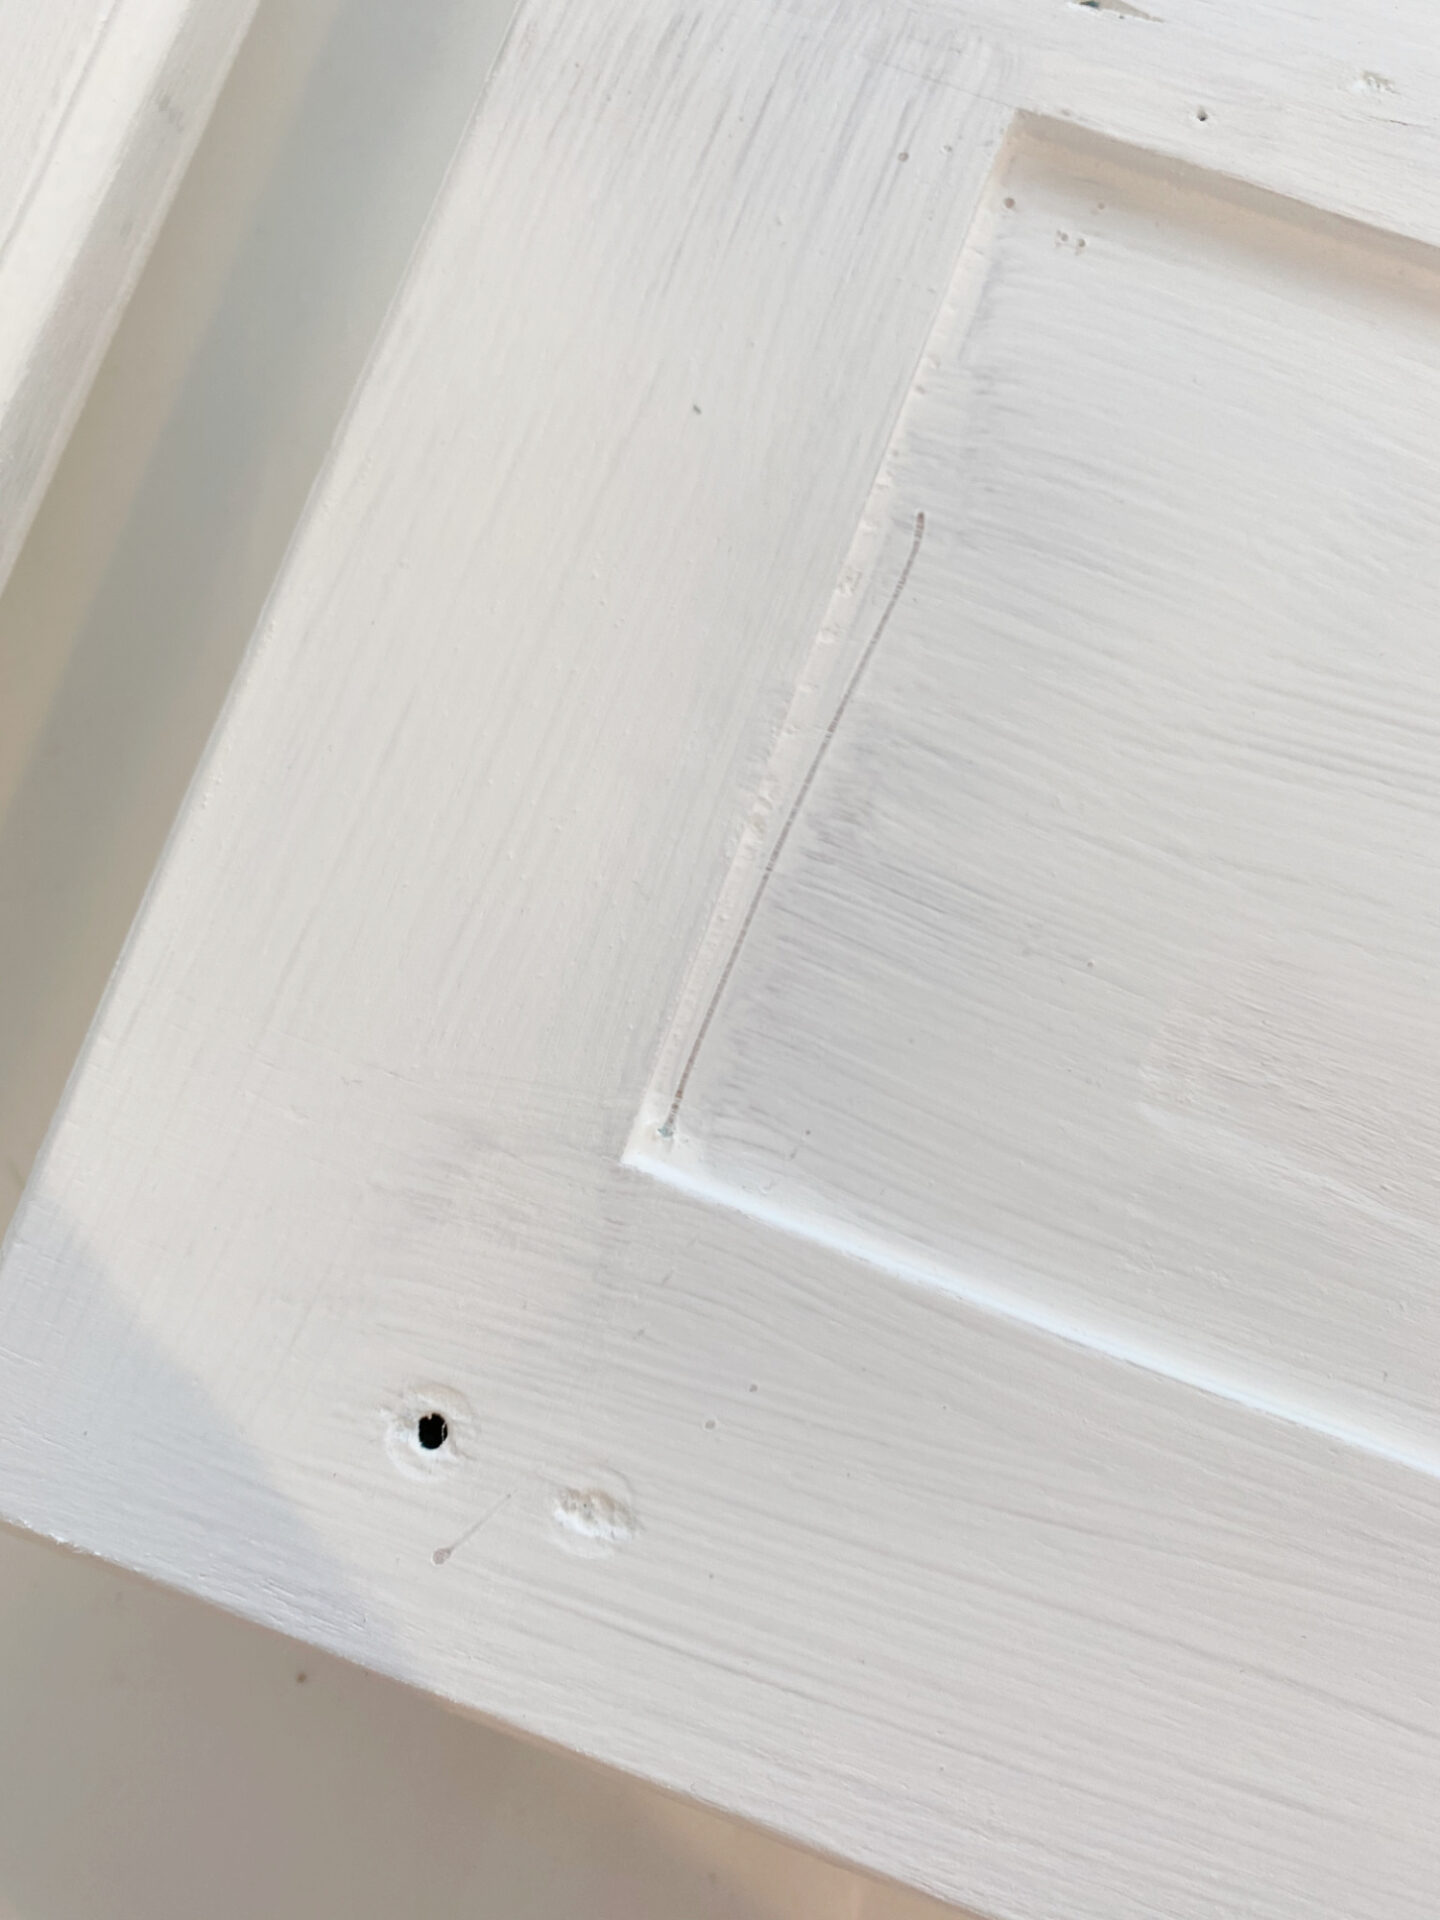
That evening, still tacky, I gingerly flipped them over anyway to get started on the fronts. I scraped one and you can see how easily the primer still came off, 24 hours later:
After another 24 hours, the first side I had painted was a bit more dry but still not 100%, so I distracted myself by priming and painting the cabinet boxes. I didn’t strip those, I just sanded and primed and painted again.
After priming one coat on either side, I had to wait a total of five days before the primer was dry enough to paint. At this point I was worried because I didn’t do two coats (I didn’t want to wait 5 days again – I was hungry and wanted to cook). But I went ahead and painted and luckily the paint dried really quickly. I was able to quickly do my two coats on either side.
Painting Cabinet Doors Tip #5: Decant Paint into Smaller Containers
I like to decant some paint into a clean plastic container for ease of use (I used to use those Handy Paint Pail things, but this is easier and free). I also think if you’re painting slowly and have the whole can open, you’re bound to either kick it over and spill all the paint or the paint will get thicker/contaminated with dust or debris from exposure.
Painting Cabinet Doors Tip #6: Order of Operations for Raised Profile Doors
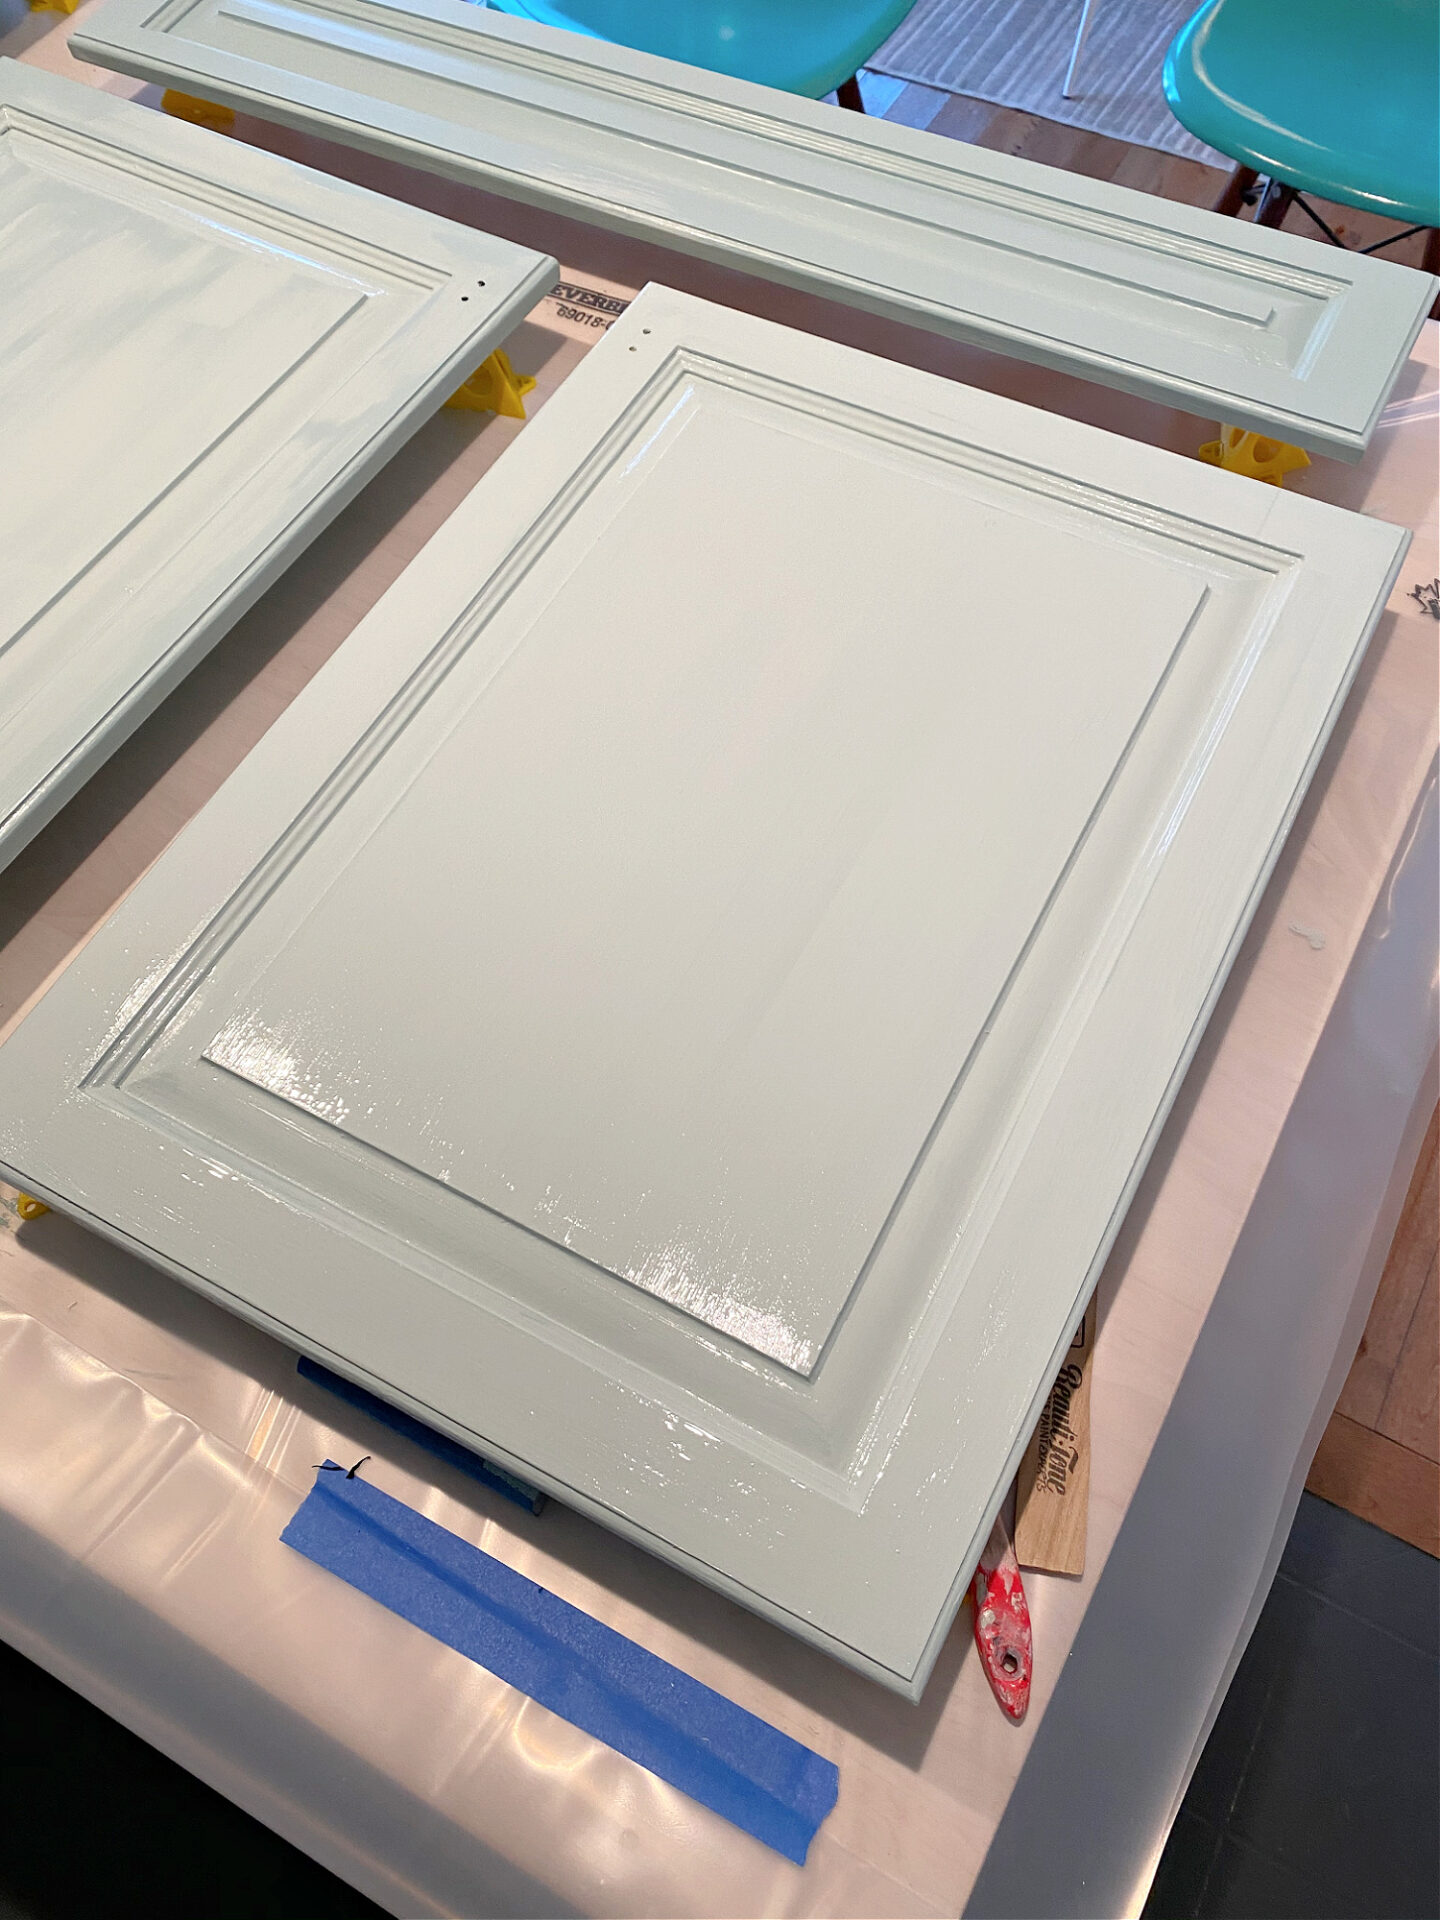
For my raised profile door fronts, I paint the grooves first, then the middle, then the outside. This order of operations for painting raised profile doors helps prevent any drips settling into the grooves.

Painting Cabinet Doors Tip #7: Get a Good Quality Paint Brush
To avoid streaks or rogue bristles stuck in your cabinet paint job, invest in a good quality brush for painting cabinets – preferably in a 2″ size and angled shape. I used this lovely paint brush, which is really nice quality! I normally buy good quality brushes, but this was really good! Using my paint sprayer for the turquoise version of these cabinets worked really well, but between this self-leveling paint and the good quality cabinet painting brush, the end result is really smooth and brushstroke-free.
Painting Cabinet Doors Tip #8: Don’t Rush Dry Time
I let the cabinets cure for a few days on the counter and then installed them. As you saw with my primer, paint and primer sometimes dry are their own time and it’s important not to rush the drying process. And, even once a paint is dry to the touch, remember that dry time and cure times are different. It takes weeks for paint to fully cure so, ideally, you’ll paint your cabinets and then go on vacation so they can properly cure (that’s the dream) but if you can’t, remember to handle them GENTLY for the next few weeks.

Is Sherwin Williams Emerald Urethane Trim Enamel Paint Good Quality?
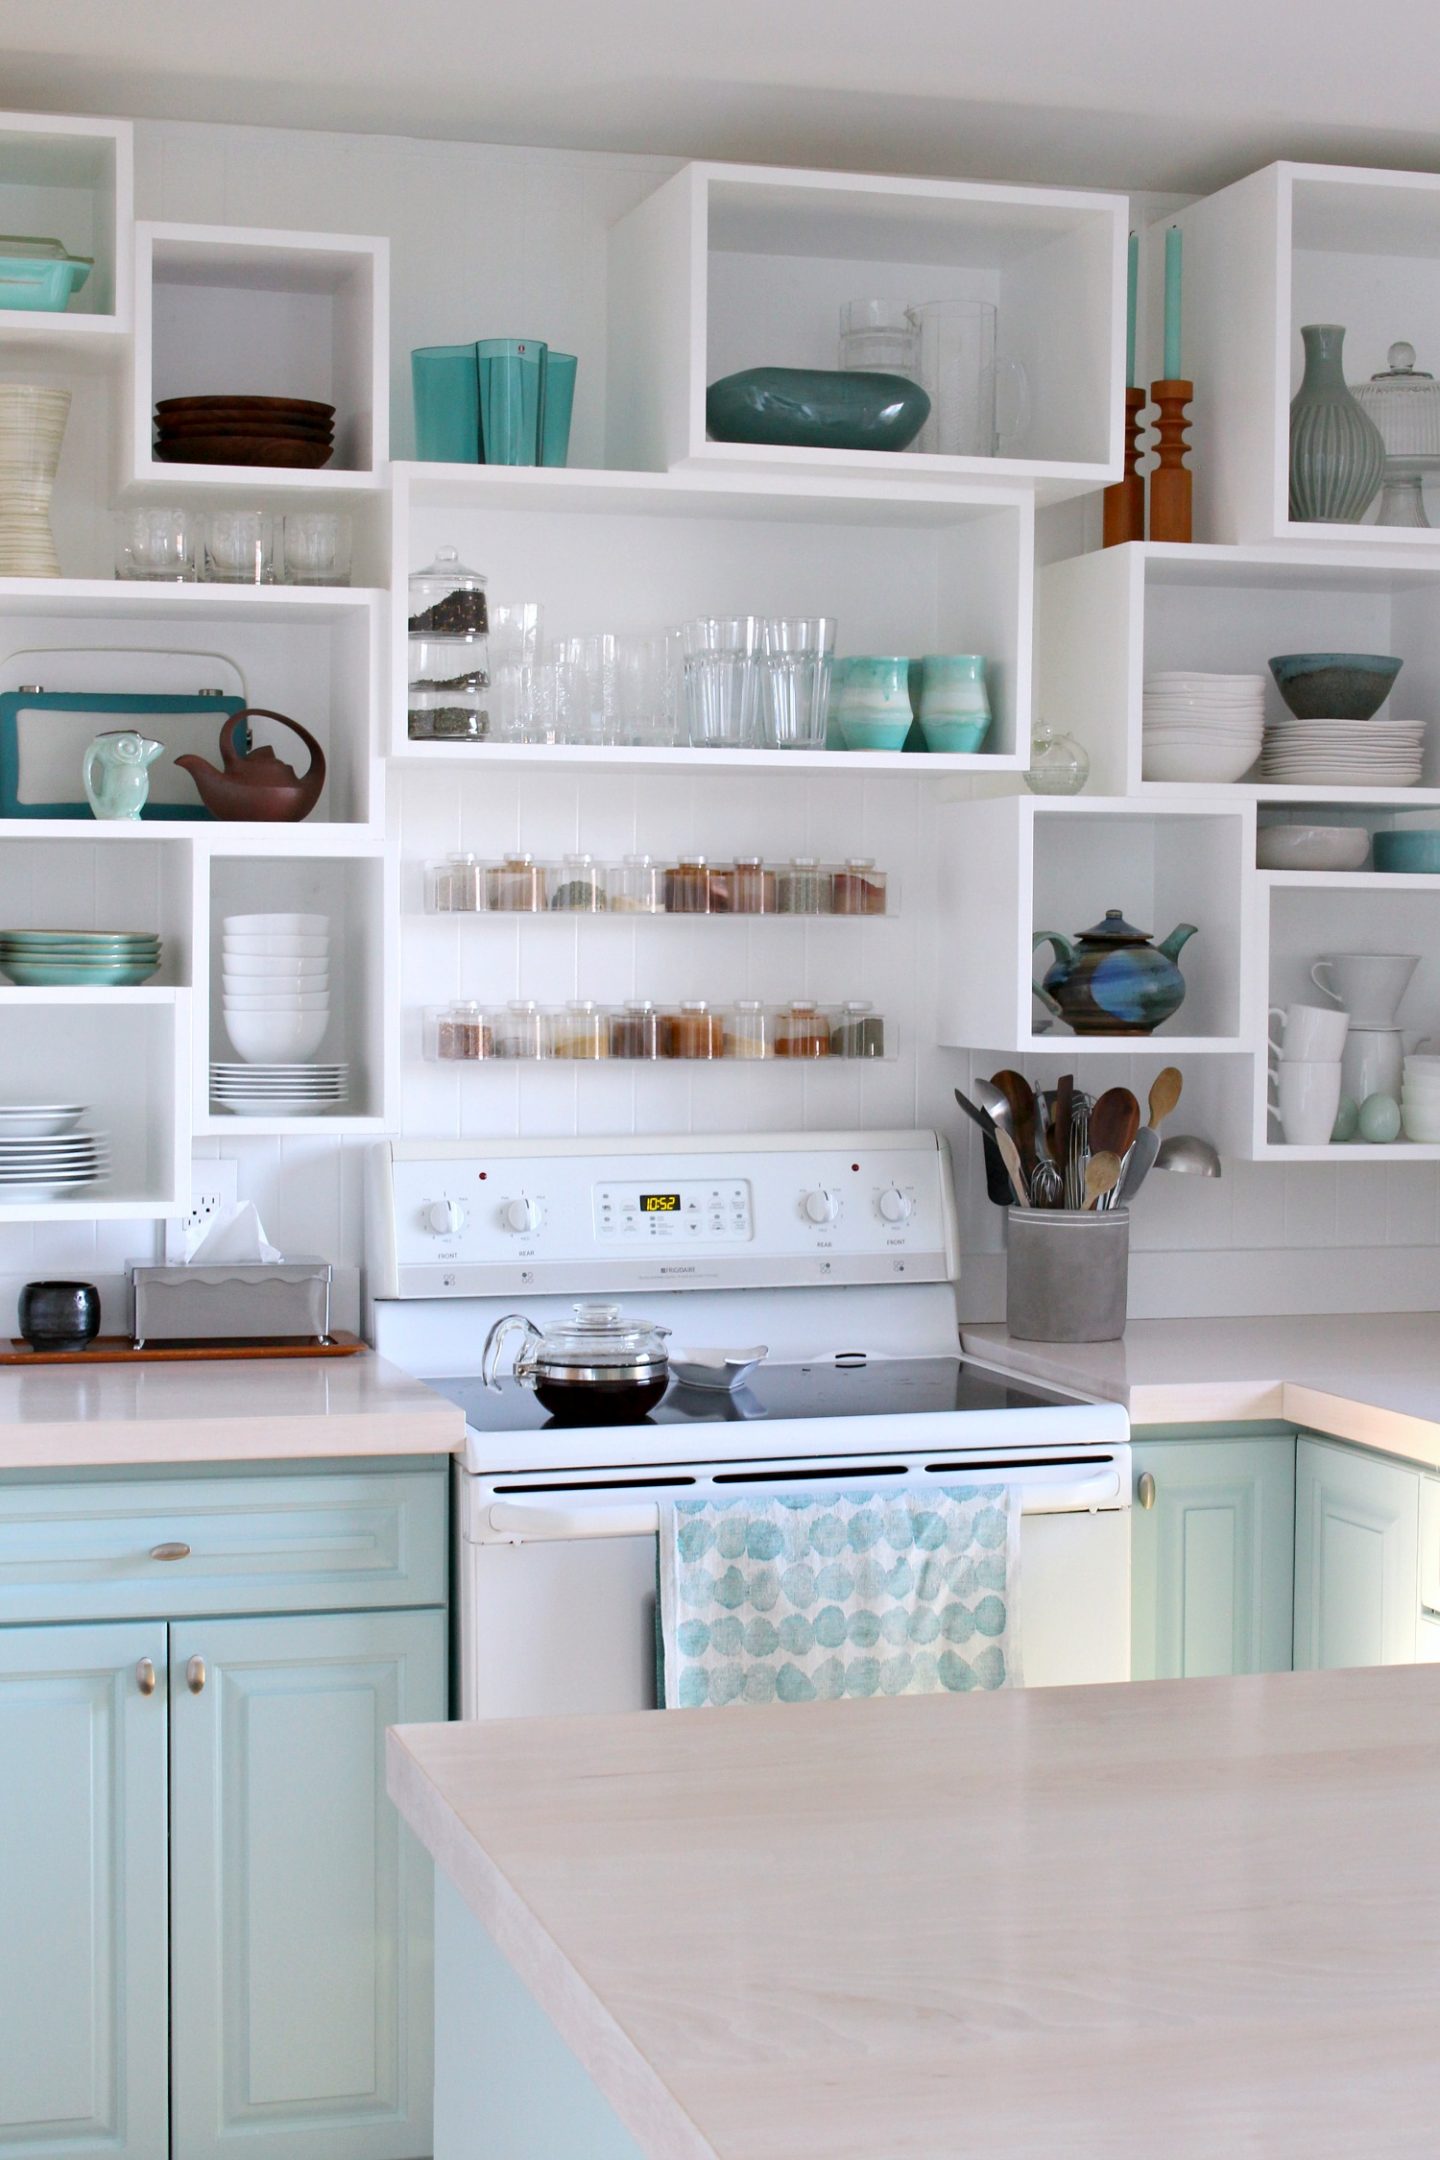
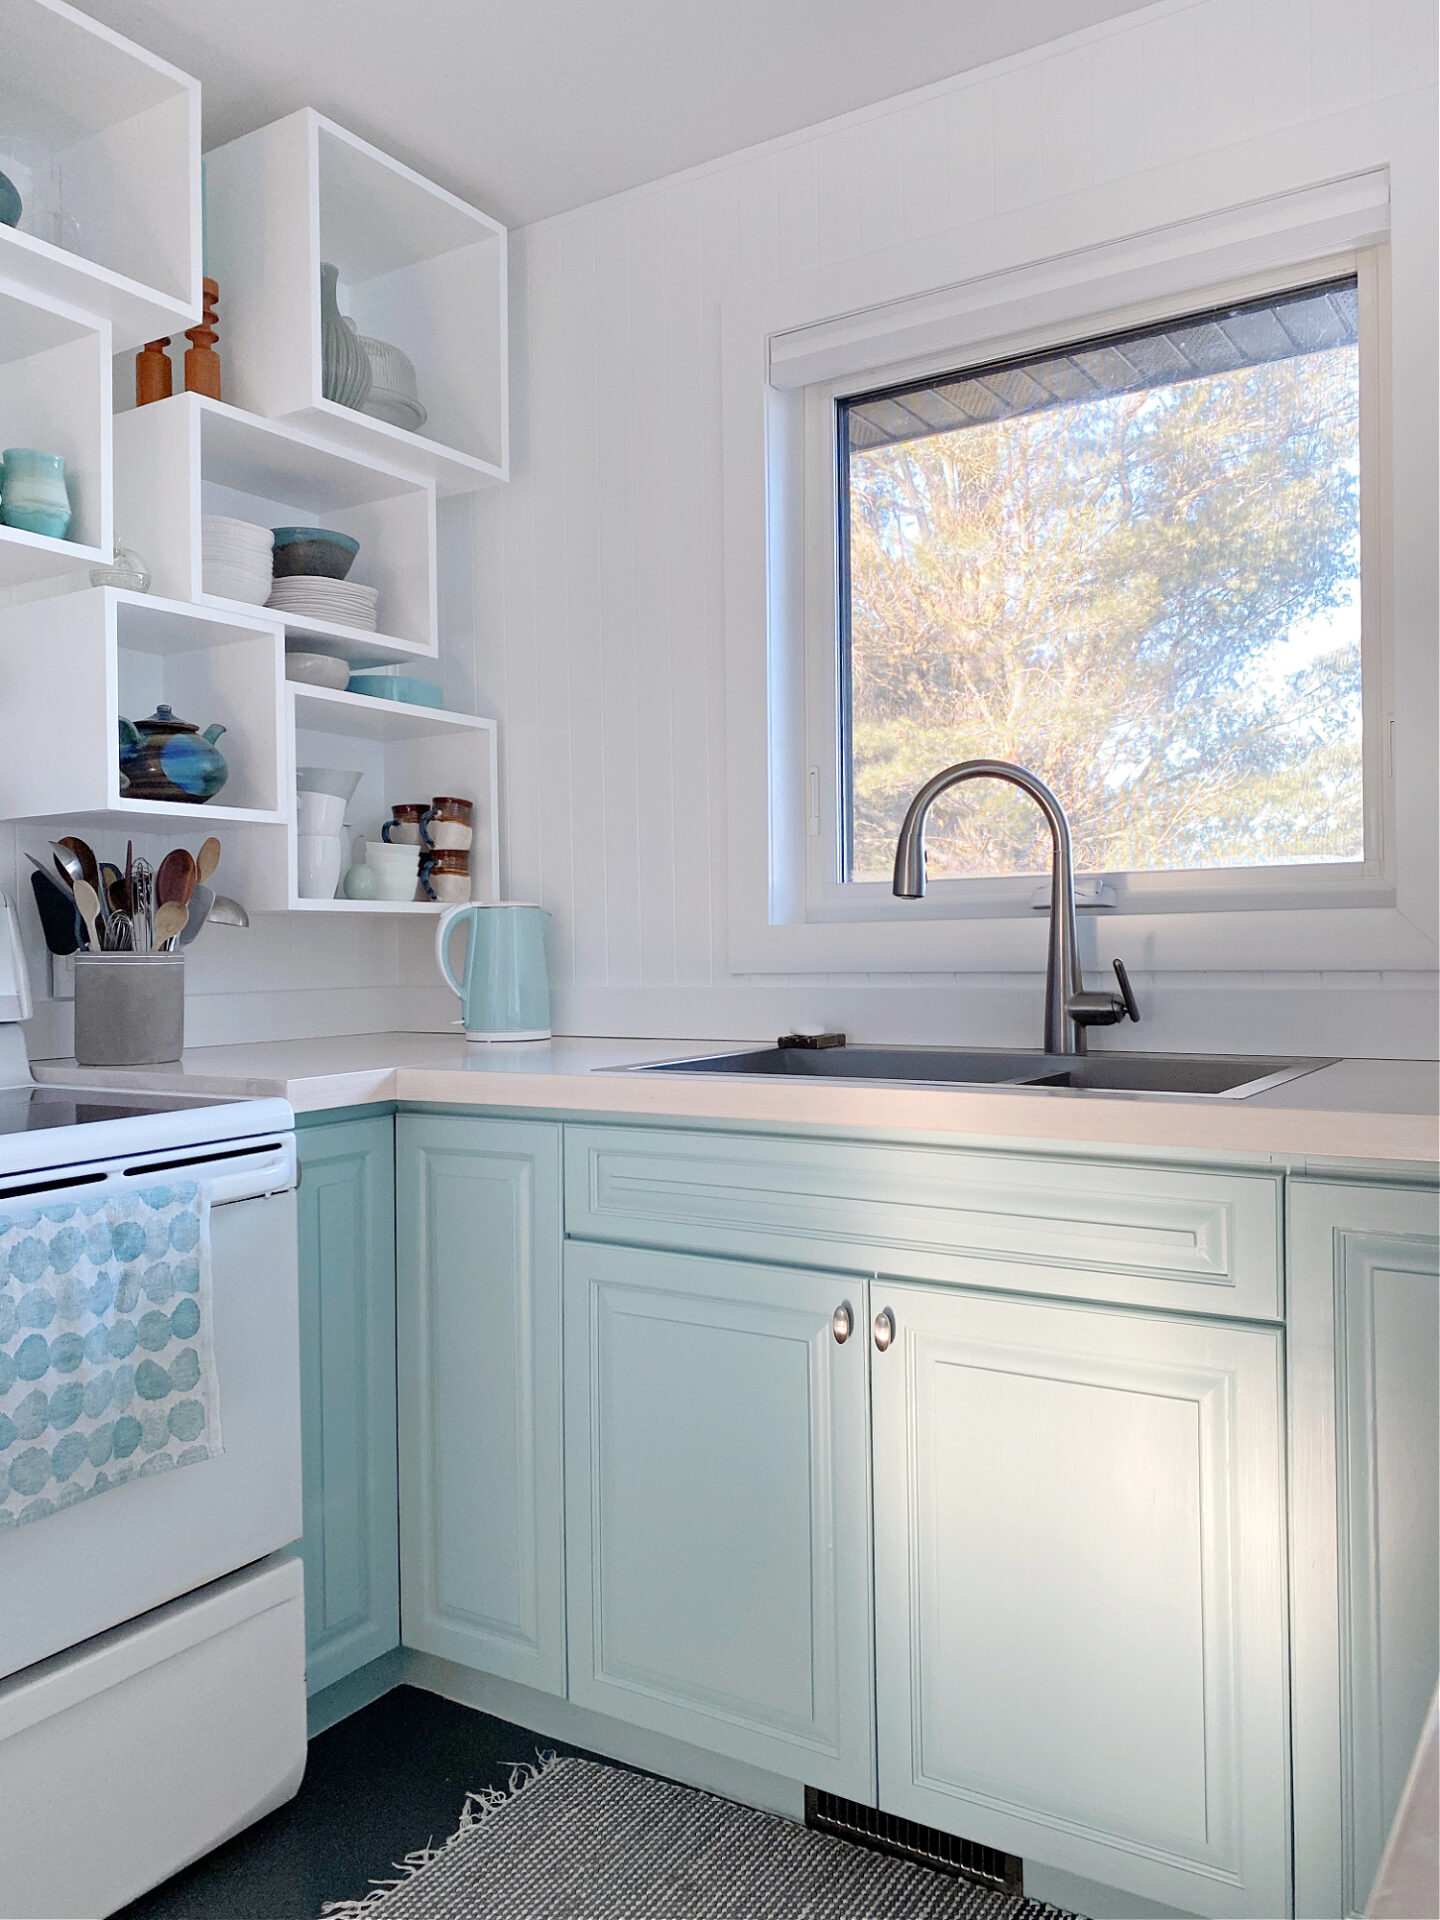
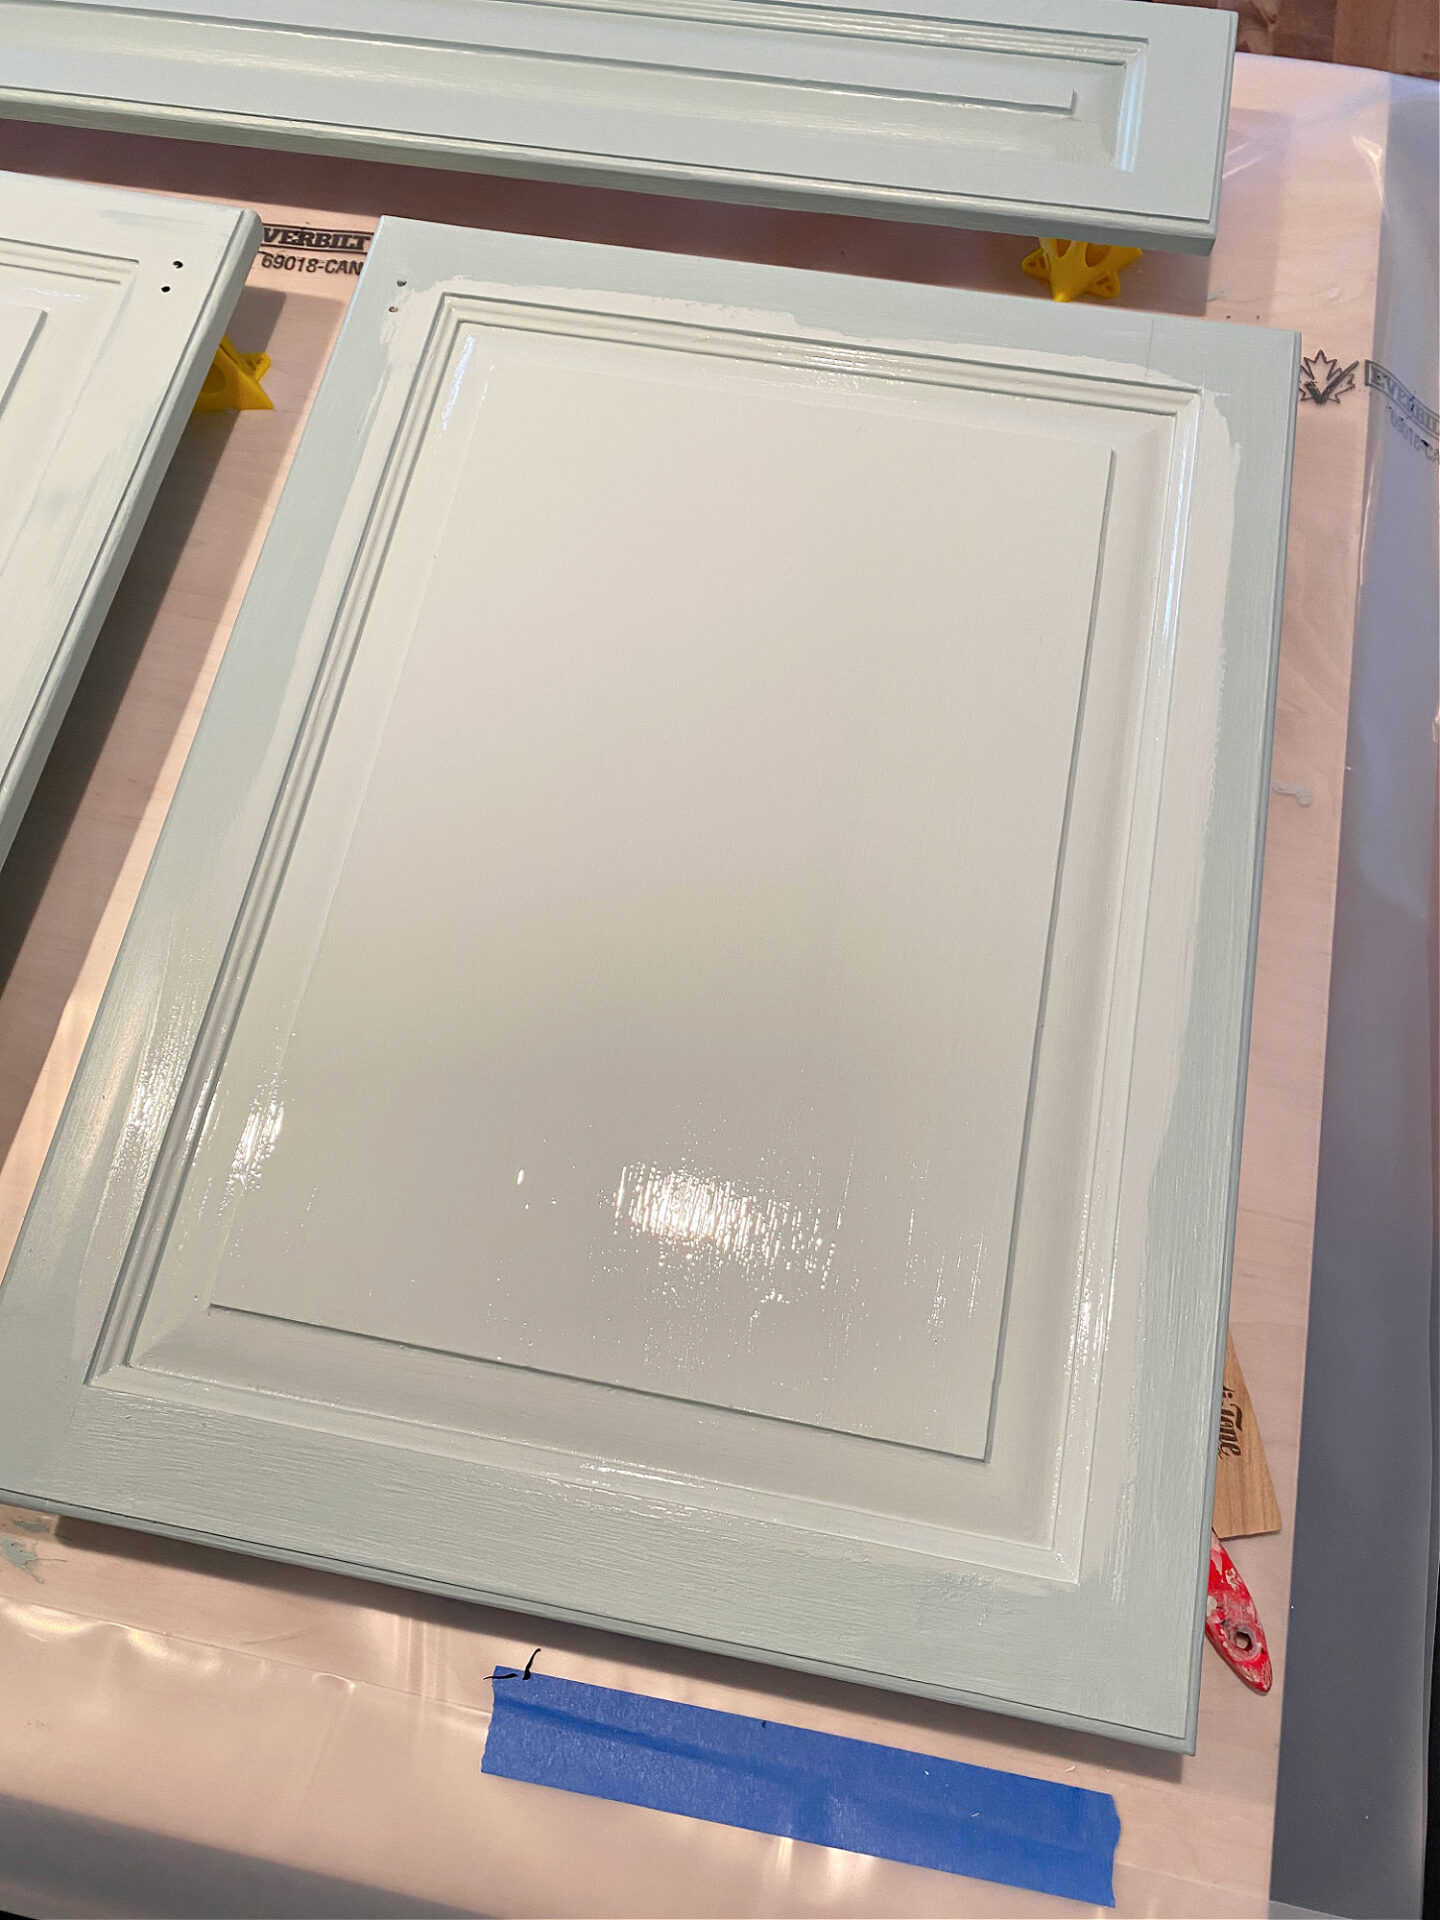
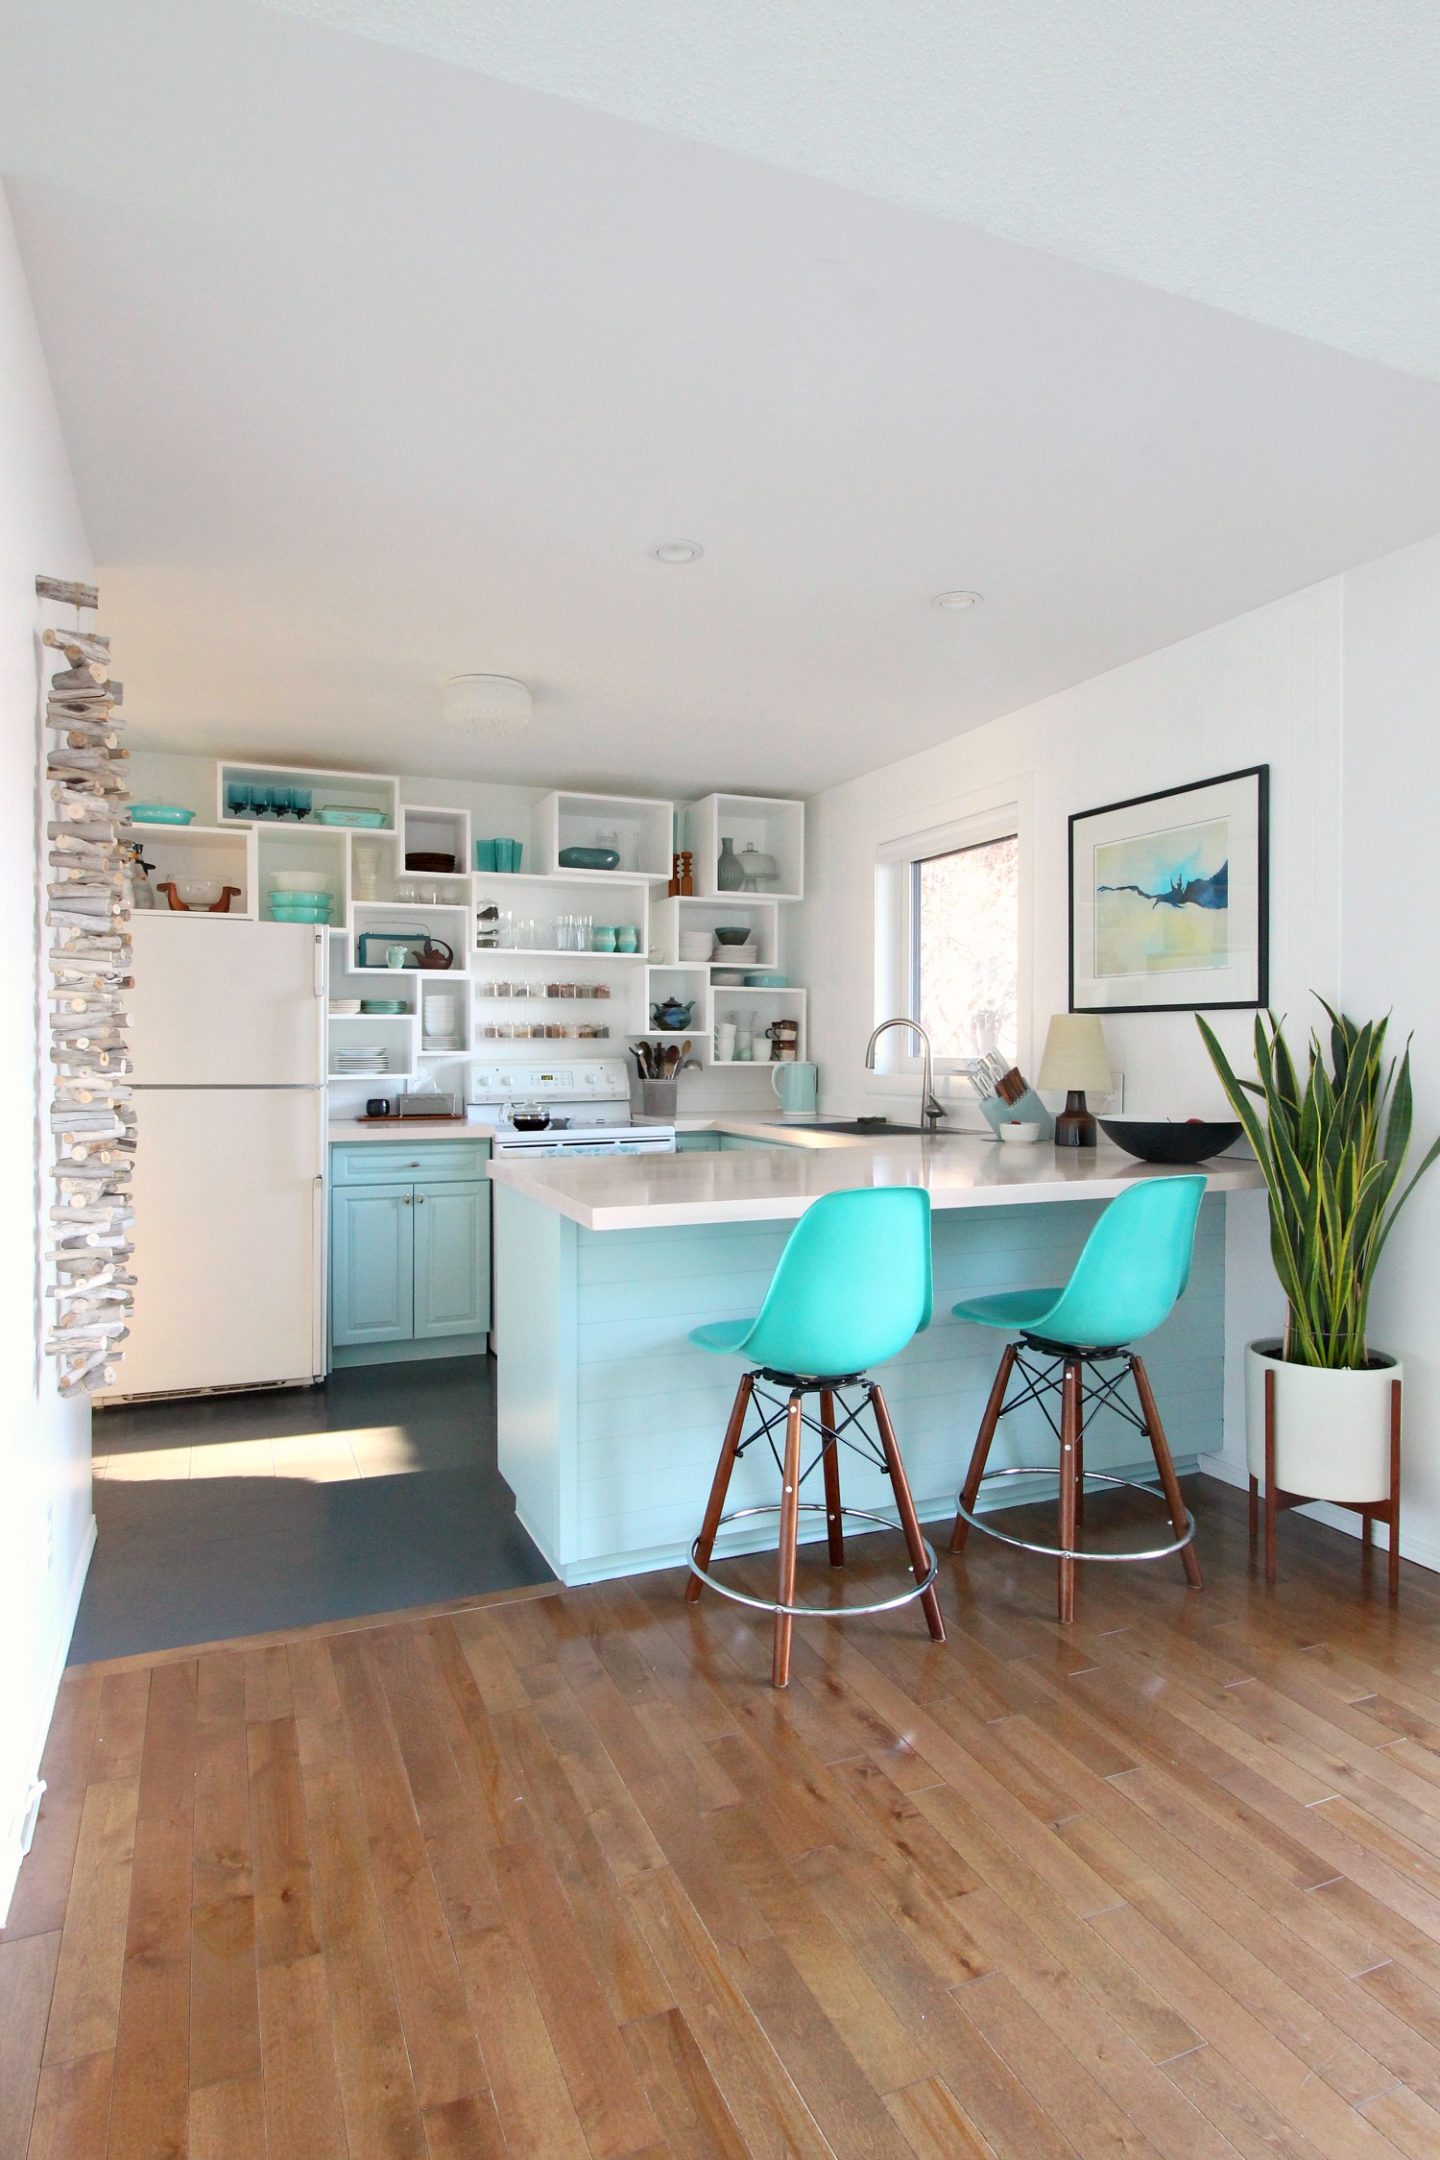
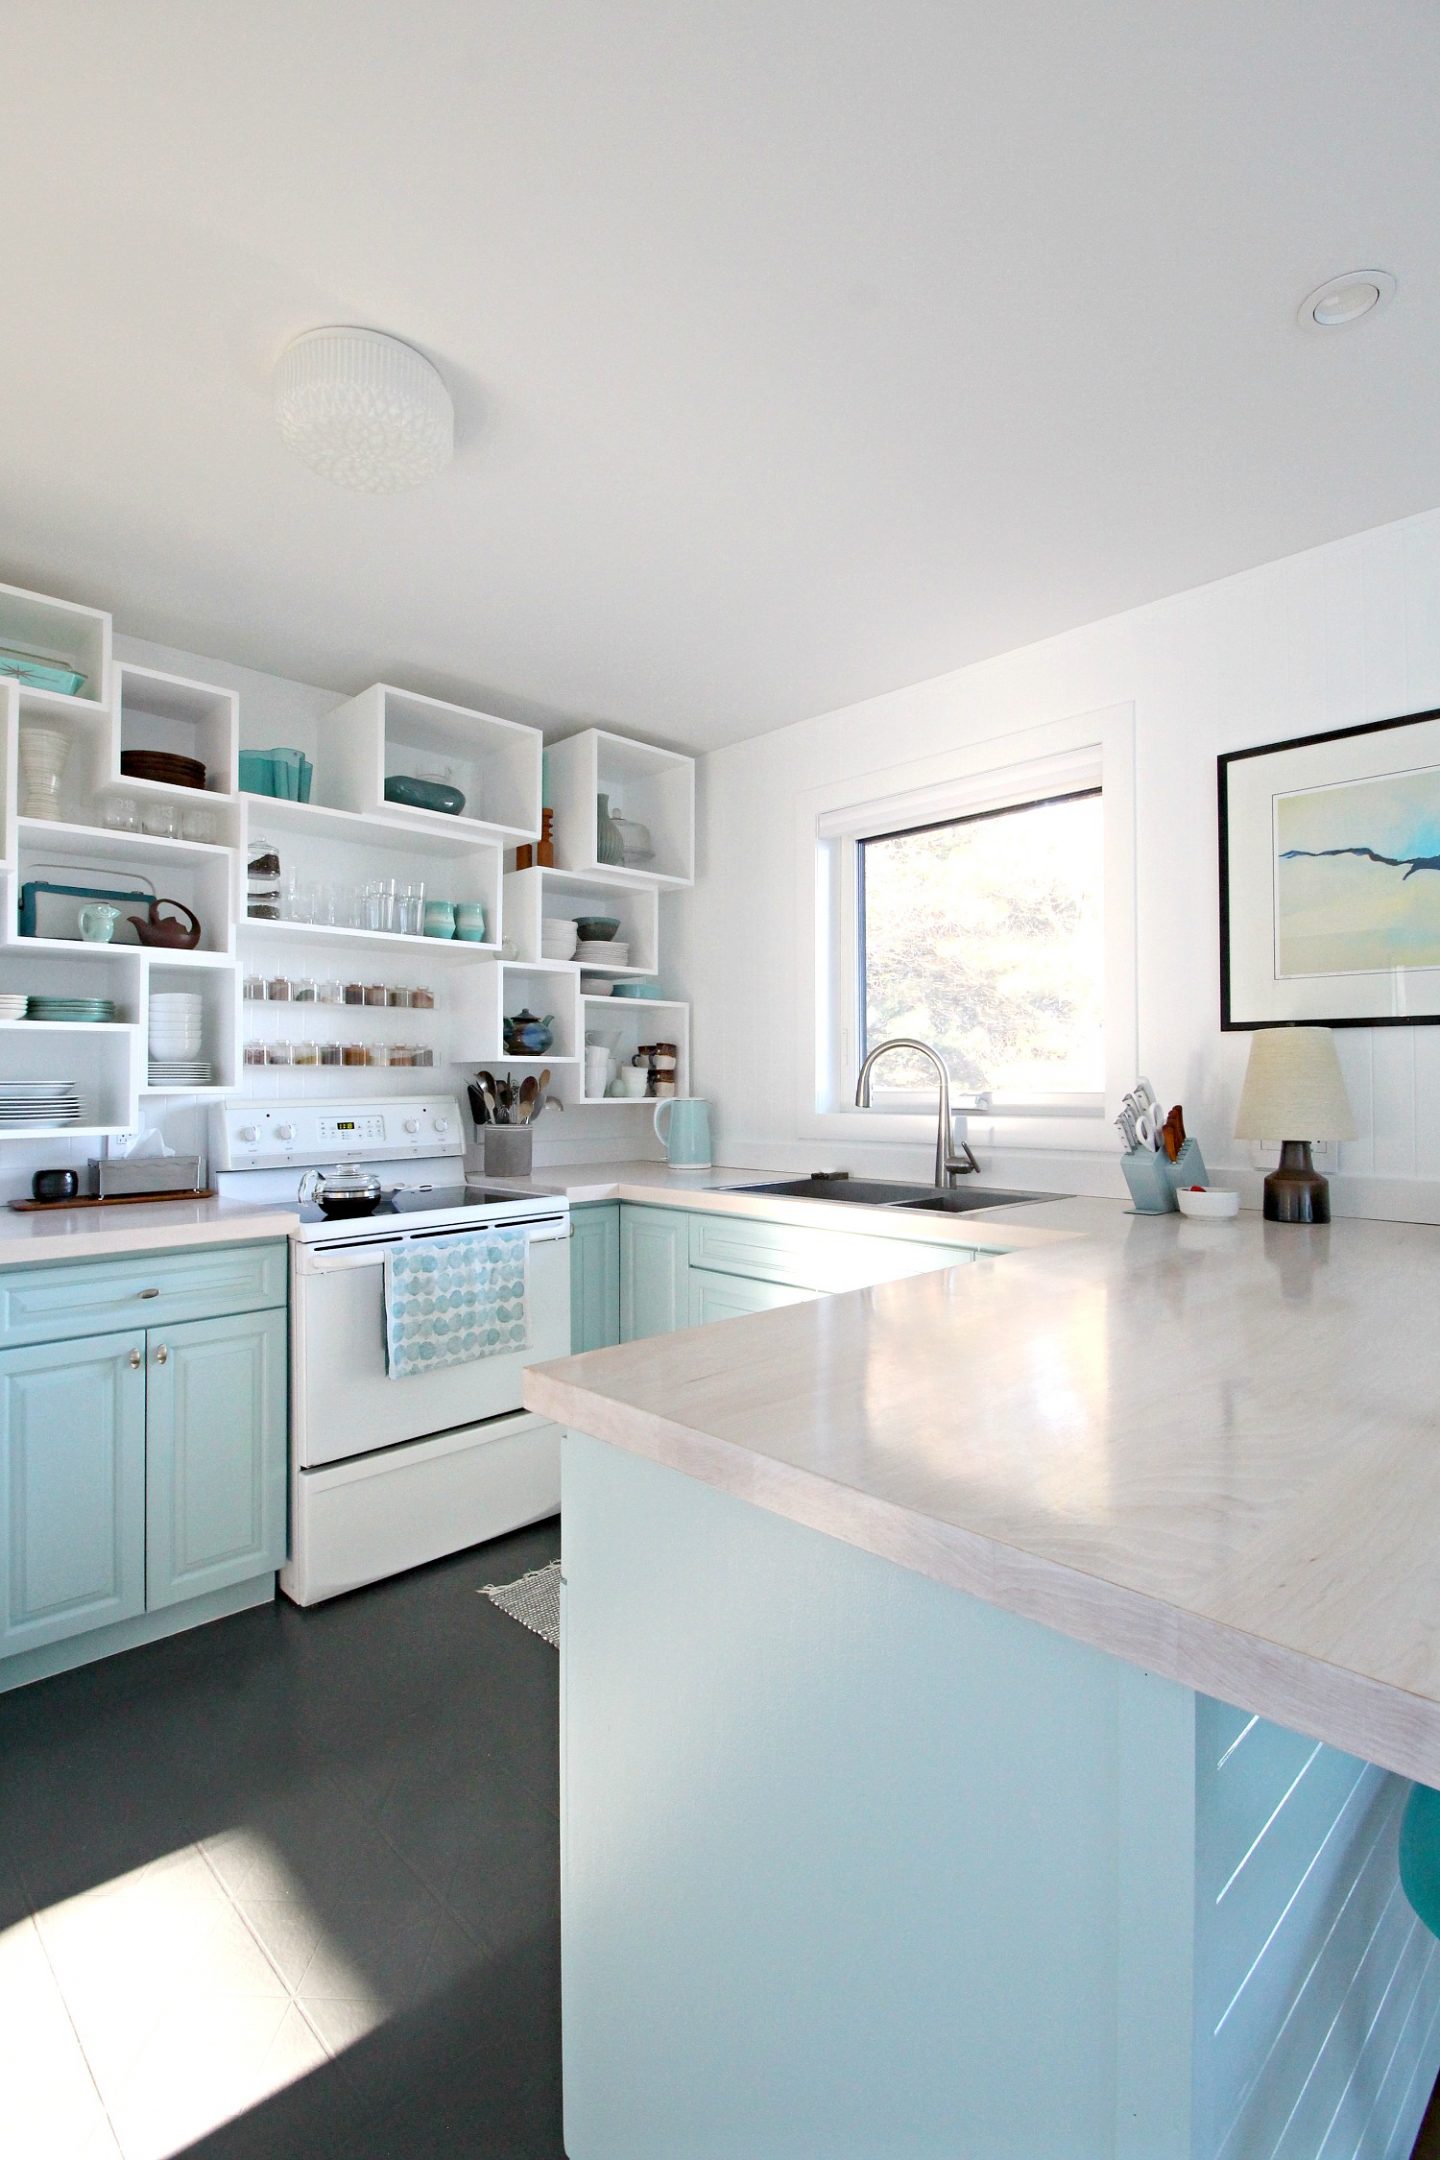
I babied the cabinets the first week, careful not to scrape or scrub the paint once they were installed but still inside the curing time. Today, the finish is rock solid. The Sherwin Williams Emerald Urethane Trim Enamel paint is exceptional quality. It really does level out and smooth as it dries! There were brush strokes visible right after I painted them, but they really did disappear! In the past, I chose a semi-gloss finish but this time I chose a satin and I love the velvety finish. The finish looks amazingly smooth, has held up to wear and tear, and it cured perfectly – no issues, even with only one coat of troublesome primer. I’ve since scrubbed these painted cabinet doors clean very vigorously and no problems. I am in love with the color too (Sherwin Williams Watery)! It’s so light and airy, but without feeling like a baby’s room – it’s a clean and bright, but soft and muted aqua. It’s the perfect color for a coastal kitchen vibe.
See My Sherwin Williams Watery Kitchen Cabinets Here
Click the link above to see more photos of my kitchen sporting its beachy new hue!
Why Did My Sherwin Williams Exterior Oil Based Primer Take So Long to Dry?
When I had problems with my primer, I called the store right away and the salesperson who recommended the primer then informed me that it will take longer to dry inside than outside, because it’s designed for exterior applications. I asked why and he said, “I don’t know… the sun?” So I went on a Googling mission and chatted about this in Instagram stories. Some people did say that some paint requires sunlight to dry, but I also learned that it could have been poor air circulation. Apparently you need to change the air periodically because it will saturate with paint solvents which can slow down the drying time of an oil based product. I did have our whole home air exchanger going at the time, but that pales in comparison to working outside on a project so my best guess is just that because it was designed for exterior applications it was saturating the air too much? In any case, the employee who helped me was right: the primer is an excellent base and it did eventually dry. I just wish I’d known it would take so long because I hadn’t budgeted that into my timeline.
Links to Past Cabinet Refinishing Posts and Tutorials:
Here are some other tutorials to help you update your bathroom or kitchen cabinets!
- How to Strip Wood Cabinets Back to Bare Wood
- How to Paint Cabinets with a Paint Sprayer
- How to Refinish Cabinets with Rust-Oleum Cabinet Transformations
- How to Strip and Re-Varnish Wood Cabinets
- Comparing Different Cabinet Refinishing Methods
P.S. Don’t Forget to Pin for Later!

I think this is an especially good color for any waterfront locales, while not being too beachy. So many good tips and techniques here, I’m marking this post for future projects.
Author
Thank you! And I’m so glad you found it helpful!
Hello!
This looks beautiful!
Where did you get the spice jars and shelves??
Thank you!
Author
Thank you! I bought these acrylic art ledges and they fit the clear spice jars from my spice carousel perfectly.
Great article but I cannot find “Sherwin Williams Emerald Trim Enamel Paint” on the SW website or anywhere else. There’s: Emerald Urethane Trim Enamel, ProClassic Waterborne Interior Acrylic Enamel, and ProClassic Alkyd Interior Enamel. What am I missing? A photo of the paint can would be helpful (as done with the primer).
Author
You’re correct, I missed the word “urethane”. It’s the Sherwin Williams Emerald Urethane Trim Enamel – I’ll correct the post. Thanks!
Great article – thank you! Any tricks to rehanging your cabinet doors after you paint? I have test painted the bathroom cabinet and our kitchen island. The same paint you used from SW I’d fabulous! But I cannot hang the doors back straight. Ideas???
Author
You might not have what I have, but I have adjustable hinges. They look like these ones. Inside the cabinet box, there are screws on this hinge and tightening/loosening one of those raises and lowers my cabinet doors, so that’s how I straighten mine. Here’s a youtube tutorial. If your hinges look like mine, then that’s the trick. If they’re just plain hinges then I’m not really sure why they’re not on straight. Sometimes mixing up the doors can be a problem, because the holes might not line up 100%. I have put my doors back in the wrong spot and that has caused a problem before.
I’ve been using emerald on my trim/cabinets/doors, and I think it is worth mentioning that it feels a bit chalky. It’s not like not regular paint- but it’s easier to use than oil, less VOCs, and self levels like a dream.
Author
That’s interesting feedback. What finish are you using? Mine doesn’t feel chalky…
We painted our house white and all the exterior doors are the same SW watery color and I love love love it too! A gorgeous color that when paired with a bright white is such a pretty pop! Great job with the cabinet paint! I’ve been wanting to paint my cabinets but am so scared! Def saving this!! Thank you for sharing!!
Author
Oh gosh that sounds absolutely gorgeous!! I LOVE a white exterior with soft aqua front doors. Painting cabinets makes such a difference – you can definitely do this!
How has this paint held up? Did the satin feel smooth to you? I’ve read reviews that it feels chalky. How well does it wash? We plan to paint two unfinished bathroom vanities a dark navy color and have been looking into the satin sheen of the SW emerald urethane line.
Author
This has held up really well and the timing of your question is impeccable: I literally just washed my cabinet fronts today. Even set in/dried on stains wiped off effortlessly with just water and a rag. I used to have semi-gloss finish cabinets (in a dark teal) and the transition to this satin finish has been no problem in terms of keeping them clean. I would say it is smooth: not slippery like a semi-gloss, but not as matte as eggshell paint you might use on walls. While I can understand what some people might mean by chalky, because it’s not as shiny/slippery as semi-gloss and definitely closer to a matte finish than a glossy one, it’s definitely far from being as matte as a chalk paint. I would recommend grabbing a sample pot, if you can, and painting a piece of scrap wood to see for yourself. The finish might change the look of the color you’re planning to use – I know when I chose my dark teal cabinet color, the difference in appearance of color between the satin/semi-gloss was very dramatic. But in terms of it feeling smooth, it feels smooth to me. I hope this helps! I’ve been very happy with the quality of this paint and how it’s held up.
How do you think it would look to have edited cabinets and use Watery pain color on the walls? Do you think it would be too much of that color? We love the beachy look but don’t want to overdo it.
Author
I have used a paint color almost the same color, with similar intensity, as an accent wall color and I don’t find it overpowering. It’s fairly soft, although lighting will change it for sure. With cabinets breaking up the color, I don’t think it would be too much. If you like to color but want it to be even softer, you can always have them tint it 50% at the store. It would be a lighter, paler version, but still the same color shade.