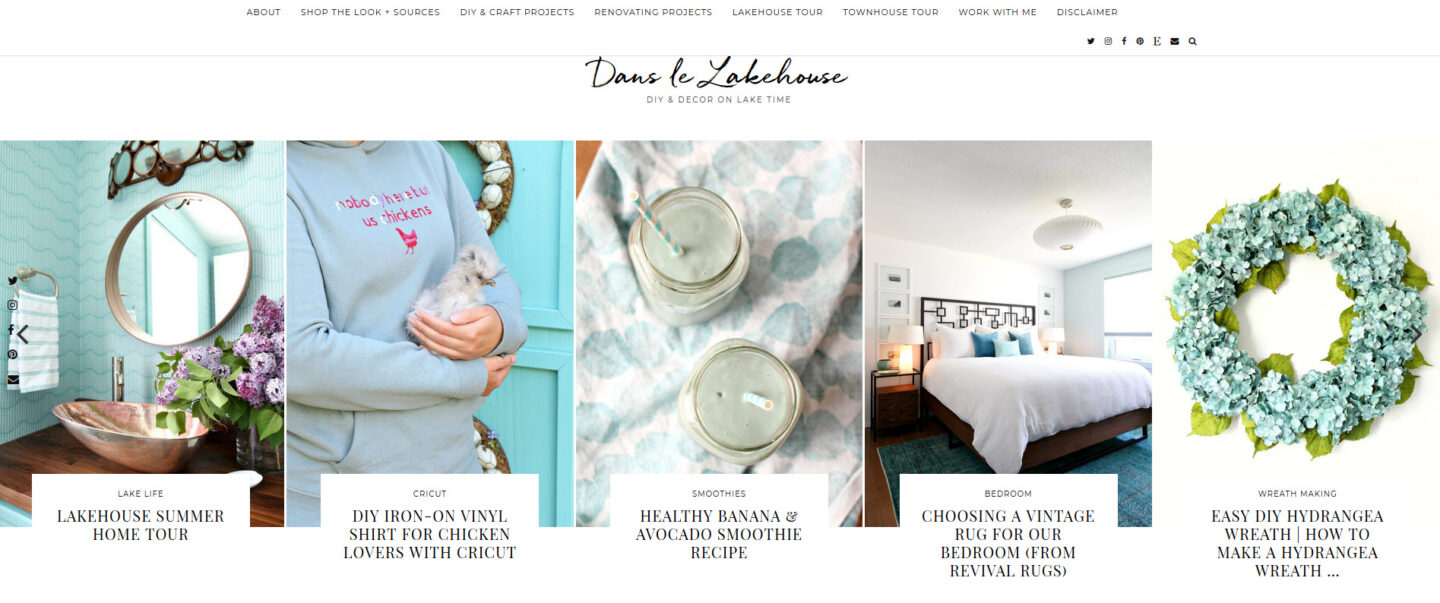
Welcome!
Hello! Welcome to my Pinterest Guide 2021: How to Use Pinterest & Leverage Pinterest for Website Traffic.
My name is Tanya and I’m the DIY obsessed blogger behind Dans le Lakehouse:
Thank you for purchasing this Pinterest guide. It’s part of a larger series of guides I’m creating, about how I turned blogging into a career – and how you can too. I get a LOT of questions about how I make money online and how I grew my website, so I wanted to write these guides as an easy way to share what I’ve learned. I am not a blogger who makes my money showing other people how to make money blogging – this guide took forever for me to write because I’m actually busy running my website and earning a living through my blog. Blogging about home decor and DIY will always be my primary focus (although I also want to open a print and textile shop)! These guides are a passion project for me and that’s an important distinction (I’m always wary of “gurus” who make their money telling people how to make money online).
I am super excited that you’re here because I want to help you leverage Pinterest to drive a LOT of traffic to your website, blog, or business (or even Instagram account or affiliate links)!
I’d love to connect with you, so I encourage you to find me on social media – I’m @danslelakehouse on Instagram, Twitter , TikTok, and Facebook. I’m most active on Instagram, so feel free to DM me any Pinterest related questions. If you’d like to see my pinning strategies in action, be sure to follow me on Pinterest too!
Your time is valuable, so let’s get right into it!
Pinterest Guide Outline
This Pinterest guide is broken down into sections and is self-paced.
I recommend viewing this guide on a laptop or tablet, as opposed to a cell phone.
I recommend going through this guide as soon as you can and start putting these tips into practice right away. The Pinterest algorithm is always subject to change, so I want to make sure you get as much value and traffic from this guide as possible (and as soon as possible).
If you’re new to Pinterest, just start. That’s the hardest part. If you’re already using Pinterest, try implementing a few of these suggestions right away!
In this guide I’ll break down how to drive traffic to your website and make money using Pinterest, from the very basics (what is a pin?) to more advanced techniques, along with best pinning practices and the tools I use to easily grow my audience and reach on Pinterest.
Because Pinterest is always changing, I recommend that you start keeping tabs on your Pinterest analytics right away. Keep checking those analytics as you implement these suggestions. Really get to know Pinterest so you can adapt to changes and take control of your growth and reach. Pinterest typically announces new changes and best pinning practices, so once you read this Pinterest guide and have your pinning down pat, you can easily adapt to new changes without needing to purchase a new course or guide. You can finally maintain and take control of your Pinterest growth!
Table of Contents
Here’s a linked table of contents for easy access!
- My Pinterest Stats
- What is Pinterest?
- Understanding the Importance of Keywords
- Discovering Tailwind
- Setting Up Your Pinterest Account
- Encouraging People to Follow You on Pinterest
- Creating Pinterest Boards
- Learning Pin Basics
- Deciding What to Pin and From Where
- Sticking to Best Pinning Practices
- Creating Winning Pins
- Emphasizing Fresh Pins in Your Pinning Strategy
- Building Momentum of Popular Pins
- Earning Money from Pinterest
- Paying for Promoted Pins
- The Takeways
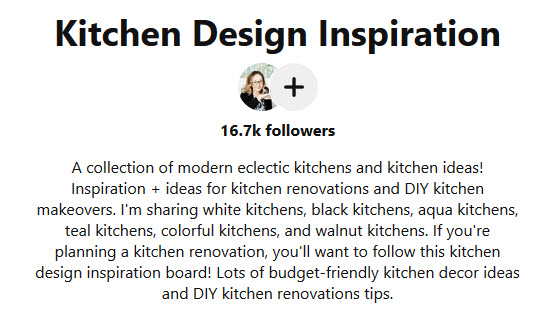
My Pinterest Stats
I want to share a peek into my Pinterest stats and also share a little story about my growth, to encourage you not to wait! Hopefully you find these numbers – and the meaning behind them – motivating.
My statistics vary from season to season, and will occasionally dip (like in the summer, when we collectively spend less time online), but overall my stats are on an upwards trajectory.
My Current Pinterest Stats:
In December 2020, I had 35,000+ Pinterest followers and 5.8 million monthly viewers, but then Pinterest changed that to views and my displayed stats shot up to 9 million views. Then it changed again and after asking Pinterest support for clarification, I learned the new metric is Pinterest views but only views on pins you created, not pins you saved/re-pinned. So for me now this number fluctuates (currently 4+ million), but that’s because it’s only focused on my own created pins.
The really important statistic is how much traffic Pinterest drives to my website – which is over 100,000+ page views per month views per month. That number is consistently growing (plus it really blossoms around the holidays, especially November/December, which is also when revenues are highest for display ads). In the past year, each month has been my BEST month for website traffic – I’m consistently beating my previous best!
My Missed Opportunities – Don’t Be Like Me:
It’s painful to think back about all that missed traffic (and income!) I could have gotten from Pinterest in my early days of blogging. I started using Pinterest years ago, just for myself, to pin ideas and recipes and really random things. My boards were a mess and I pinned really randomly – filling my followers’ feeds with an obsessive number of pins for whatever I was planning that day and then ghosting the app for weeks. I must have been really annoying to follow!
I could see from my website statistics that other people were pinning images from my website and I just hoped more people would because getting that traffic was awesome. I would occasionally pin my own content, to a board or two, but back then there was this “rule” that you had to pin 80% other people’s content and 20% your own, so it became really laborious to curate all that great content just to pin a few things from my own website.
But things shifted and people began taking the time to properly categorize and describe their pins. The old 80/20 rule went out the window and using Pinterest for self promotion was no longer taboo! I dusted off my Pinterest boards, deleted some and re-named others. I already had a following of a few thousand so I didn’t want to re-start, but it took a lot of work to get my boards into shape. Sometimes I still find an old rogue pin that’s ugly or has a broken link.
A couple of years ago I developed a new, focused strategy for Pinterest and immediately saw results. I wish I hadn’t waited!!

In the fall of 2019, I doubled down my Pinterest efforts and had my best month for website traffic EVER in December 2019. Then the algorithm changed in January 2020 and I had to change up my tactics again. By the spring of 2020, I had surpassed my December traffic goals for my website. Pinterest will keep you on your toes a little, but if you follow best Pinning practices – with some extra bonus tips – you can easily adapt. It is not secretive and mercurial like the Instagram algorithm.
But the one thing I want you to get from my story is: DON’T WAIT! Get started – even one great pin could double your traffic views.
Don’t Get Too Bogged Down in the Numbers Game:
Once you start tracking your own Pinterest stats – or look at mine – you’ll notice that sometimes the monthly viewers will fluctuate. Don’t get too bogged down focusing on certain numbers! Especially the “vanity” numbers, like monthly viewers. I have a friend who had 10 million + monthly viewers and we compared Pinterest traffic in 2020 – I was surprised to learn that our traffic to our websites from Pintetrest was very similar. But, since we spoke, mine has skyrocketed even though my monthly viewers hasn’t increased too much. 10,000,000 monthly viewers has been my goal, so I was shocked! For my “smaller” size of Pinterest audience, I generate a lot of traffic. And I have seen really tiny accounts create amazing pins and generate a lot of clicks too!
So that big number doesn’t really matter – neither does the number of followers you have on Pinterest. Although both of these definitely help, they aren’t the be-all, end-all and you shouldn’t spend too much time obsessing over them. Which is difficult, I know – social media is such a comparison game, especially when everyone’s stats are displayed front and center!
The most important number will be: are you converting people? Luring them to click over? Driving traffic your way? ARE YOU GETTING CLICKS?
I’ll help you get those coveted clicks and GET PAID!
What is Pinterest?
Before I dive into my “hacks” and examples, I want make sure everyone is on the same page so let’s go back to some basics.

How People Use Pinterest:
If you’ve never used the app, the best way to describe it is this: Pinterest is a sort of a blend between Instagram, Google and those Inspiration Binders we all kept back in the day (maybe I’m dating myself here) – you know, those tear outs from magazines and catalogs, categorized and labeled.
It’s like Instagram (or any other social media) in that you can follow people (or just some of their boards) and leave comments. If you try a project or recipe, you can upload your own photos to the pin that inspired you and share a review. So there is somewhat of a social/interactive component. Sometimes you’ll see the comments for a particular post are lit – like the pin for this particular face mask, below. It’s a pin and product that got people talking and sharing their photos and opinions in the comments. Usually, though, you’ll find the comment feature remains unused or at least under-utilized.
It’s like a search engine because people will hop onto Pinterest and search for specific things.
It’s like those binders we all had, full of inspiring ideas torn from magazines, because it’s very visual and focused on images which you can label and then put into boards for easy access (which are like the folder tabs in a binder). Some people even pin images with no link – they just want a handy place online to “store” an image for later. But Pinterest is way better than those binders because, if you write good captions on your pins, you can find them again by searching the key terms within your own pins or just navigating your well organized boards. So it’s a way to find new inspiration and also keep track of and organize the inspiration you have saved.
At its core, it’s a digital way to keep track of links, organized by their photo. Importantly, unless you choose to set your boards to “private,” other people get a peek into your pins.
Pinterest is a Search Engine, Not Social Media:
The first mistake people make is thinking that because Pinterest is structured like social media, you need to use it like social media. In the beginning, people didn’t put good pin descriptions and their board names were cutesy and unhelpful (think: “nom nom” for a recipe board). Back then, it was important to follow good accounts you trusted to curate pins well, otherwise you’d never find anything! Now, after years of honing, it’s more a search engine – so think of it like Google.
Yes, people will go to Pinterest and scroll their home feed or leave comments and engage on certain pins. They’ll definitely seek out and look at a particular influencer or blogger’s Pinterest page. People will follow entire accounts – or just pick and choose certain boards, but mostly people will search! They will use the Pinterest search bar and look for “how to raise chicks” or “easy keto dinner ideas”.
When you’re pinning, think of the end user: how will you help them find your content?
You want to make sure that when they’re looking for something, they find your post!
Update for 2021: While the above is still very true, I was sensing a change in how Pinterest operates that was recently confirmed by a Tailwind tutorial I watched. Lately more and more pins I have looked at have popped up later with a message from Pinterest, asking me to review or share a photo if I tried that pin. The other day in my dashboard, a notice popped up to engage with comments that had been left on my pins. I never think to look or answer them, but I did it right then and there because I sense that Pinterest wants us to stay on the app more. Not content to be a search engine, I think the platform creators want us to spend more time there, connecting, commenting, engaging (and, of course, being a captive audience to the ad spaces they’re selling).
What Can You Pin?
I’ll go more in depth, covering the ideal pin and how to create content that does well, but let’s just get the “how to use Pinterest” basics down for any Pinterest newbies.
You can pin any image/video on its own or leading to any URL:
- You can pin from any website so that the pin, when clicked, will lead back to the website (be sure to pin from individual posts and pages, so that the pin can lead back to that specific content and not a homepage or main page)
- You can also create your own pins right in the app by uploading an image from your computer/phone and adding any URL
- You can also upload a photo from your phone and computer and leave the URL blank
- You can also re-pin content from within the Pinterest app
So your Instagram post? Pin it!
That great sofa you have an affiliate link for? Pin it!
The products from your shop? Pin it!
A cool product photo you took? Upload and pin it!
Theoretically, you don’t even NEED a website to benefit from Pinterest – you can create pins right within the app and have them lead to your affiliate links or Instagram page!
I’ll delve into more detail about how to create pins (and how to make GREAT pins).
Understanding the Importance of Keywords
There are a couple of things I’ll mention over and over in this Pinterest guide, so I’d like to explain them in this section so that, moving forward, you know exactly what I mean.
Because I will talk so much about keywords in this guide, here’s what I mean and how you can find them. Keywords are the words people are searching for (ex. “keto dessert recipes”) – you want to make sure you use relevant keywords so your pin is found. So if you’re writing the description for a pin about keto recipes, don’t write “good idea for Sam’s party” in the description, you want something that starts with “easy and healthy keto dessert recipe idea…” and then build it out from there, using all of the characters you’re allowed and mixing up keywords because people might also search “keto desserts” or “keto dessert recipes” or “keto chocolate cake” – find those related search terms and integrate them into your pin description. You will use keywords in everything from your profile to your board names – they’re the “KEY” to success on Pinterest!
How to find keywords?
Pinterest has a built-in method for targeting keywords! When you type in a search term, Pinterest offers up related keywords. When I typed in “keto,” Pinterest also suggested some related keywords and if I had typed in “keto desserts,” I’d get even more specific keywords. So right in the app, you can search for related keywords!
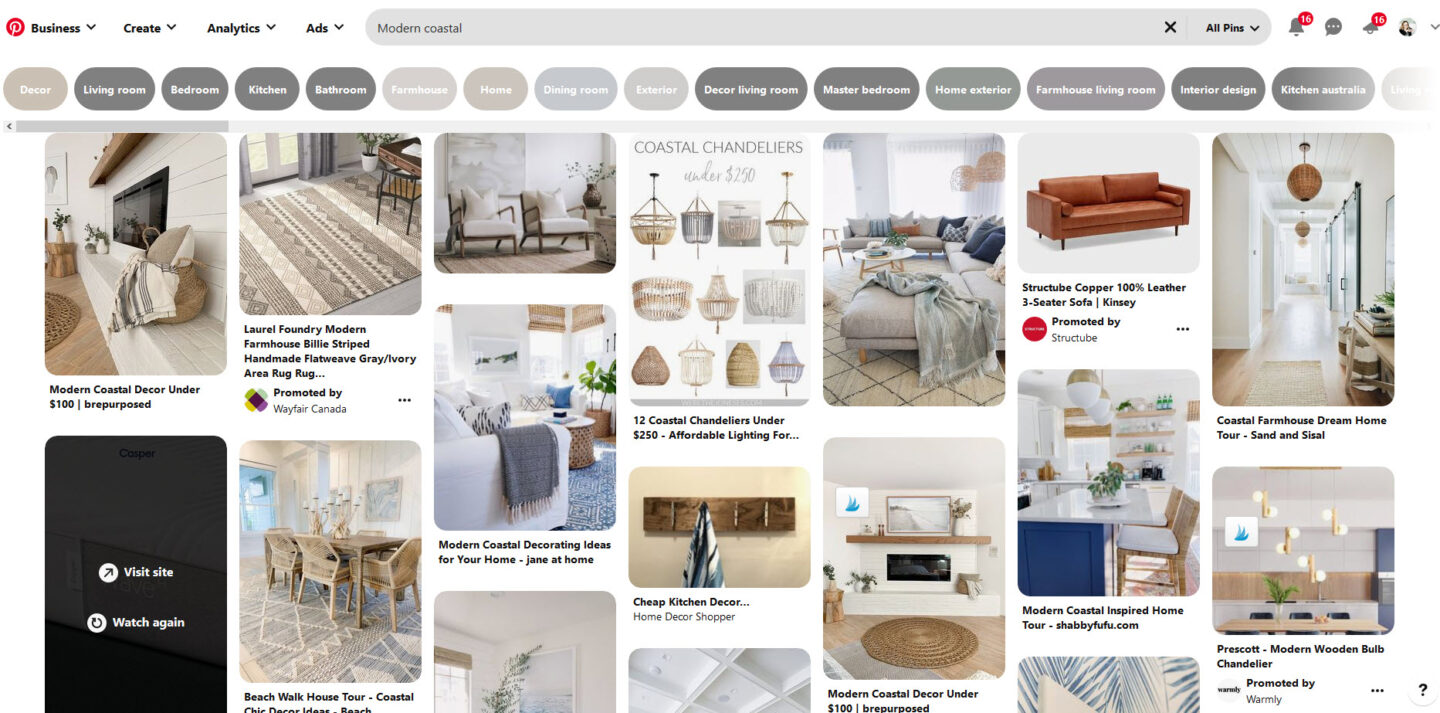
Here’s another example, this time from my desktop (I searched “modern coastal”), and you can see the other suggested/popular search keywords along the top:
You can also use Ubersuggest to find keywords (I use that for SEO – search engine optimization – for my website also). These two methods work if you already have a rough idea of your content and how people might search for it. If you’re still at the point of figuring out what to write about, you can use trends.pinterest.com to see what people will be searching for (you can filter by country). Pinterest even shares insights into trends and what’s popular on their Pinterest Insights page (and here’s the list for 2020 trends predictions and popular themes/content).
Try to use these trends in your pin and board descriptions – and even your content creation.
Be careful with your keywords and take the time to put the right ones for your topic/content in your username, profile, board names, board descriptions, pin titles, and pin descriptions (I’ll talk about this in more detail).
Discovering Tailwind
You don’t NEED to use Tailwind to use Pinterest. Many people don’t use any kind of scheduling tool at all, which is called “manual pinning”. But if you want to get serious about growing your traffic with Pinterest, I think a scheduler is an invaluable tool.
I will mention Tailwind a lot – it’s a scheduling tool for Pinterest (Pinterest approved! Nothing shady about it) that costs a bit of money per month, but saves SO MUCH TIME.
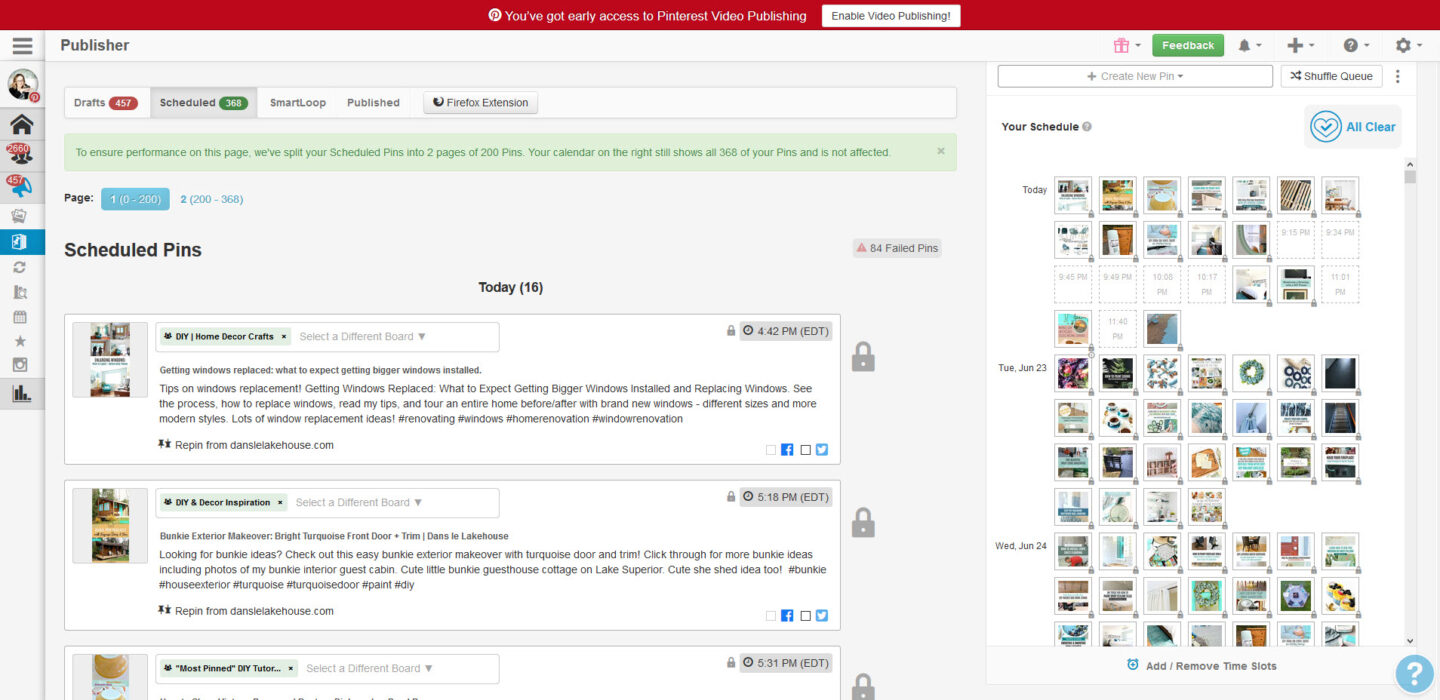
Plus, it gives you insights Pinterest doesn’t, so you can analyze your boards, group boards, pins, etc., to tweak your pinning habits to maximize performance. At the back end you can schedule pins days, weeks, or months in advance:
It’s AWESOME! I have used Tailwind for years and LOVE it so this is a genuine recommendation. You can manually pin with all of the following tips, but Tailwind automates your pinning to save you valuable time and also deep dives into stats to adjust your pinning practices. There are added bonuses and resources: for example, Tailwind hosts live Q&A’s from people who work at Pinterest, shedding light on changing algorithms and best pinning practises, etc. When you use it to schedule pins, it will warn you if you’ve re-pinned too soon or have pinned to too many boards – it’s worth every cent!
Setting Up Your Pinterest Account
Alright, we’ve covered some basics: what is Pinterest, what is a pin, the importance of keywords and my favorite Pinterest scheduling tool. Let’s move on to setting up your Pinterest account.
Set up a Pinterest Business Account and Claim Your Site(s):
Once you set up your account (Pinterest has instructions to walk you through this), go to the options menu in the upper right corner (looks like a little nut or gear – in the black bar in the screenshot below) and choose “Get a Free Business Account“. It’s important you have a Business Account on Pinterest because you’ll want to see and track your analytics.
Use your blog or business website as your website and claim/confirm this site. It’s important to confirm your website, but also your Instagram, YouTube or Etsy shop (if applicable). That way pins from those go toward your engagement and are attributed to you, and you can track them easily too. Once you click that “gear,” navigating around Pinterest to set up your account is pretty straightforward – just enter all of the information and follow any instructions/prompts.
Update for 2021: It’s very important to CLAIM your website because now Pinterest has changed the key stats they show you. We used to be shown viewers on our profile, but then that changed to views and now it has shifted from all views to ONLY views to content your created. So it’s important that Pinterest knows what is YOUR created content so that metric can be calculated properly.
Profile Photo:
If you’re just setting up your account, make sure you use an engaging profile photo – avoid a logo, people like to see a face. Have someone else take the photo because a selfie can be a little too zoomed in and TOO MUCH FACE.
Make sure the image says what you want it to say about your business/brand/website. If it’s a website about DIY fishing – have a great, clear, crisp photo of you holding a fish! Or in a hat with a fish logo! Or a profile shot in front of the water. Or wearing/holding the product you sell. Find a photo that looks professional and eye catching (no grainy, over exposed cell phone photos from 2000, please) that draws people in and signals what people should expect from your content and brand. A relaxed blog about fishing shouldn’t have a head shot with you in a suit looking formal. So get that vibe going already in your profile photo – and smile!
Mine used to be a head shot with a turquoise top but I changed it to one of my holding a chick in front of my beautiful credenza with some art in the background – it’s got a little home decor, a little turquoise mixed with some rural quirkiness – and that’s my jam! It’s a colorful, fun photo and that’s what you can expect of my brand. Plus my hair was freshly blond and I was feeling good.
Custom Banner:
The collage of photos behind my profile photo (the banner, for lack of a better word) can also be customized: you can upload an image or video, or choose which board(s) those pins are pulled from. I have left mine as a default but it’s an option to customize which I might do. I had it set to default but recently switched to pulling pins from my “Dans le Lakehouse” board, because it provides a snapshot into what I am pinning.
Display Name:
You are given a user name (mine is “danslelakehouse” which results in this link: www.pinterest.com/danslelakehouse). Use your brand name or website name for that, for consistent branding.
You’re also given a display name, which will be longer. Make that display name a combination of your brand name and some applicable keywords.
Create a display name that says what you do so when people search your main niche, they will find your account! Use those keywords I talked about above! Not all of it will show in searches – you’ll see in the screenshot below mine is cut off, but Pinterest can read it all and will act accordingly!
I change mine from time to time, but right now it’s “Dans le Lakehouse | DIY Projects, Thrifted Home Décor & Turquoise”
I don’t use my given name anymore, because who cares? People won’t search “Tanya,” but they might search my website/brand name (Dans le Lakehouse), or “DIY” – and “thrifted home décor” is a trending search term recently pointed out by trends.pinterest.com, so I added that because I do share and pin a lot of thrifted finds and makeovers and, with the current economic climate, I am predicting we will see more demand for budget-friendly décor. So I updated my display name and also created a new board with “thrifted home décor” and “thrifted store crafts” as well – to be ahead of the curve a little. Have your display name include the topics you’ll be pinning most – or what you think will drive a lot of search traffic your way!
If you search the keywords in my display name, my account pops up in searches:
Add Keywords to Your “About” Description:
When you edit your profile you’ll see options to edit the section “about your profile” and you want that to be quick and readable, on brand, and also filled with keywords. Right now mine is: “BEACHY DECOR & SUSTAINABLE LIVING: Modern DIY Projects & DIY Crafts, Thrifted Home Decor, Home Renovations on a Budget, Backyard Chickens & Lake Life”.
Some people recommend incentivizing this area (like, “sign up for my newsletter for a free downloadable thing”) or adding something catchy like, (“check out the blog for more FREE DIY plans”) but I have experimented with all of these ideas and found blah results. People on the app tend to stay on the app unless a pin inspires them to click over. So use that about section to paint a picture about what kind of content you will be pinning and why people should follow you.
Keep Your Personal Account Personal:
If you have a personal account, keep it personal (or set those boards private if you’d like to use the same account for business/personal pinning).
I only have one Pinterest account because I can’t handle two. I have dozens of secret boards (when you edit a board, you can set it to secret), so that I can use it for myself and also promote the Dans le Lakehouse website at the same time. I just make sure to always pin for my audience, even if I’m secretly pinning a little for me too. I didn’t want to start fresh because I already had a following of thousands and some momentum.
If you have already gone nutty pinning things and your boards are a mess, start fresh with a new account or make all of that content private.
Encouraging People to Follow You on Pinterest
Good pinning practices, which you will learn in this Pinterest guide (like consistency, using keywords everywhere, pinning high quality content) will help you grow organically within the app. People will find you and want to follow you – Pinterest may even recommend you to new pinners. Using new features, like Pinterest Stories, will also help you be discovered.
You can also do things to help encourage people to follow you on Pinterest. Make sure to have links from your website. These were set up with the blog template I purchased. I have my social media icons people can click to follow me, but I also have a widget that pulls my latest Instagram posts and Pinterest pins because I want to focus my growth on those two platforms. If you want to do it yourself, Pinterest has other widgets you can use. You can also try a pop up, like one hosted/created by MiloTree but I find pop-ups distracting as a viewer, so I avoid them personally. I did use the MiloTree Pinterest pop up for awhile and it functions very nicely.
I even created a custom Instagram “link in profile” for myself and added a link to my Pinterest account there too, in addition to links my website, other social media, Etsy shop, affiliate Amazon shop, and also my DIY and renovating project galleries.
Sometimes in a blog post, especially a round up or if I’m planning a project, I’ll link to a Pinterest board of mine and write, “check out this Pinterest board on modern coastal home decor to see what direction I’m headed,” or “find more create DIY sewing projects here” and I’ll link to my sewing board.
Creating Pinterest Boards
Before you get started pinning, you should have you boards ready! Or maybe you’ve already been pinning and have boards set up. Let’s stop for a minute and make sure your boards are optimized for success.
How to Create a Pinterest Board:
Pinterest is really awesome when it comes to the platform being laid out easily and providing lots of resources, so I won’t spend too much time on technical things. To create a board, you’ll see a + with a prompt to “create a board” or, when you pin something, you can choose existing boards or create a new one right then and there!
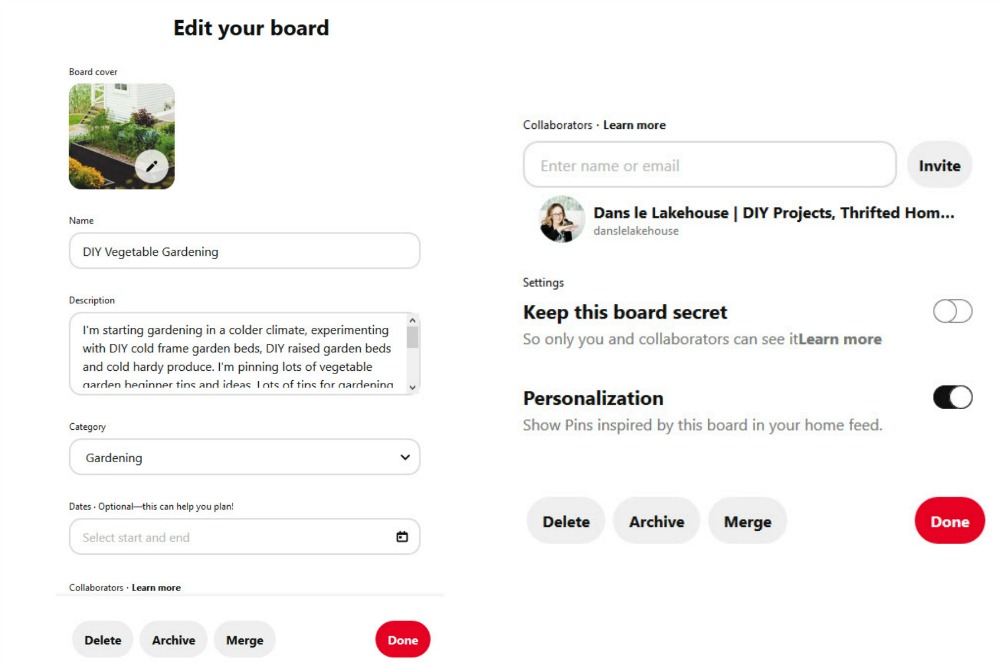
When you edit your board (click the board, then the three dots, and choose edit) you’ll get a menu that looks like the screenshot below: you can choose your board’s cover photo, name it, add a description, choose a category, delete or merge the board. You can also add collaborators, keep it secret (perfect for your personal boards) and use it to inspire the kind of pins you are shown:
How Many Pinterest Boards?
The number of boards you start with doesn’t really matter – you can add new boards at any time. If you want an “ideal” number, I say start with at least 10-15 boards for now and then grow from there.
Taking the time to create GOOD boards is important so focus on quality over quantity when you’re just beginning. If you’re totally new to Pinterest, go with a number that feels manageable to you right now. Create one at a time if you’re doing this on the side, alongside a full time job. Create a board, pin some content (a mix of pins from your website, pins from other sources, and a few re-pins mixed in), spending time to get the keywords right on the board name, description, and populating with high quality pins. Then move to the next board.
Just start! Don’t get bogged down in numbers again. Five boards isn’t as good as fifteen boards but it’s better than none.
Other guides stress people out with how many but really, once you get going you will get the hang of it and LOVE pinning so soon you’ll have to think about maximum number of pins per day (that’s a real thing).
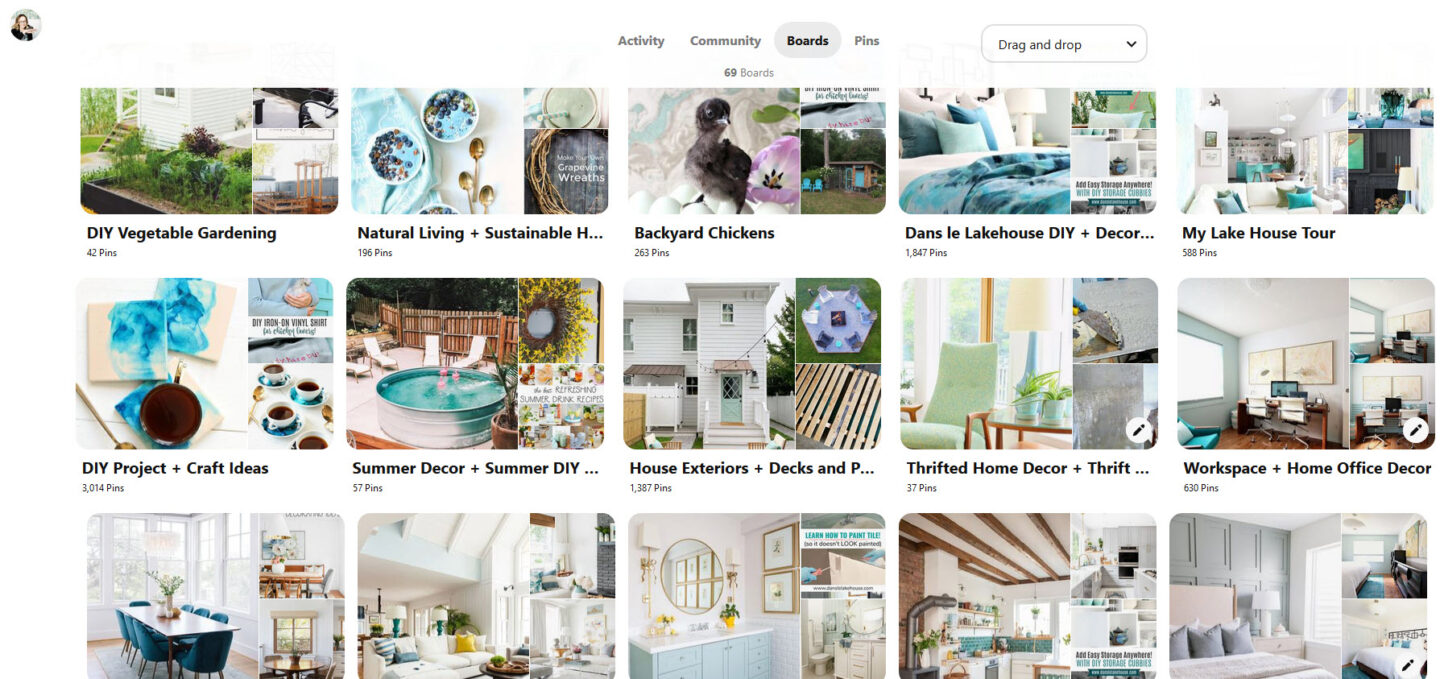
For reference, I currently have 69 boards but 16 of them are group boards. I have friends with over 200 boards. I’ve recently been working to niche down more myself, so I have been adding a couple of boards each month and sometimes re-categorizing boards. For example, I had a Dining Rooms/Living Room board that I spent two DAYS reorganizing to have two separate boards: Dining Rooms and Living Rooms.
Ugh, that took forever, so take the time to figure out your categories/board topics NOW because doing it later is a lot more work – but not impossible, so don’t stress too much. I don’t want to stress you out.
Aim to fill your new boards with 50 pins each (minimum), so none of them look sad and neglected and then you can build from there with steady and consistent pinning.
How to Determine Board Themes:
Remember this: You want to pin to serve your audience.
If you’re starting fresh with your account, make a list of the topics you cover on your website, blog or shop – search around and see what other people in your niche are doing to find inspiration.
Once you have your list of topics, then think of your ideal client – who do you think (or want) to follow your blog or business? What are they into? Are there any related topics? For example, if you run a website about backyard chickens, topics like canning and gardening might be other things your audience would be interested in and appreciate curated content on Pinterest boards they can follow.
If you run a DIY/lifestyle blog, you have the luxury of creating many boards – it’s a broad category. So think about the type of content you create and make sure you have boards to pin it to.
Create a board for your own content, but then get specific: “House Exterior,” “Dessert Recipes,” Nursery Décor,” Bedroom Décor Ideas,” etc.
When coming up with boards, think about creating resources for people and if your topic is already really niched down, then get super specific with boards. I only do a little gardening, so I created a DIY vegetable garden board. If I did a lot of gardening, or I was a gardening website, I’d do individuals boards about: cold frames, raised garden beds, composting, gardening tools, etc. If you have a business/website with a specific theme, like the Keto Diet, maybe your boards will be these topics: “Keto Snacks,” No Cook Keto Meals,” Keto on a Budget,” Vegetarian Keto Recipes”
The theme of your boards will vary, based on your business and brand, so take some time to think about it! You can take a look at mine, but also look at influencers/content creators/businesses in your niche who are doing well at Pinterest.
Niche Down Your Boards:
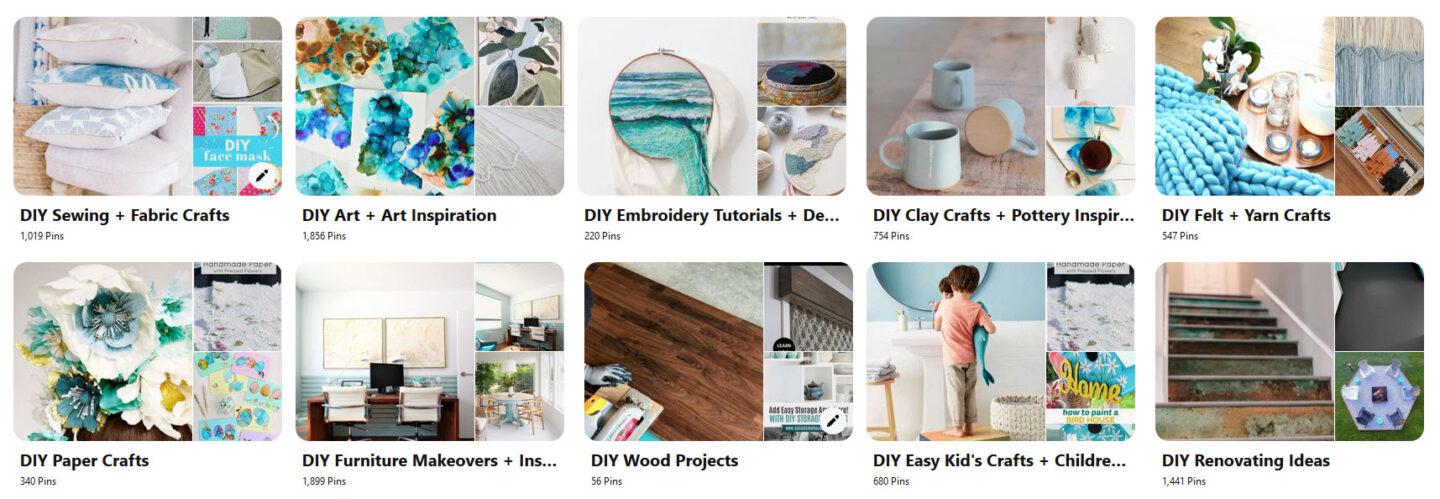
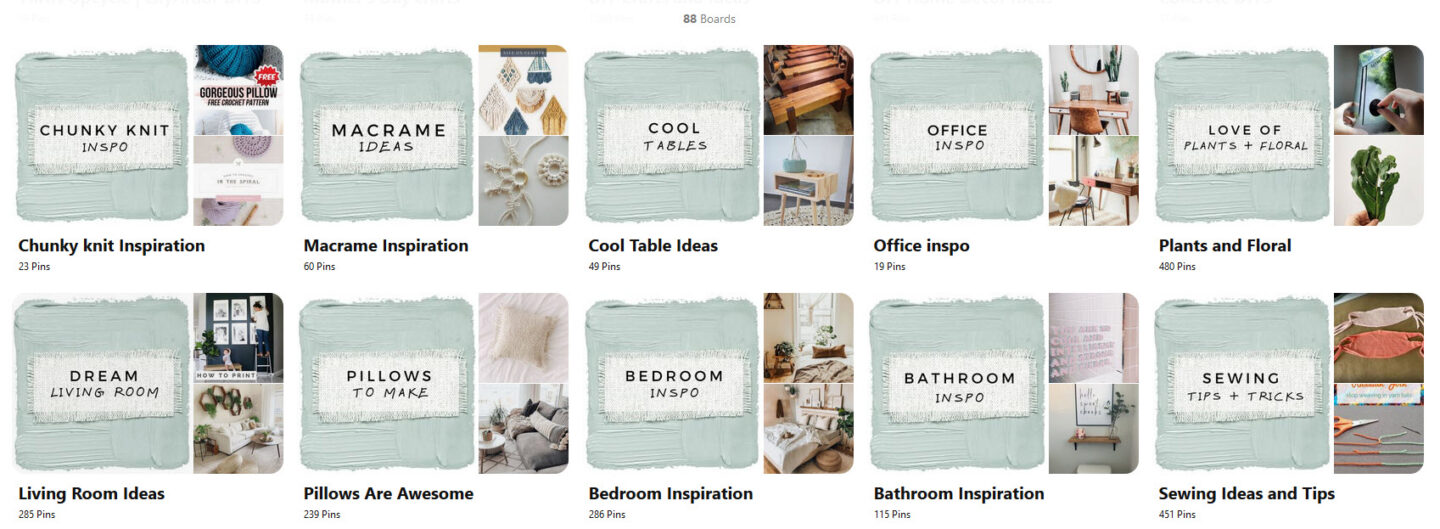
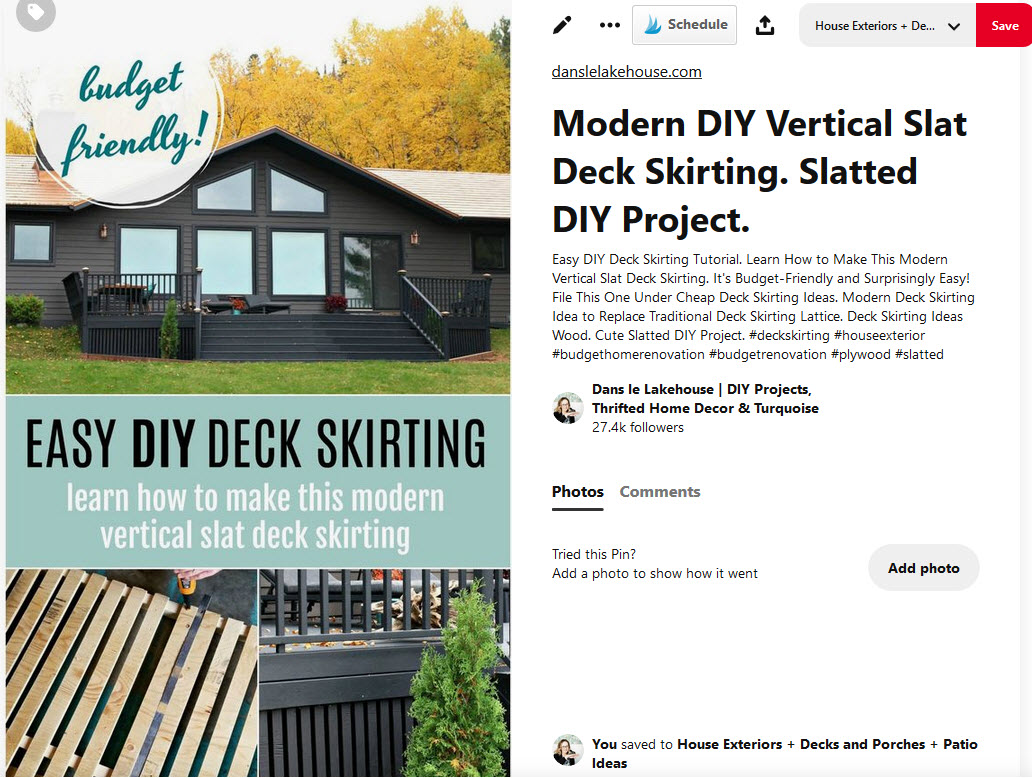
I’m going to emphasis this some more, because it’s important. In the beginning, I had one massive DIY board – I still do. It has a good following and gets a high number of re-pins so I kept it, but I also niched down and created more boards that are more specific, like “DIY Wood Projects” and “DIY Sewing + Fabric Crafts”:
Think about how people search – how you search. You probably don’t search for “DIY Projects,” you probably search for “easy sewing project” “DIY sewing ideas” “beginner Cricut projects”. The way YOU search can help shed light on how to create boards.
Creating more niched categories this way not only helps my boards get found, it also helps my boards become helpful resources for people to follow. If people search for “Living Room Designs” I want them to find my board! And then I want them to be really inspired by my board, which is not only on theme but on brand, with a curated selection of living room designs featuring my own blend of vintage meets coastal decor.
Narrowing down the focus/theme my boards also gives me more boards to pin to!
When I share a DIY ottoman project, for example, I want to be able to pin it to multiple boards, like: “Living Room Projects,” “DIY Furniture Projects,” “Dans le Lakehouse” etc. Not everyone who follows me follows every board – so I want to have clear, niched down categories that entice people to follow and by pinning across them I can reach more people.
A trick for traffic is to create boards centered around upcoming themes or popular topics. In the current climate, self-sustainability is trending so you might want to create some boards pertaining to that, if it’s a good fit for you. For example, if you see composting is trending, or predicted to be, and you pin gardening content, then create a board for it!
You can break down a board into categories within that board, so I could have a “sewing” section within my DIY board but I personally prefer to create individual boards because they are easier to find and I want to be found. But you can also organize your content within a board, just FYI.
Use Keywords to Name Your Boards:
Create specific boards for the niche(s) that your website focuses on and once you’re ready, name them. But don’t use cute names. Don’t use “yum” for a dessert board. Be specific: name your boards “Cookie Recipes” “Easy Dessert Recipes” “Keto Dessert Ideas” or “Coastal Home Décor”. Remember to make your boards findable and clear. Once again, type in your ideas into the Pinterest search bar, or use Ubersuggest, to see if better, related key words pop up.
Don’t forget to add a topic – click the 3 dots on the top right of a board, and then “edit” and select a topic from Pinteret’s options.
Create Awesome Board Descriptions:
Once you have created your boards, do the same search to find keywords for the board description. So if your board is about “Keto Recipes” search that term in Pinterest, find the related terms that pop up, and add them to your board description as well as the board name. Pinterest is allll about keywords – it relies on us to categorize the information for better search-ability, so the more you can use keywords in every step, the more eyeballs will find your pins. But write your board description in an organic way, don’t just stuff keywords in, write full sentences. You want Pinterest to understand the content but you also want humans to be able to understand it too. The trick is to find as many combinations of words people might use when they’re trying to find inspiration on that topic:
Create/Select a Board Cover and Cohesive Branded Aesthetic:
Once you populate your boards with some pins, you select a cover photo for each board. Because I pin a LOT of turquoise projects and beachy, airy spaces, I have curated my feed so at one glance, you know what you’re gonna get! You’re going to get a little crunchy granola, with chicks and gardening and natural living, and then you’ll also get a lot of coastal and lakehouse vibes. I’m sort of a lakeside hippie, haha, with a love of vintage.
Some people use branded cover pages too, (like Lily Ardor – look at her gorgeous boards!) but I like photos because I can curate my aesthetic with ease and switch up photos to keep things fresh and seasonal. For example, for winter I tone down the summery vibes, and switch to a more wintry mood, on my board covers.
Create New Boards With the Trends/Seasons:
If you see a keyword really trending, and it’s on topic for you, create a new board for it so people who are searching for advice on that topic will see your board. Make sure it’s filled with top quality content and they’ll want to follow it – then populate it with your own content as well. If you really want to drive traffic, create some seasonal boards – topics centered on Christmas do REALLY well! Gift ideas, wrapping ideas, Christmas tree decor, homemade ornaments – it’s all gold. Pinterest publishes seasonal, category and audience insights on their Pinterest Insights page so you can find great resources there. They also predict the top 100 trends for every year, here’s the list for 2021. Plus you can sign up for the newsletter, which also has tons of great trend predictions and resources to create pins and boards that perform well.
Thoughts on Group Boards:
At one time, group boards were AMAZING for exposure but lately they have fizzled out. Group boards were boards with many members and you could pin to it and have your reach expanded by a lot. But if those boards were inactive, it signalled to Pinterest your pin sucked, but it might have just been a dud board. So inactive group boards could drive down your “average,” which is a bummer, because they used to be so awesome for getting a pin seen. Now the emphasis is on creating an awesome pin, with an excellent, key-word rich description, pinned thoughtfully to the best 10 (or fewer) boards.
I have removed myself from poor performing boards but kept some of the good ones. I used Tailwind to assess this, but basically I kept boards that got me re-pins! A group board is only valuable if the community is active and pinning your content! If so, they’re super awesome. If not, ditch them! If you’re interested in finding group boards, see what boards people in your industry are using. To join, most group boards have the rules right in their board description (typically an email address or who to reach out to if they’re still accepting members).
I did keep some high performing boards with flash – for example, I’m a pinner for Better Homes & Gardens magazine. That board gets great re-pins and it lends me credibility, so I’ve kept it but will re-evaluate my group board participation.
I have shifted focus to Tailwind Communities, (formerly called “Tailwind Tribes”), which is like having secret group boards that function a little more like engagement pods on Instagram.
Use Tailwind Communities Instead:
You can actually try Tailwind Communities without purchasing Tailwind. You can search for communities in your niche: homesteading, DIY, décor, seasonal tablescapes, etc. You name it and there’s a community for it. Some are free to join, some you need to ask and be “vetted”. With these communities, you are typically expected to re-share content from the community at a 1:2 or 1:1 ratio. It’s easy with Tailwind, because I can share my content with my communities as I’m scheduling my pins so it’s super easy to use and takes two seconds, but then I need to commit a bit of time to re-pin other content.
It’s a bit of a gamble, because you might share a lot and never get shared yourself. OR everyone will re-pin your pin, expanding your reach. That’s why you need to create good content and good pins – make your pins irresistible.
I have had some “power pinners” (old school pinners, with millions of followers) re-pin my content from Tailwind Communities and that boost has been awesome! They might never have seen, or been enticed to pin, my content without Tailwind Communities. And actually, some really huge accounts have followed me after finding me in their community.
These communities are also a great way to find quality content to re-pin (you can see total shares – that’s what those little blue flames are, top right corner on the images in the screenshot below – so you can gauge what is popular content).
You can also create your own communities and create a pinning party with friends in the same niche to help spread each other’s content. I’ve gotten a lot of re-pins from Tailwind Communities and it’s been a great way to build momentum on popular pins and also help revive dud pins (but I only share my own content to these).
Just be careful not to re-pin too much content from Tailwind Communities (or anywhere) – Pinterest prefers fresh, new content.
Learning Pin Basics
With your profile and boards all set up, it’s time to start pinning! I’m going to go through some pin basics for anyone new(ish) to Pinterest. I want to clarify some terms and make sure you know all of the cool things you can do with a pin!
As I mentioned, there are pins and re-pins (Updated for 2021: now sometimes they’re called “Creates” and “Saves”).
PIN (aka Creates): is something new that you created or pinned from your site (or any site). You are pinning it TO Pinterest. You added content to Pinterest.
RE-PIN (aka Saves): come from within Pinterest itself (or within Tailwind Communities). You took something already “within” Pinterest (even if it was your own content) and saved it to your board(s).
What is a Pin:
As I mentioned earlier in this guide, a pin is an image/video with a URL attached so when you click it in Pinterest, it leads to the website! You can pin without a URL, but why bother? That’s for personal not business use.
You can take ANY image(s) – from your website, from your photo folder on your desktop, from Instagram – and pin it to Pinterest.
Right now, Pinterest is emphasizing FRESH PINS: they define this as a new photo not yet seen on Pinterest. So it could be a brand new post you just wrote and pinned – or even a new photo or graphic for a URL you have pinned many times before.
How to Create a Pin:
You can create a pin right in Pinterest. You can upload a photo, then add a URL and description and set it to pin immediately or at a later date. You will either see a little + when you’re looking at your pins or you can click “create” from the drop down menu top left and choose “create pin”:
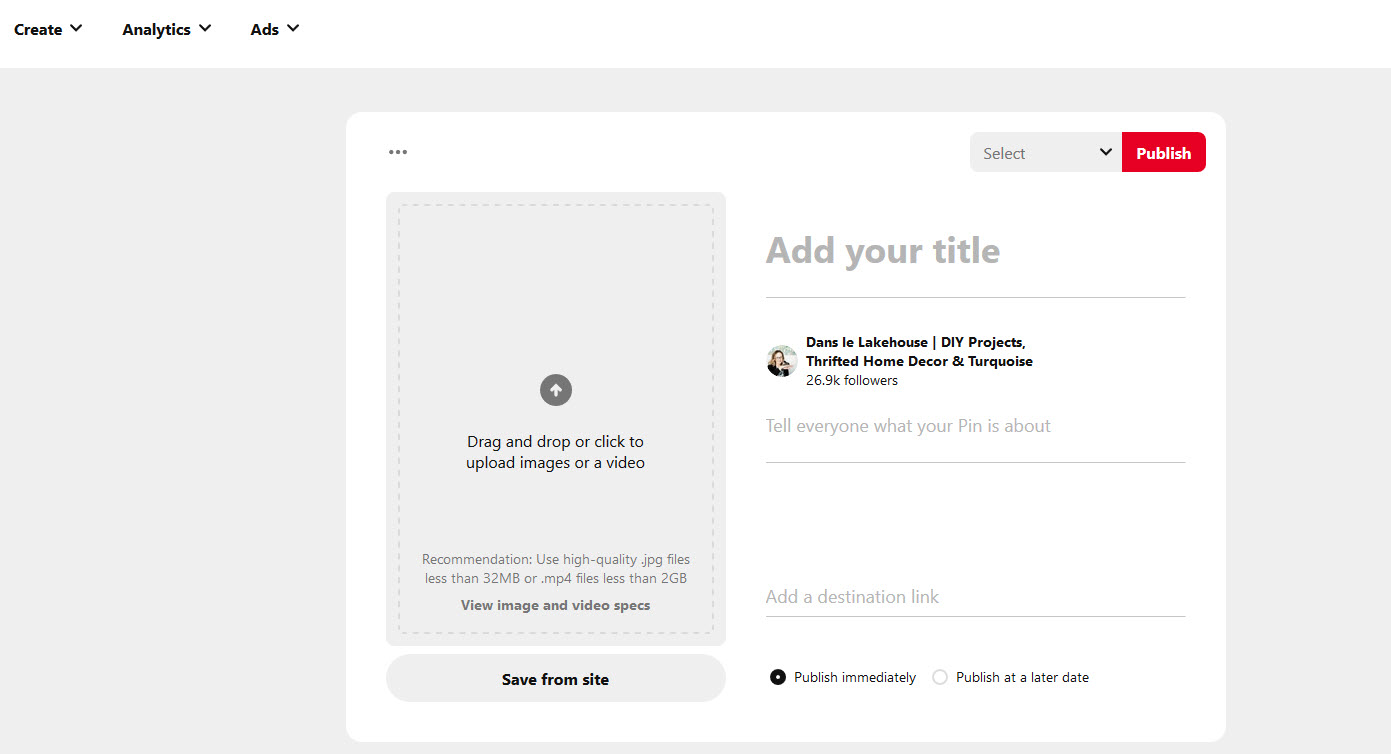
So whatever URL you want to drive traffic to, attach it to a gorgeous photo or graphic, and make your pin right in Pinterest.
You can create a pin that doesn’t even need to “live” on that page by using Pinterest’s option to design/create a pin right in the platform. So let’s say you want to create an ugly Pinterest graphic but not have it on your blog post: create the graphic, click “create new pin” and upload and add your blog post’s URL.
How to Pin from Your Own Website:
You should be pinning (a lot) from your own website, if you have one – I highlight recommend you have a “Pin It” or Pinterest Save button active on your website so that every photo of yours will be easy to pin, for yourself and others. Mine came installed with my blog template. You can see it when you hover over the photo (little “P” in the corner) – people click that and can save my post with ease:
Pinterest has a “save” button you can use. A little red button will appear on your images, imploring people to pin it and making it much easier.
You can also download a Pinterest extension or Tailwind extension – I use the tailwind extension because I can click on the tailwind logo that appears on any photo, and then the scheduler pops up, easy-peasy. But when you use an extension to pin, that’s only available to you – and you really want other people pinning your content too! So some kind of “pin it” button is really necessary.
Deciding What to Pin and From Where
Once you set up your boards, you’ll want to populate them with awesome pins! In this section I’ll give you some tips and tricks for deciding what to pin – and from where.
Start with (at least 50) pins. Pin high quality content and, when you start, do a mix of a few re-pins but focus on FRESH content. Again, Tailwind Communities is awesome for finding quality content to re-pin and curate because you know those links aren’t broken. Pinterest hates broken links! But you want to spend less time re-pinning and more time pinning your own content.
Pin for Your Audience Not You:
I follow people on Pinterest and laugh when their feed is suddenly ALL keto recipes – I always say Pinterest is a window into someone’s soul. A friend starting dating a new girl a few years ago so I creeped her Pinterest feed and it was a lot of artificial nails and an actor she was obsessed with. I knew it wouldn’t last because he wanted a girlfriend who was down to earth and into sports – unsurprisingly, they broke up weeks later. I predicted it from her Pinterest feed, lol.
When I started using Pinterest, years ago, I started wrong. I pinned for myself – to collect inspiration for projects I was tackling or diets I was on. Now I think of it like I’m curating content for people – I’m basically making little inspiration binders people may want! I curate by creating round up posts on my blog and pinning them (“25 Organizing DIY’s,”), I curate by niching down my boards, I curate by staying on topic, I curate by sharing my own content mixed with other quality pins, I curate by creating a vibe and showing my audience things they might like that they may not have thought to search for themselves.
Make your Pinterest boards a resource for people interested in the topics that are on brand for you, and pin in service of your audience.
Where to Find Good Content to Pin?
Pin your own content! Pin from your blog posts, home tours, Instagram posts. Pin your own images and add your affiliate links to products. Create content FOR Pinterest.
If your own website is small and you don’t have much content yet, mix pins from your website with quality pins from friends’ website, or try curated sites like Apartment Therapy or Craftgawker or Dwellinggakwer to pin high quality content or find websites to pin from. You can also pin from your Tailwind Communities to help add other resources to your boards to make them valuable so people want to follow them.
Ultimately, you want to pin YOUR links to drive traffic, but mixing in quality content from other sites will help curate content people will want to follow, and also signal to Pinterest that you’re a valuable pinner adding fresh content to the platform.
Always Pin from the Original Source:
Always pin from the original source so if someone shares an image in a round up, go to that link and pin from the person who created it, otherwise your pin may be deleted/flagged at a later date. Also, if you have a blog, make sure you are on a particular post or page before pinning – that way it will lead back to that specific post or page. If you don’t have truncated posts and pin from a main page/home page that will make it difficult for people to find the source.
Pin Multiple Pictures/Angles:
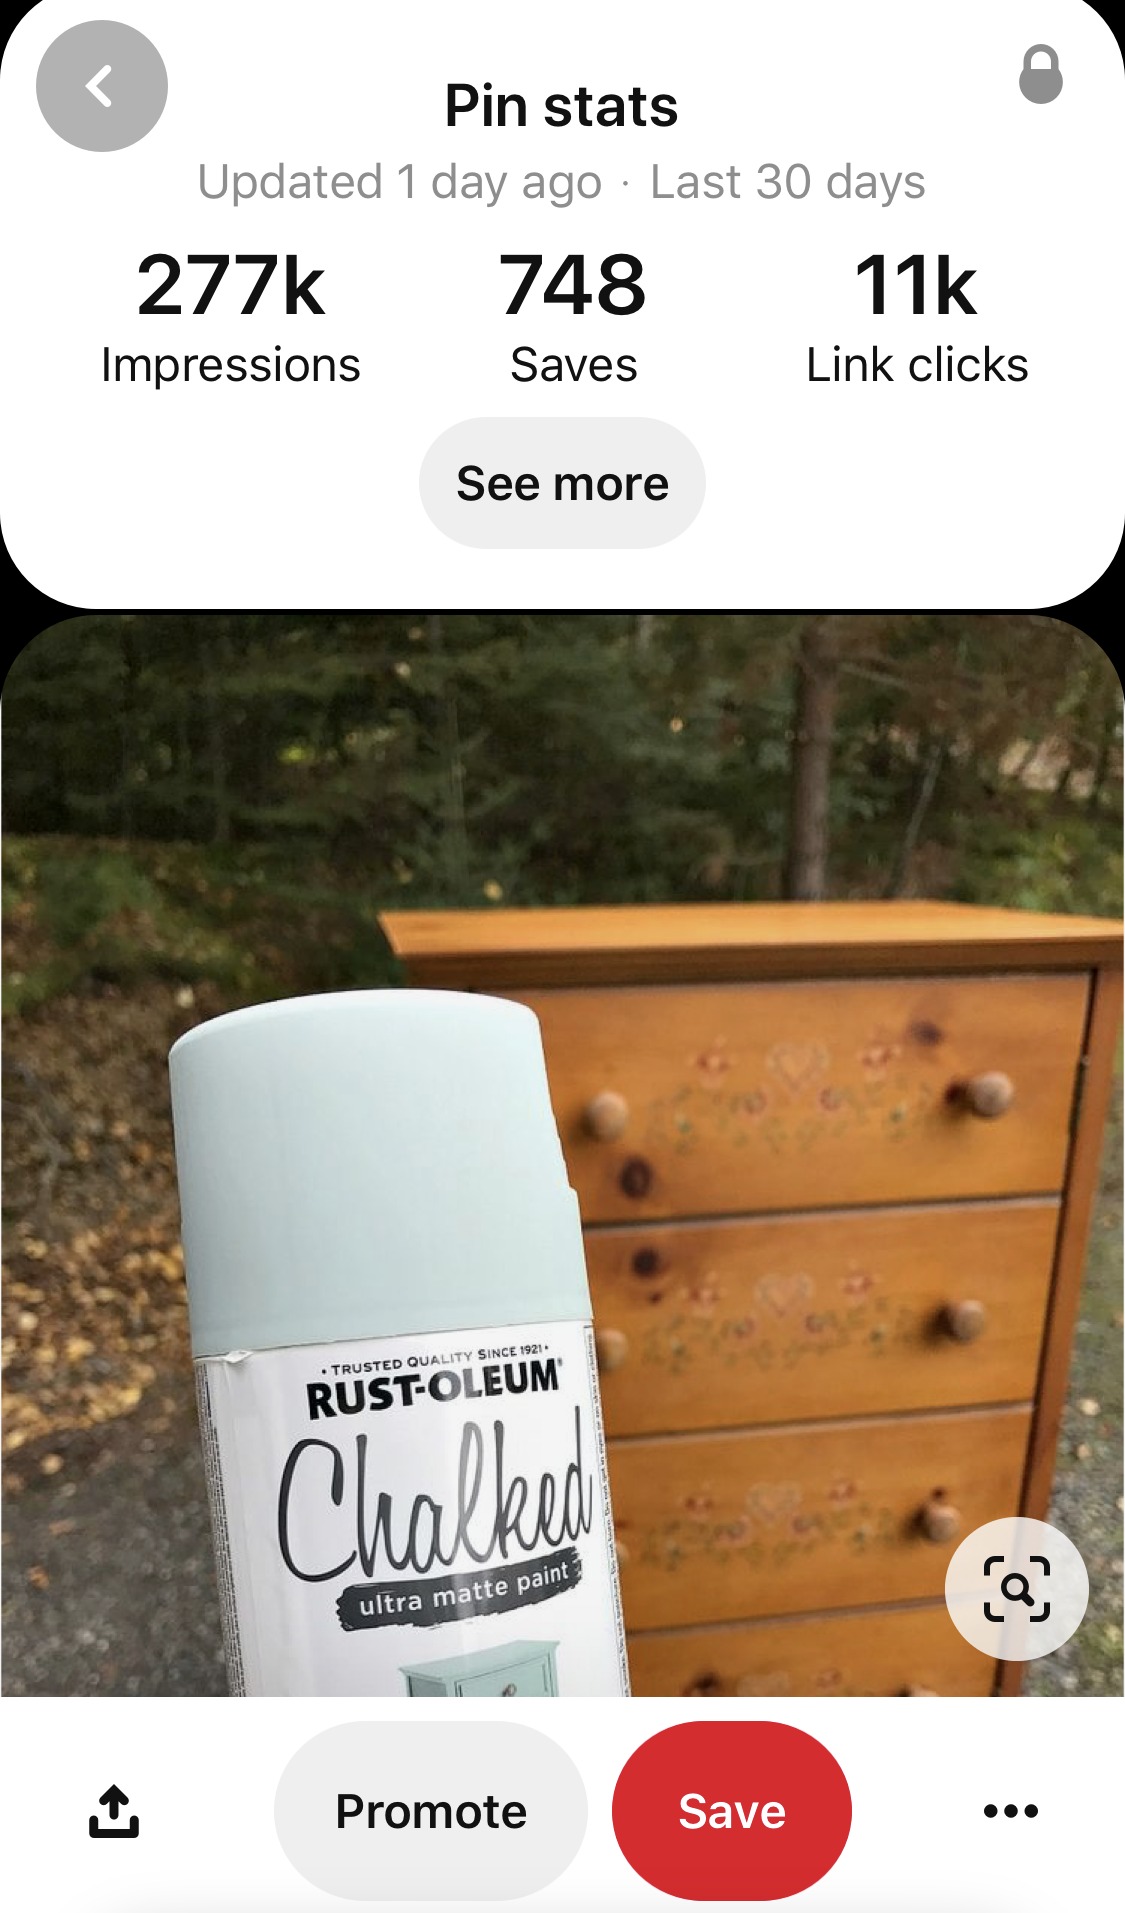
There is a human element to Pinterest and sometimes popular pins defy logic. For some reason, a photo of me holding a can of spray paint in front of a dated cabinet I was about to paint suddenly became popular. Like, really popular. This is a recent snapshot, after the flurry of traffic had died down! Even now, months past the peak of the flurry of activity, 11,000 views were driven from this one, tired pin in the last 30 days alone. And there are OTHER pins, of this same image, simultaneously driving another 7,000, 5,000, 3,000+ (etc.) clicks my way in the same 30 day period. Overall it’s had tens of thousands of repins (saves) and driven a lot of traffic to my website. It caused a nice boost in traffic, and I watched my newsletter subscriber list swell in numbers too.
I didn’t even pin it, someone else did and it started driving a lot of traffic my way. So I took that others person’s pin from my page and sent it going through group boards, my boards, and Tailwind Communities and played up that momentum and traffic soared.
Lesson learned: pin LOTS of different images because you never know which one will take off! A blog friend and I were talking and our theory is that it’s that “click bait” factor – people want to see the finished product!
So when you’re writing a post, include multiple photos: before/after collages, beautiful after photos with text overlay, after photos without text, well lit progress photos… Have lots of pin-able photos and make sure to have a few different kinds with text overlay because, overall, they perform well on Pinterest.
Pin “Ugly” Photos Too:
I never liked to pin messy, progress photos but I learned that they can do SO well – sometimes better than a polished “after”.
So I started pinning more photos from each post I publish and see which one takes off. Then I push that pin.
Pinterest gurus will tell you to pin aesthetically pleasing photos and yadda yadda yadda but in my experience, beauty is in the eye of the beholder. AND while you and I (content creators and business owners) may care about a visually pleasing photo or image, the average person won’t! Their Pinterest boards aren’t curated like ours, they are those old tear sheets in binders full of pretty photos and also tips and tricks and resources and progress photos.
I no longer focus just on those beautiful pins – I pin those progress shots and before photos. (And I’m trying to take BETTER progress photos – knowing they might end up getting tens of thousands of re-pins)! Giving up that idea that photos has to be super pretty and Instagram-perfect was a major factor in my Pinterest growth. Instead of forcing my beautifully curated content, I let my audience decide what was popular and then pushed that content (no matter how much I cringed, sharing a photo of paint roller in a big against a backdrop of a painted floor, lol).
My focus is TRAFFIC! So I go where the traffic leads me.
Create a Pin for a Category:
Here’s a neat trick! In WordPress you can tag your pins with categories you create so when you click the tag “smoothies,” all of your smoothie posts – and nothing else is pulled up. When you click on that “tag,” you get a custom URL of that category.
I’ve taken that category URL and created a graphic for the topic and then created a pin right in Pinterest, using that category URL and my fresh graphic with an SEO-optimized description. This then drives traffic not just to one post, but all of my posts in that topic! So the photo below, for example, doesn’t exist anywhere on my blog. I created it using Picmonkey and then created a new pin within Pinterest, using my category tag for a URL (https://danslelakehouse.com/search/label/smoothies) and when you click on it in Pinterest, it will lead to a list of truncated blog posts all about smoothies/smoothie bowls.

Create a Pin for an Instagram Story:
Did you spend a lot of time creating content, like a DIY project, that’s saved to an Instagram story? Create a compelling graphic for it (like I did for my smoothies, above) and pin it with the story URL.
Create a Pin for Your House Tour or Shop the Look Page:
Create a graphic for house tours (or pin every photo) as well as “shop the look” pages – look beyond individual posts and see where you want to drive traffic to. For example, I have a DIY Project Gallery and DIY Renovating Gallery but to pin directly from those galleries, the photos are formatted square and small. So I could create a collage of my best projects with text like, “100 Unique Home Decor DIY’s” and create a pin, linking to my gallery.
Create a Pin for a Product:
Because you can create pins right in Pinterest, go ahead and create custom pins for your products – these pins DON’T need to go on your product page so if your branding is all horizontal or square photos, for example, awesome – keep it that way if you want. But create a pin-worthy graphic for your shop or item and pin that with your product URL. To reiterate, the image for your pin doesn’t need to live on your website at all! It can be created just for Pinterest.
Create Content with Pinterest in Mind:
Round ups do okay on my blog, when it comes to regular readers, but they can REALLY take off on Pinterest so I make them with Pinterest in mind. A shopping round up not only drives lots of traffic back (generating ad revenue) but you can stuff those picks with affiliate links or your own product, increasing your earnings. This post of mine (see the Pinterest image below) has done really well on Pinterest and has driven a lot of traffic and also boosted my affiliate sales. In fact, any of these shopping round ups that I have made do well – my goal (and yours) should be to make more because people love curated, vetted content. Online shopping is overwhelming so they appreciate if you do the work for them! Gift guides around the holidays do well for this same reason!

Sticking to Best Pinning Practices
Here are some tips for when to pin and best pinning practices. Pinterest issues their guideline of best pinning practices with any algorithm change so always follow those rules to avoid being flagged as spam. However, you can bend the rules a little to get maximum results.
When to Pin:
If you use Tailwind, you’ll be provided data on when to pin so that you’re pinning at optimal times. If you’re doing it manually, I find pinning in the evenings and weekends is good, but you’ll want to spread some out because people will check in the AM or at lunchtime. I have read that Pinterest is chronological but Hubby follows me on Pinterest and my pins DO not enter his feed chronologically – he also doesn’t see all of them! But it still helps if you can target those optimal times, while also pinning consistently. This is why I love Tailwind: I set it once a week and it automatically “releases” my pins throughout the week, at the best times (determined by Tailwind).
Pin Consistently
Pinterest reward consistency, so pinning regularly is ideal. This is something CONFIRMED by Pinterest – they want you regularly using the app, in small, human (not bot-like) movements.
Don’t pin a thousand pins on a Sunday and bounce for the week – dole out your activity.
You can do this manually, but again, I prefer to use Tailwind. Tailwind allows you to schedule content so you can sit down in one afternoon and schedule content weeks or months in advance.
You can space out posts so let’s say you have a new post you want to pin, you can schedule each photo from that post to roll out to different boards on different days – or different weeks or months. Make sure you do no fewer than two days apart when scheduling pins.
Pin 15-25 Pins Per Day:
The “ideal” number of pins was lowered with the January 2020 algorithm change and now it’s recommended to only pin 15-25 pins per day. That means every pin needs to be awesome and schedued at an optimum time. It also means less pressure to pin, for busy business owners and content creators. 100 was a LOT for me to maintain, this is more manageable and can be scheudled out with ease.
Create new pins from your claimed account (your own website) at least weekly – don’t let a week go by without some kind of fresh pins from your site. This was confirmed by Pinterest in July 2020: they’d like to see FRESH pins at least every week. No word on exactly how many of these fresh pins to create per week, but emphasize fresh pins over re-pins because it’s something Pinterest keeps reiterating as something they want to see.
Pin to The Most on Topic Board First!
When you start pinning your posts, pin to the most appropriate board first because it gives Pinterest an important clue as to what kind of content that pin is. If you pin a “best banana bread” recipe to your own branded hodgepodge board it won’t clue Pinterest in, so pin it to your “best baked recipes” board. Remember KEYWORDS are so important at every step and by pinning to a certain keyworded board FIRST, you tell Pinterest what that pin is about – it’s an important clue, in a long line of clues.
Pin to a High Performing Board First:
The first people who see your pin must interact with it for you to see immediate traction so pin to a board that performs well, if given a choice among your niched boards. Topic is important but so is the traction it gains right away so that’s why having niched down boards is important. Ideally, there will be a few “topics” among your boards that are a good fit for your pin, then assess which is the best performing board (ie. which board gets you a good number of re-pins). You can use Tailwind to track board performance.
Right now, summer 2020, best pinning practices indicate pinning a pin to no more than 10 boards – this was a huge change because I was doing very well pinning to many, many of my own boards and group boards, but now Pinterest sees that activity as spamming so you want to choose the 10 most relevant and best performing boards.
Pin a Variety
I hate checking out someone’s Pinterest feed and seeing them pin the same images or project pinned 10 times over. MIX THEM UP. Curate. Space out pins. If people are interested in following you, they won’t do a deep dive into your pins, they’ll scroll a couple of times and assess so try to keep your pins enticing. Don’t overwhelm with the same photo again and again – it looks spammy. Space it out and mix it up.
Pin Seasonally
I have read that a general rule is to start pinning 3 months in advance of holidays and events. Pinterest recommends 30-45 days. It can take time for a pin to gain traction, so if you want your fall pins to take off, start pinning them in the summer!
But don’t FILL your boards with next season content because people are still searching for summer stuff in the summer months, so mix it up but lean into the next season and keep your eye on seasonal trends and larger trends to keep ahead of the curve.
Creating Winning Pins
Let’s talk some more about what is a GOOD PIN.
Pin Images with Context and Limited People:
Pinterest recommends CONTEXT for photos – a lively photo showing how someone can try your project or product. This is why photos of my painting have done so well on Pinterest. My face never gets pins (thank goodness) but action shots of me painting a wall or sewing will.
I have read this advice, but also learned it myself through trial and error: photos with people don’t do as well. If I am actively doing a DIY, a photo will perform well but my face? Nope. And I’m not alone. Unless you’re a fashion blogger, or somehow you or someone else being in the photos makes sense/has purpose, people-less photos or action photos of someone doing something (like showing a DIY technique) tend to perform better.
Pin Vertical Images:
Just like Instagram, vertical pins do better. Think of scrolling Pinterest on your phone – the images are so small, you’ll barely see a horizontal photo! Some of my horizontal photos have been pinned by people and taken off, but the best, most popular pins are typically vertical.
The Ideal Ratio:
I have spent so many hours researching a good pin and courses will tell you that, just like Instagram, vertical pins do better. Ideally a ratio of 2:3 aspect ratio (1000 x 1500 pixels) is best but taller will do well too (as long as it isn’t so tall it gets truncated) and I have had horizontal photos take off too! Courses will also tell you to pin visually beautiful photos and while that’s true too, I have also discovered a trend of people pinning my progress photos like crazy! Which is terrible, my progress photos are often taken at night, on a cell phone. Ugh. I am working to improve my progress photos now that I know people like to pin those and they often TAKE OFF like crazy! People will pin UGLY photos if it’s useful or helpful to them. I see people sticking only to beautiful curated photos and I cry about their lost traffic. The uglies can do well, they really can, so make those uglies as nice as possible.
Make sure every photo on your website is vertical and clear, and well lit and edited. You never know which one will gain traction, so I pin them all but I put extra emphasis on pins with clear text and Pinterest “graphics” I created.
Create a Pinterest “Graphic”:
For every post, I create Pinterest “graphics”. I switch them up a little but basically, it’s a photo with text or a collage style with photos and text. Here’s a simple one:
Pinterest even recommends a text overlay to tell a better story, so it’s a good idea to get into the habit of making these! Sometimes I’ll do a photo with a closer photo/different angle paired with it:

I HATE these, lol. I don’t like to create or pin them, lol. My feed used to look like my Instagram feed, just a sea of pretty pictures. But these “graphics” PERFORM and generate a LOT OF CLICKS! People love to see what a pin is about right in the image. They don’t want to squint and read the tiny text of the post title. Take a look at Pinterest on your phone or laptop and look at your feed – it’s full of images and the titles are small. If you’re trying to get your content seen, the picture needs to immediately convey what the topic is about. You’re also competing with hundreds of other photos to get seen and clicked.
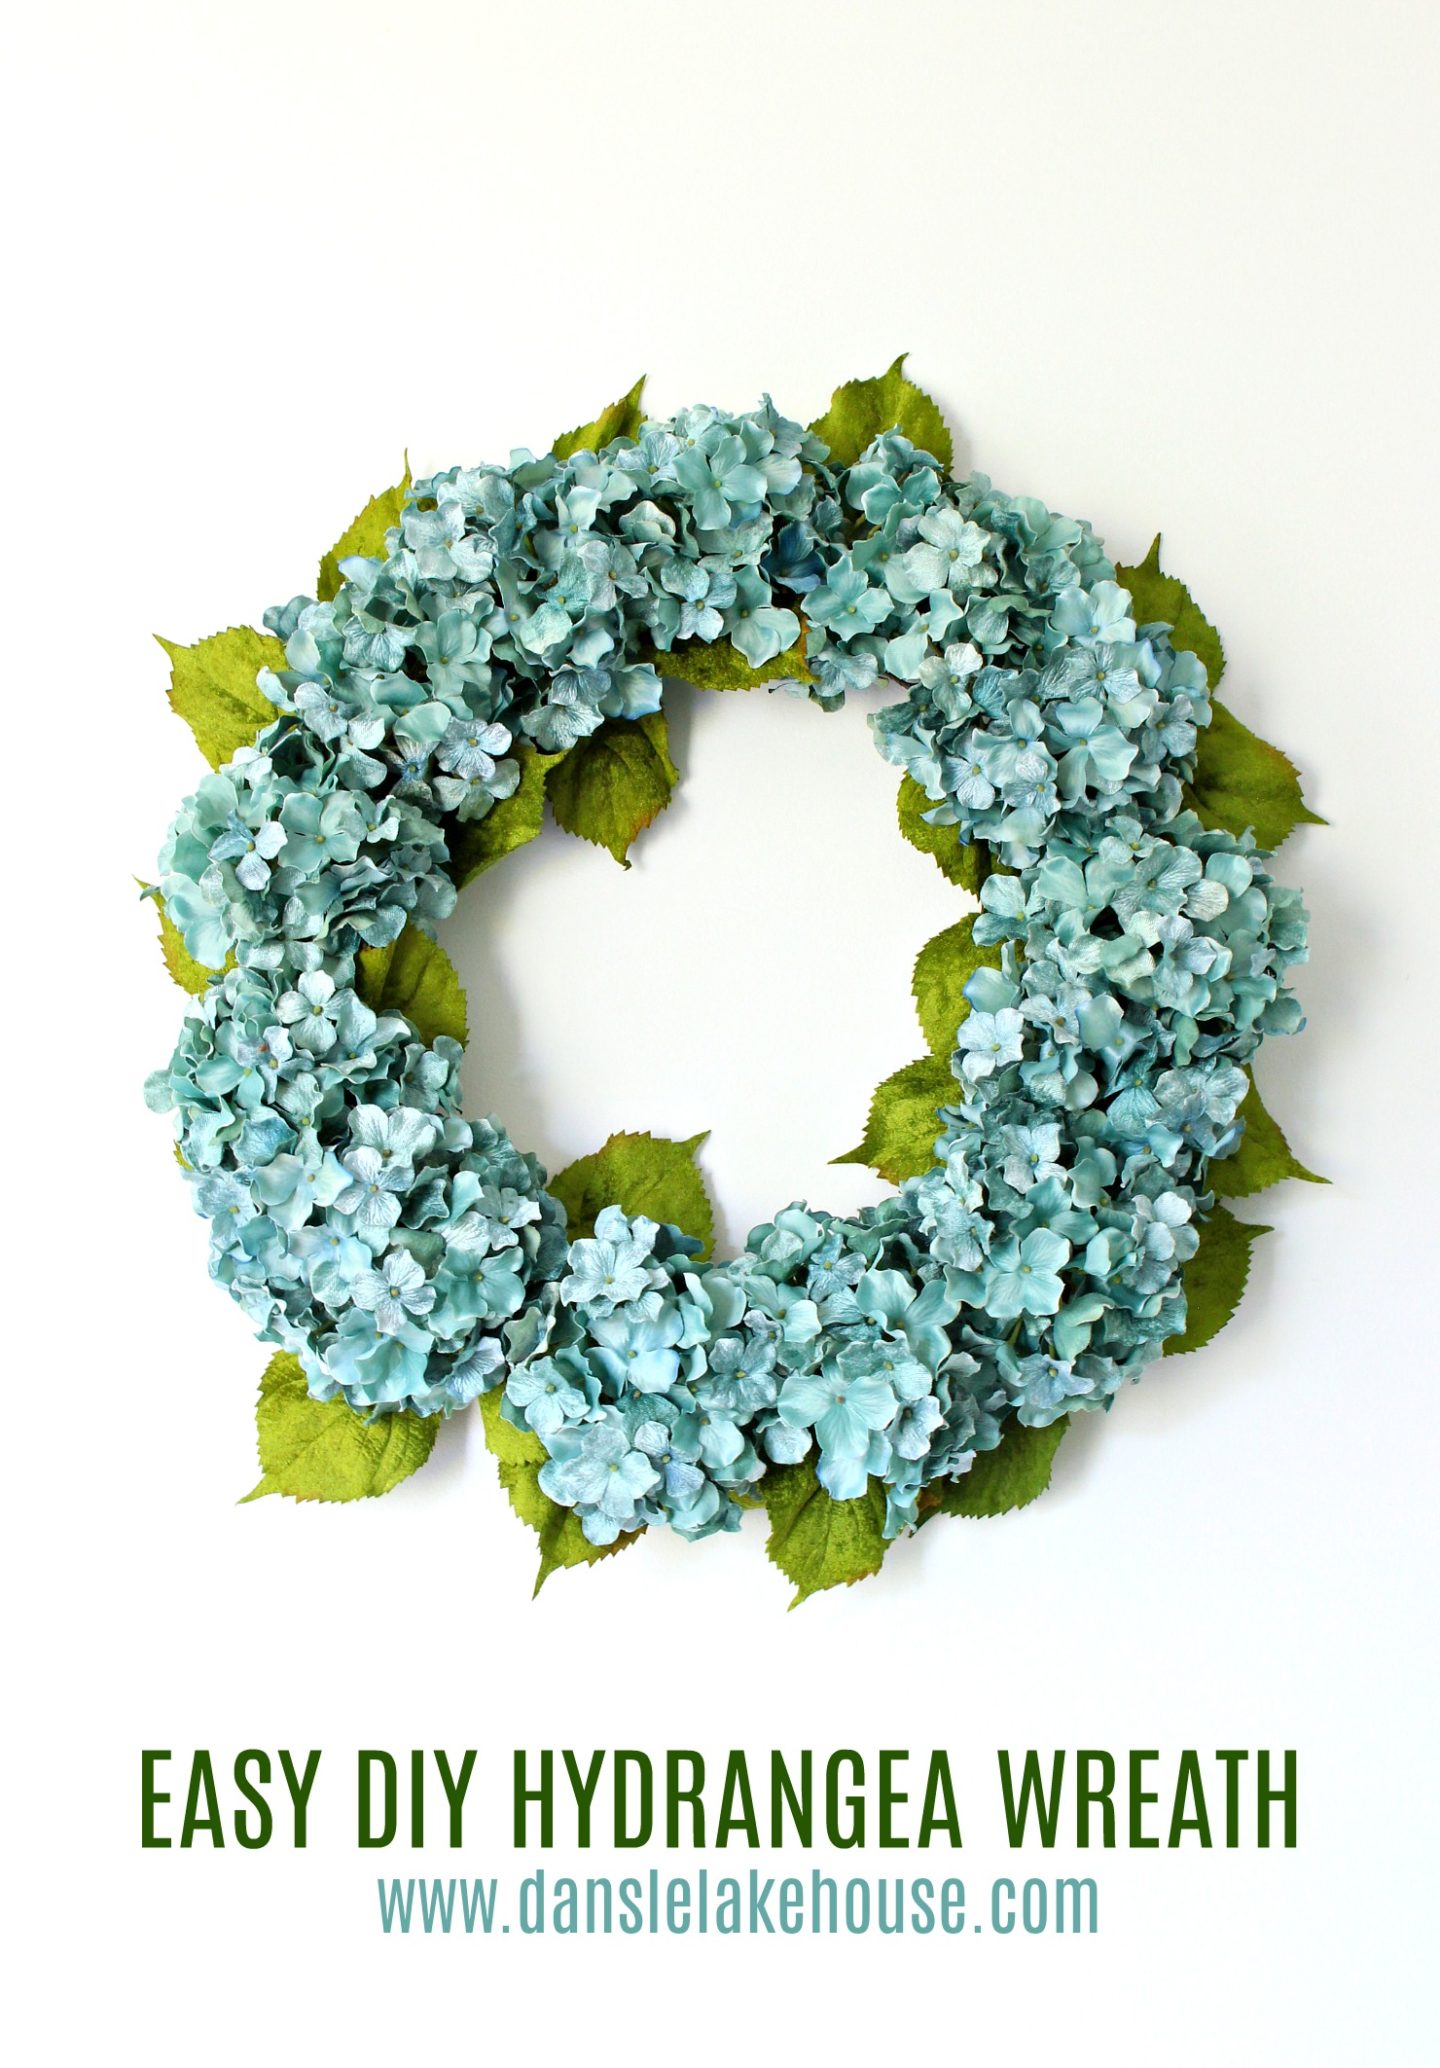
I typically like to create a “graphic” with a photo, text bar, and then photo or pair of photos underneath. I like to pair a before/after as well. Or a collage for a round up. Sometimes just a simple text overlay on a single image (as above, with my wreath example). Create a variety of pin-able images/graphics for every post. Over time you’ll see which style performs best – and it might surprise you!
Some people do really branded pins so people recognize it, but my personal opinion is that I like to mix it up. I mix up the styles of my Pinterest graphics, that way my feed doesn’t look like it’s all 100% my content (sneaky, haha), and also I can see which styles of graphics do well and keep updating my method. A branded feed looks nice but it also looks self-promotional and boring. I do, however, always put my URL somewhere in my Pinterest graphic.
I care a LOT about how things look and so this pains me, but Pinterest graphics perform better than pretty pictures. Sometimes a beautiful stand alone photo will take off, so keep pinning those, but also create some graphics intended purely for a Pinterest audience.
So put the pertinent information in the graphic – What’s the post about? Why is yours the best? Why do people need to click? Try buzz words/captions like:
- “Budget Friendly Bath Makeover Under $200”
- “10 Beginner Home Decor Sewing Projects”
- “The 10 Best Mid-Century Modern Style Dining Room Chairs”
- “20 Easy Keto Dinners for Fast Weight Loss”
- “The Best Arm Knit Blanket Tutorial”
- “The Definitive Guide for Sewing DIY Throw Pillows”
- “Cheap & Easy Weekend Kitchen Makeover”
- “Save Money & Paint Your Vinyl Floors”
How to Create Pinterest Graphics:
I use Picmonkey or Canva to create my Pinterest graphics. Both have templates you can use, but I often rely on Picmonkey collages because that style of pin has worked well for me. I actually pay for Picmonkey because I like it so much. With Canva I’ve always used the free option, but now I see they’re promoting Canva Pro – you can still get a free subscription, the options are just limited.
If you’re going to add text overlays, make the text big and clear. I have, in the past, used beautiful script fonts until I realized that some people can’t read the cursive. Oops.
So keep that text clear and enticing. Try to use your graphic to tell a story, like a before and after, or a nice photo paired with a detail shot or progress view. Can a person tell what’s happening very clearly?
Write Strong Copy for Text Overlay:
When composing a text overlay, be clear with the wording too. State simply what the project/point is and what people can learn/benefit.
Why should people click YOUR post? Will people save money? Make something faster? Is it the BEST of whatever…? Is it a how-to? Is it the cheapest… whatever? A time saving hack? Think “click bait” when you write your text overlay. At the very least, make sure the focus of your content is clear:
Create a Great Description:
Pinterest allows 500 characters for descriptions – use them! But remember that only the first 50-60 might be seen in someone’s feed, so put the most pertinent information there.
Find your related keywords and describe your pin clearly and thoughtfully. No matter what people see, Pinterest is using that entire description to decide who should see your pin so make sure to use all of the character allowed. Use complete sentences – write like a human and don’t do keyword stuffing (where you just list all the keywords). Work the relevant keywords into the description in an organic way. Include a call to action: “click through to see all 20 soup recipes” or ” check out the after of this DIY chalk painted cabinet makeover”.
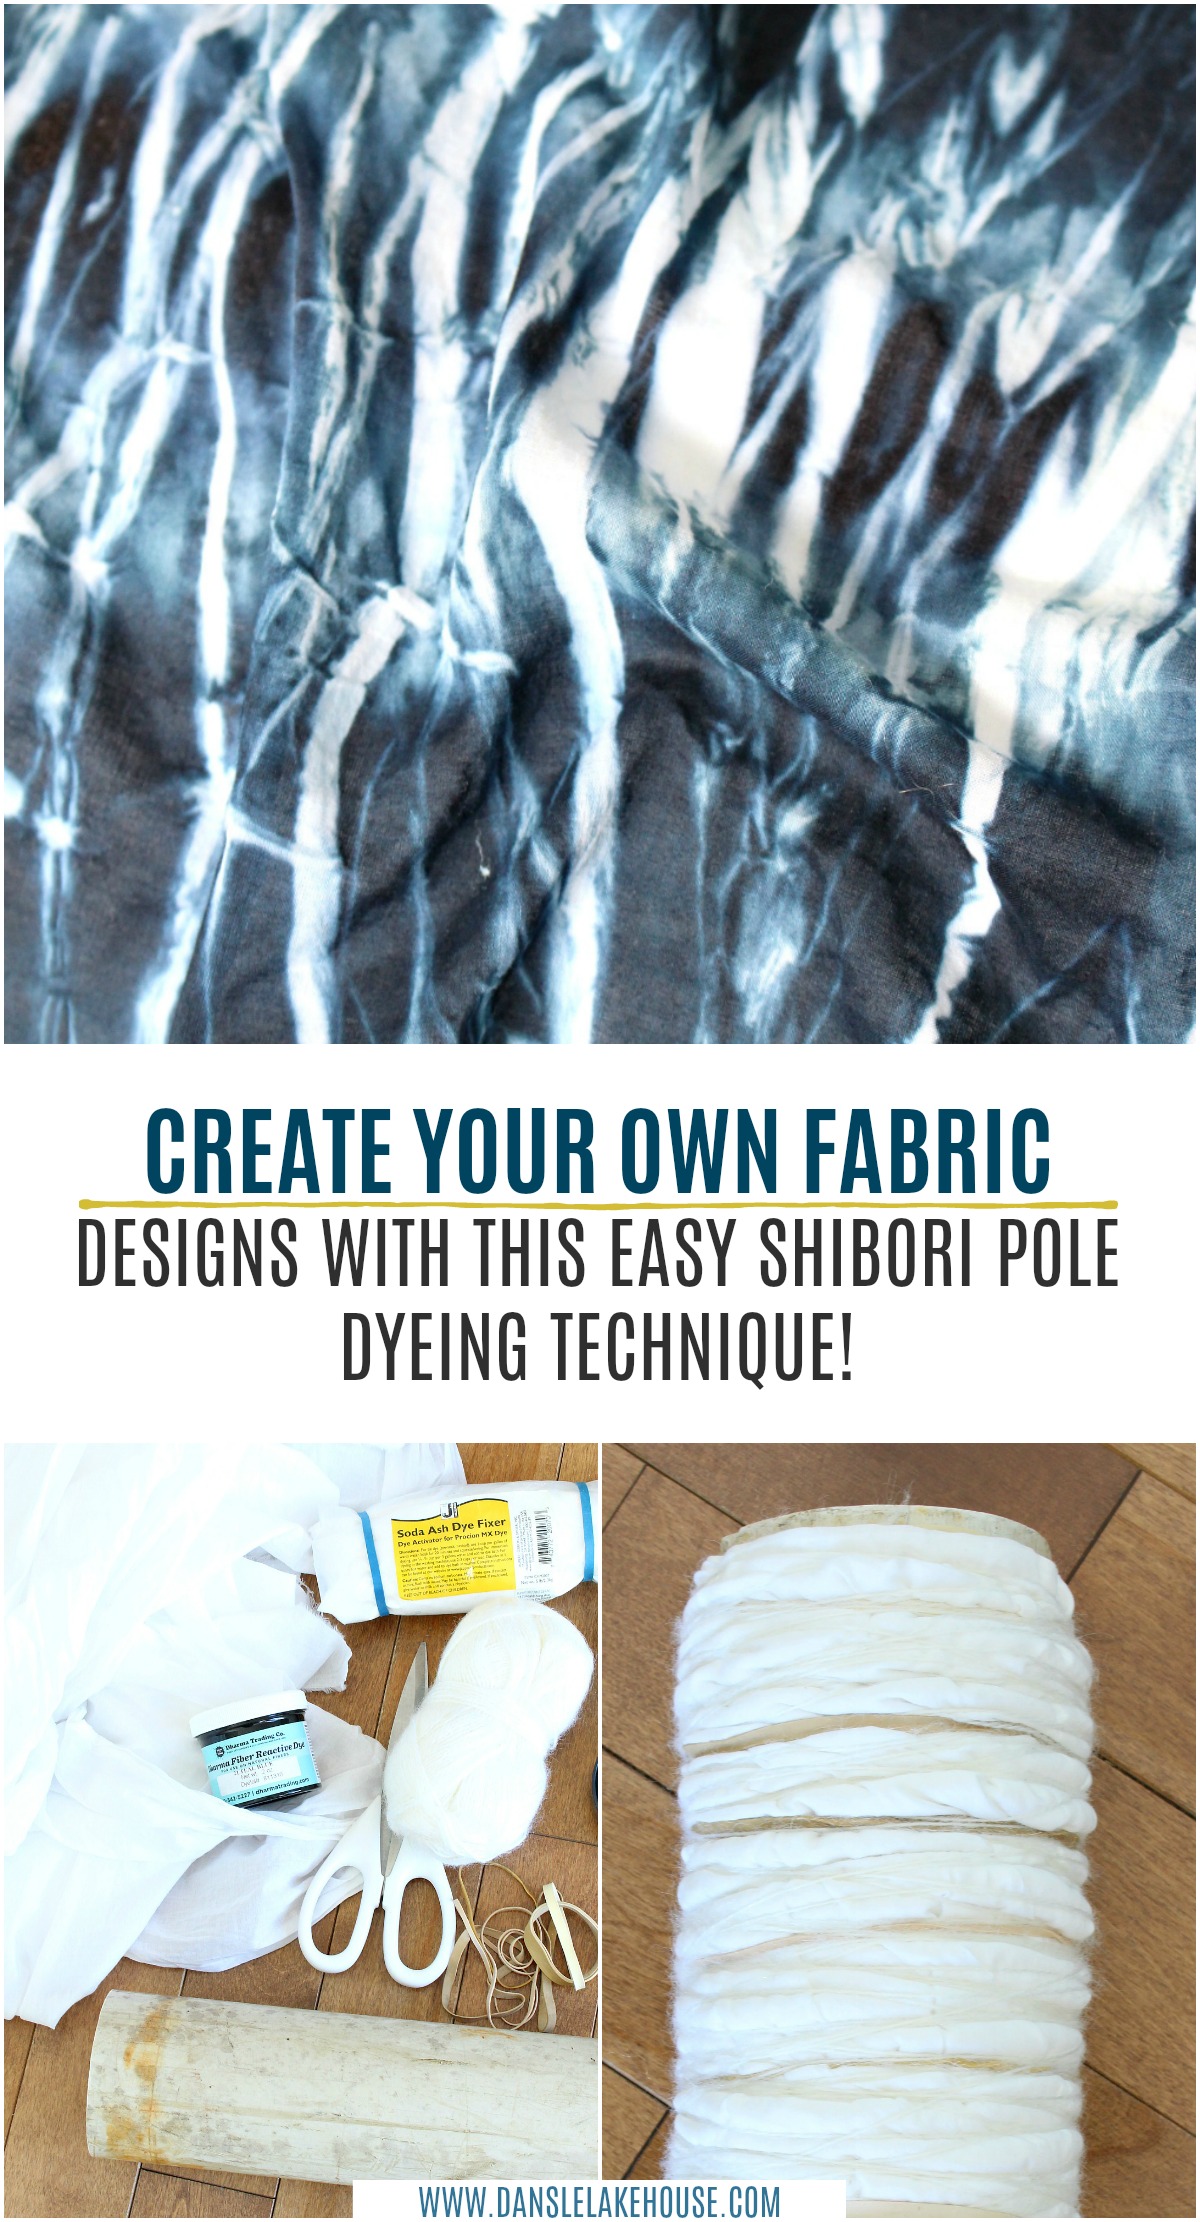
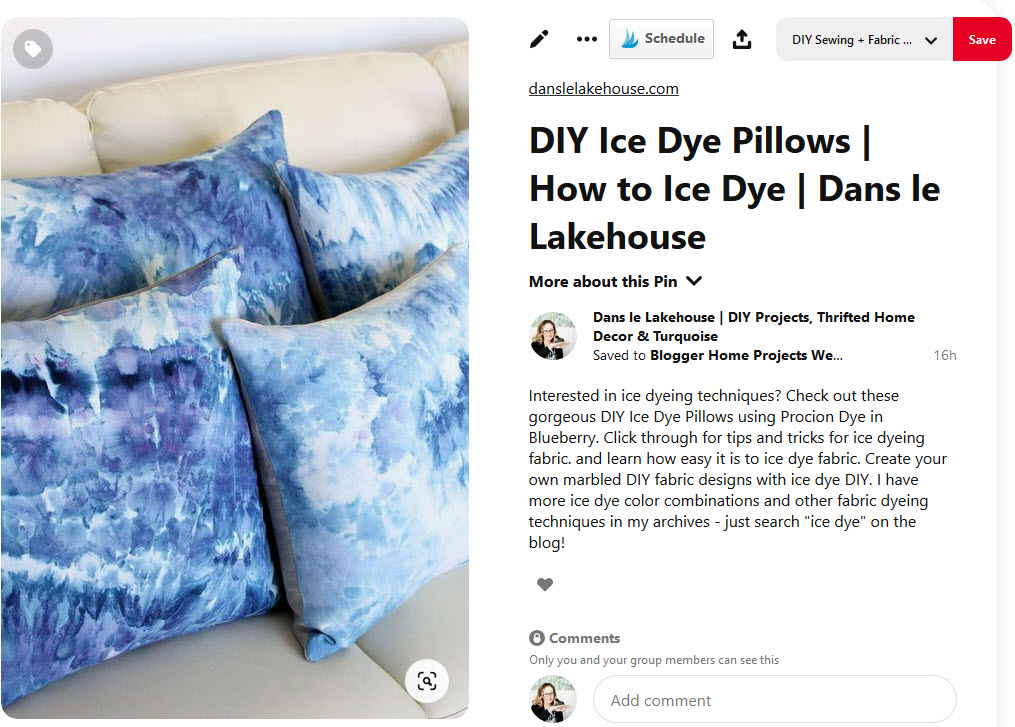
What do you want people to do? Look, click, check out? Write your pins so humans can understand and that Pinterest’s magic crawlers can also know what your pin is about. Here’s an example of a pin description I wrote for an ice dye DIY:
Interesting in ice dyeing techniques? Check out these gorgeous DIY ice dye pillows using Procion Dye in Blueberry. Click through for tips and tricks for ice dyeing fabric. Create your own marbled DIY fabric designs with ice dye DIY. I have more ice dye color combinations and other fabric dyeing techniques in my archives – just search “ice dye” on the blog.
That’s easy for a human to read, right? I’ve STUFFED it with key words I found, included two call for actions and also included the dye color I used (people often search for a color of dye or paint) – I copied the caption and underlined the keywords below:
Interesting in ice dyeing techniques? Check out these gorgeous DIY ice dye pillows using Procion Dye in Blueberry. Click through for tips and tricks for ice dyeing fabric. Create your own marbled DIY fabric designs with ice dye DIY. I have more ice dye color combinations and other fabric dyeing techniques in my archives – just search “ice dye” on the blog.
Here’s another example (this pin did really well this season, and it includes some #):
If you pin multiple images from a post or website, make sure to change up your pin descriptions so you can target even more keywords.
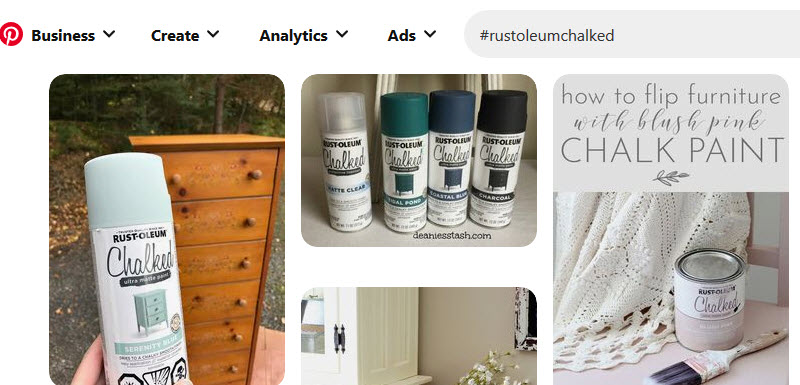
Update: as of February 2021, you can NO LONGER use hashtags in Pinterest descriptions. With Pinterest, good pin titles/descriptions are how your content will get found. Here’s an example of a pin description I created with hashtags, when they were active, and when you clicked the hashtag for #rustoleumchalked, my pin was first! Now they are inactive, so I recommend not adding them to new pins, but don’t bother going back to delete them from old pins. You never know when Pinterest might re-introduce them! Plus it’s just not worth the time.

Create a Great Title:
A newer change for Pinterest is that your pin title no longer needs to be the same as the blog post – it used to pull up the blog post title, but now you can edit/change that when you pin a photo. So as you pin your different pinnable images, change up the title. So a fire pit makeover project of mine will have different pins of the same project, with slightly different titles like:
- Budget Friendly Fire Pit Makeover Before/After
- How to Use Gravel for a Budget Friendly Fire Pit
- DIY Fire Pit Makeover Reveal
- How to Weld a Fire Pit
- DIY Fire Pit Project
If a blog post has different sections/themes, you can alter the pin titles to align with the photo and what message it’s trying to convey. So my project, for example, featured my welded fire pit and the gravel surround and I use my graphics and titles to highlight different parts of that project. Not everyone cares about the welding, but just emphasizing the cheap gravel idea draws some people in. So maximize that option to edit the titles so they align with the pin and also re-word your topic a bit to catch as many eyes as possible.
What Does Pinterest Consider a Good Pin? (UPDATE for July 2020):
A representative for Pinterest recently revealed 5 dimensions of inspiring content and suggested that a good pin has at least two of these. Now, keep in mind that this is from the perspective of Pinterest and what they would like to see people pin, but the advice is something I have experienced in practice – except for #3 because sometimes the MOST GARISH text on pins really grabs people):
- NOVEL (unique, different content people haven’t seen before)
- ATTAINABLE (every day moments)
- VISUALLY APPEALING (attractive design and imagery with type used sparingly and branding minimal)
- INSPIRING
- ACTIONABLE (bringing inspiration to life, showing people how – ideas was emphasized, not just pretty pictures)
I think #5 is super important and it’s advice given to content creators in general: how can you solve a problem for your ideal client or audience? People want help making their lives better and pins that do that can perform well. Make sure it’s clear how clicking on YOUR pin will HELP someone.
Additionally, it was highlighted that Pinterest is a “happy place” for people and so Pinterest suggests keeping content uplifting, inspiring, motivating and otherwise positive.
Emphasizing FRESH Pins in Your Pinning Strategy
I’ve talked a lot about new pins, fresh pins, and re-pins. A pin vs. re-pin should be clear by now, but a FRESH pin is an interesting distinction.
One of the big changes of 2020 was that Pinterest stopped rewarding people who re-pined their own content again and again. In 2019, that was advice I learned and it did WELL. I found pins that were already doing well and I re-pined them. They snowballed, gaining a lot of re-pins and click throughs. So when I shared to Tailwind Communities, they did well too because they had 10,000 or 60,000 re-pins (and if people are going to re-pin, they want to re-pin popular content).
I was also pinning a LOT – up to 100 pins a day, with a mix of my own new pins, popular re-pins, pins from Tailwind Communities and some content that fit my feed well.
In Jan 2020 my Pinterest traffic dipped. Pinterest no longer wanted to see heavy re-pining ad excessive pinning. Instead, the emphasis became FRESH content, which was defined largely as a new image not previously connected with a URL. So while NEW content (like a brand new post) was good, so too was taking an older post that was doing well, creating a new graphic for it, and pinning it again. But now, in 2021, there’s an even stronger emphasis on Fresh Pins but also a greater emphasis on BRAND NEW PINS (a new URL).
What is a “Fresh” pin vs. a New Pin or Re-pin?
Right now, if you want to succeed on Pinterest, you need to slow down the pinning and focus on sharing fresh pins (basically, new images) and creating keyword rich descriptions.
A fresh pin can be a new graphic/photo for a URL you pinned previously. So if you have a post that didn’t do well, make a new graphic and pin it – even though the URL was pinned before, Pinterest is happy because the image is FRESH.
Basically any content you are pinning to Pinterest, vs. finding on the platform and re-pinning, is good! But you don’t need to be churning out new content every day – you can add new images/graphics to old content, pin it to Pinterest, and it “counts” as new. Pinterest NEEDS us to curate content and recirculating it doesn’t help Pinterest – it is user generated so by pinning NEW content with excellent descriptions and photos, you are helping make Pinterest great and Pinterest rewards that!
Re-Work Graphics on Old Content
The emphasis on fresh pins makes sense. Sometimes a pin will do really well and then sort of run its course. Everyone has seen it, lol. I take that old blog post and create a new pin image, and repeat the process, which re-invigorates interest in that post! That’s the “FRESH” content Pinterest wants and sometimes it pays off really well. I’ve noticed that Netflix does this: if I haven’t clicked on a movie, the cover art will change and sometimes I’m fooled, like “hey, what’s that movi-oh never mind”.
But, sometimes a photo just doesn’t do well so re-working the images and trying again makes sense! It might not have been the content, it might have been that the photo didn’t catch the eye (or maybe even the timing was off).
Because I have a large archive of older content, I often take a post that didn’t do well and re-do a graphic or image for it, schedule it in Tailwind, and then it takes off! Usually adding text or a before/after collage is the key. When I revisit old content, I also fix the SEO, add more affiliate links, and just make sure it’s a really great post. I did this for the curtain sewing tutorial below, which hadn’t performed well, and all of a sudden it picked up traction. Then someone who had clicked through pinned some more photos and her pins gained traction and all of a sudden this old post that was sort of a dud was bringing in lots of money!

Pinterest has become quality over quantity which is GOOD – you can slow down and do it well! Make a good pin and enjoy the longevity of its success.
NEW for 2021: Emphasizing FRESH Pins in Your Pinning Strategy
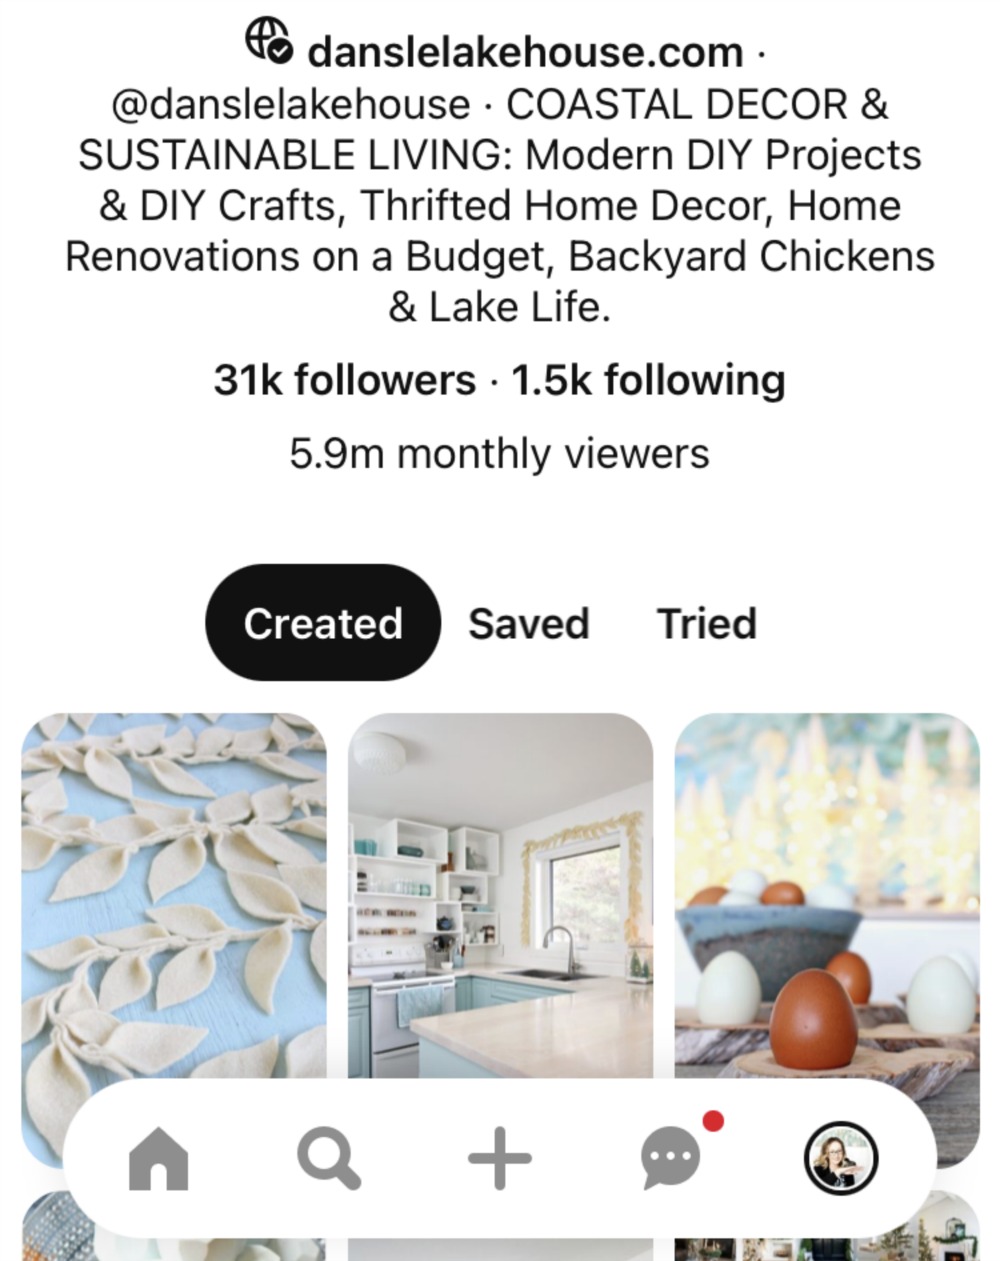
Uh-oh! Like I briefly mentioned above, Pinterest announced a new priority in 2020 which will carry over the 2021 and it means a bit more work for all of us content creators. Whereas Pinterest originally indicated that “fresh” pins were what we should be striving toward (new photo for URL that has been pinned before), now the goal is a BRAND NEW PIN. Which means pinning a URL that has never been pinned before, like a brand new blog post or product page.
A giveaway for this shift was the way the look of the platform changed. Remember how our pins used to be all mixed together? Now there’s a category for CREATED pins, SAVED pins, and TRIED pins – and created pins are seen first when someone views your Pinterest account:
At first, I was taken aback because I had been really on a roll mixing curated content with my own and the change was jarring. But now I see that Pinterest is helping bloggers shine while doing what bloggers do best: create new content!
With this new shift, we have to picture more of a symbiotic relationship with Pinterest. As opposed to seeing Pinterest as a traffic driving machine we use and exploit, we have to think about what Pinterest wants and needs to succeed. It wants fresh new ideas! If the same cycle of the same old content is shown to users again and again, who will want to hop on Pinterest? This shift in best pinning practises means more work for us content creators, but there are ways to get creative:
- Create fresh new blog posts (obvious, haha)!
- Break applicable content down into multiple posts to create more URLS to pin from (like if you’re re-doing cabinet, write multiple tutorials: how to strip paint, how to sand cabinets, how to paint, etc)
- Pin pages (like your home tour or about page you might not have been pinning already)
- Try a new style of content that is easier to generate faster (like short stories vs. massive makeover projects)
- Pin brand new pins from your colleagues (as opposed to always re-pinning from Tailwind Communities)
- Get better tagging your posts in categories and pin more category URLs with a Pinterest-ready graphic
- Create more round-ups with your content (“my BEST 10 Christmas cookies”)
- Create more round-ups with your colleagues’ content (“30 awesome DIY Christmas ornaments”)
- Pin your Instagram posts
- Create more pins right in Pinterest (like using Pinterest stories – called “Idea Pins”)
A Note on Pinterest “Pin Ideas”
Pinterest launched Pinterest “Pin Ideas” and they’re positioned at the top of your profile – above your created pins. I have tested some Story Pins and they are clearly favored by Pinterest because they immediately gained tens of thousands of views. Friends who follow me commented that my Story Pins were at the top of their home feed, drawing attention to my account. So in terms of being discovered, getting seen more by your existing followers, and growing on Pinterest, it’s wise to try and use this feature. It’s incredibly easy to use – just upload photos or videos, add text, add supplies/ingredients, pick some key words, and then pin to a board!
BUT think about how you will use them because if you share detailed DIY tutorials or recipes in these story pins, you will possibly reduce your website traffic. Someone might not click to your tutorial if they can just tap through your Pinterest Idea Pin. I believe Idea Pins were created to keep people on the Pinterest app. While it’s useful to leverage them for growth, be sure not to “give away the milk for free” – you still want people coming to your website. But you also want to please the Pinterest algorithm so your account is shown to more potential followers – new customers to your website or shop. So experiment with this feature, but don’t give too much of your content away!
Building Momentum of Popular Pins
Best pinning practices, straight from Pinterest, emphasize the importance of FRESH pins – new pins, either new images and existing URLs or brand new content.
While Pinterest is emphasizing FRESH pins, some of my blogging friends and I have noticed that you can get really good traffic from re-pinning popular pins! This was an “older” method that is discouraged by Pinterest but WORKS.
In fact, sometimes you need to dip back into this old method.
But just use it in moderation. Pinterest ultimately discourages this, but allows it in moderation, and really, it’s such a strong tool for driving traffic.
Find Your Best Pins and Rep-Pin Them:
Although I emphasize “fresh” pins in my strategy, I also recycle my BEST pins and keep them going. Take a really well performing pin and re-pin it: share it to group boards, re-pin it again to your boards, share with your Tailwind Communities – but space it out! Don’t take the same pin and re-pin day after day. Schedule it out and then wait months before you dare share it again – Tailwind has a Looping feature to help you schedule this activity.
Pinterest wants us to go easy on this – pinning too many times to the same board can get you flagged as spam. They explicitly state “we don’t recommend doing this very often,” so save this technique for your BEST pins that are driving tons of traffic and you want to pump up that momentum. Doing this to the same popular pin, every few months, is how I have gotten some of pins to have tens or thousands of re-pins and tens of thousands of clicks.
Don’t make it a habit, but also don’t give up on this tactic completely.
Pin Other People’s Pins from Your Website:
Here’s a hack I stumbled across that does SO well – I often re-pin someone else’s pin of my own website content.
My goal is TRAFFIC and traffic from my own pins is ideal but I’m not super concerned about Pinterest followers or stats. So, if someone pins my own Dans le Lakehouse content and it takes off, I pounce on that momentum and re-pin their pin of my content to my group boards, niched boards, and share in Tailwind Communities.
That momentum is awesome! It’s like a snowball rolling down a hill.
If you see a pin of your content doing well, yours or someone else’s, use that momentum and re-pin those pins – but do so in a purposeful, non-spammy way! When you look at your Pinterest Analytics, you can sort by your pins (by content: whether it’s from your website or other websites) and other people’s pins of your content. Take a look at your top performing pins, in terms of clicks, and re-pin those – no matter whether they started off as your original pin or someone else’s.
You can see the top pins people have pinned from your site in Pinterest Analytics (then click “overview,” look on the left where you can choose which pins you want to see stats for – see the screenshot below). When I see a pin performing well in Analytics, I click on it and re-pin that pin to build on its momentum. I also use analytics for market research, to see what kind of pins do well so I can create more – not only of that style of pin, but that kind of content as well.
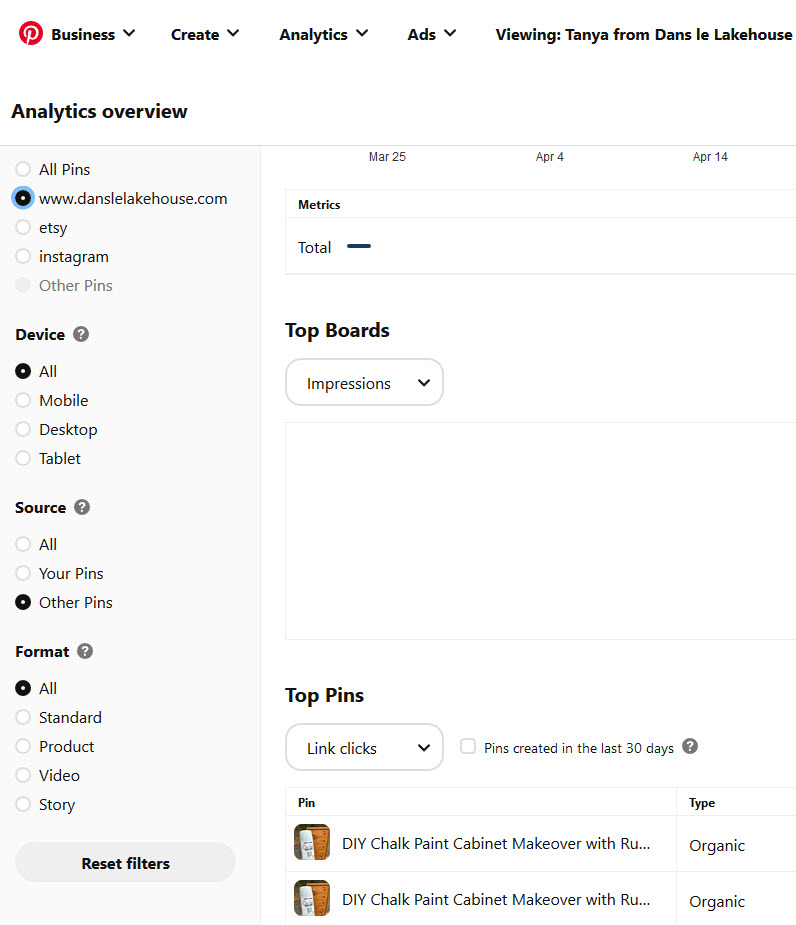
Earning Money From Pinterest
Now that you know how to create great boards, great pins, great pin descriptions and build momentum, here’s how Pinterest makes you $$.
How Pinterest & Website Traffic Help Me Earn an Income:
Combined with traffic from search engines, back links, and other social media platforms, my website earns enough from display ad revenue and affiliate links to generate a solid, and somewhat reliable income for me, independent of blog sponsorships. For a long time, I only relied on sponsored posts and I never knew where my next pay cheque was coming from. Signing on with an ad network (it used to be Mediavine but now AdThrive), re-honing my affiliate link strategy, and focusing on really driving traffic with Pinterest and SEO, I created a steady income – and sponsored posts became a piece of the pie. That has given me so much peace of mind and renewed my passion for blogging and liberated me creatively. I am no longer beholden to the kind of content brands want!
But that doesn’t mean I stopped working on sponsored posts! As my website traffic grew, so did the opportunities for sponsored posts and now I have the luxury of turning down the ones that don’t feel like a perfect fit. Interestingly, after chasing Instagram for so long, I think brands are realizing the power of Pinterest when it comes to driving traffic and making sales. I’m currently working with a popular furniture brand on a Pinterest-only campaign and I have seen more and more Pinterest campaign pitches land in my inbox.
So, for me, website traffic has played a crucial role in being able to turn blogging into a full time gig. And not only has Pinterest become my #1 traffic source (followed closely by search engine results), my success on the platform is drawing the attention of brands who want to leverage that. Plus I can pin my own products and affiliate links – and even get paid to pin – so there are many ways to earn a living using Pinterest.
Now, you CAN make money with a small website audience, especially if you have a really loyal audience of customers and you have a physical or digital product to sell. You can even make money with NO website audience and leverage a social media following (but that is, in my opinion, very dangerous because you’re building a business on borrowed land).
But if you’d like to earn money from display ads or affiliate links, optimize the sales of your product or service, or look more enticing to brands, traffic is key!
You’ll want to implement strong SEO strategies for your website content, but Pinterest is an easy way to get traffic now while you build your other skills and back links.
The best thing is that pins can have a long life, so if a pin performs well, you can enjoy a boost in traffic for weeks, months – sometimes even years. It can be an incredibly passive, easy way to drive traffic, unlike other social media posts which can fizzle out in a day or so. I’ve been working to grow my presence on Instagram (I currently have 21,700 followers) and it’s a LOT of work! Shifting gears and working on Pinterest has proven to be a lot less work for a far greater return!
Drive Traffic to a Website and Earn:
Pinterest generates the most money for me by driving traffic to my website, where clicks earn me ad revenue. There are different ad networks you can join, based on your page views. If you don’t have display ads, look into Google AdSense, Ezoic, Monumetric, Mediavine or Adthrive.
Also, the more traffic I have, the larger brand sponsorships I can land.
While they’re there, folks will sign up for my email newsletter, buy from my Etsy shop, follow me on Instagram, shop my affiliate links!
BUT there are other ways to leverage Pinterest too.
Pin Affiliate Links:
You can pin products to Pinterest with your affiliate links as the URL, so when someone clicks your pin for cute turquoise shoes, it leads to the product page with your cookies. You can create a graphic and lead them to your Amazon shop! But be sure to follow the ever-shifting rules, not only from Pinterest, but also from the affiliate networks themselves on how to pin affiliate links. For example, you’ll want to clearly indicate that the link leads to an affiliate product page.
Or you can create gift guides and shopping guides, which I’ve mentioned perform really well on Pinterest, that lead back to your website where people can find the (affiliate) links for the products that enticed them and earn you ad revenue. The bonus is when you pin from an affiliate link it’s not counted as a pin you “created” but if you create a round up on your blog and then pin the images from there, it is considered a pin you created!
Create content FOR Pinterest that does well on Pinterest and optimized for Pinterest: like shopping guides (you saw one pop up in the top search when I typed in “modern coastal” to demonstrate keywords – a round up of coastal chandeliers was front and center), shop-able mood boards, design how-to’s with shop-able links.
Pin Your Products:
Shop owners (from big to small) can use Pinterest to pin directly from their shop webpages as well, driving Pinterest audiences to a website or shop where they can purchase an item. Or, once again, create a graphic for a category or theme – like a line of pillows or beauty products you’re selling. Businesses with lots of products do well on Pinterest because they have a steady stream of “fresh content”.
Pin From Other Social Media:
If you’re someone who has built a business on Instagram alone (yikes!) then build your following by leveraging Pinterest. Create collages of your best projects and makeovers and send that traffic to individual Instagram posts, your whole account, or stories. You can pin directly from Instagram but you can also create a graphic (like a before/after – using the photos form an IG carousel style post) and link to that Instagram post URL.
Pin Your Services:
You can also pin “landing pages” on your website, that lead people to sign up for a newsletter or download a freebie or sign up for a course or buy your e-design. I will create a pin for this course and send it to a URL on a page that has the sign up. I can drive traffic to my service this way – and this can work for any service.
Get Paid to Pin:
HomeTalk has a Pinterest program and you can pin from their curated list of pins and get paid for traffic you send their way. I believe it’s $8 per 1000 clicks? I have been testing it out and experienced lukewarm results so far, but that’s because I’d rather spend the time and drive traffic my way and earn way more. But if you’re just starting out, or don’t have display ads, this could be an avenue for income for you to explore.
I believe we’ll start seeing more of this type of pinning, although you need a minimum number of monthly viewers and I believe it’s over a million to be accepted. I have had a few smaller companies pitch affiliate pinning programs to me but I’m already doing that with affiliate programs like Amazon, RewardStyle and Shareasale.
Expect to see more Pinterest campaigns with brands and way more paid pinning gigs.
Paying for Promoted Pins
You don’t need to pay for pins to see growth on Pinterest, but they can be a valuable tool.
I’ll share me experience with you, but it’s limited so if it’s something you want to experiment with, Pinterest offers lots of resources.
I have tried paying for promoted pins and the click rate is good value, but only if you have something to sell. It didn’t drive enough clicks, for me, to earn back the money through ad revenue alone, but for an affiliate-heavy post or a post promoting products you sell (like a gift guide with all of your handmade wares) it’s good value for the money.
I recommend taking a pin that’s doing well already and make that a promoted pin because Pinterest already provided you with free market research. I don’t pay for ads often, but around the holidays it can be a good investment.
The Takeaways
I hope you found this Pinterest guide: How to Use Pinterest & Leverage Pinterest for Traffic helpful! My goal was to help beginners get set up for success and also help those already pinning to fine tune their strategy and see their Pinterest traffic sky rocket. You can really get into advanced techniques beyond this, like making video content for Pinterest. Just like on Instagram, video pins are growing in popularity but I have yet to experiment with them – when I do I’ll share my experience you. If videos intimidate you, you can start small and use apps to create mini videos or even use something like Pixaloop to add motion to static pins to start playing with the concept of video pins.
Here’s what I covered:
- Start with an on brand and welcoming profile photo of you
- Create a display name and about description that are keyword-optimized and on brand for you
- Create boards that are niched and keyword-optimized in topics related to your brand
- Create secret boards for your own content – stop pinning for yourself
- Curate high quality content that serves your audience
- Create high quality pins with keyword rich descriptions
- Pin to your BEST boards first with the most appropriate title/description to signal Pinterest about the topic
- Pin to no more than 1o boards
- Experiment with Pinterest “graphics” and pin multiple images for each post
- Focus on FRESH & NEW pins
- Get creative with URLs (think: affiliate links, blog posts, blog pages, category URLs)
- Pin consistently and with intention (15-25 pins per day)
- Watch your analytics
- Stay ahead of the trends with Pinterest trend predictions and sign up for Pinterest emails to stay in the loop
- Break the rules occasionally and re-pin content that is performing well – push that snowball down the hill!
Once a lot of this is set up, day-to-day pinning is easy, especially with a scheduler!
All apps want you to engage, so use it and love it. Login throughout the day and re-pin here or there. Pin consistently. But don’t get wrapped up in all of the follower numbers – focus on the traffic you are driving! And as Pinterest rolls out new technology – try it! Early adaptors are always rewarded (some of the “power pinners” today, with millions of followers, were people who took to it right away and were rewarded because Pinterest suggested their accounts to people). Instagram also rewards people who use all facets of the app. So experiment: try video pins and experiment with new features.
Above all, ENJOY Pinterest!