Welcome to our home! In 2013, Hubby and I unexpectedly purchased a beautiful little bungalow on Lake Superior. It took longer than expected to sell our former townhouse, which was in another city. That’s why we didn’t actually move into the lakehouse until January 2014 – six months after purchasing it! Since then, we’ve been tackling projects big and small to transform this 1990s builder’s basic house into our mid-century meets coastal dream home. Check out “before” photos, links to DIY projects, and room makeovers below.
THE EXTERIOR – BEFORE
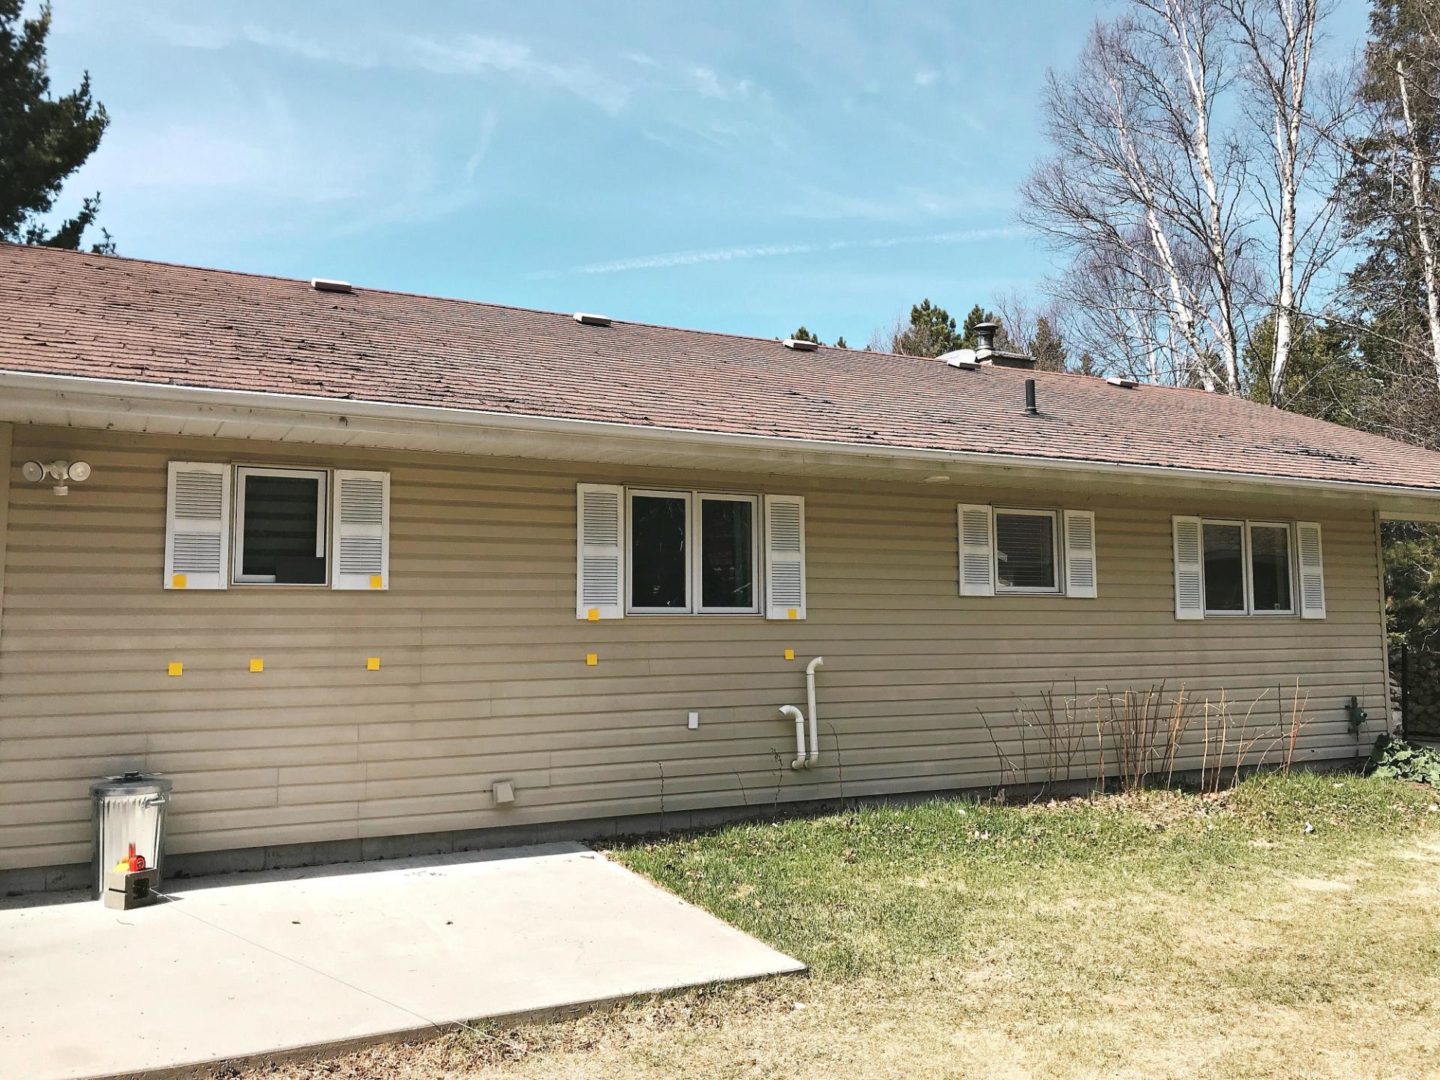
When we bought the house, we loved the cedar siding on the lake side, but the bummer was that the other three sides were beige vinyl siding that was damaged in many places. We also needed to replace the roof and it turned out that some windows were leaking.

Before
Before
Before

Before
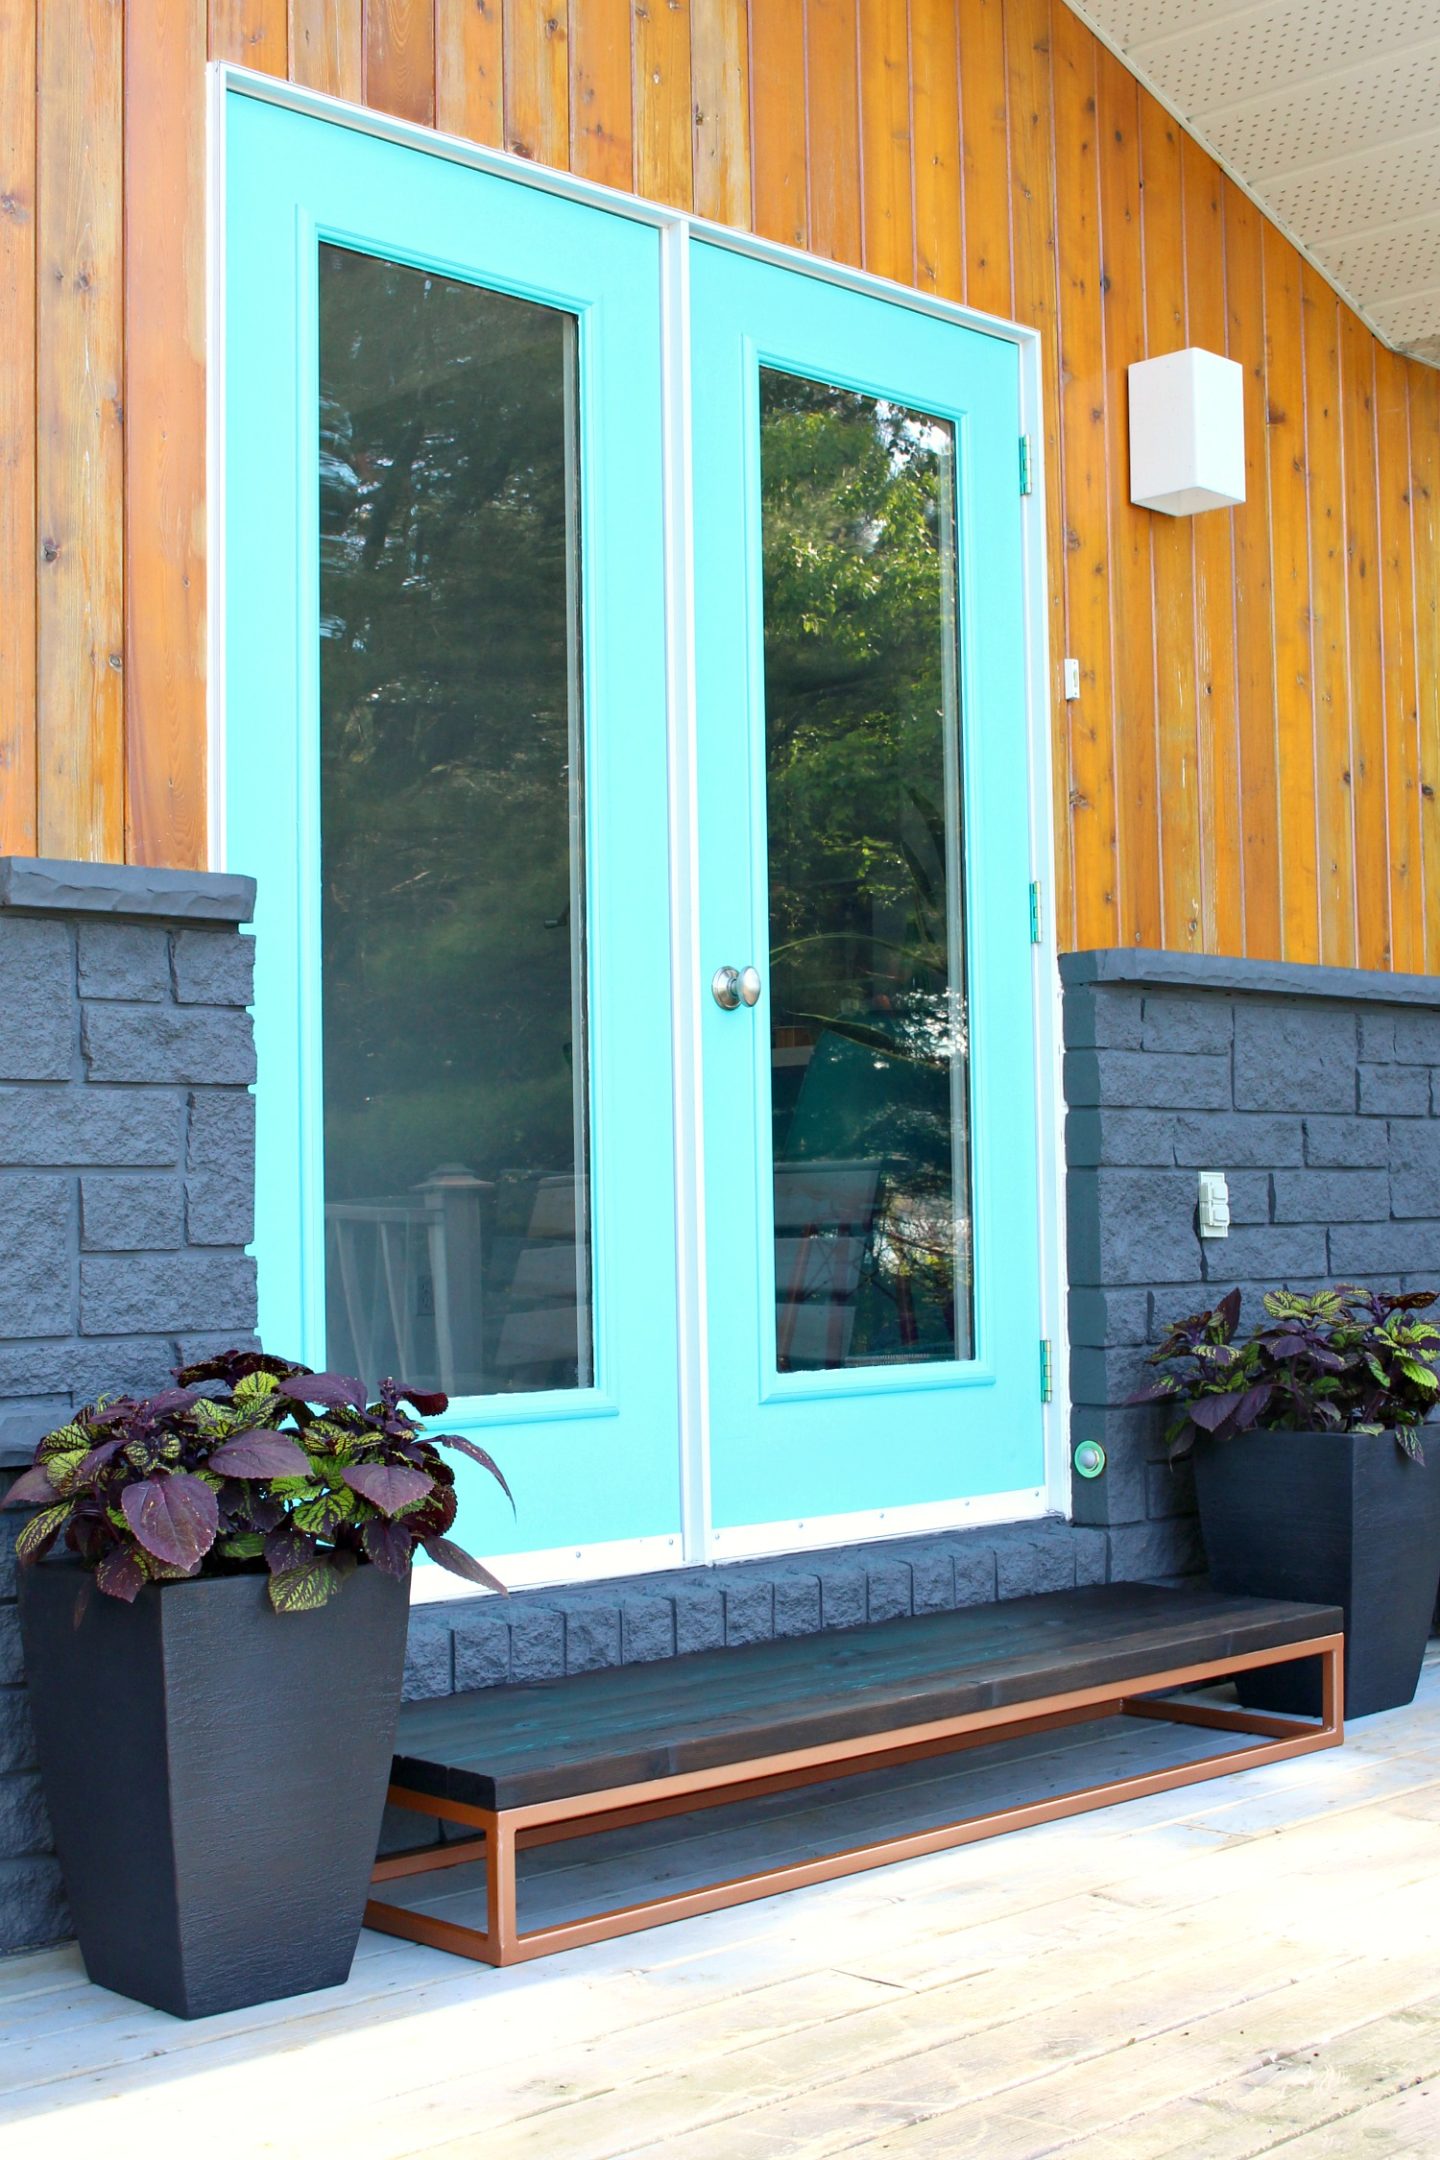
In the interim, we did a budget-friendly exterior makeover that looked like this (we painted the brick – even the chimney! – and the garden doors, and made a new welded step like this one).
The Mini Makeover
The Mini Makeover
DIY PAINTED STONE EXTERIOR | DIY PAINTED CHIMNEY | DIY WELDED STEP | DIY SHOU SUGI BAN WOOD BURNING | DIY TURQUOISE PATIO DOOR MAKEOVER
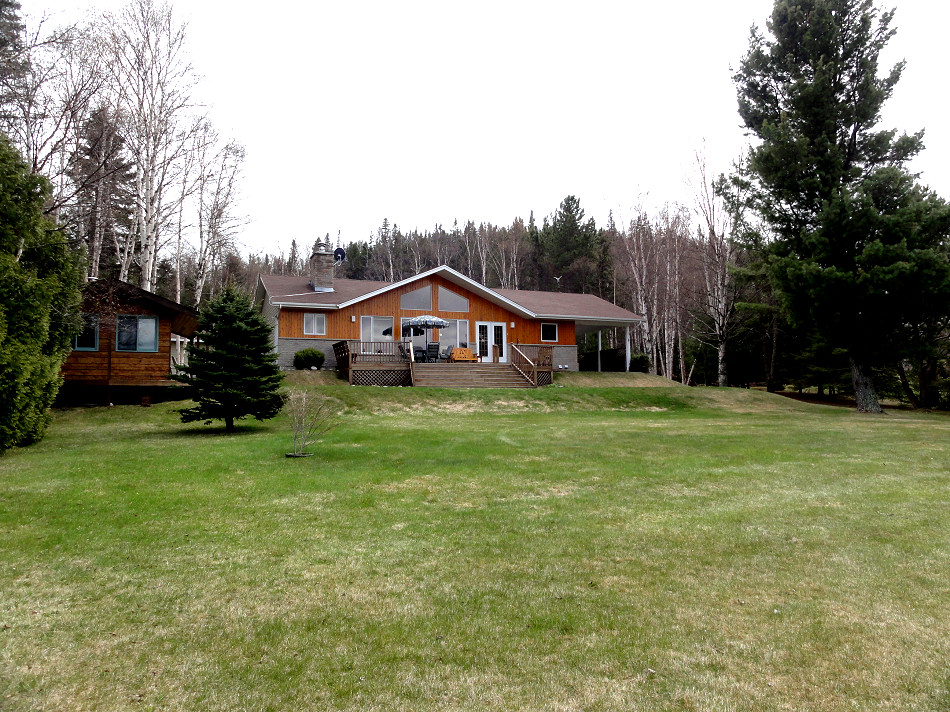
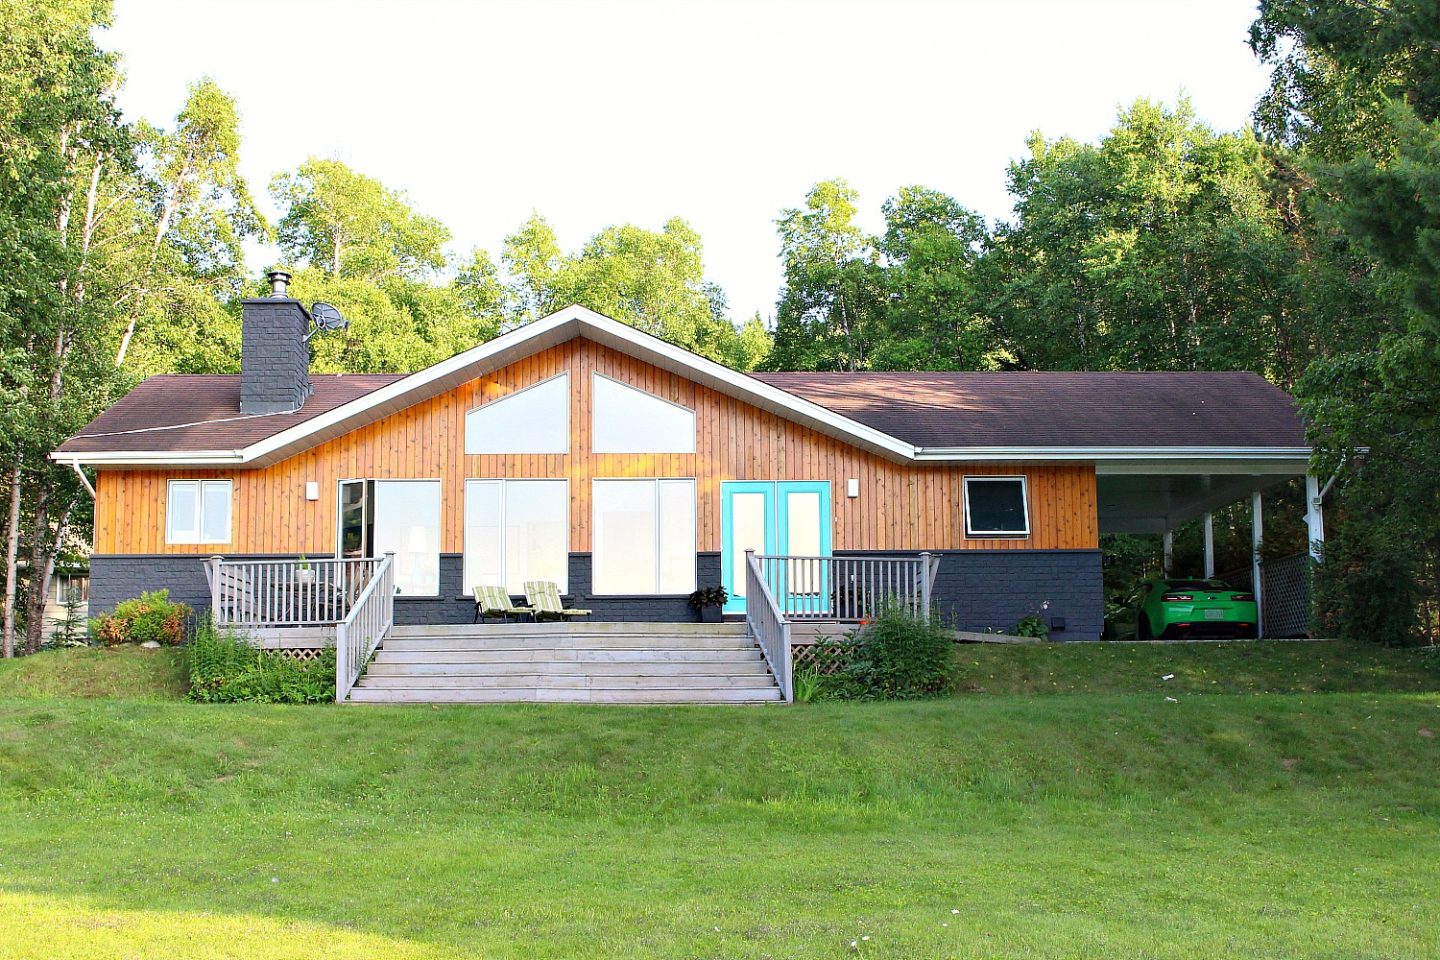
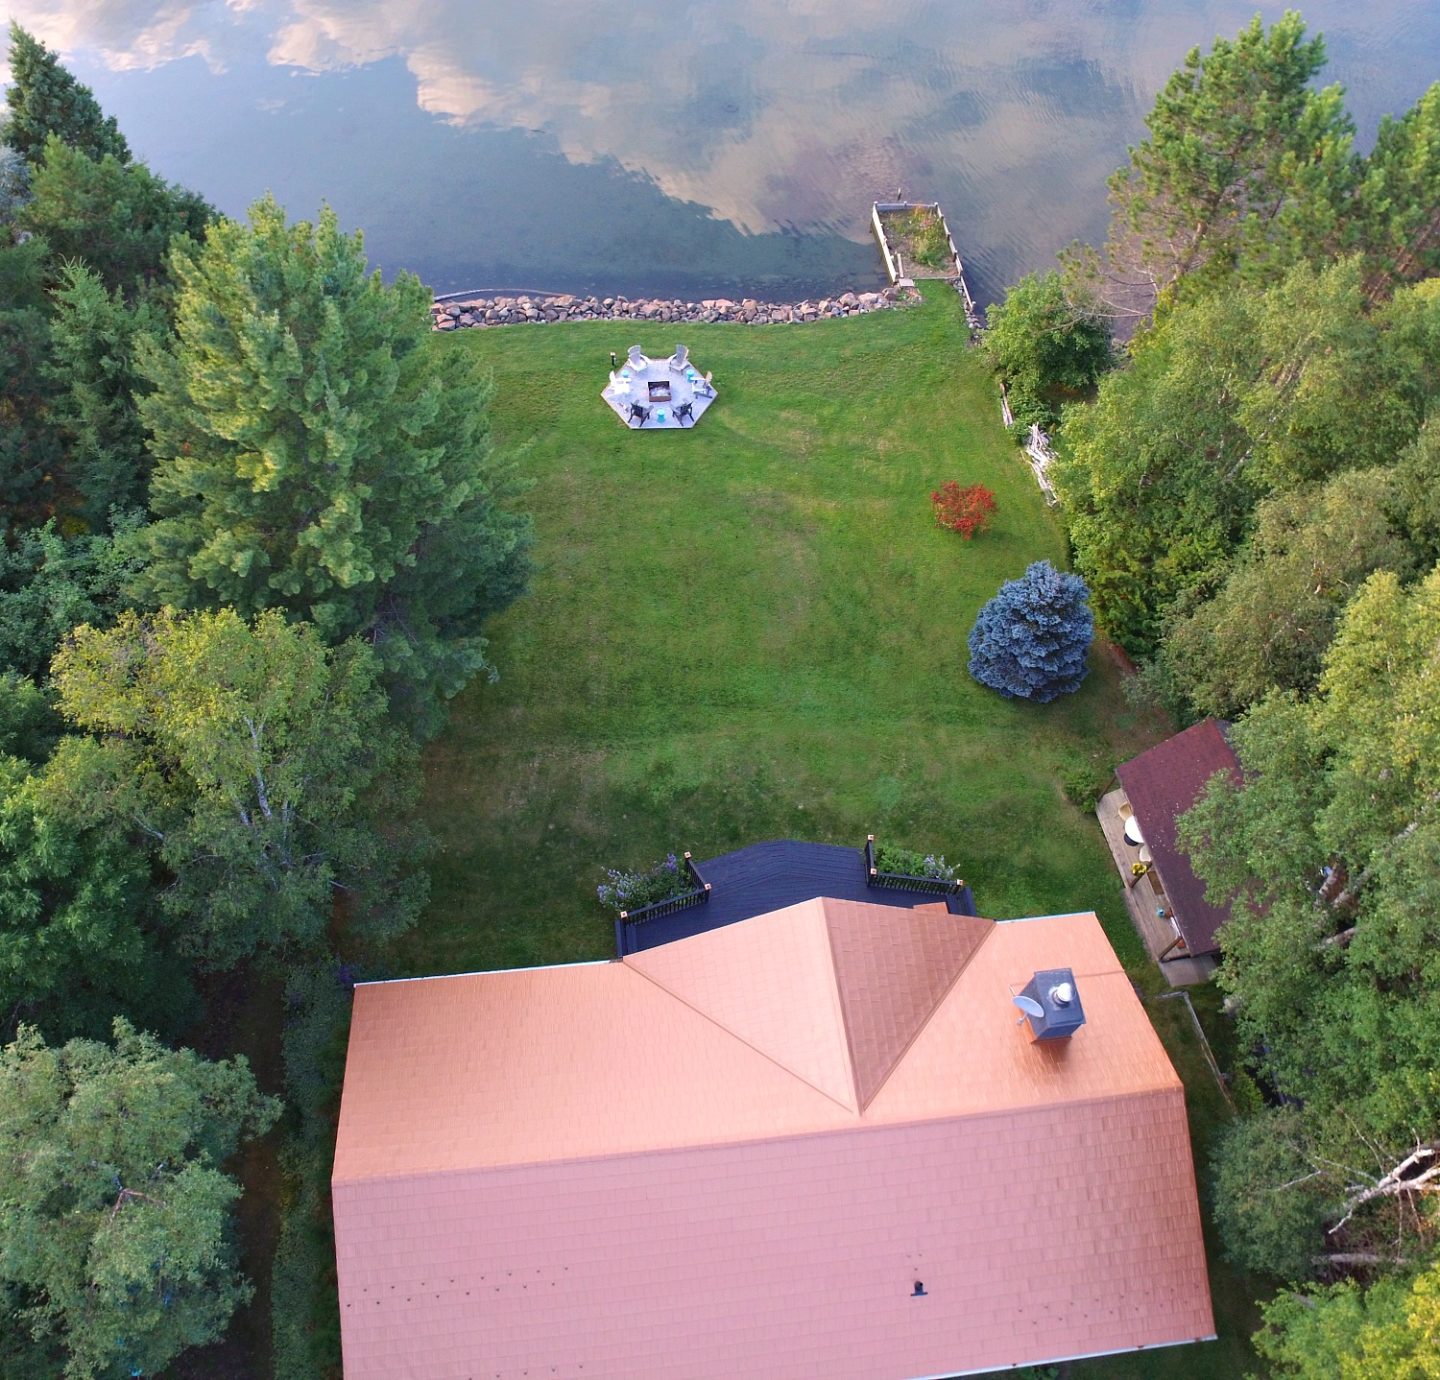
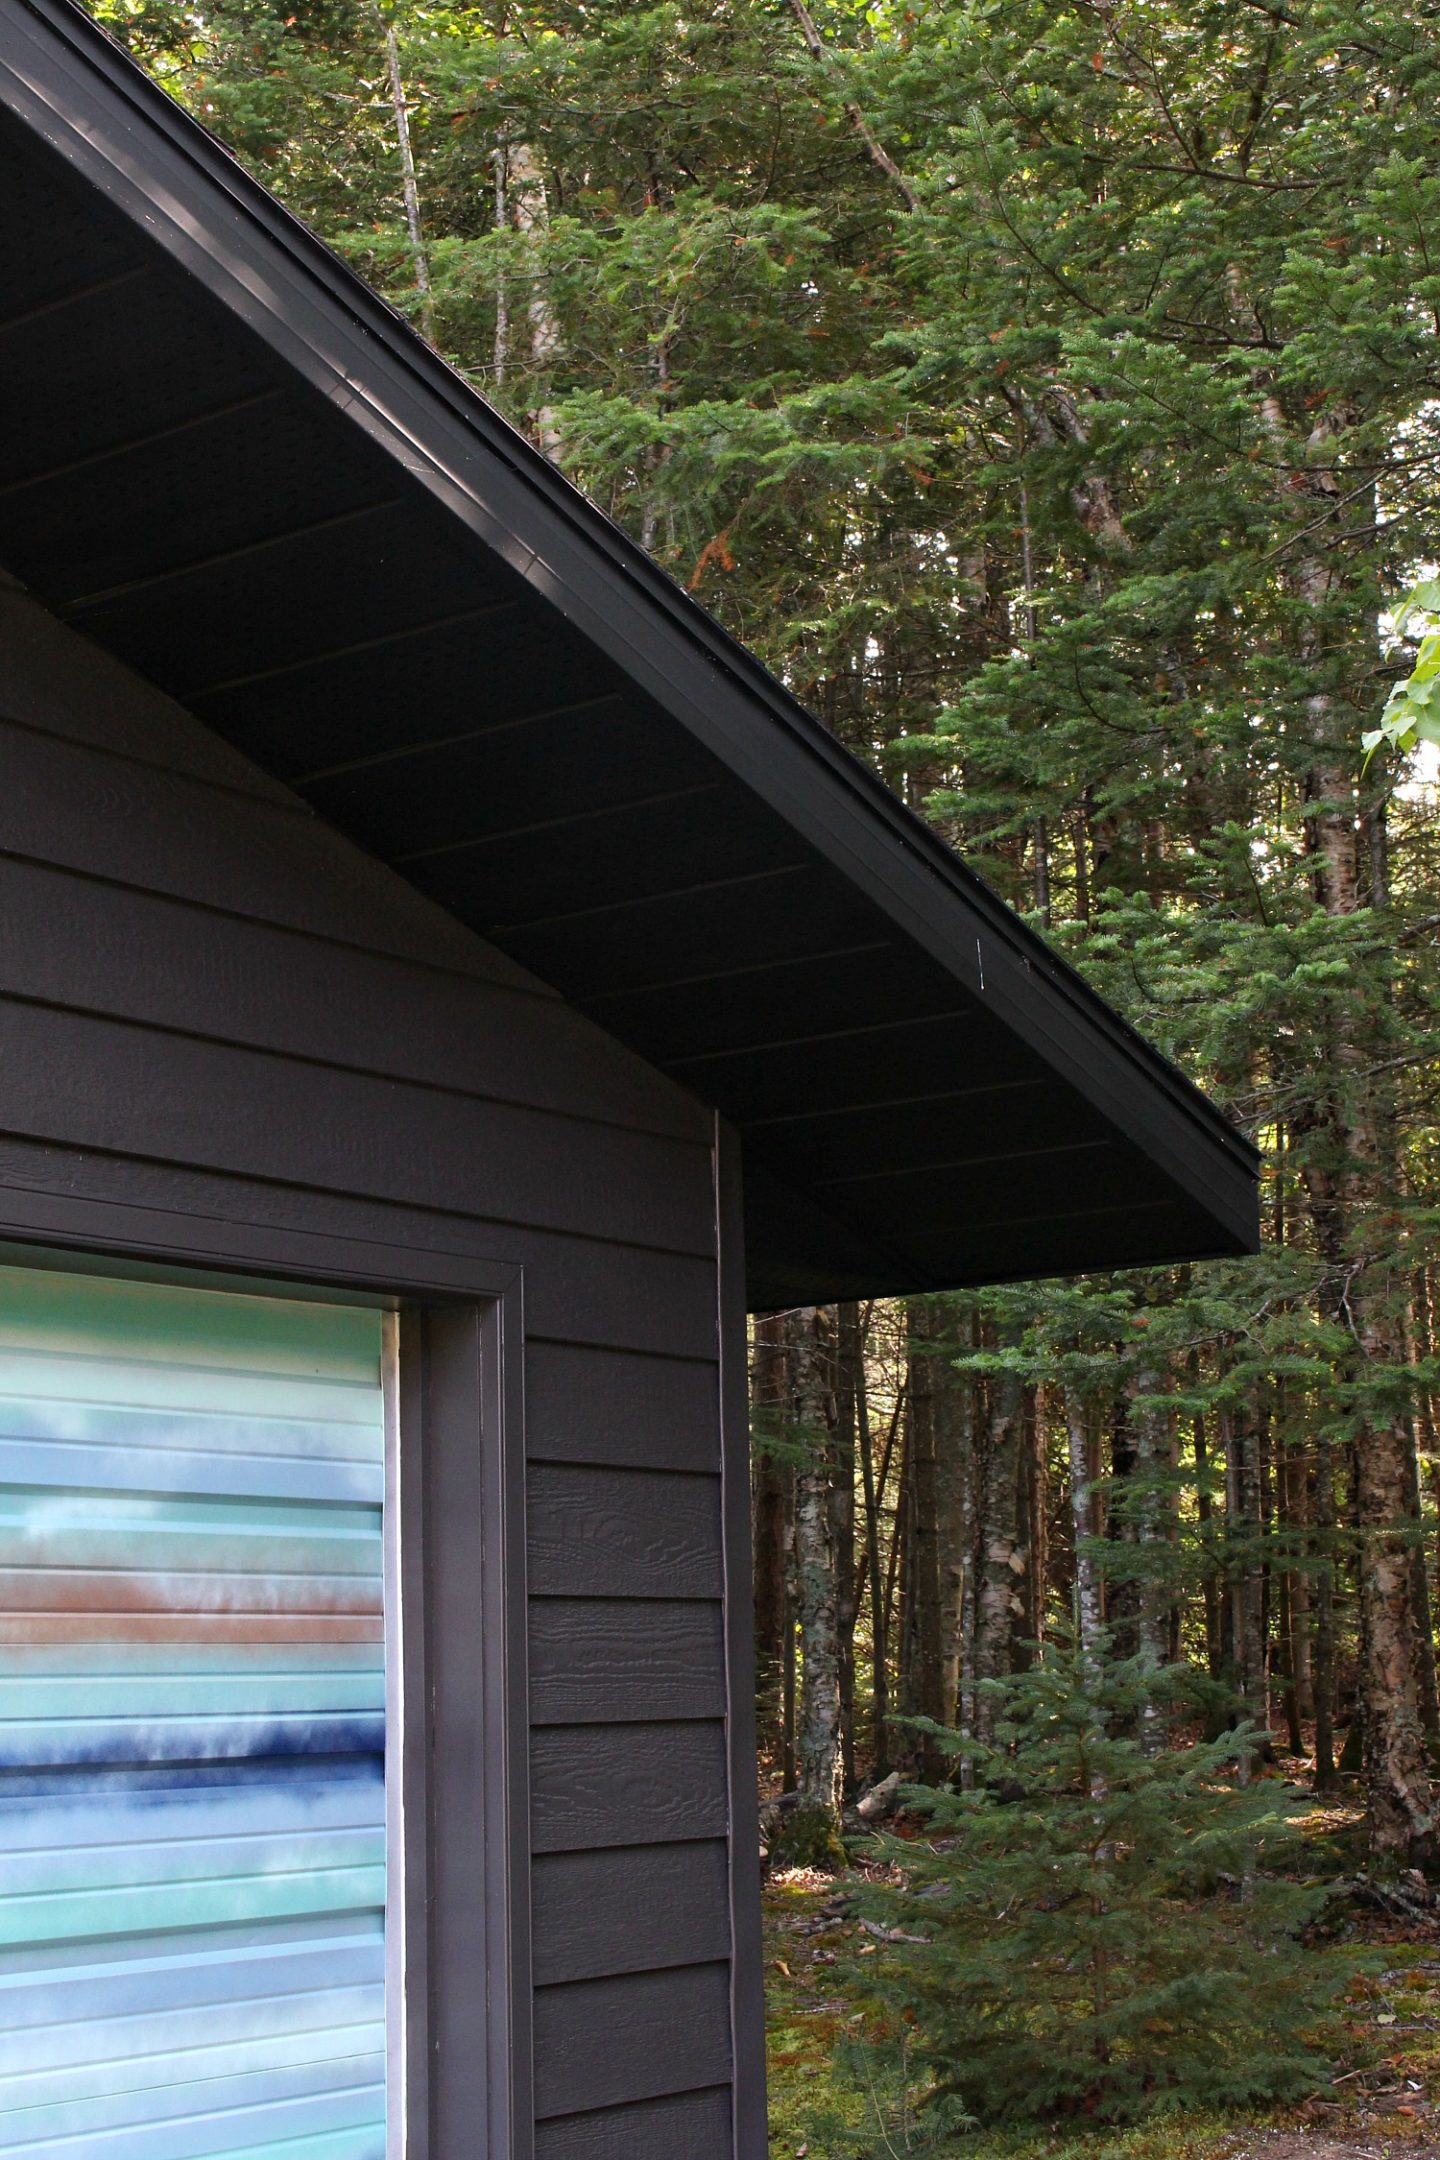
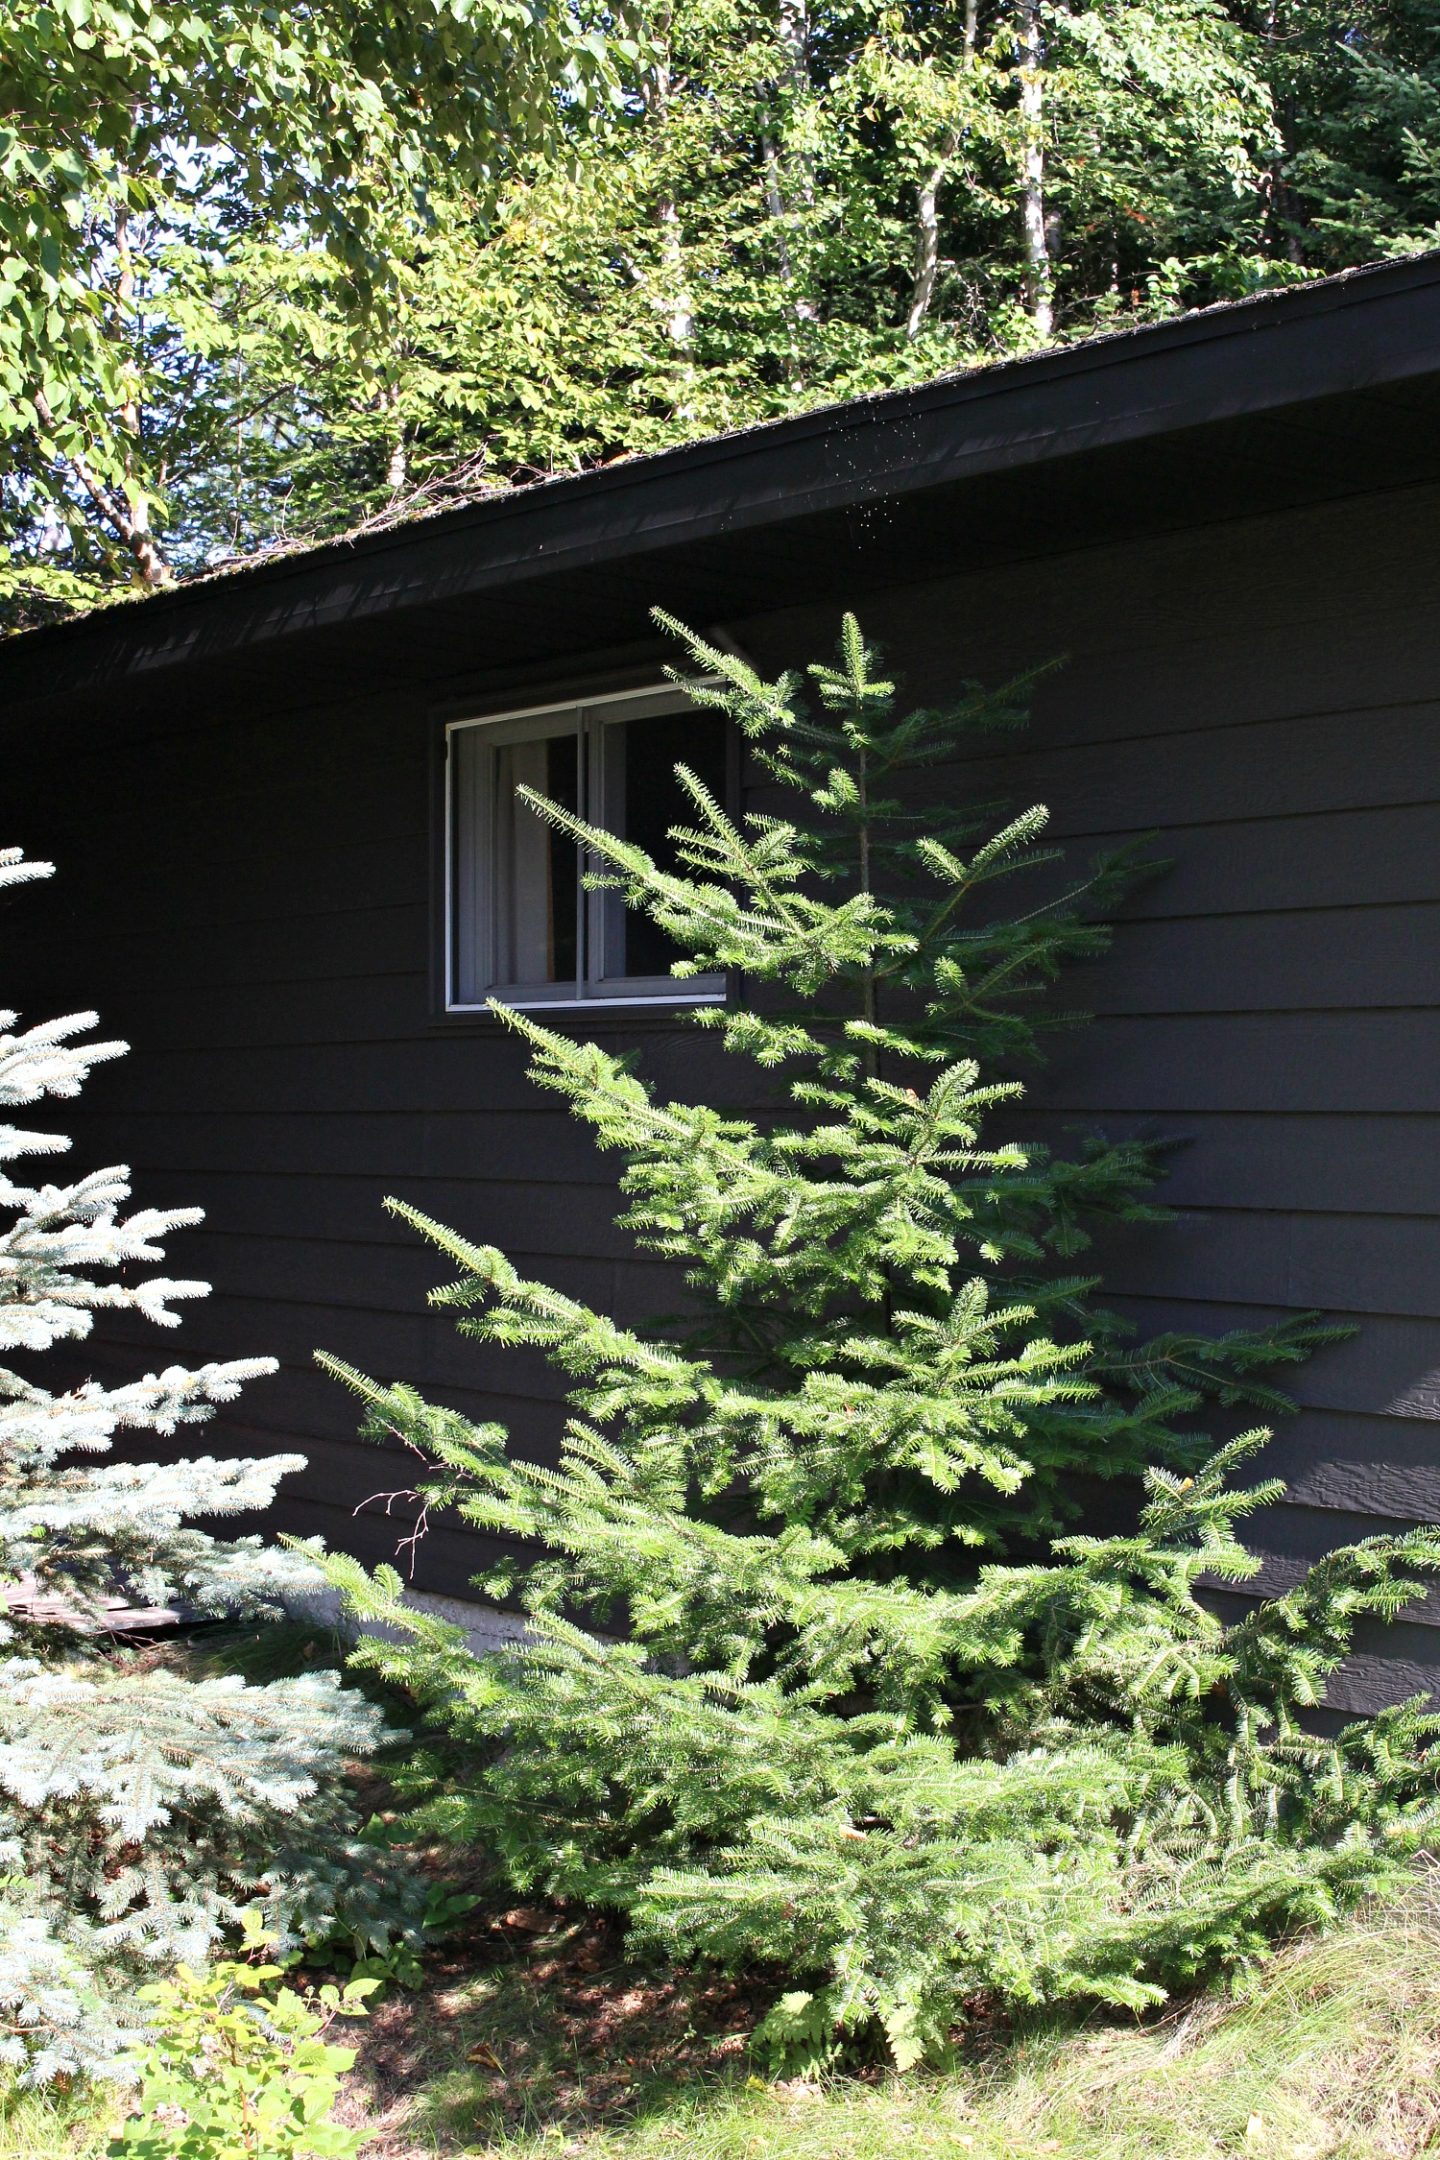
THE HOUSE EXTERIOR – AFTER
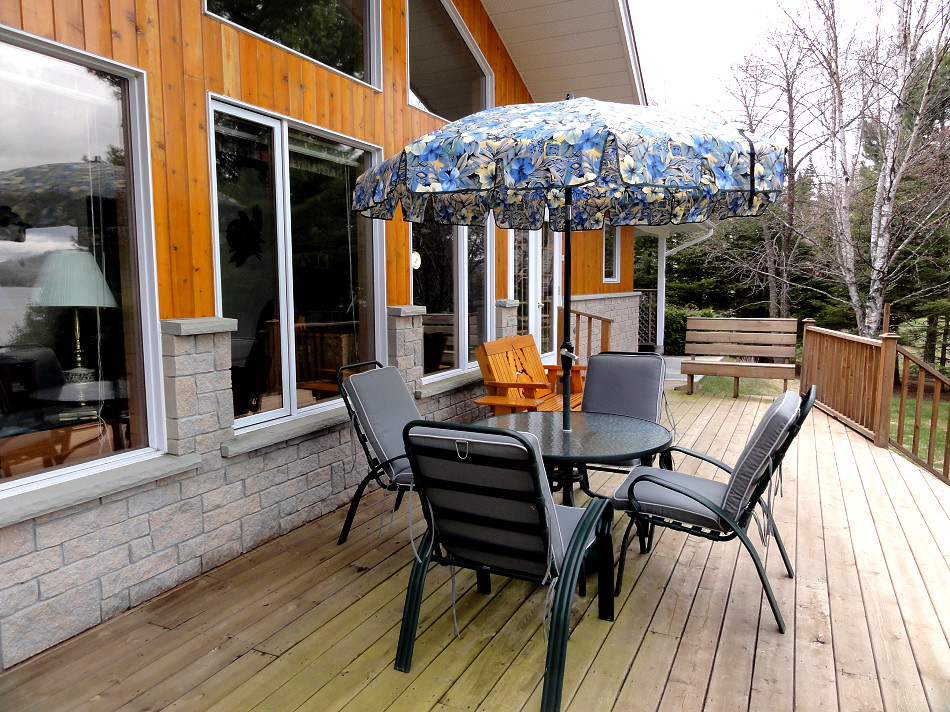
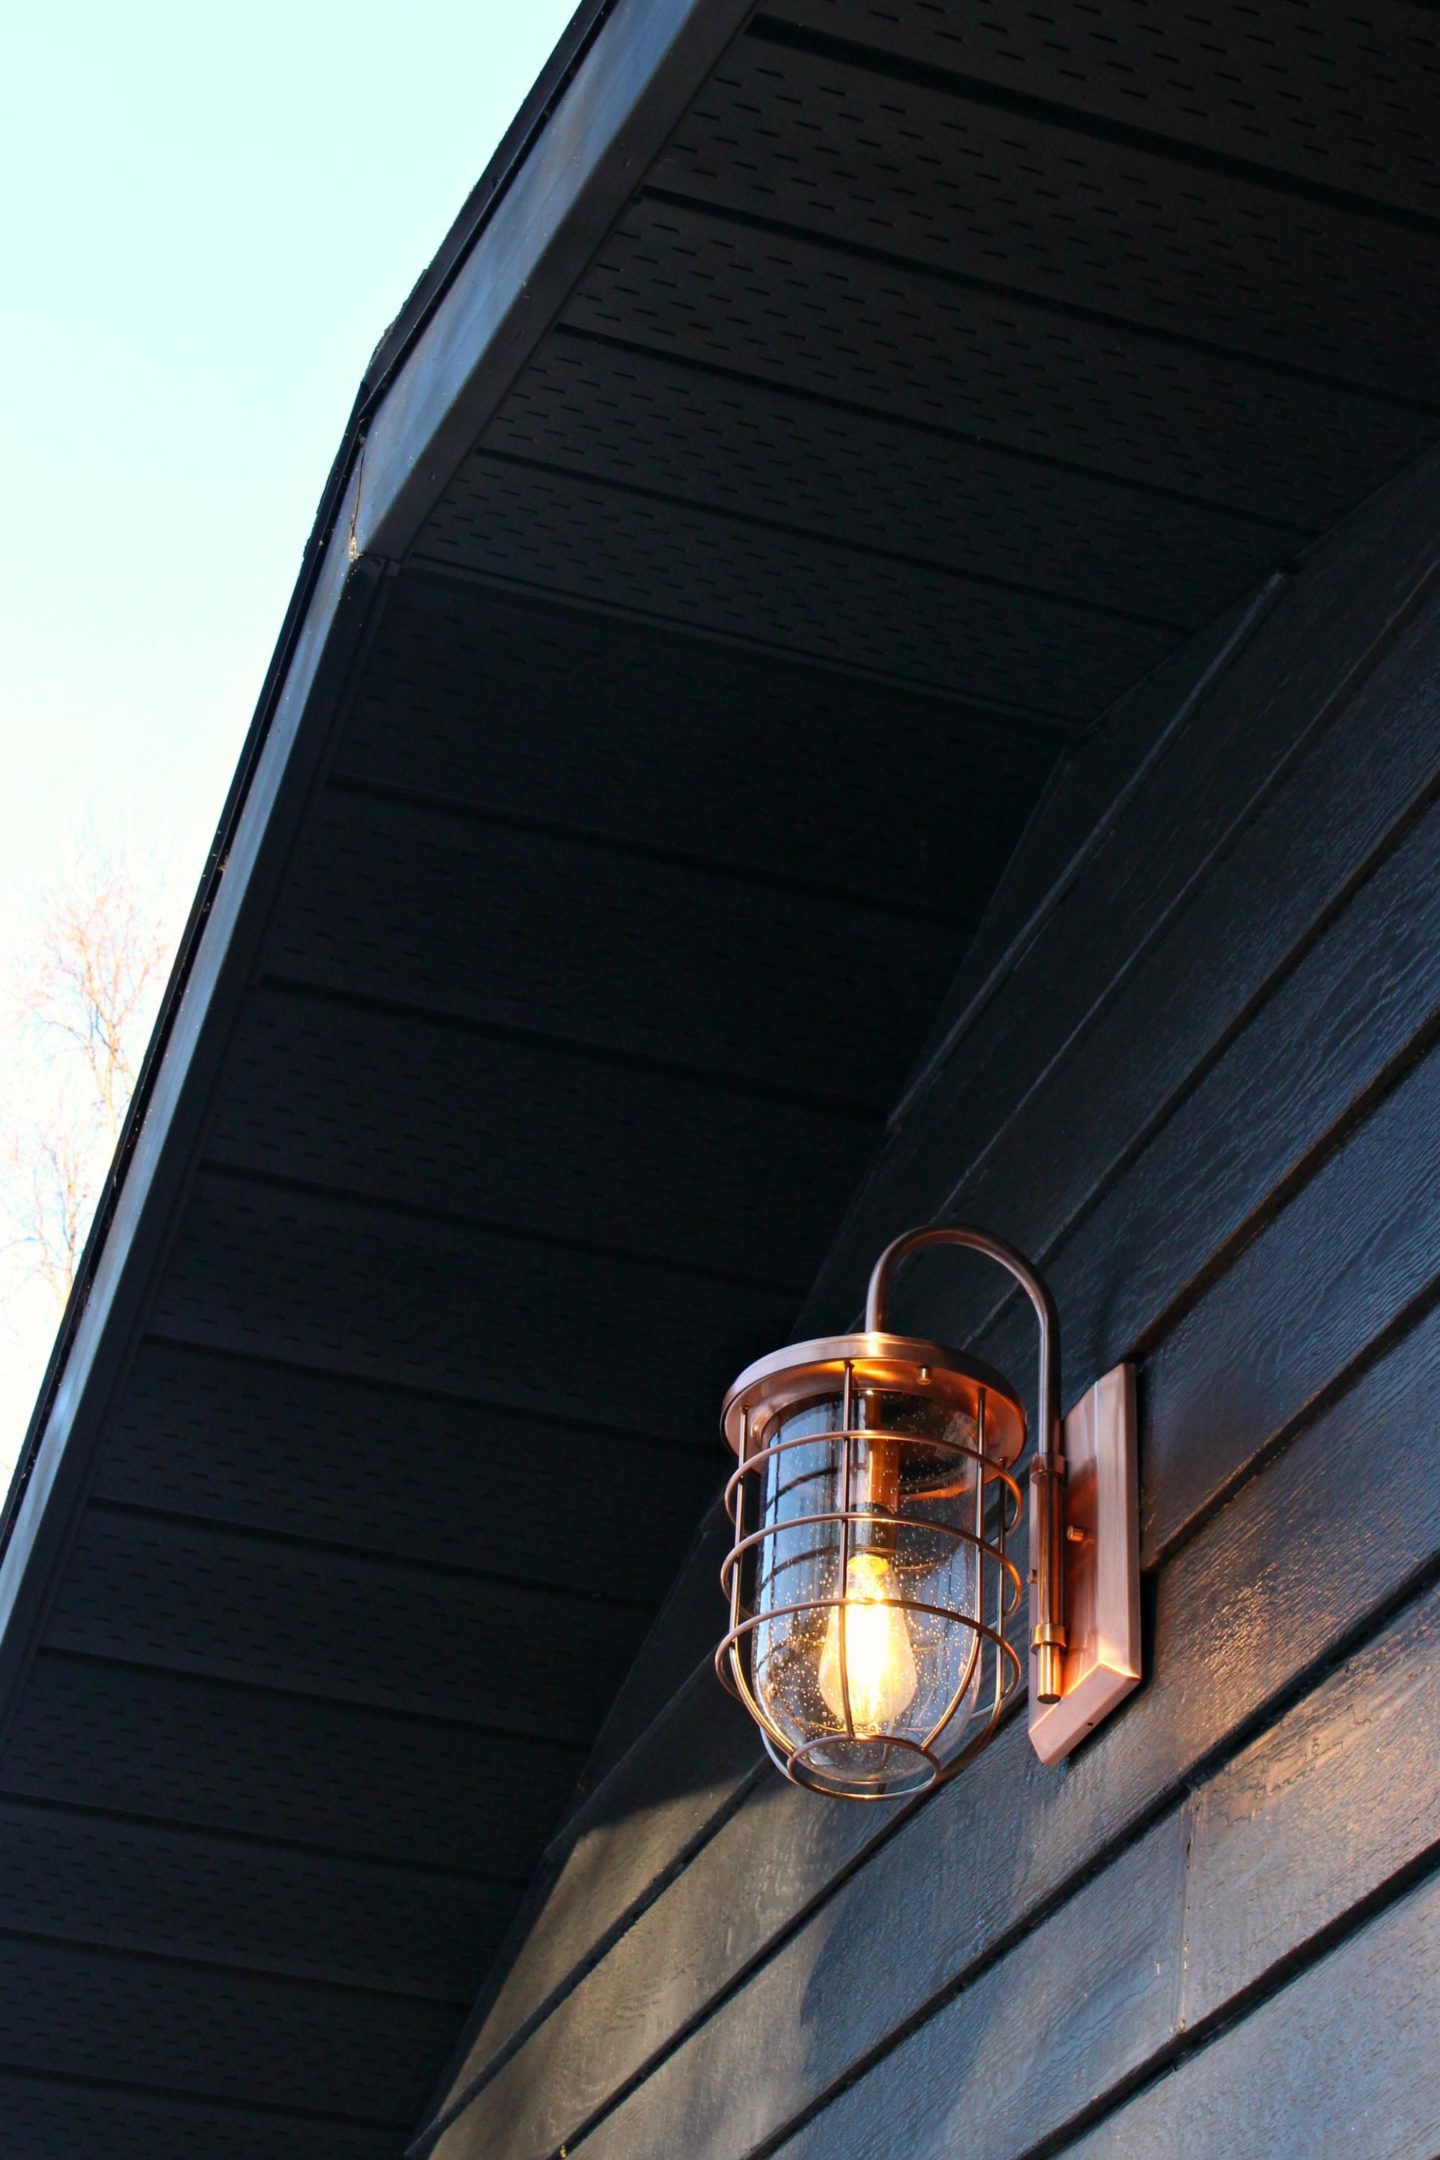
In 2018 we had the entire exterior re-done with metal siding, a metal roof, new soffit & fascia, and new windows. My favorite part is the new metal roof – which is a gleaming copper hue. The actual renovation was a bit of a nightmare, with lots of delays and setbacks (you can read the story here) but the end result is beautiful. Here’s a look at the house exterior now! Complete with matching copper ferry lights that sport a cute nautical vibe. I also stained the deck black and added matching copper solar caps, plus we made modern vertical slat deck skirting and finished the space with a DIY live edge patio table.

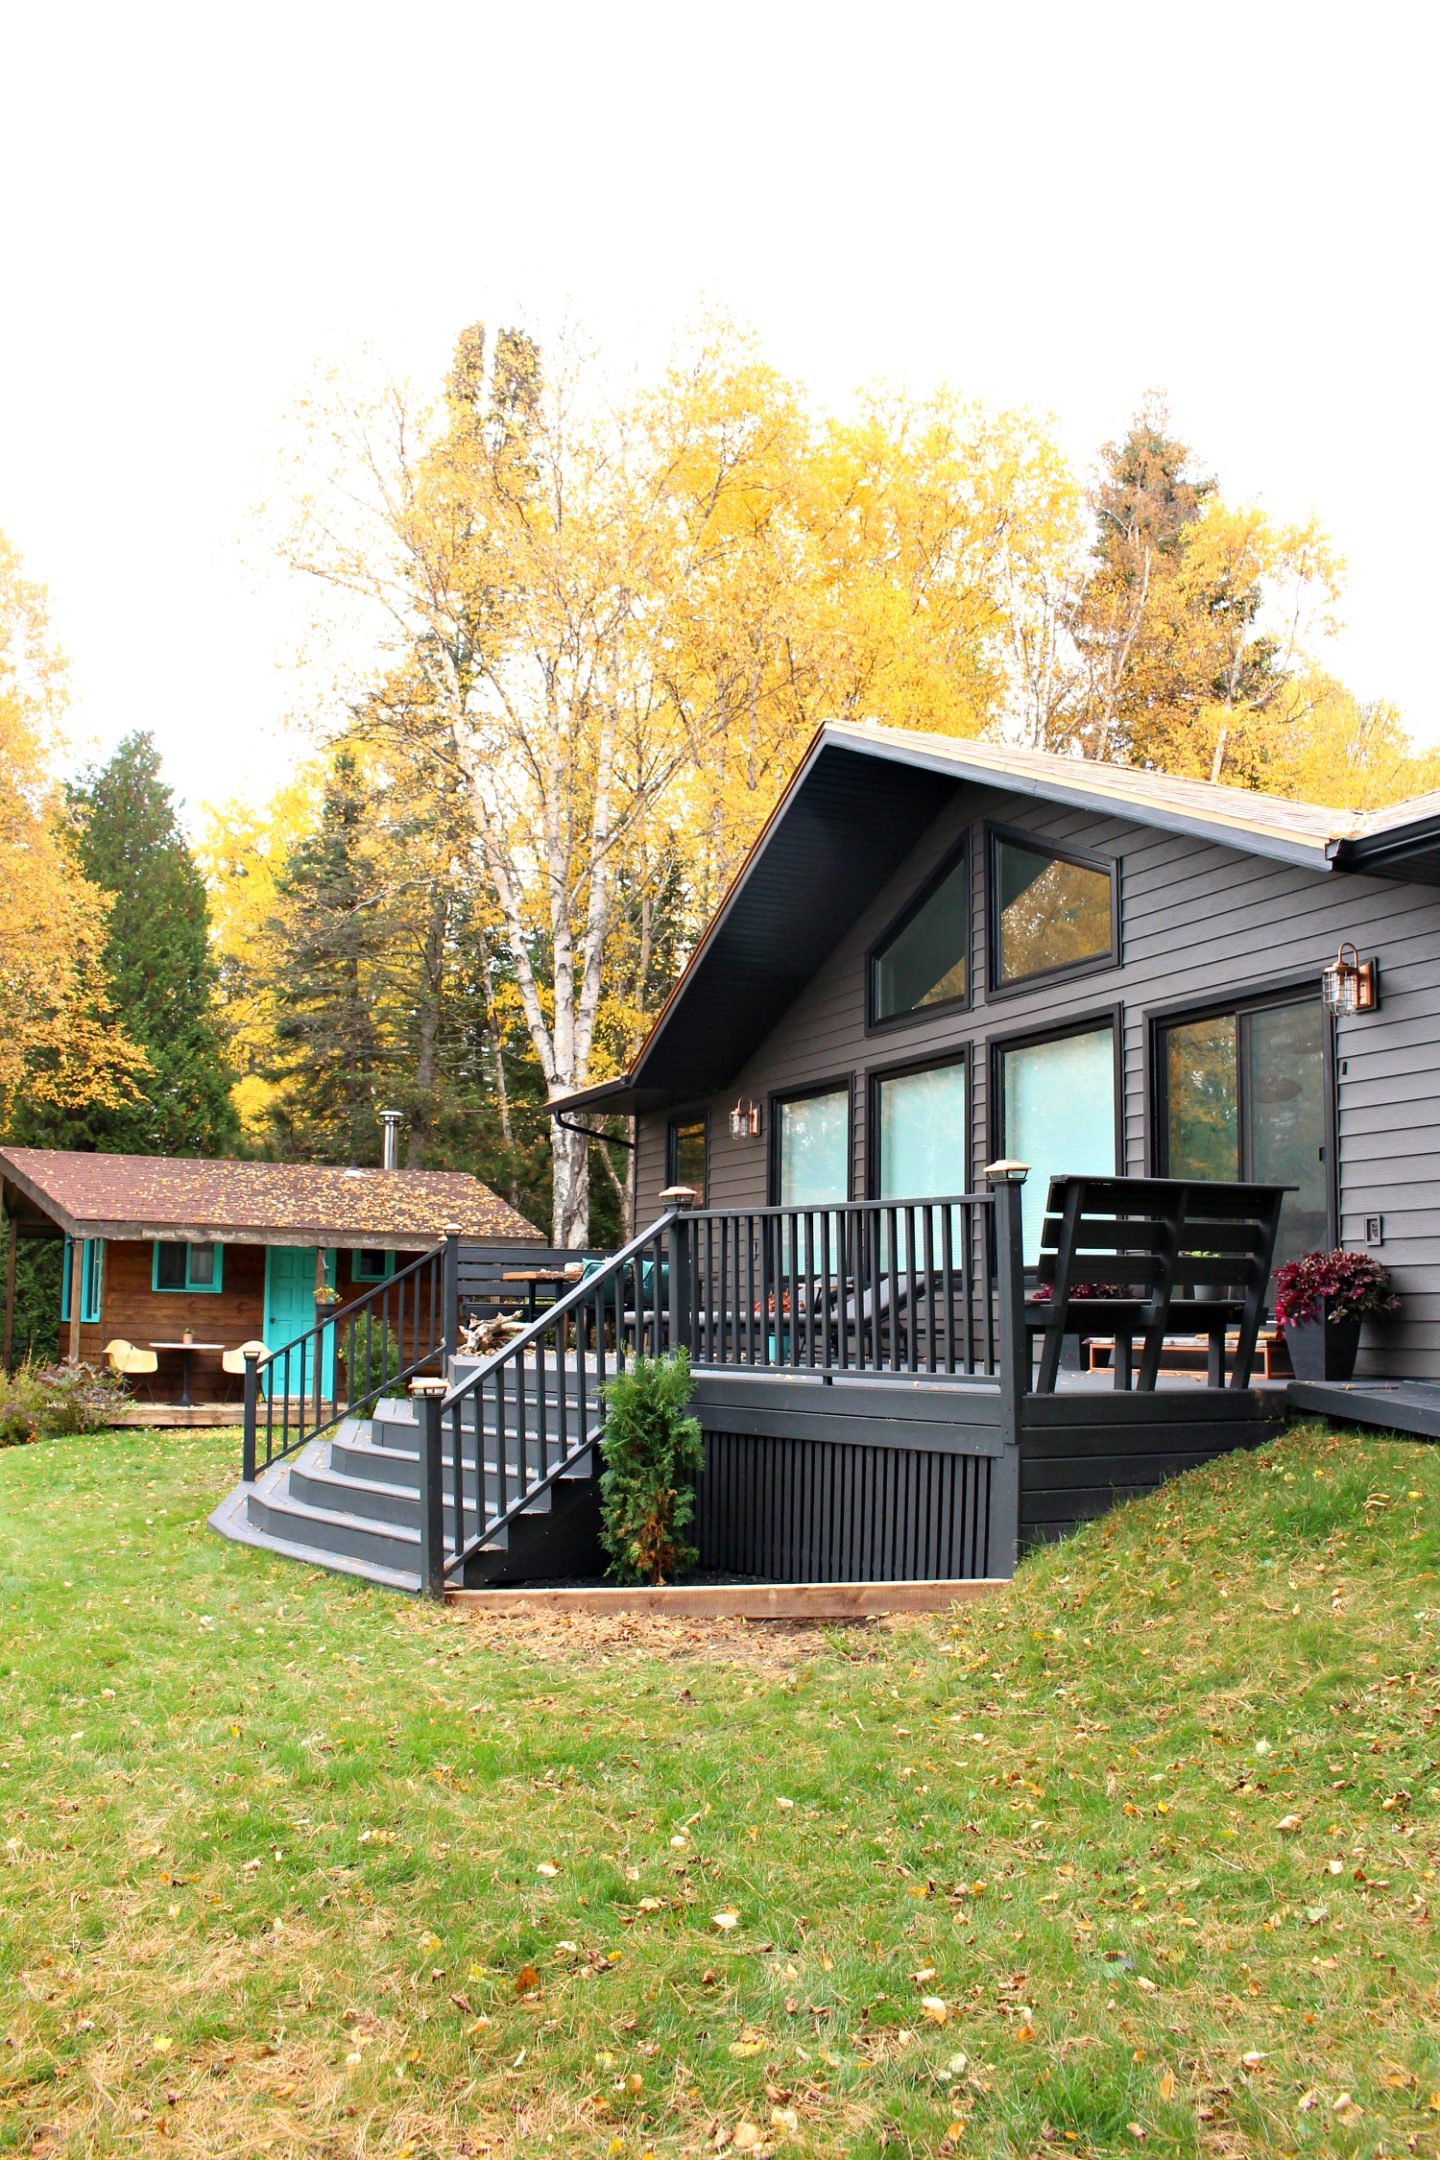
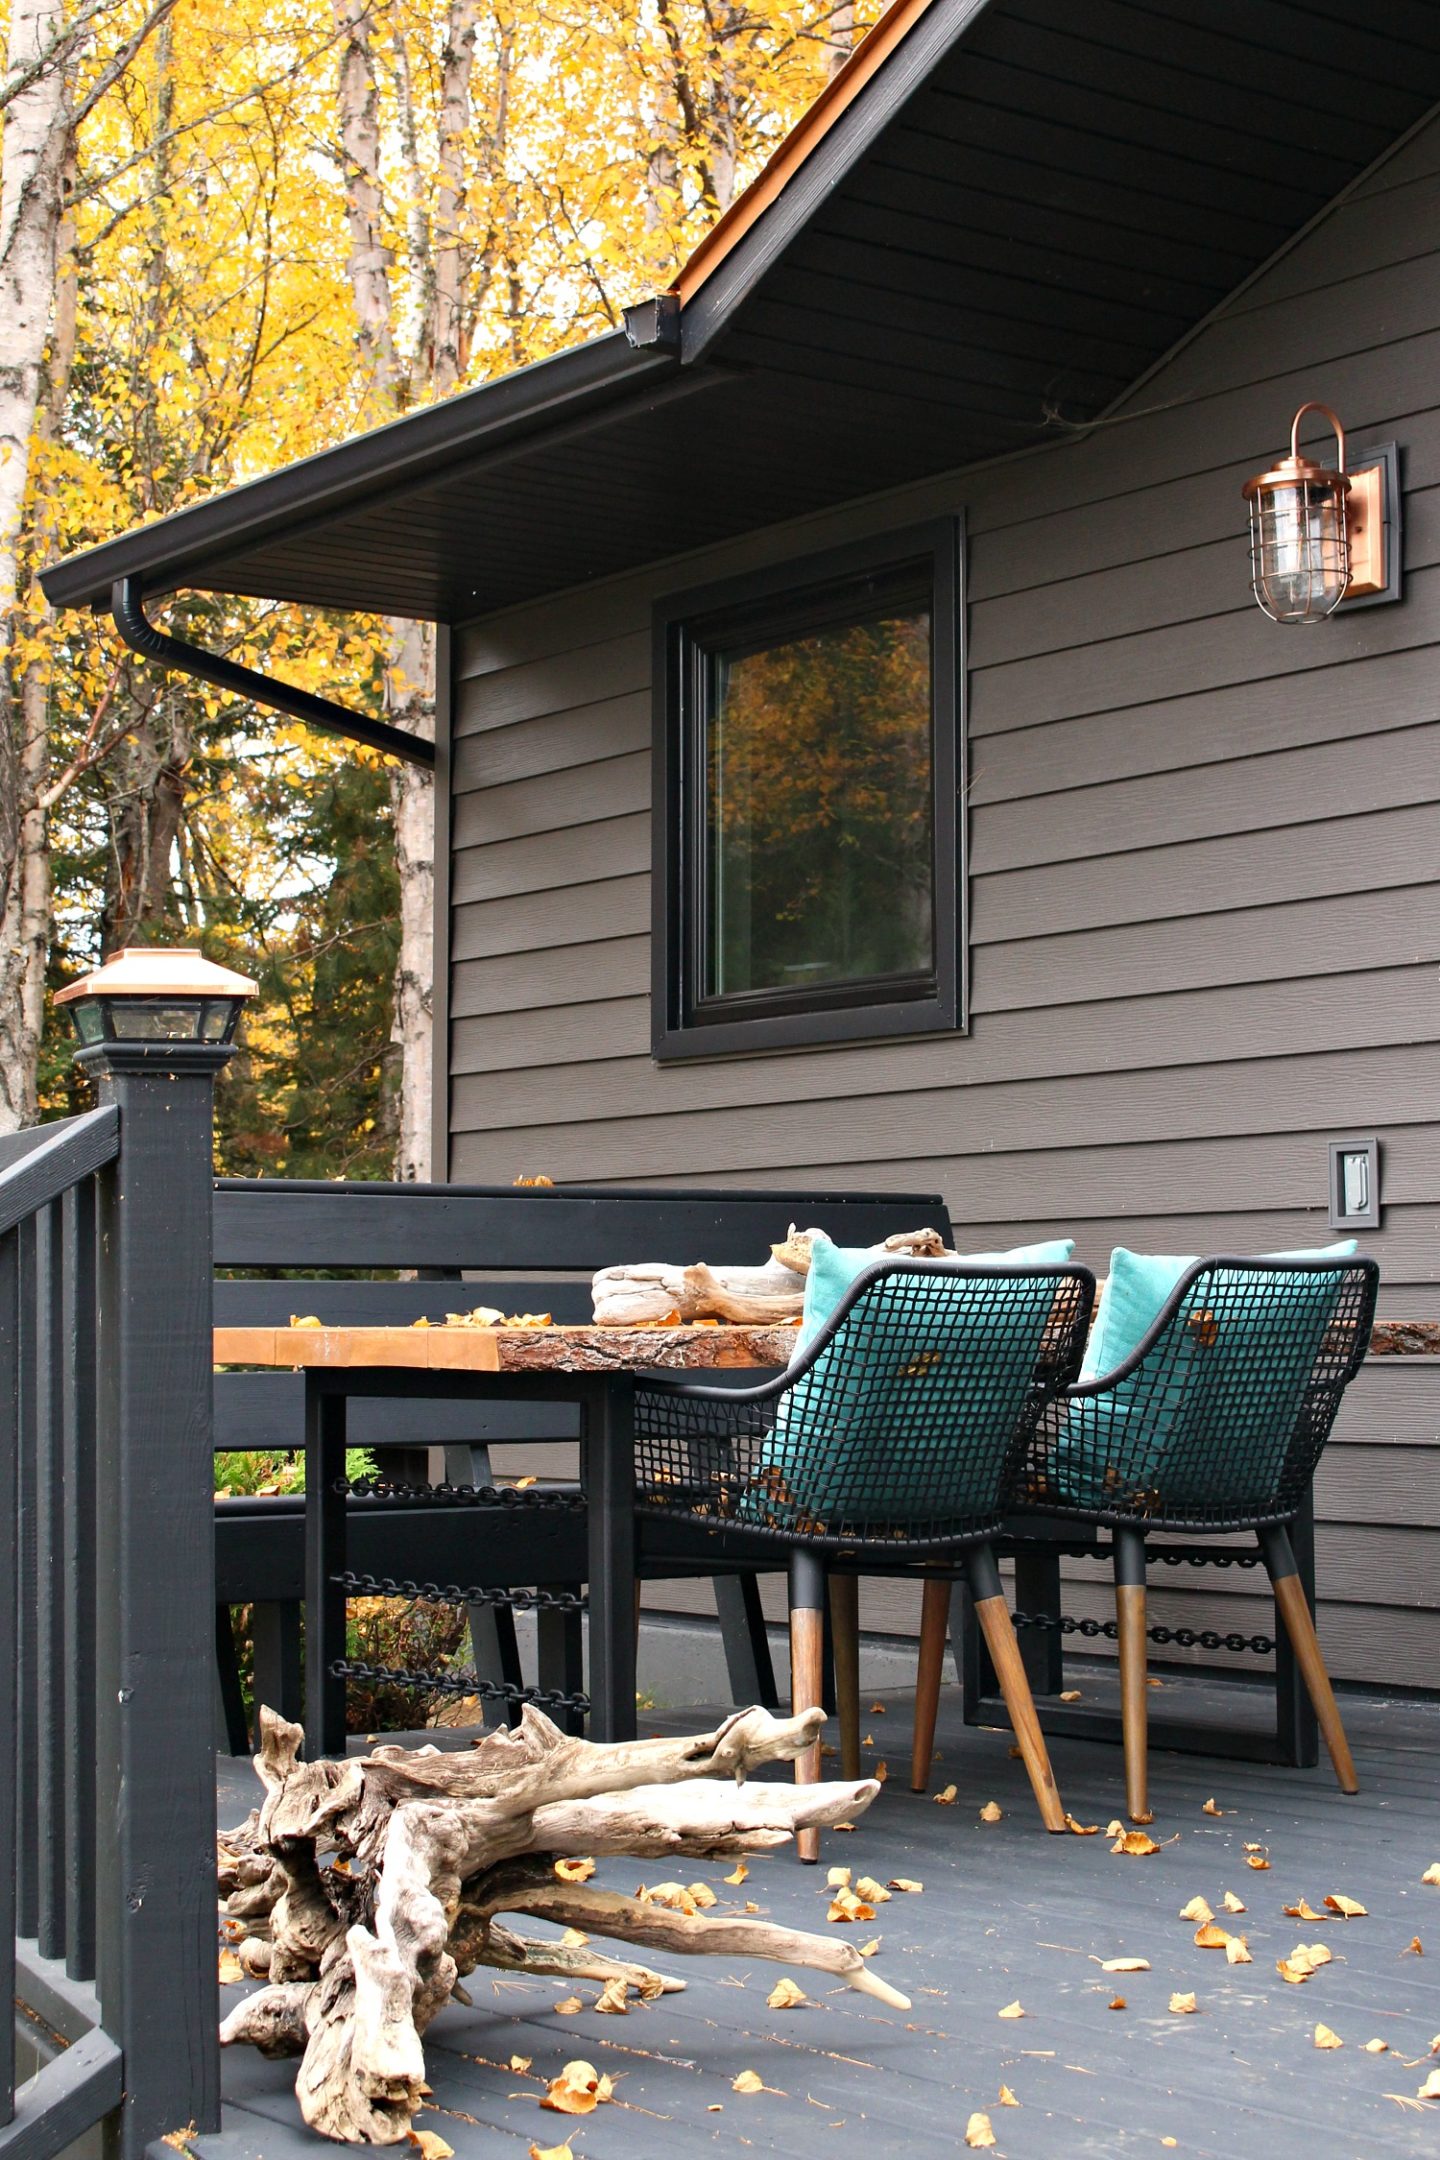
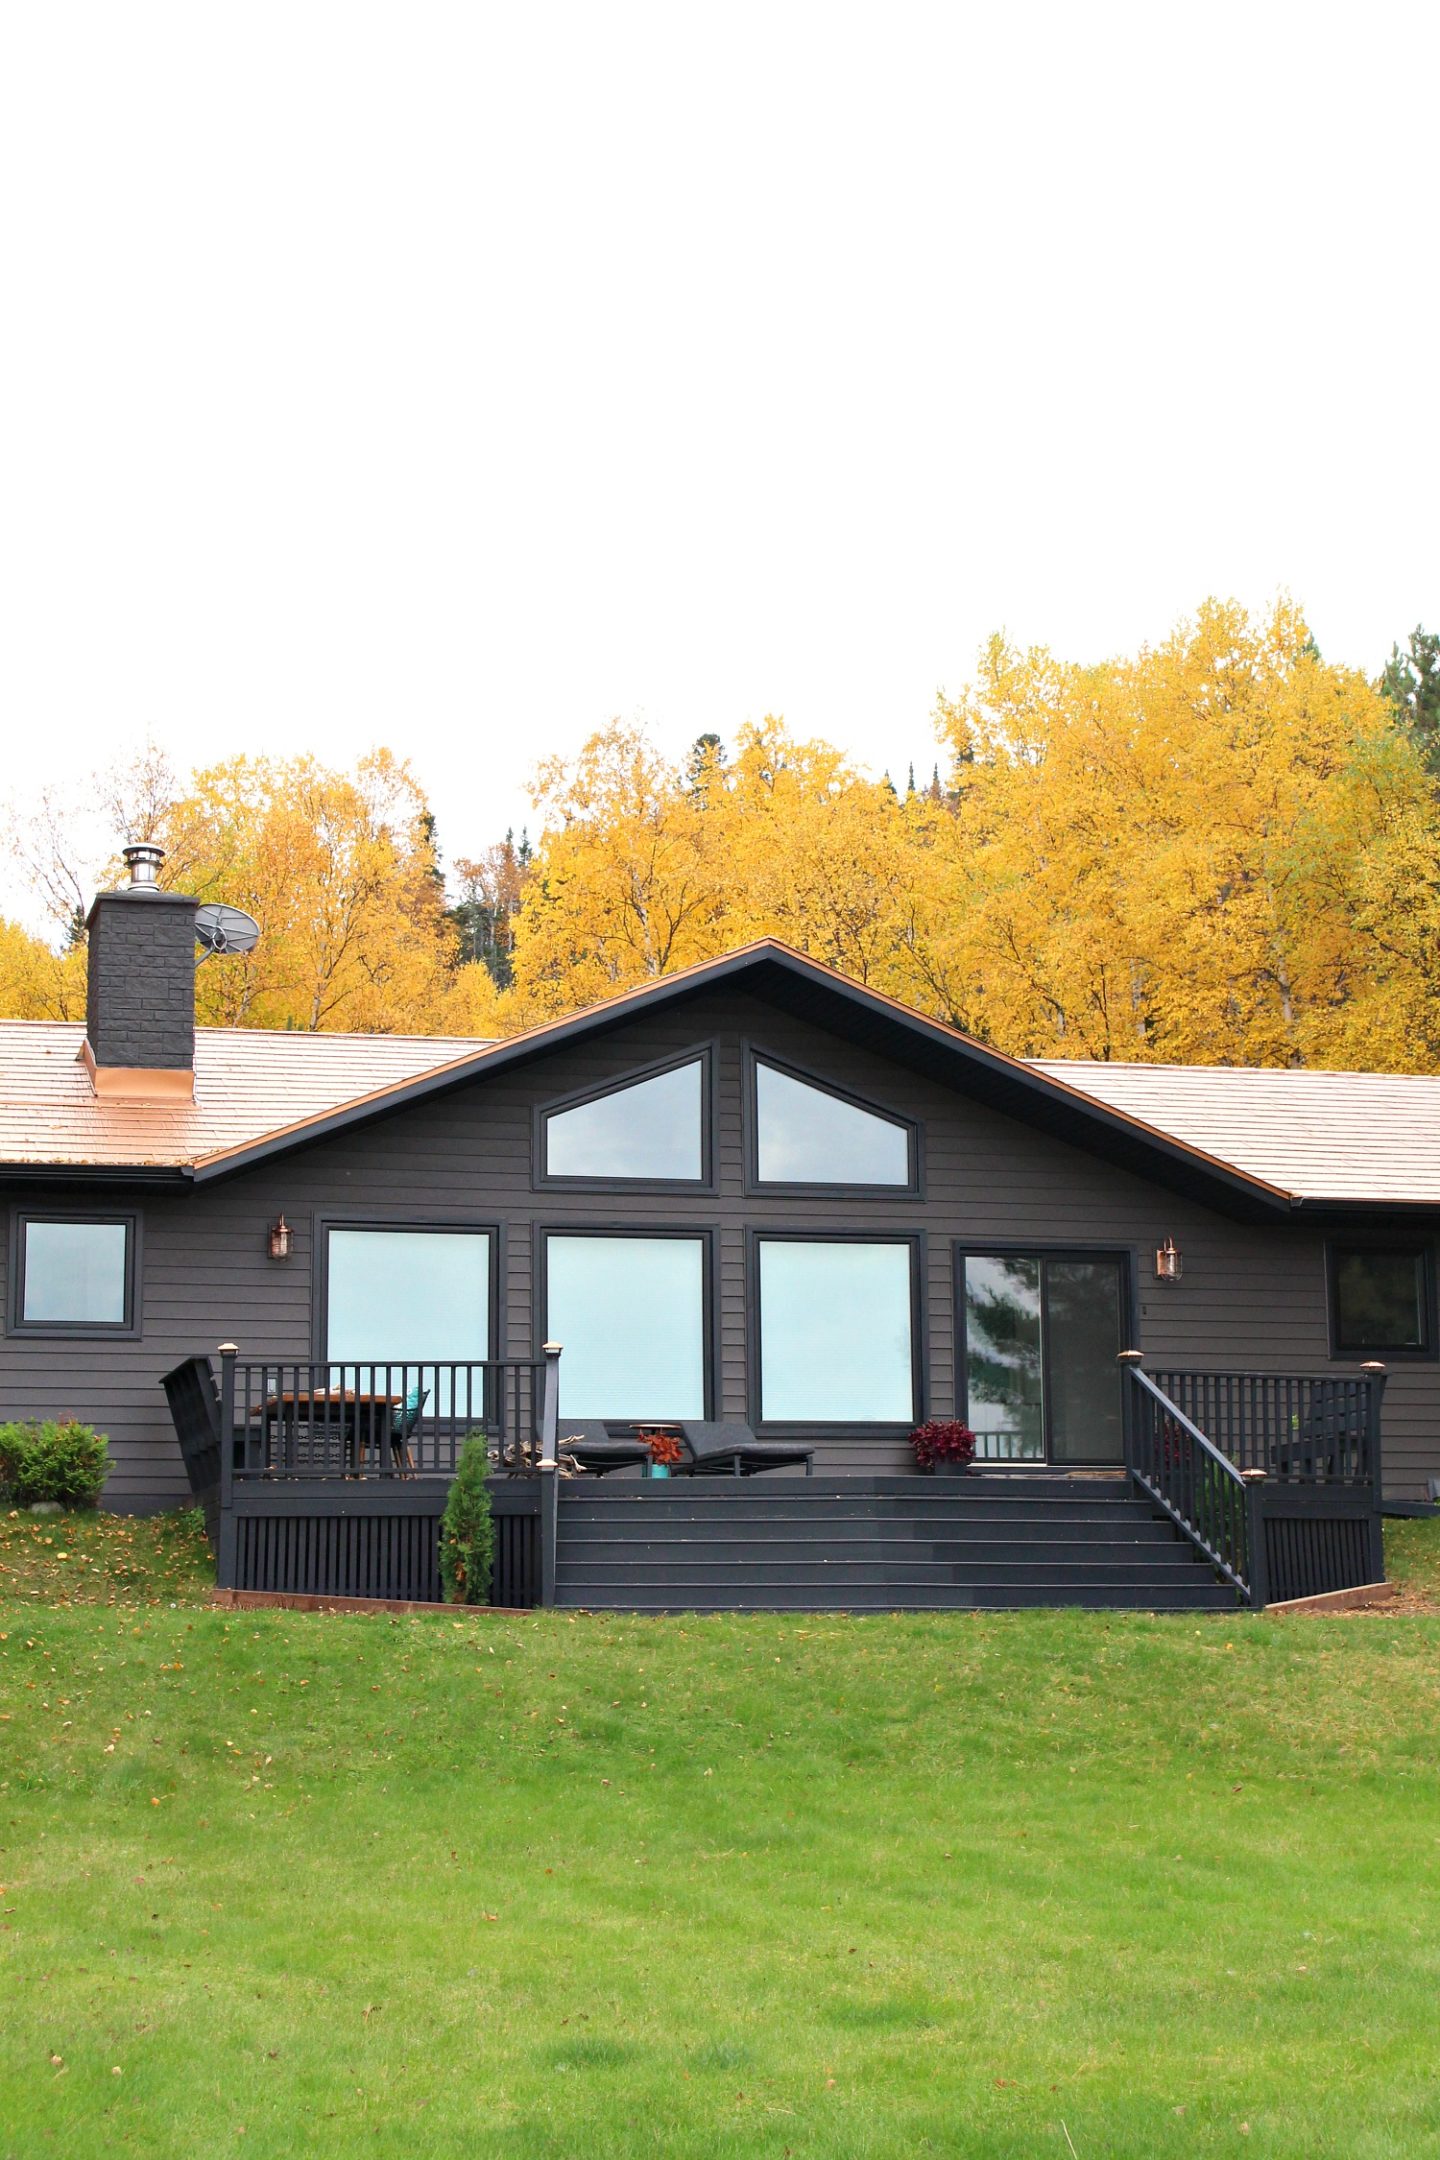
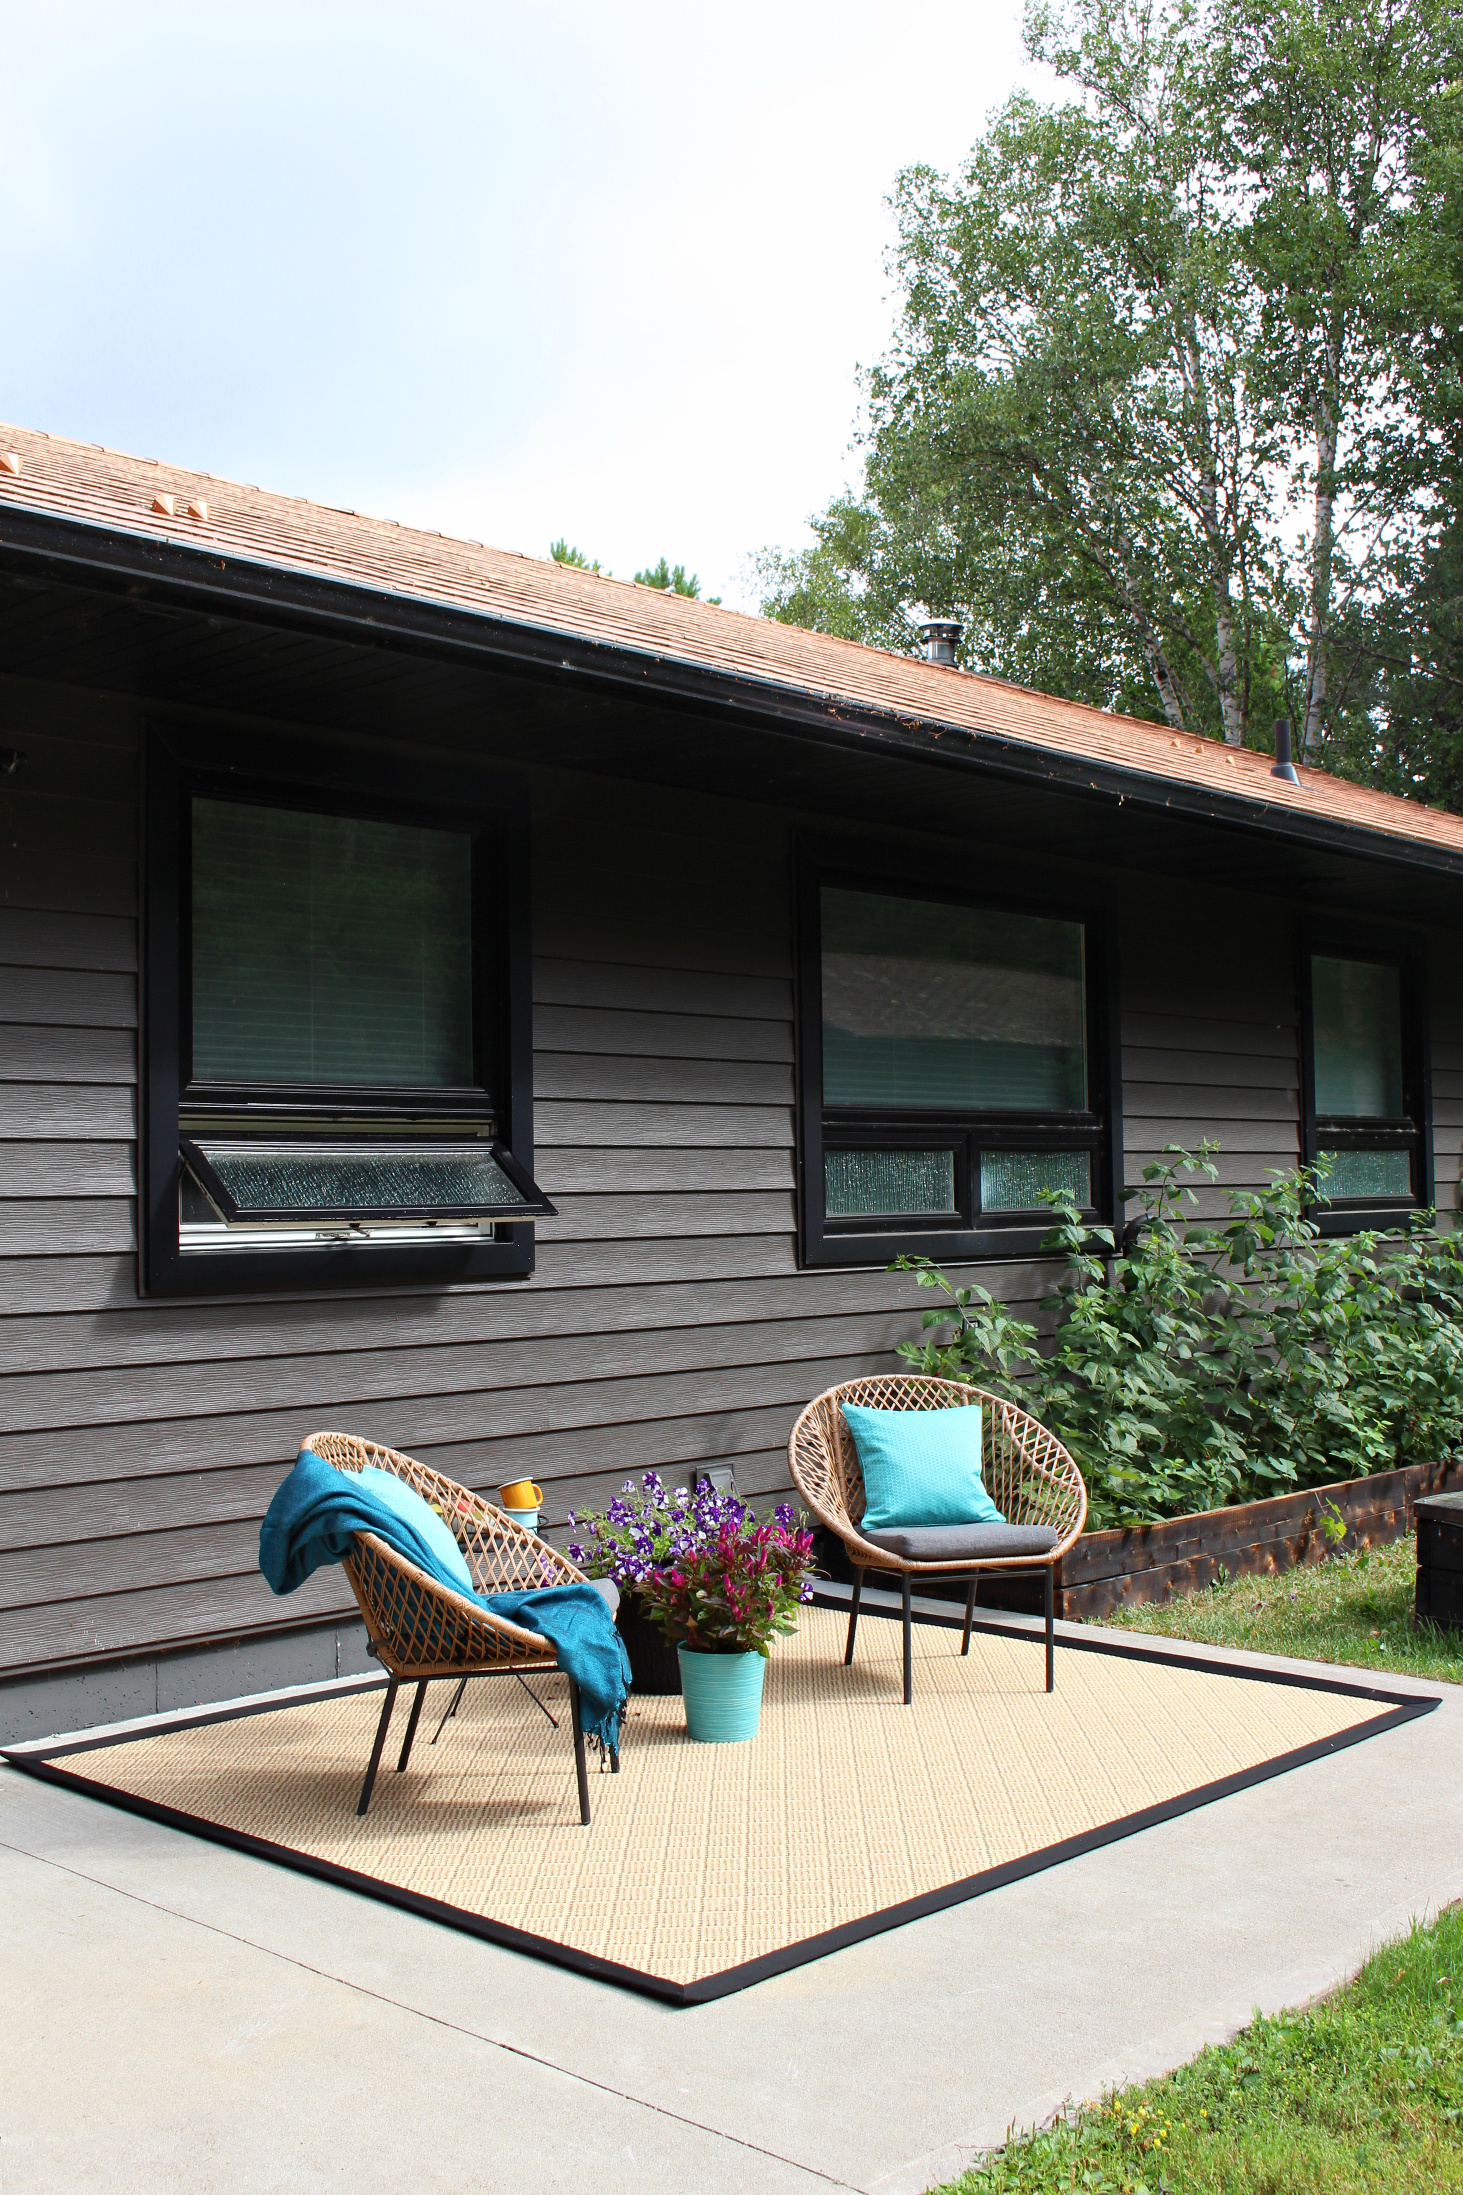


DIY DECK STAIN | DIY SLATTED DECK SKIRTING | GETTING WINDOWS ENLARGED | NEW COPPER ROOF |REPLACING GARDEN DOORS WITH SLIDING DOORS | NEW METAL SIDING THAT SPARKLES | DIY COLD FRAME GARDEN BEDS | DIY RAISED GARDEN BEDS | DIY LIVE EDGE PATIO TABLE
THE FIRE PIT – BEFORE
One of our favorite outdoor DIY projects has been how we revamped the fire pit area and DIY welded a modern firepit. Here’s the before:
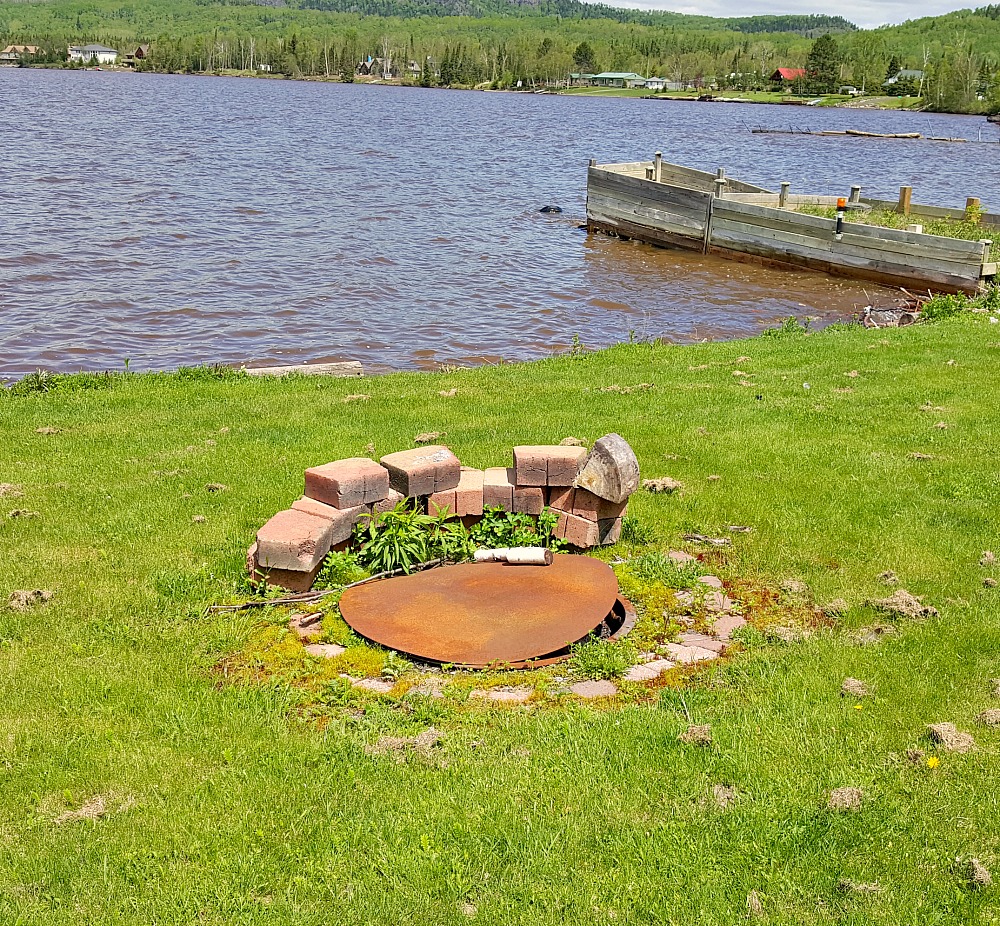
Before
THE FIRE PIT – AFTER
And here’s the fire pit area now, after we welded a new DIY fire pit, had a shore erosion structure built, replaced the sod ourselves, and added some adirondack chairs I painted ombre:

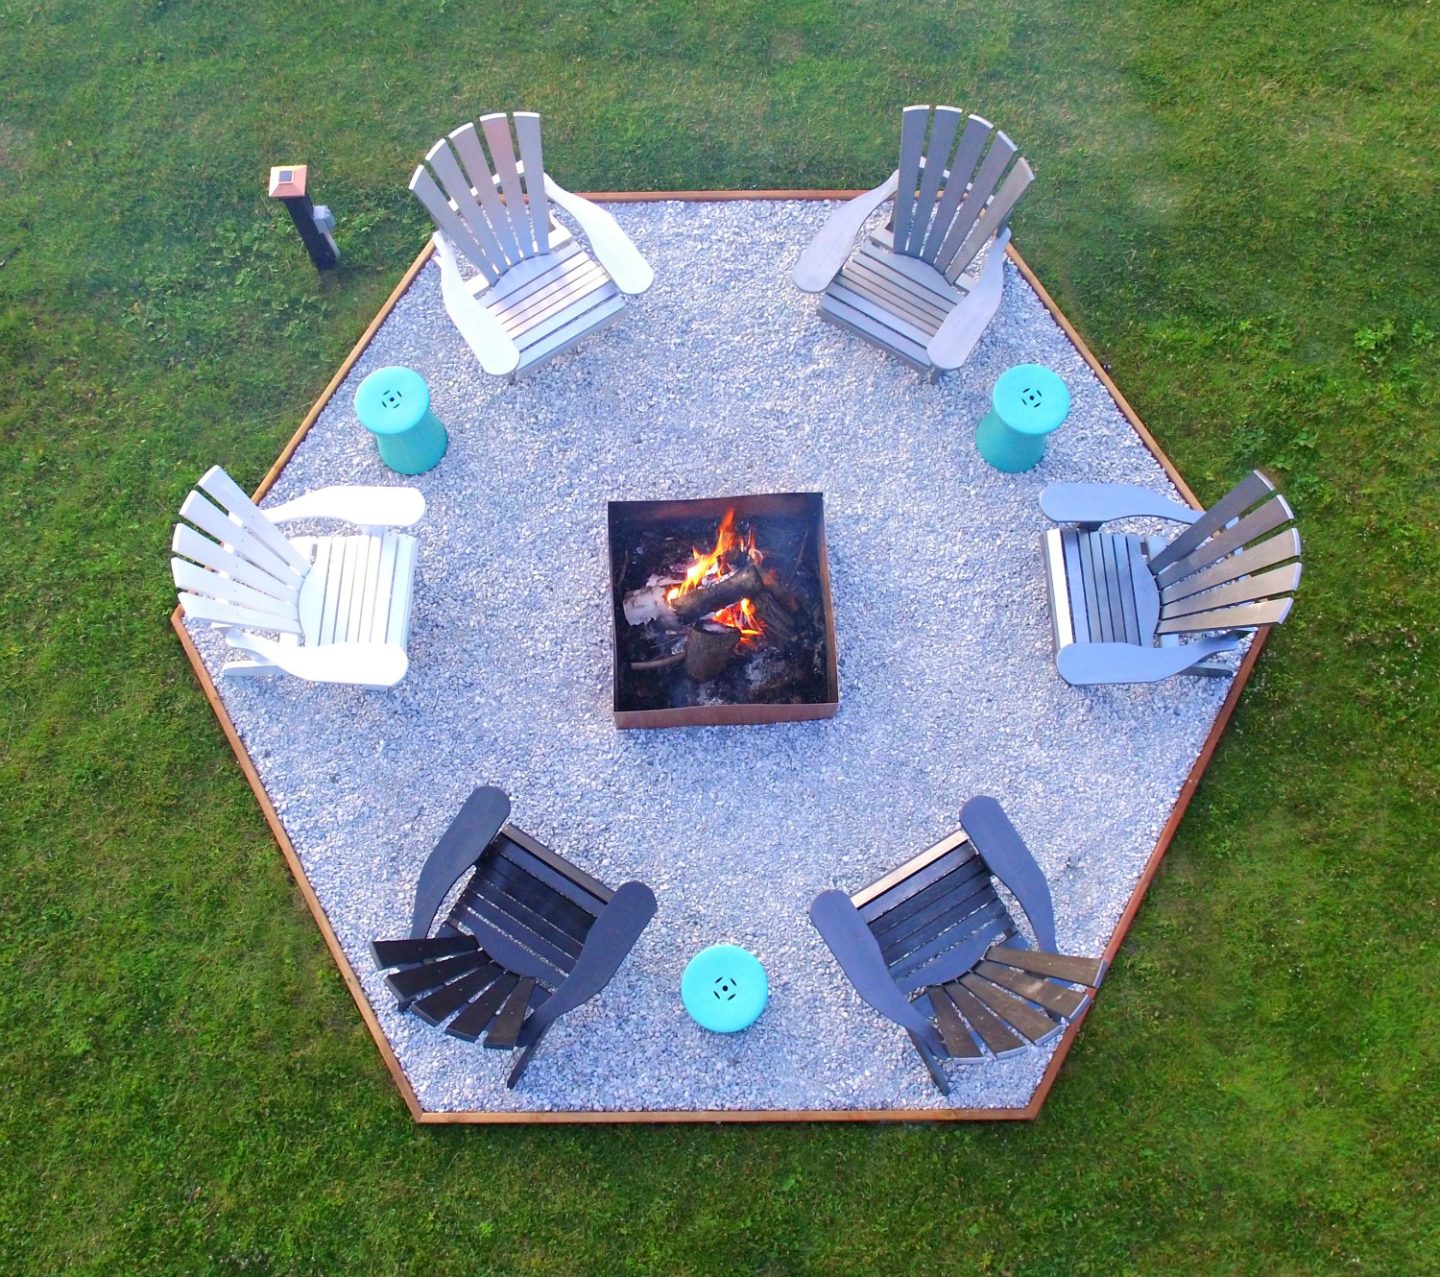


DIY OMBRE ADIRONDACK CHAIRS | DIY WELDED FIRE PIT | DIY LAWN: SEED VS. SOD | STONE SHORE EROSION STRUCTURE
THE HALLWAY – BEFORE
Welcome inside the lakehouse! I wish we had a proper entryway, but this hallway is it. Note the abundance of boob lights and oak. Nothing a little paint, some mid-century inspired door hardware, and a quick trip to Ikea couldn’t fix.
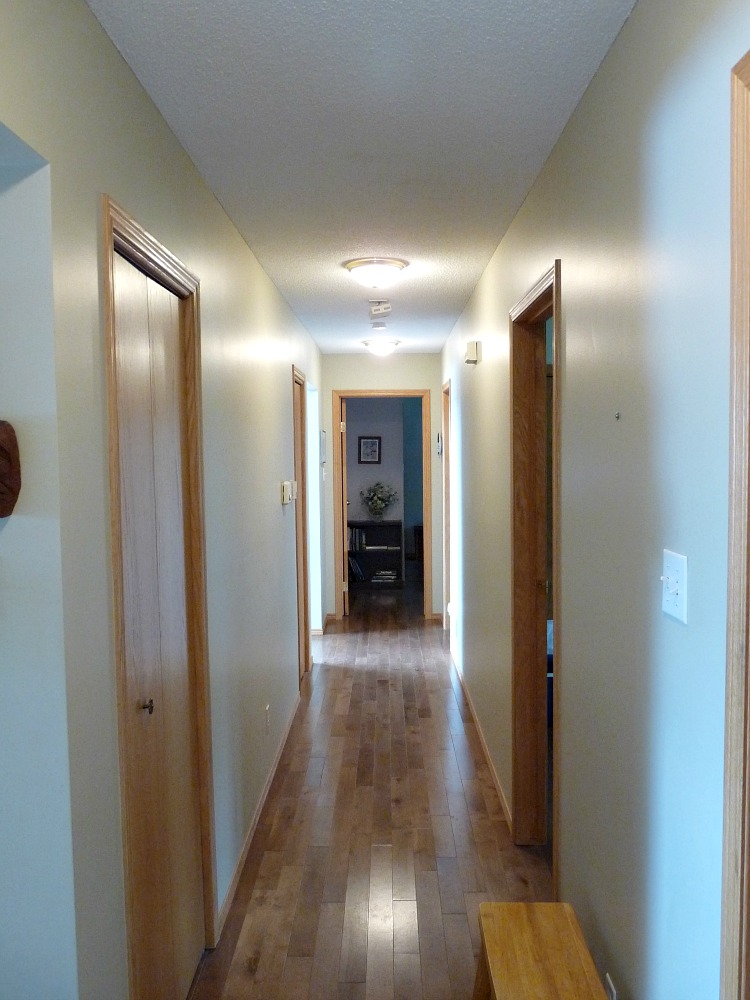
Before
Before
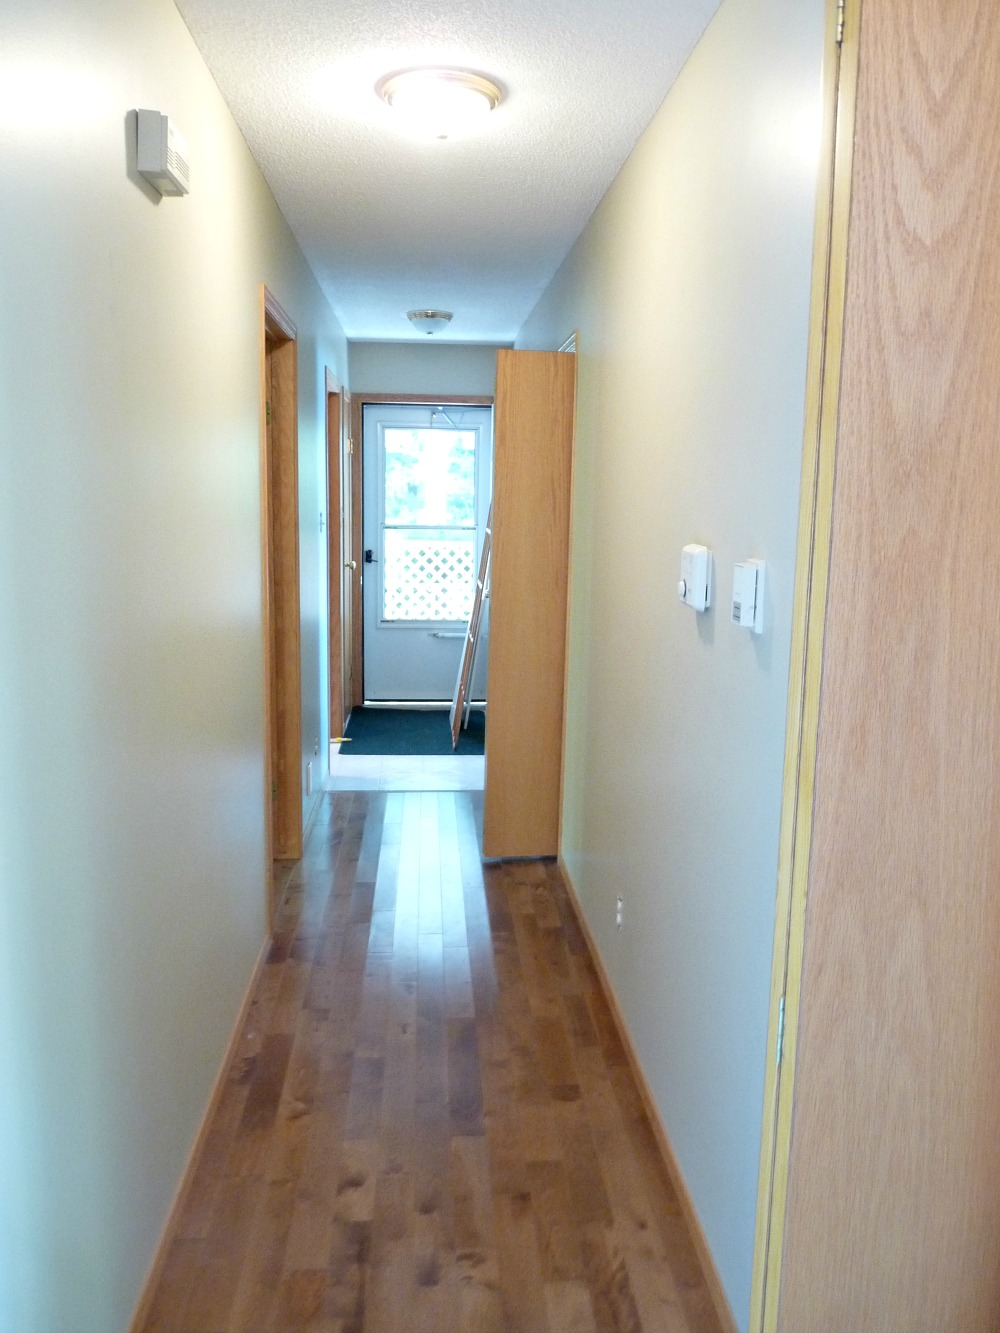
THE HALLWAY – AFTER
We painted the walls, trim, and closet doors and then replaced the front door with a mid-century inspired door. The bright aqua is so cheery in this dark hallway! But the new door lets in a lot more light too, which we needed. New modern door levers – and beachy knobs for the closets – updated the space. To make up for a lack of storage, we hung 10 IKEA Trones cabinets for a convenient place to store hats and mitts – shoe cabinets don’t just have to be used for shoes!


MCM TURQUOISE DOOR | NEW DOOR HARDWARE | BEACHY DOOR KNOBS | NARROW ENTRYWAY STORAGE
THE KITCHEN – BEFORE
Our small, u-shaped kitchen sported a temporary makeover for 10 years but this is the real “before”:
Before
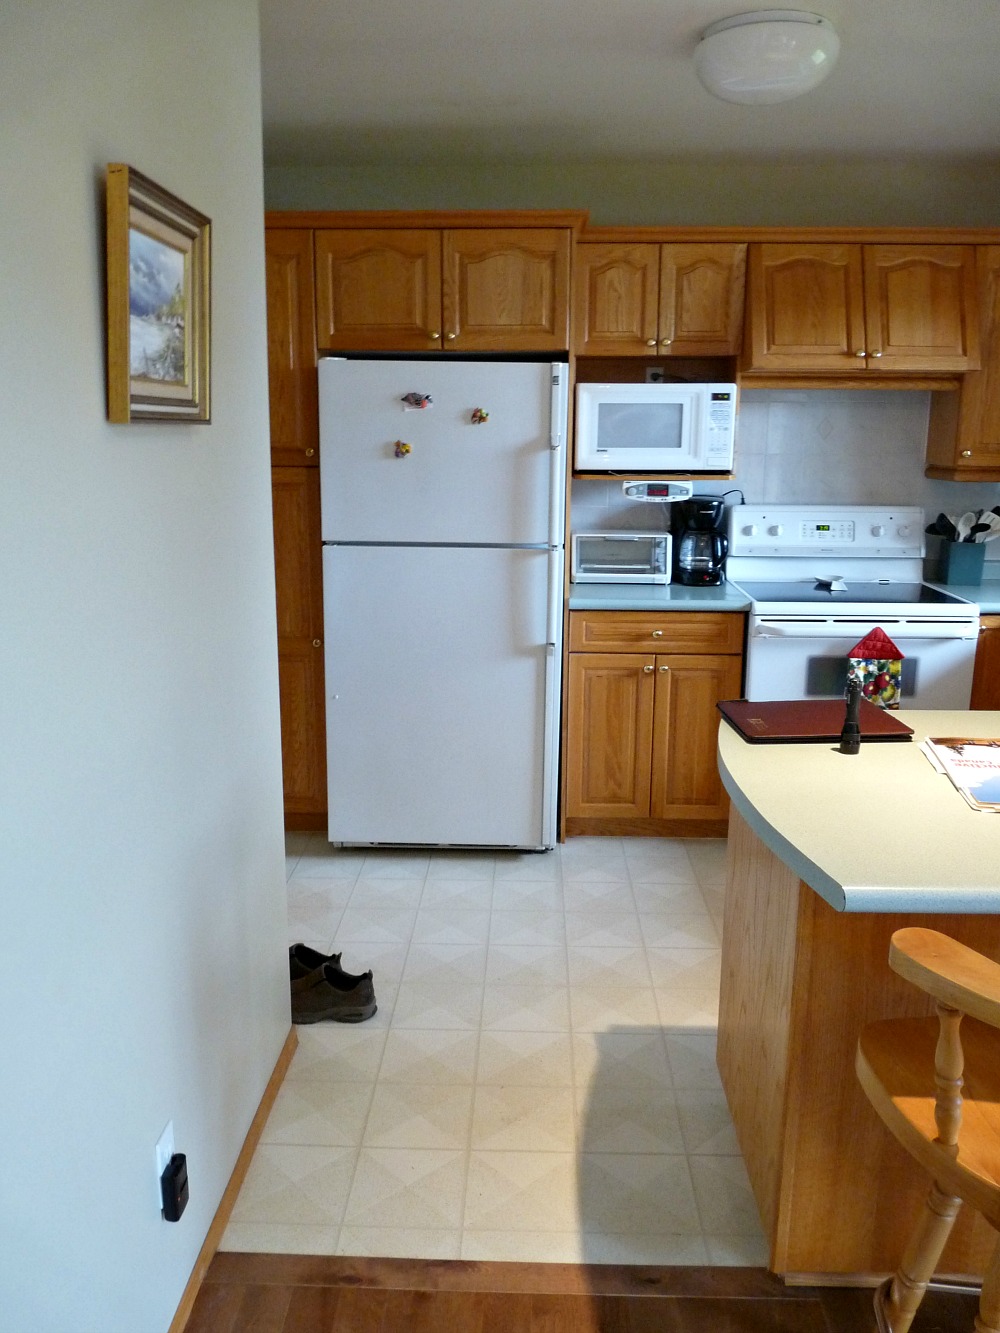
Before
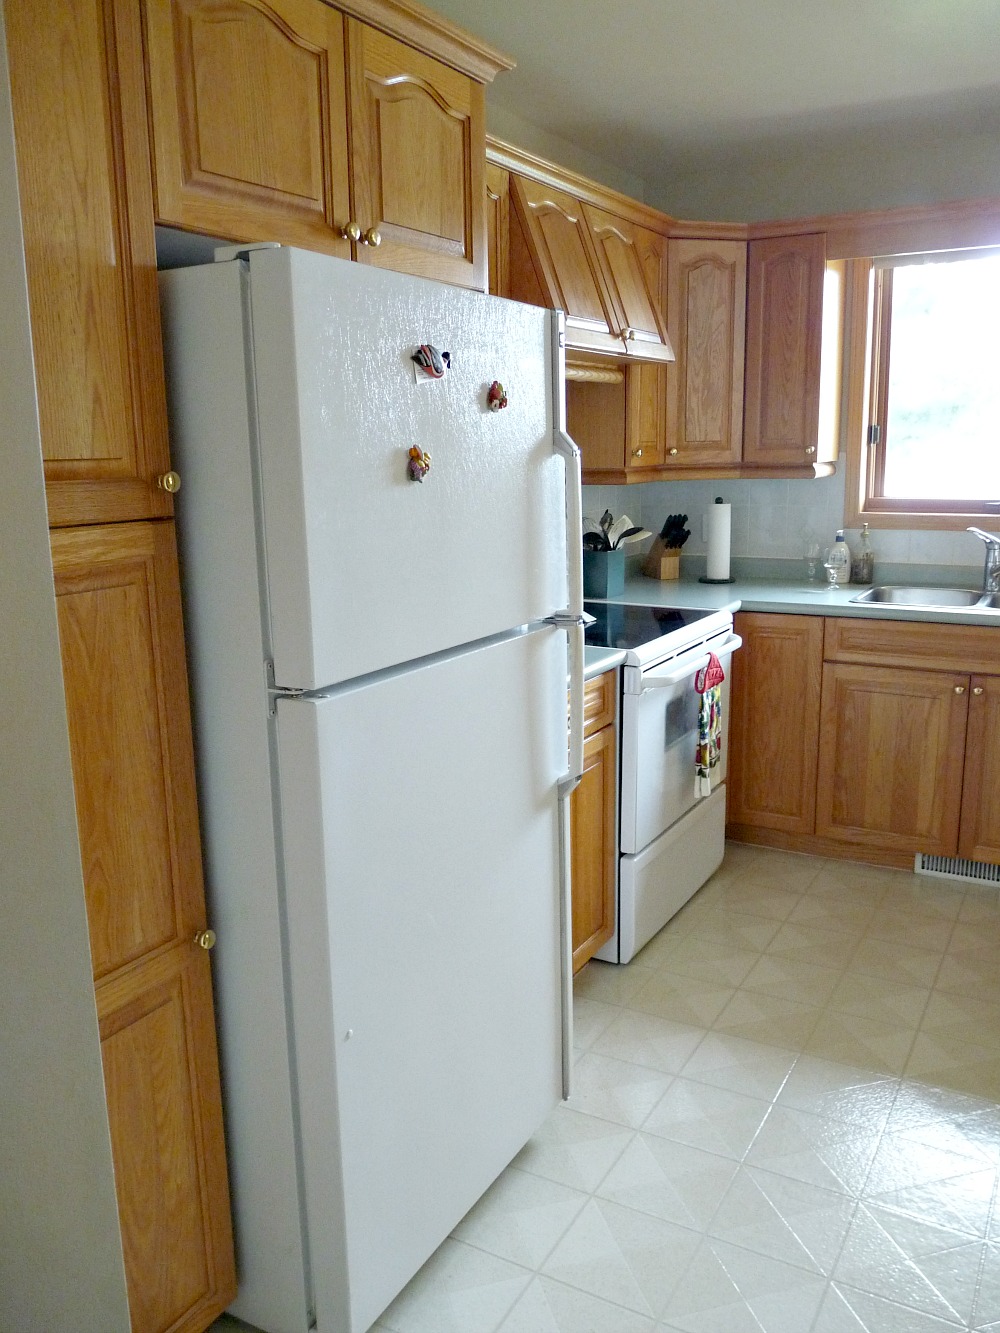
Before
At first I tried open shelving and a bolder turquoise kitchen cabinet colors, but I changed it up quite a bit over the years.

This was the final DIY kitchen look, after a series of kitchen DIY projects, like DIY wall cubbies and DIY wood counters, before the renovation began:

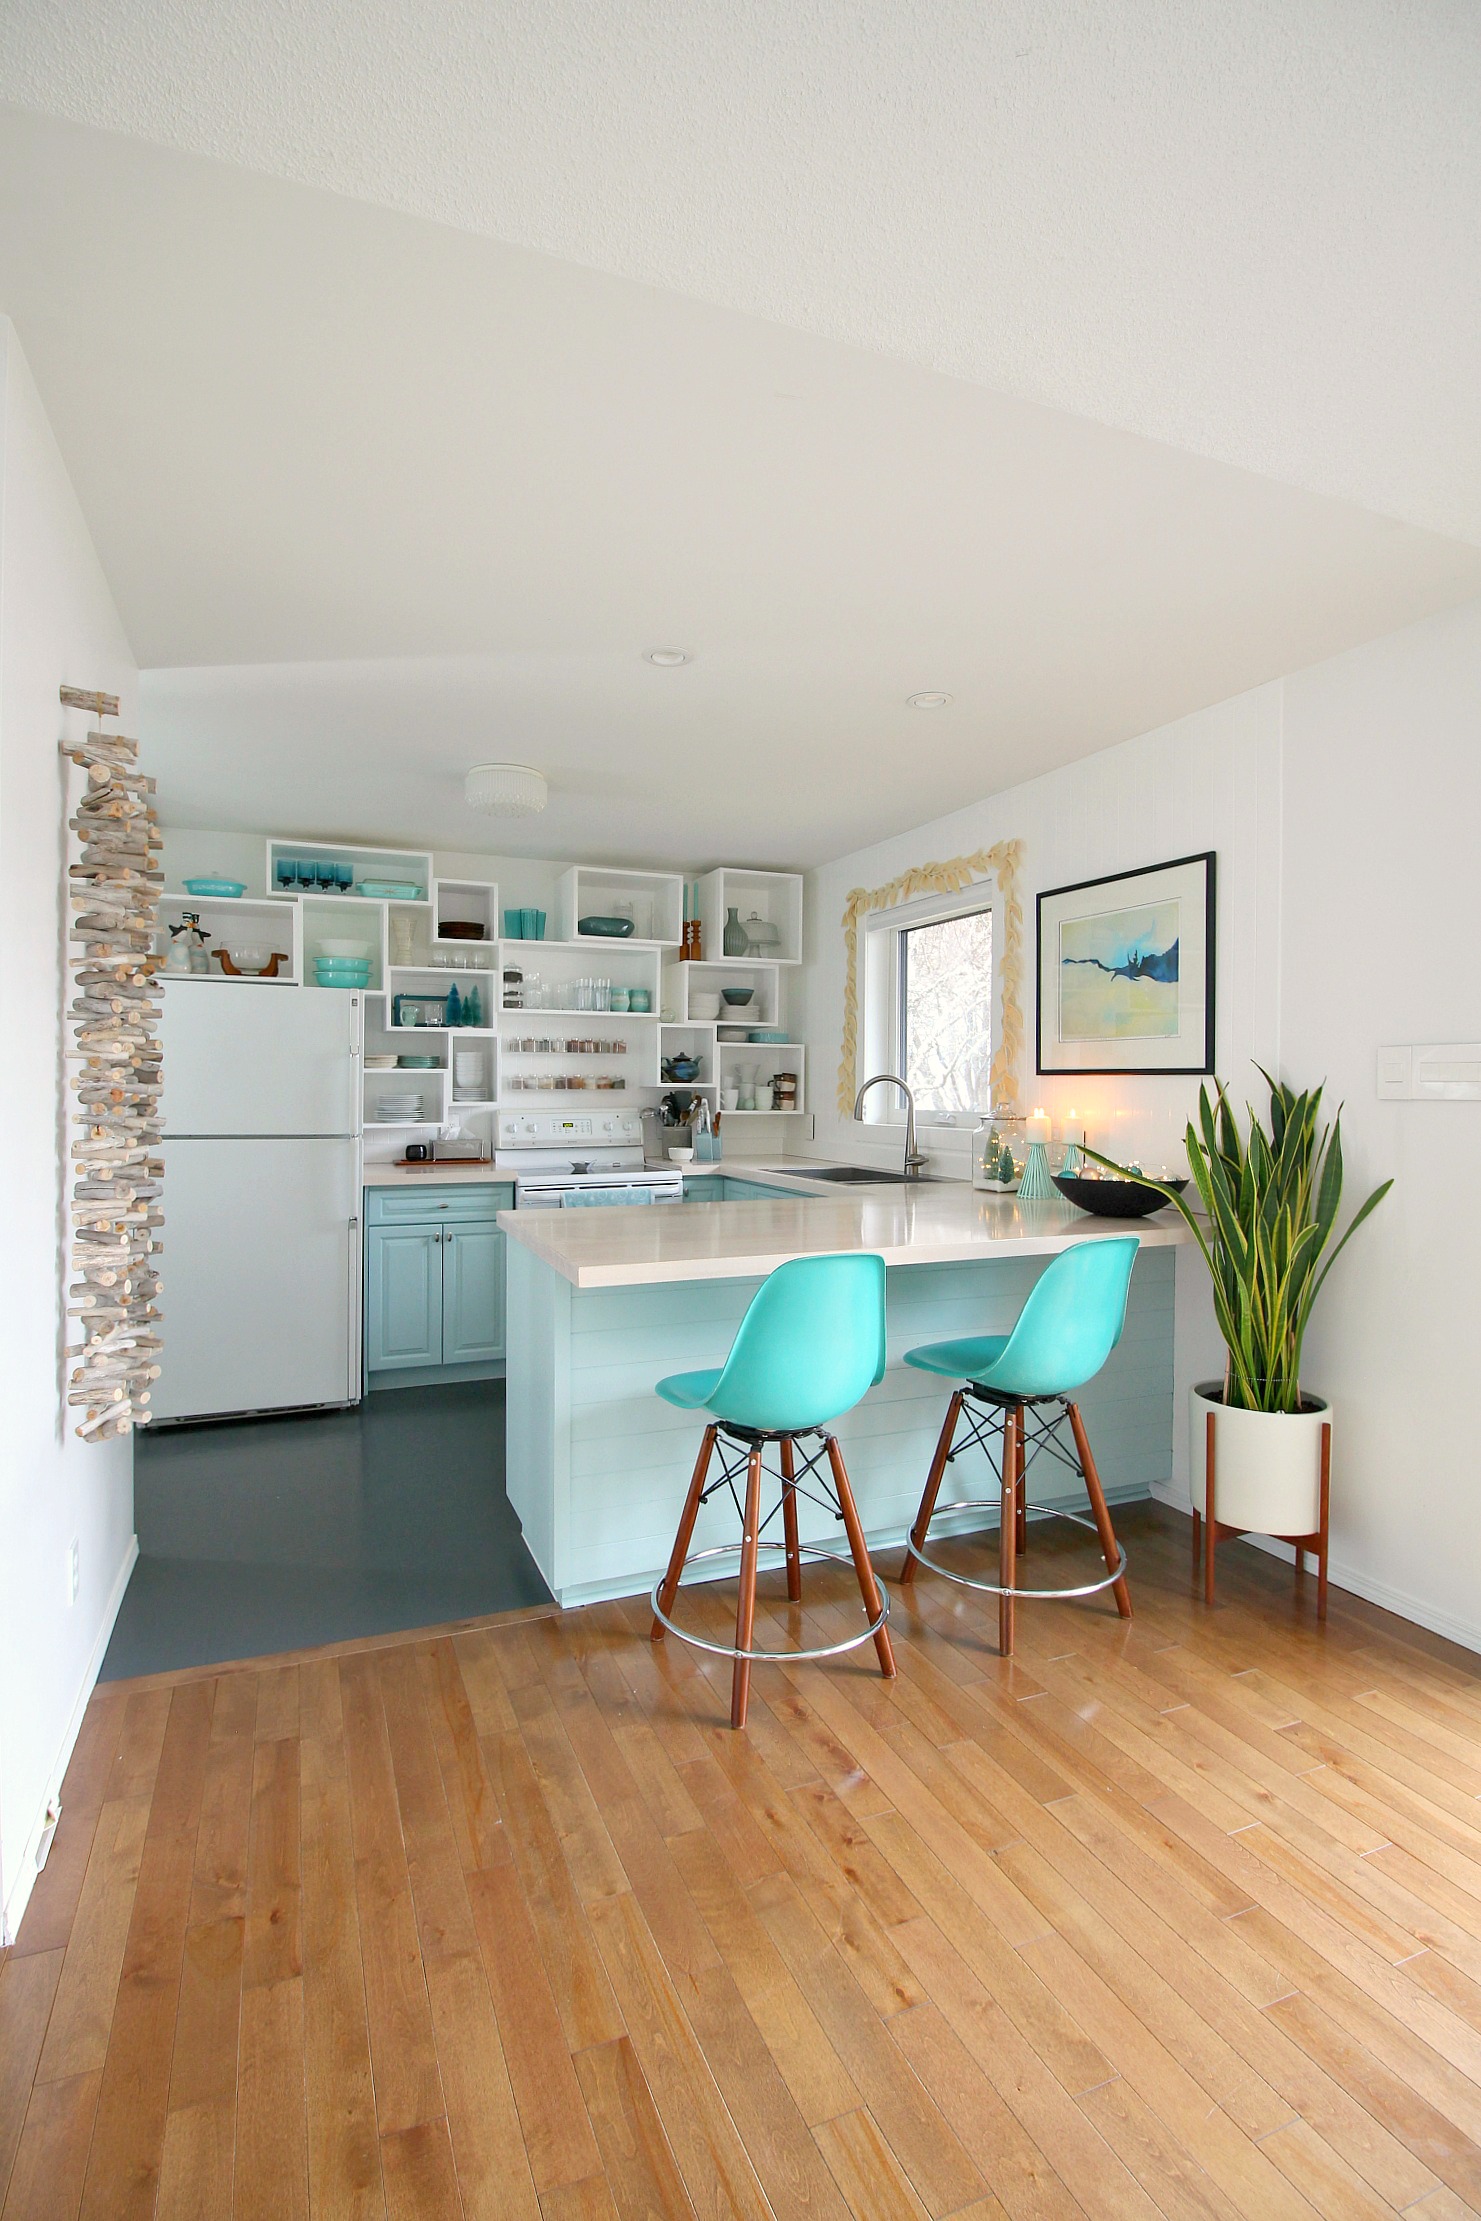
THE KITCHEN – AFTER
This kitchen had a LOT of DIY kitchen makeovers – see them all here. After completing the mid-century coastal kitchen renovating of my dreams, the kitchen now looks like this:
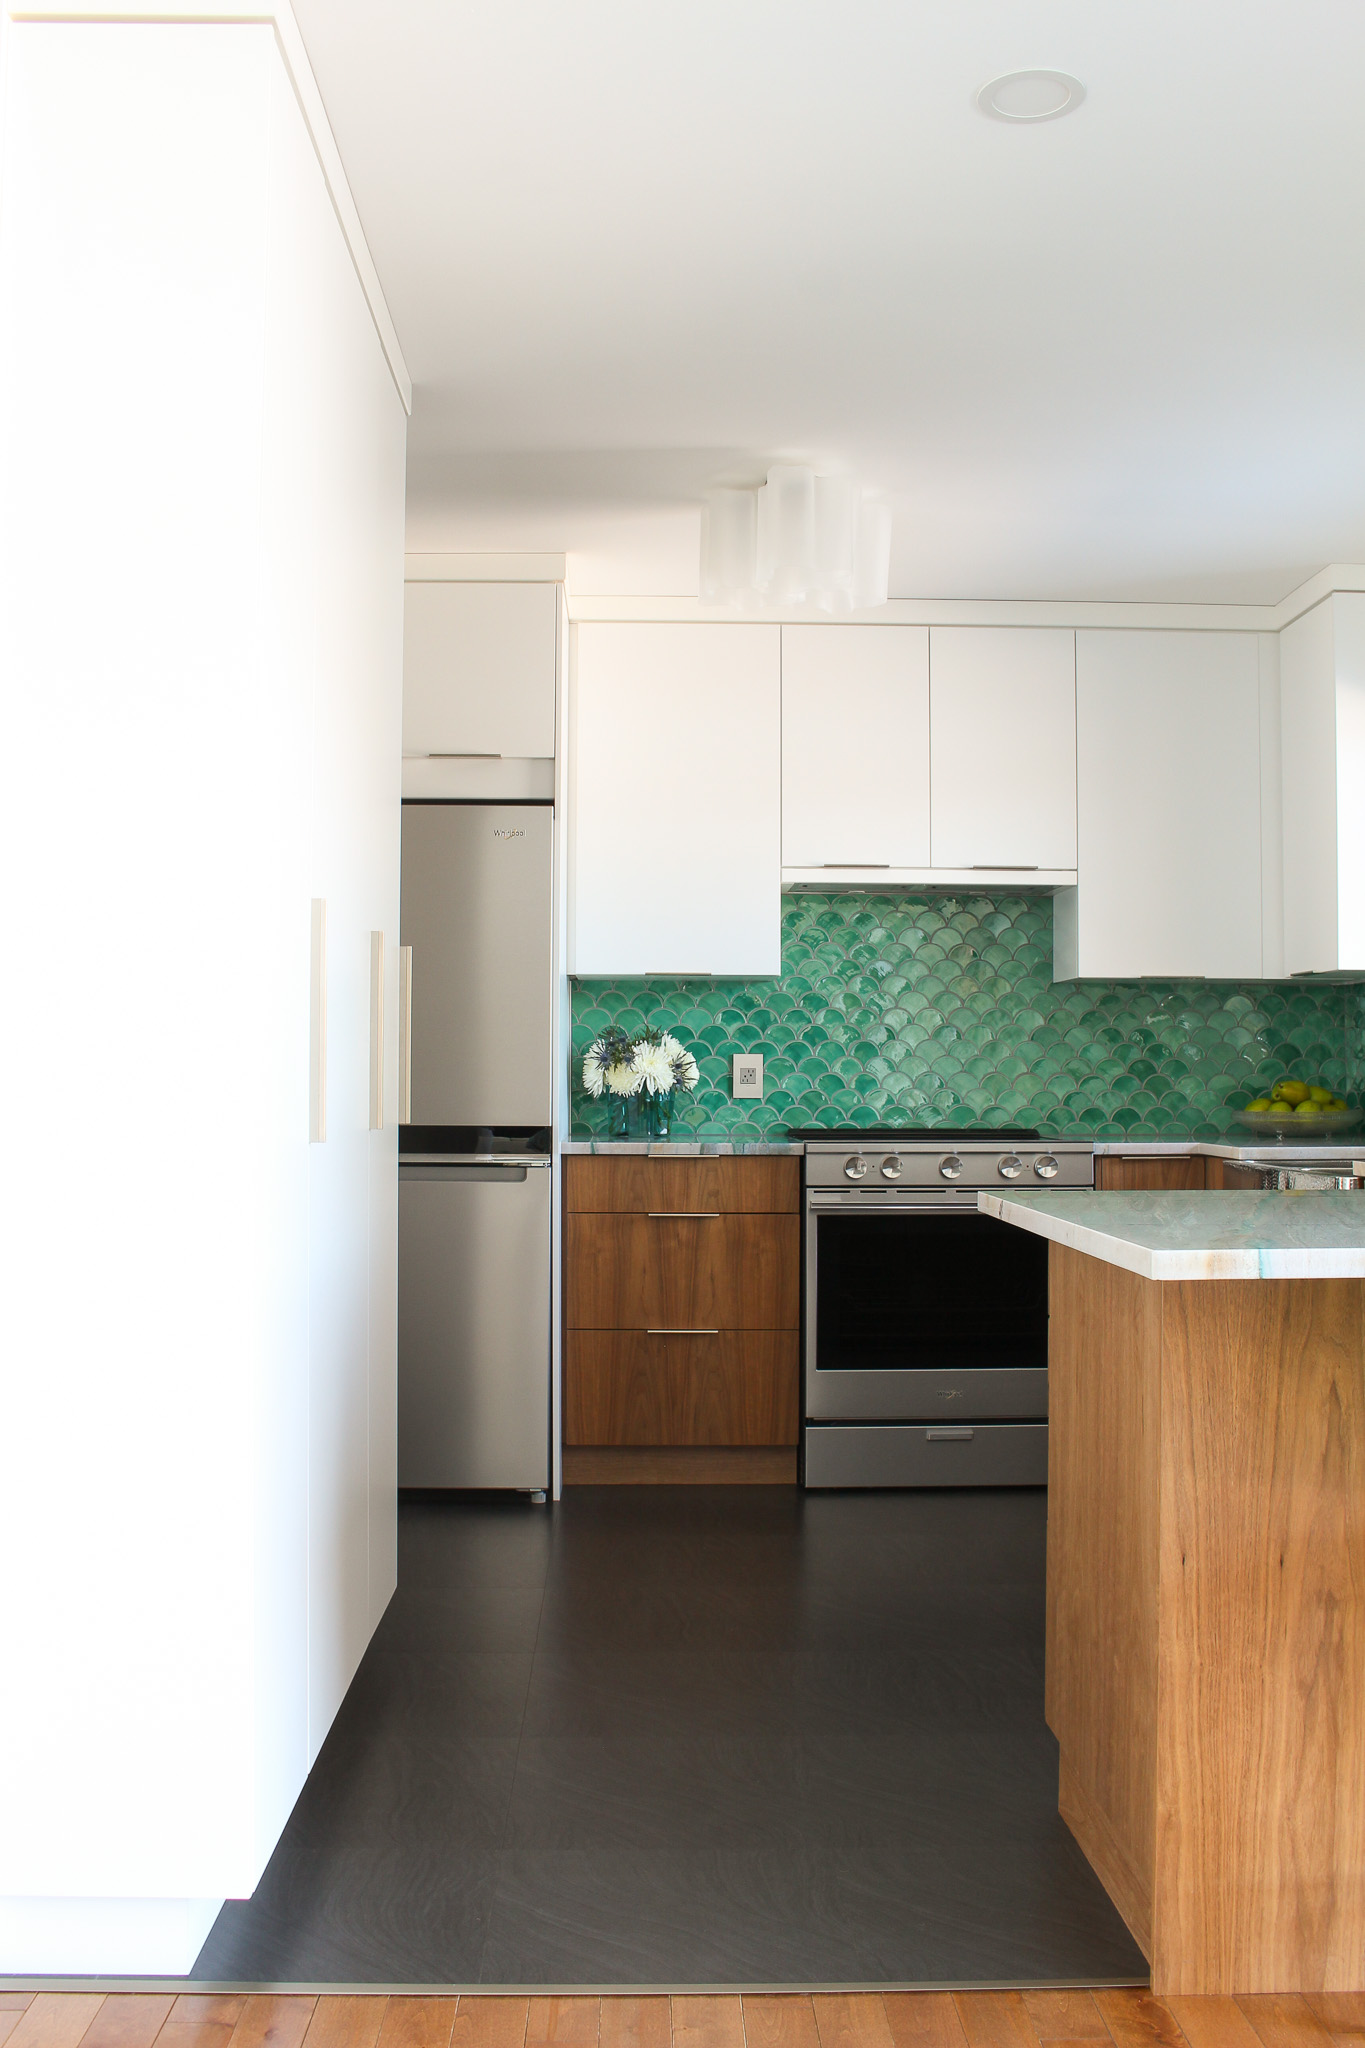
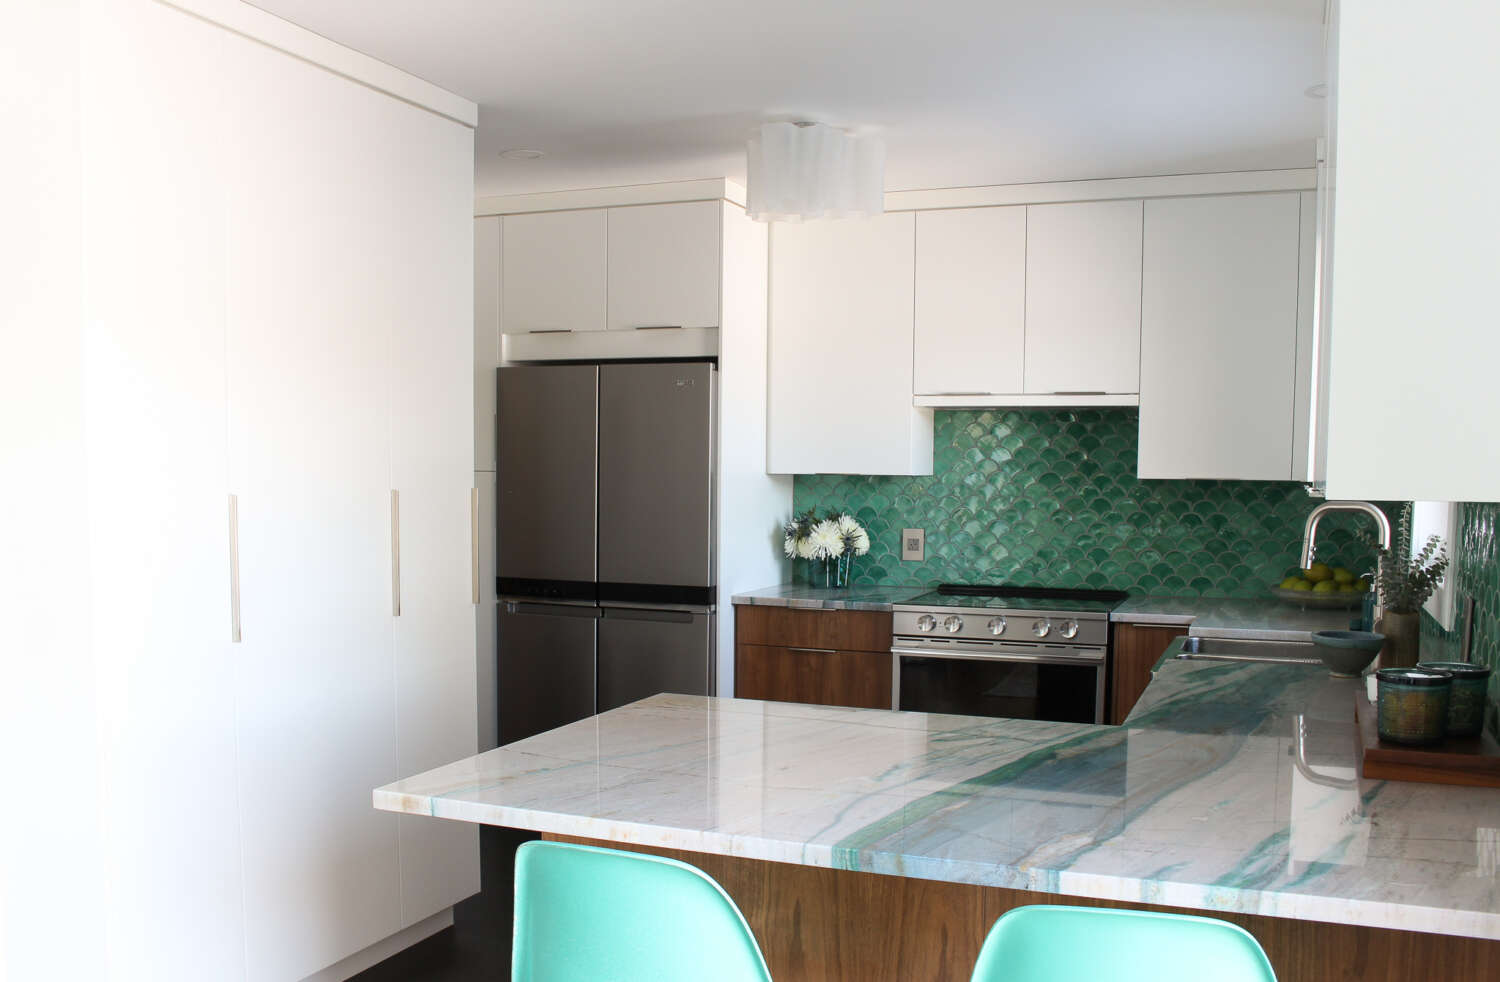
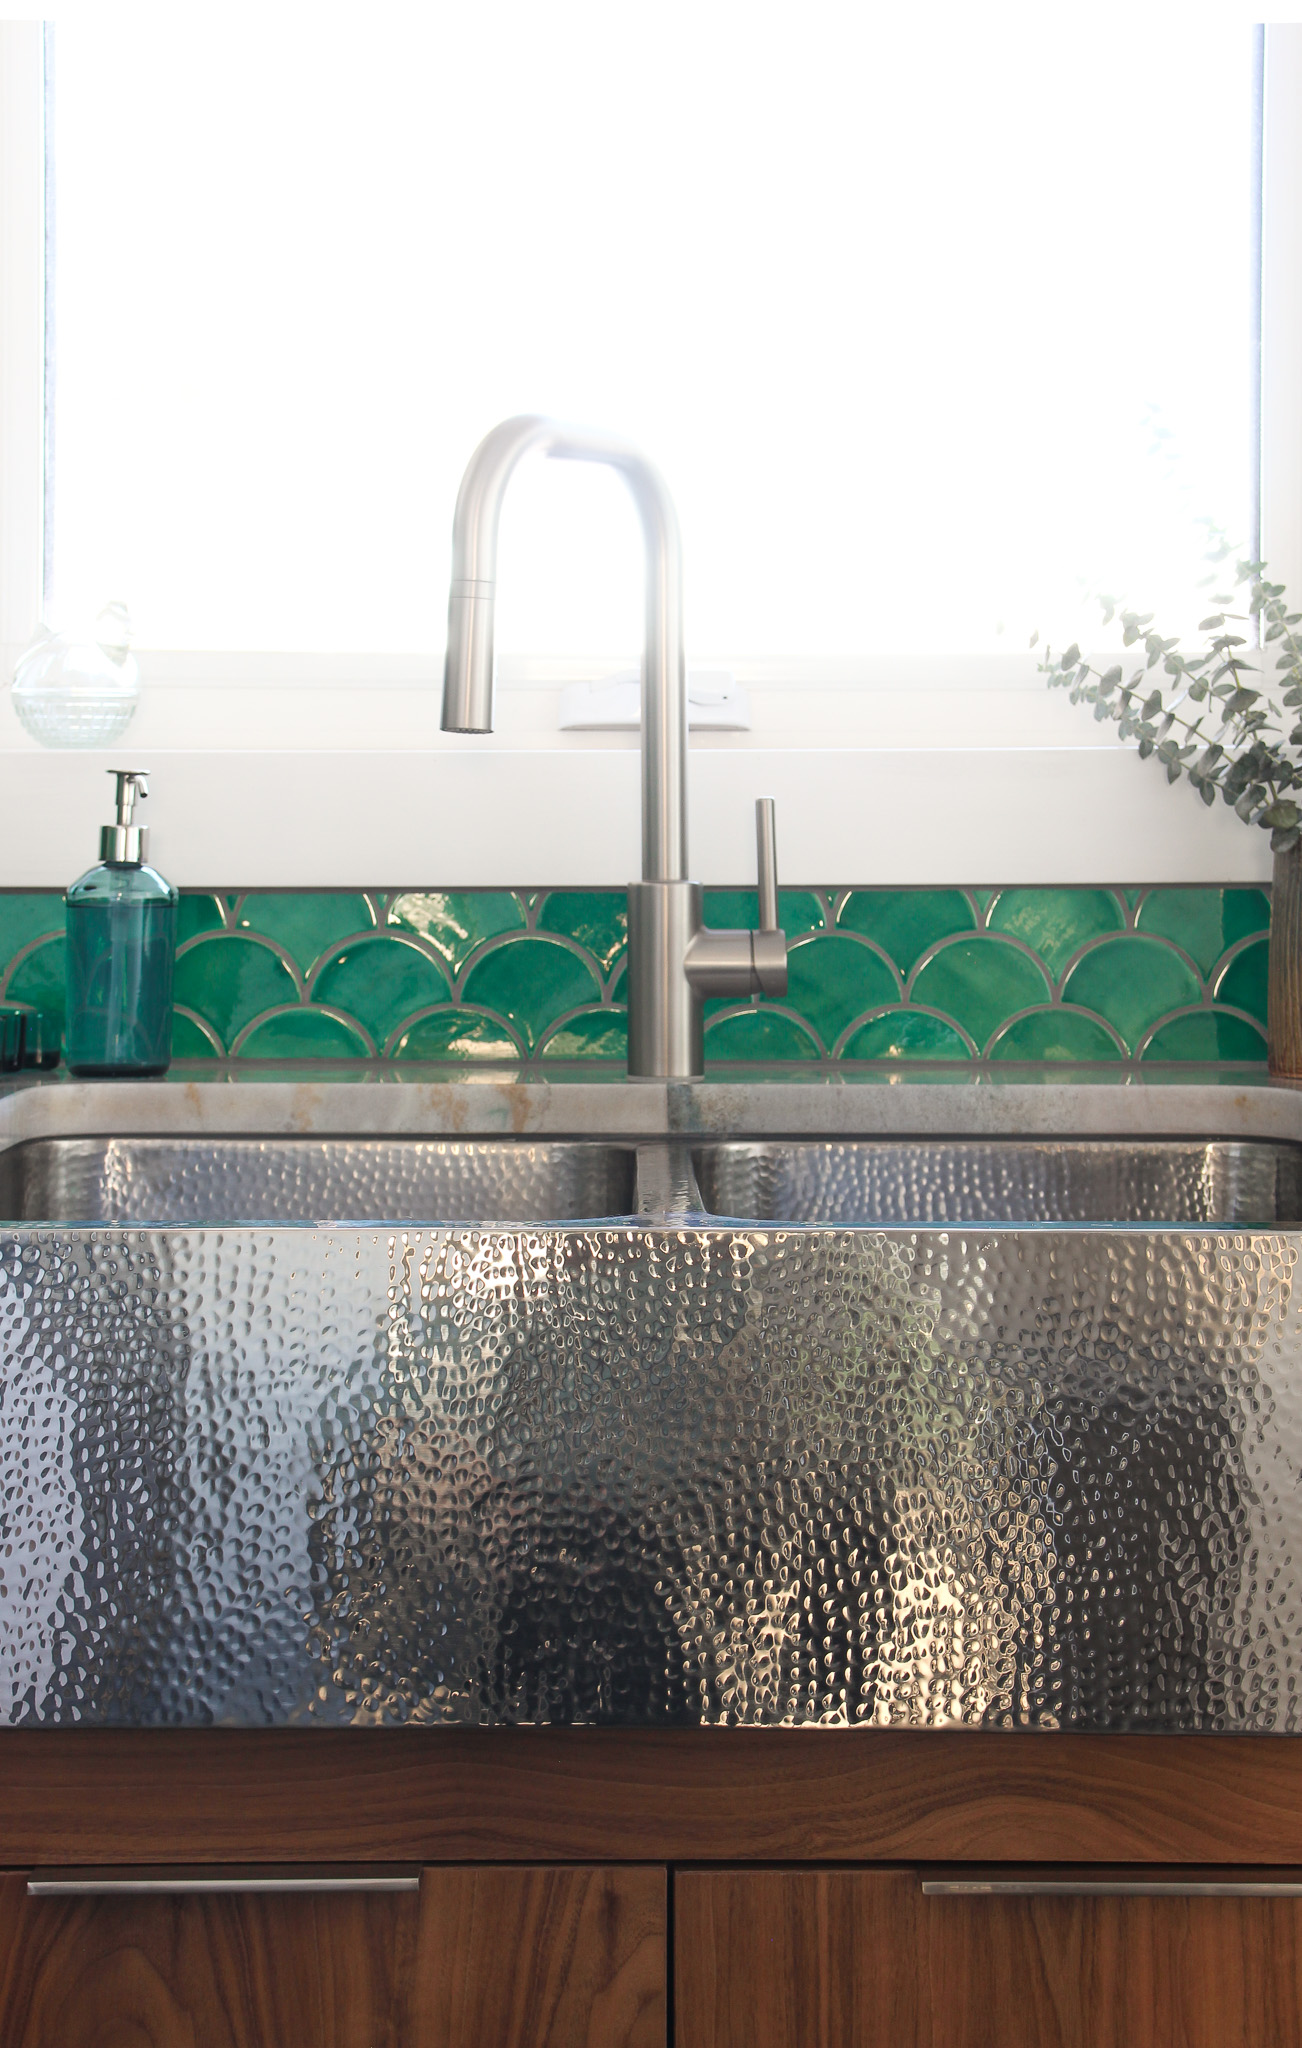
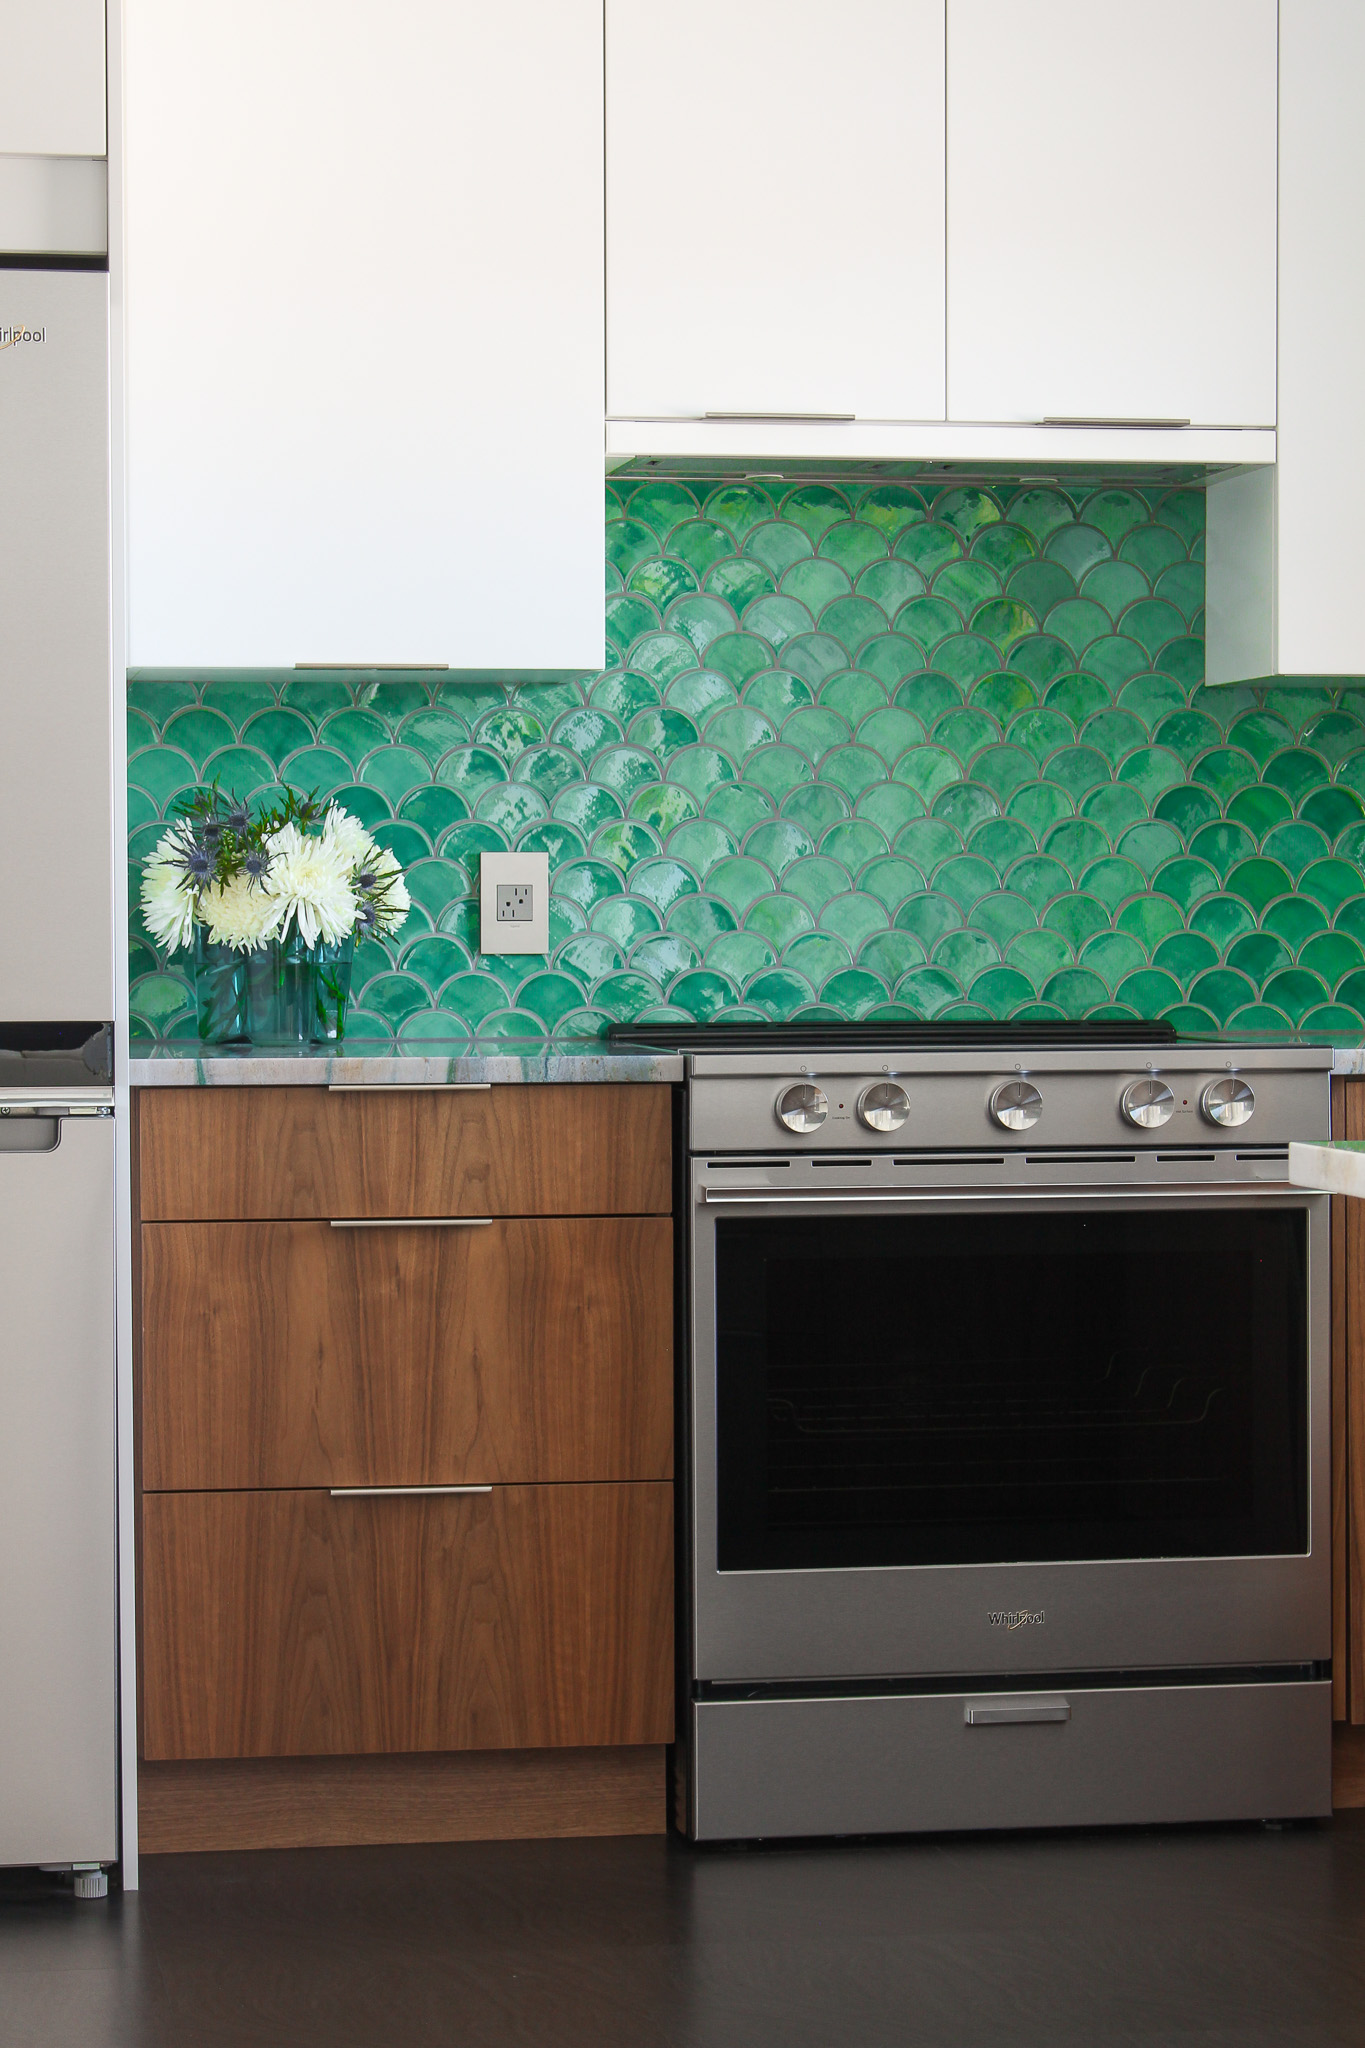
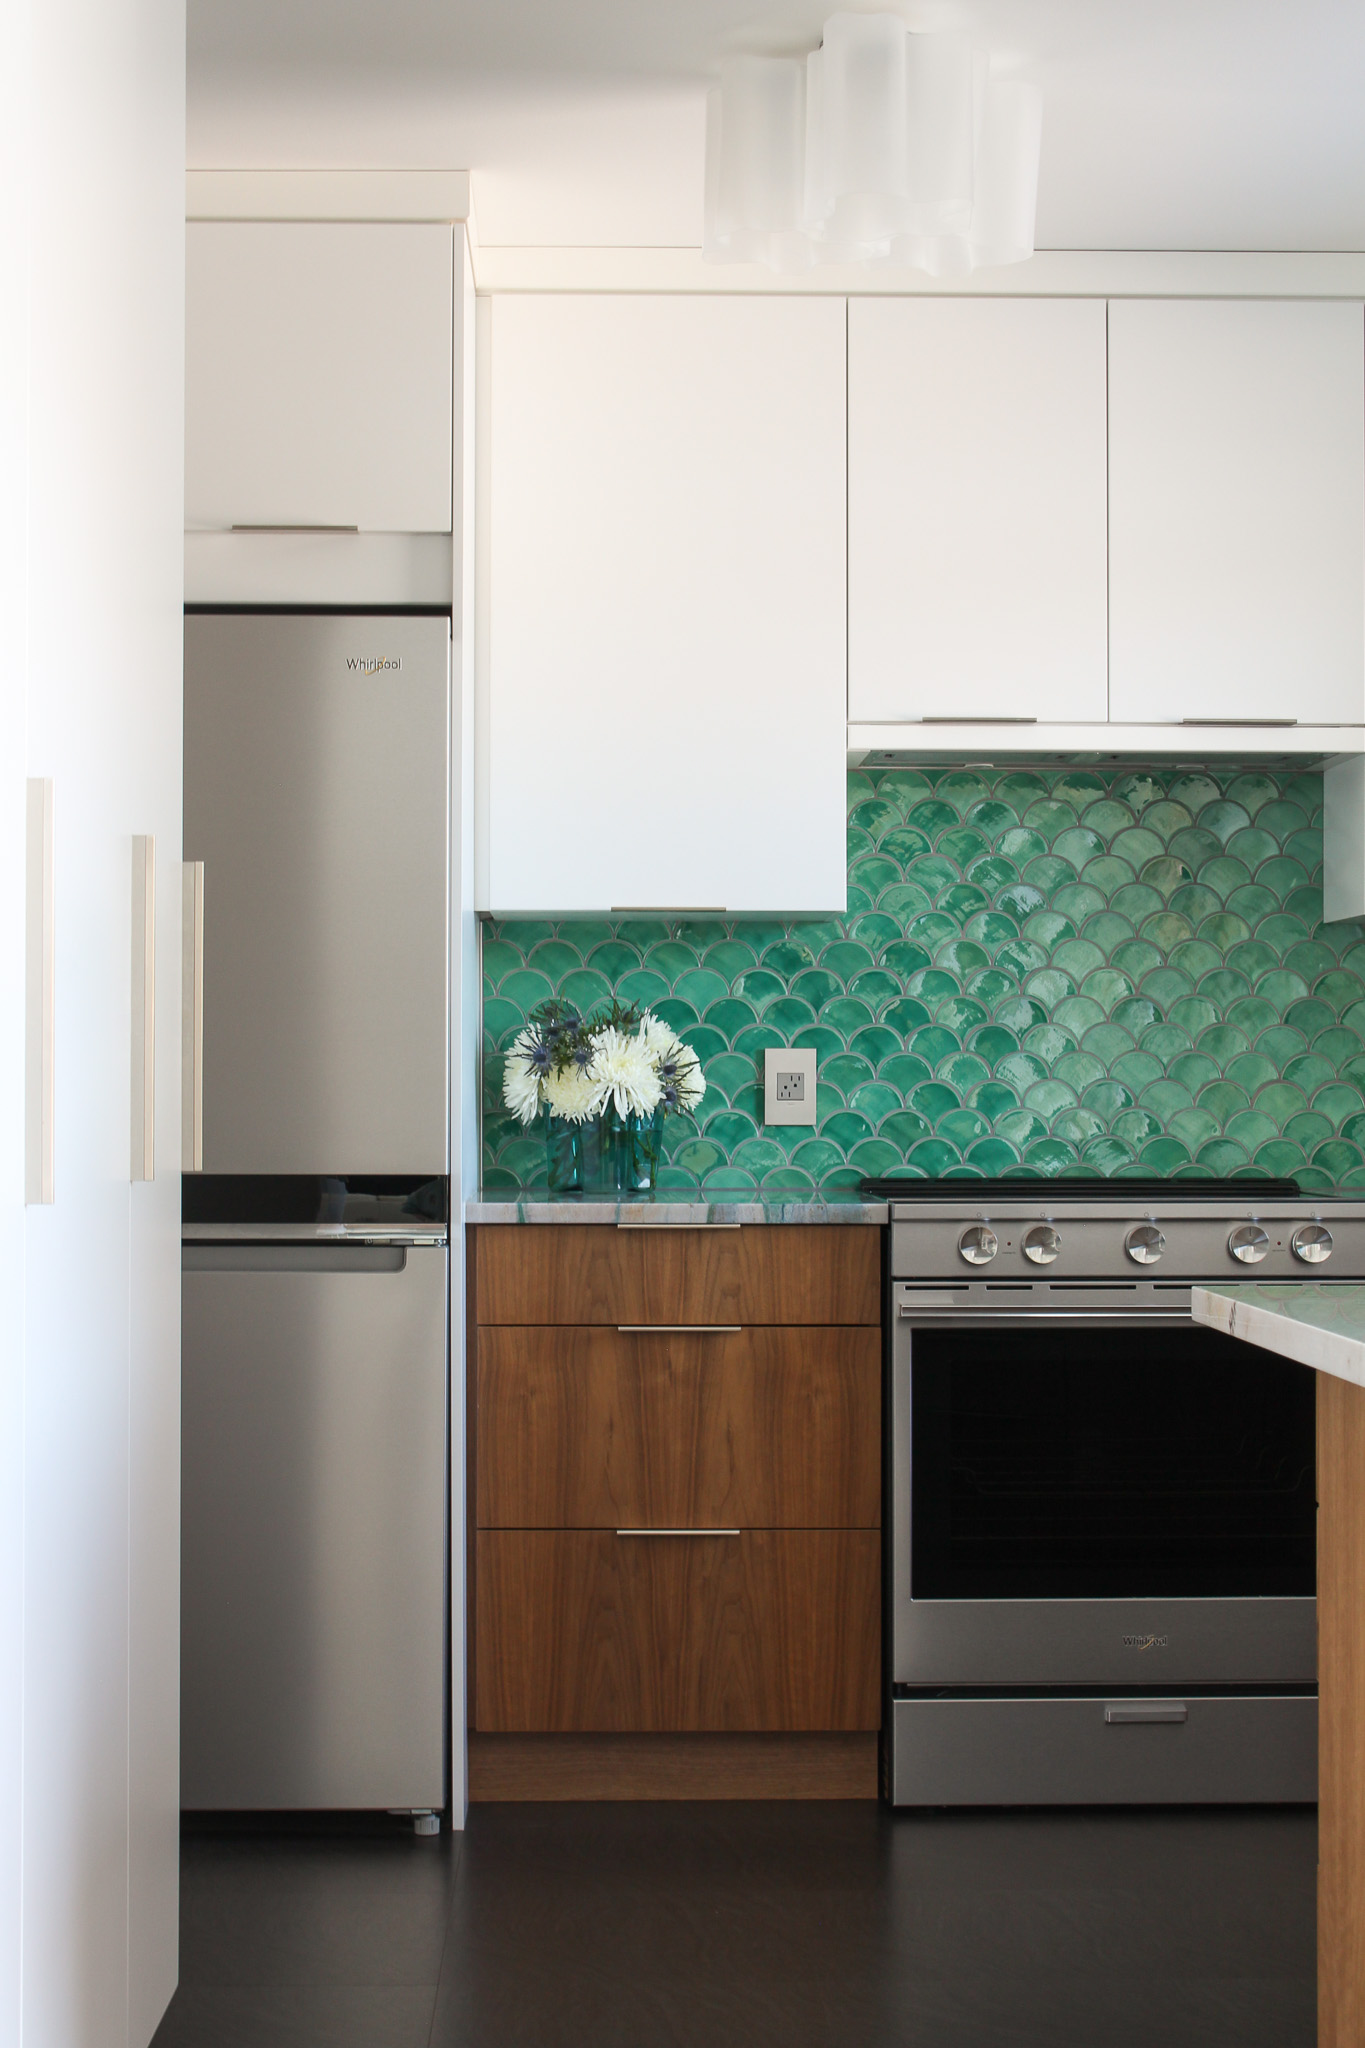
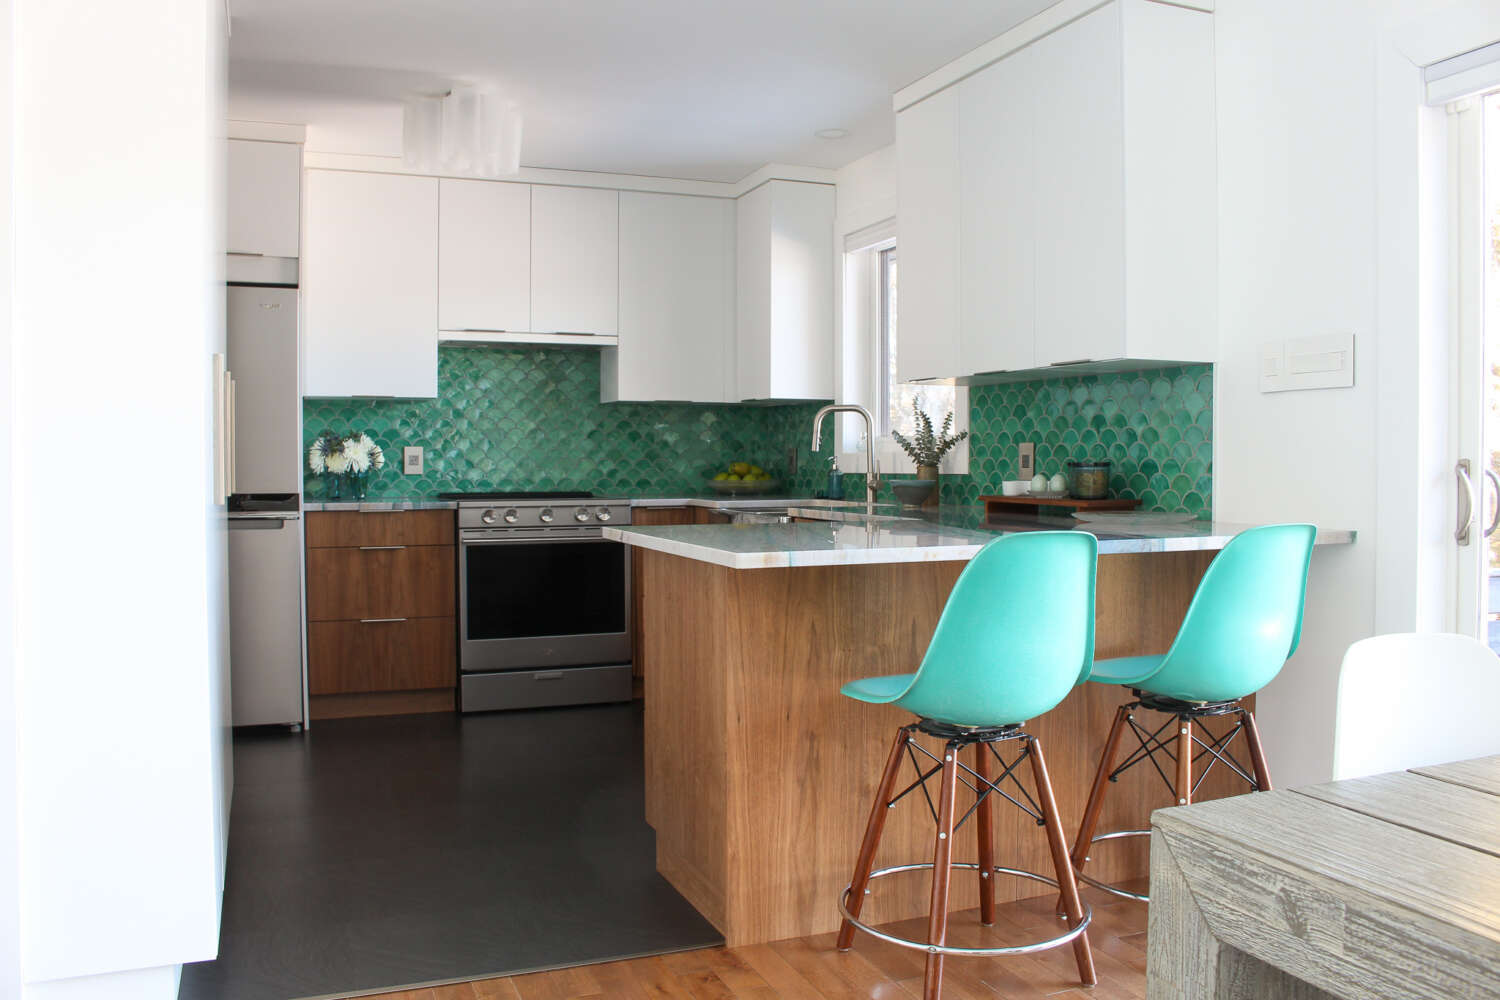


ALL ABOUT THE STONE COUNTERS | DIY LUXURY VINYL TILE INSTALLATION
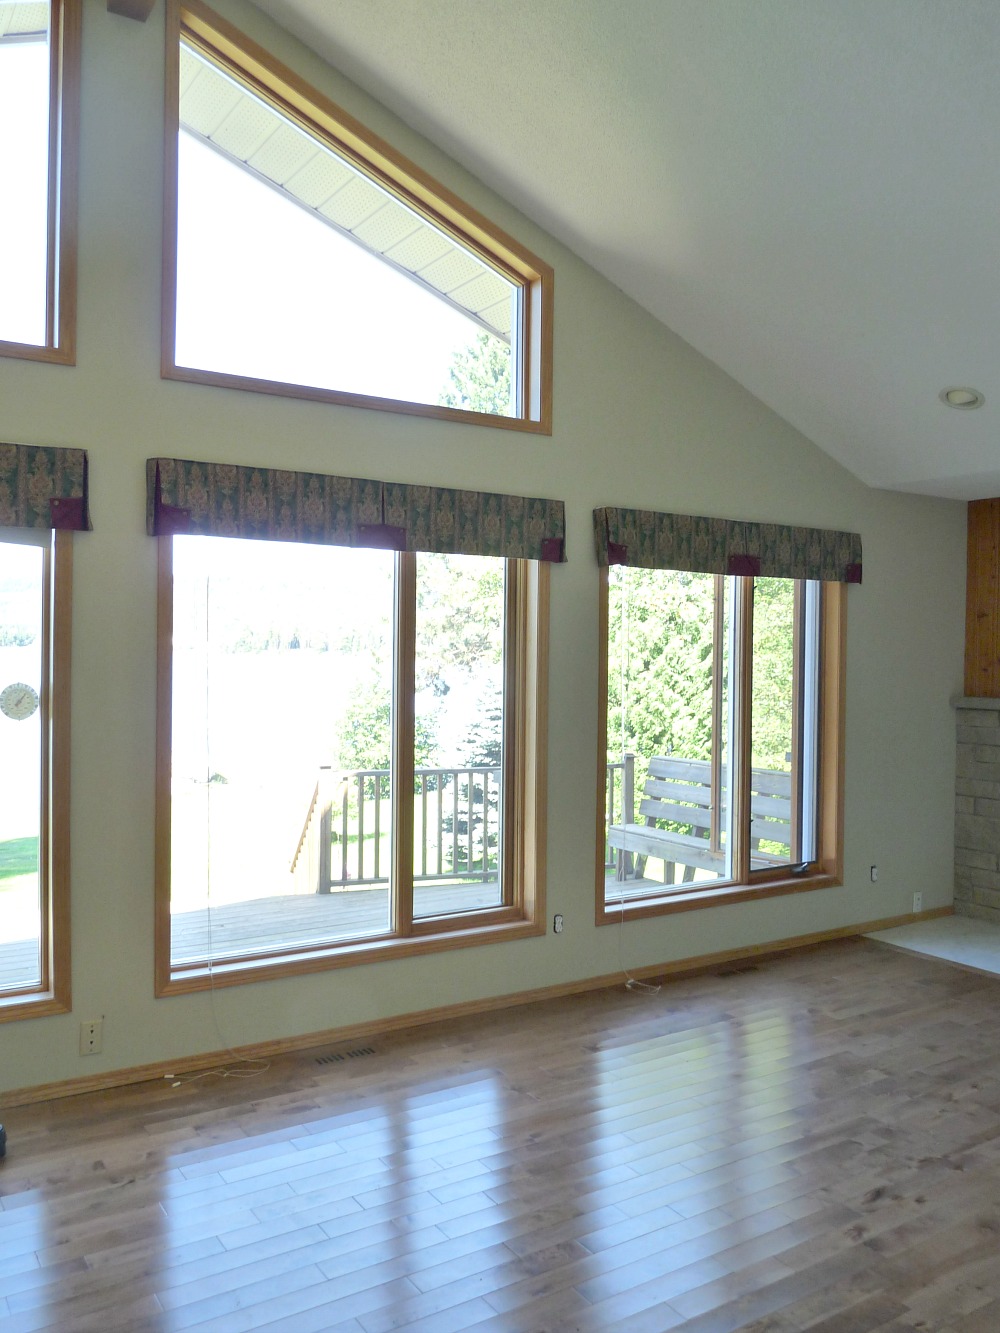
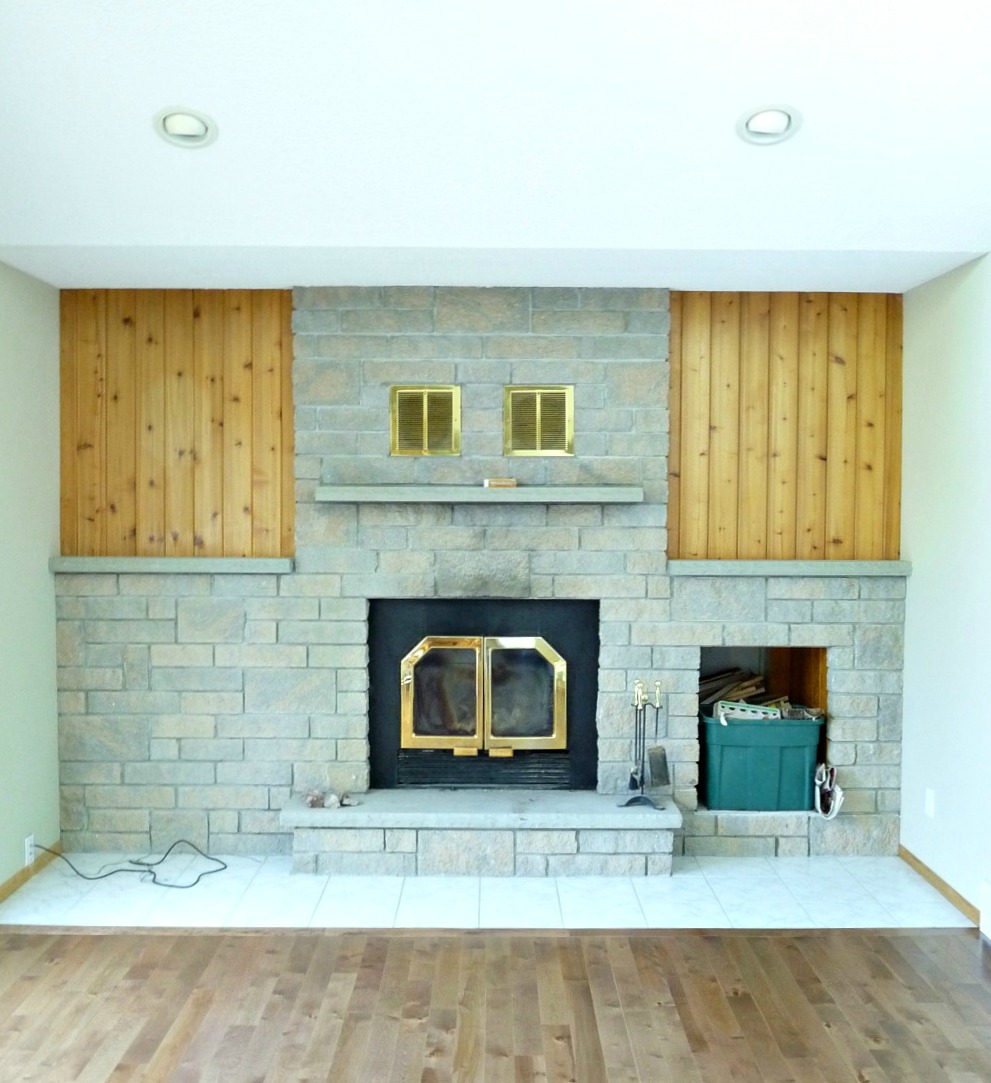
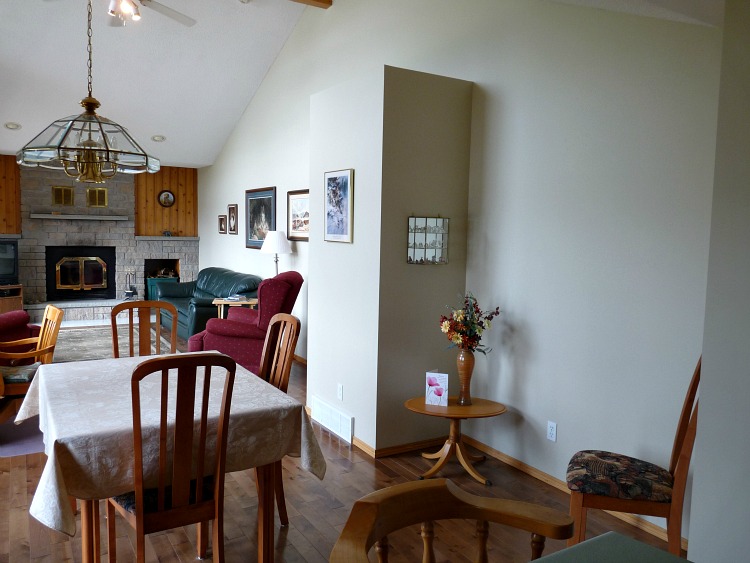
THE LIVING ROOM – BEFORE
Here is the living room before:
Before
Before

Before
Before
Before
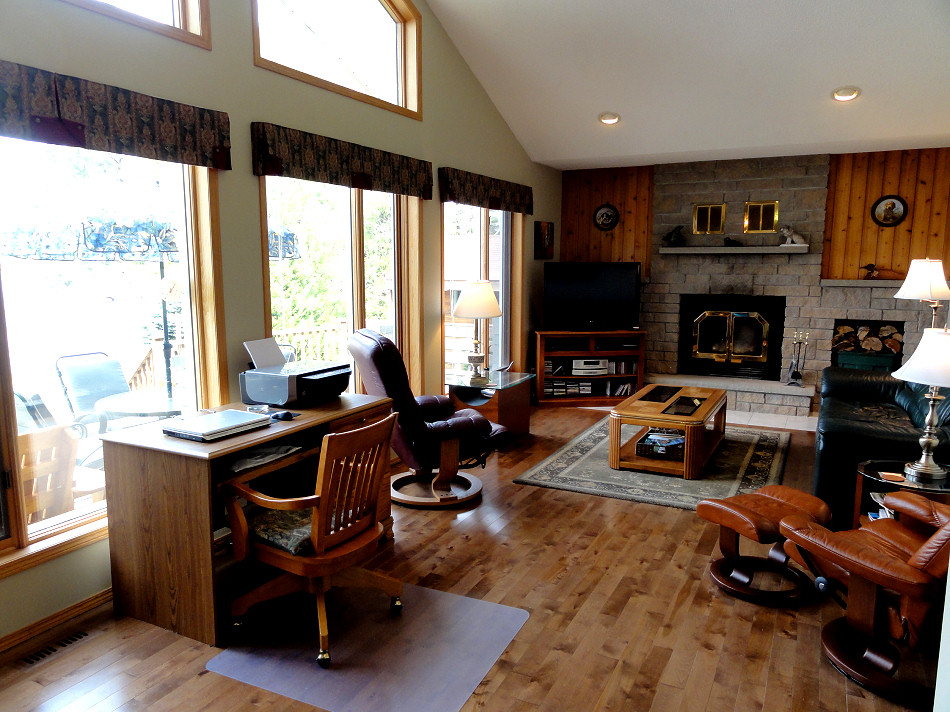
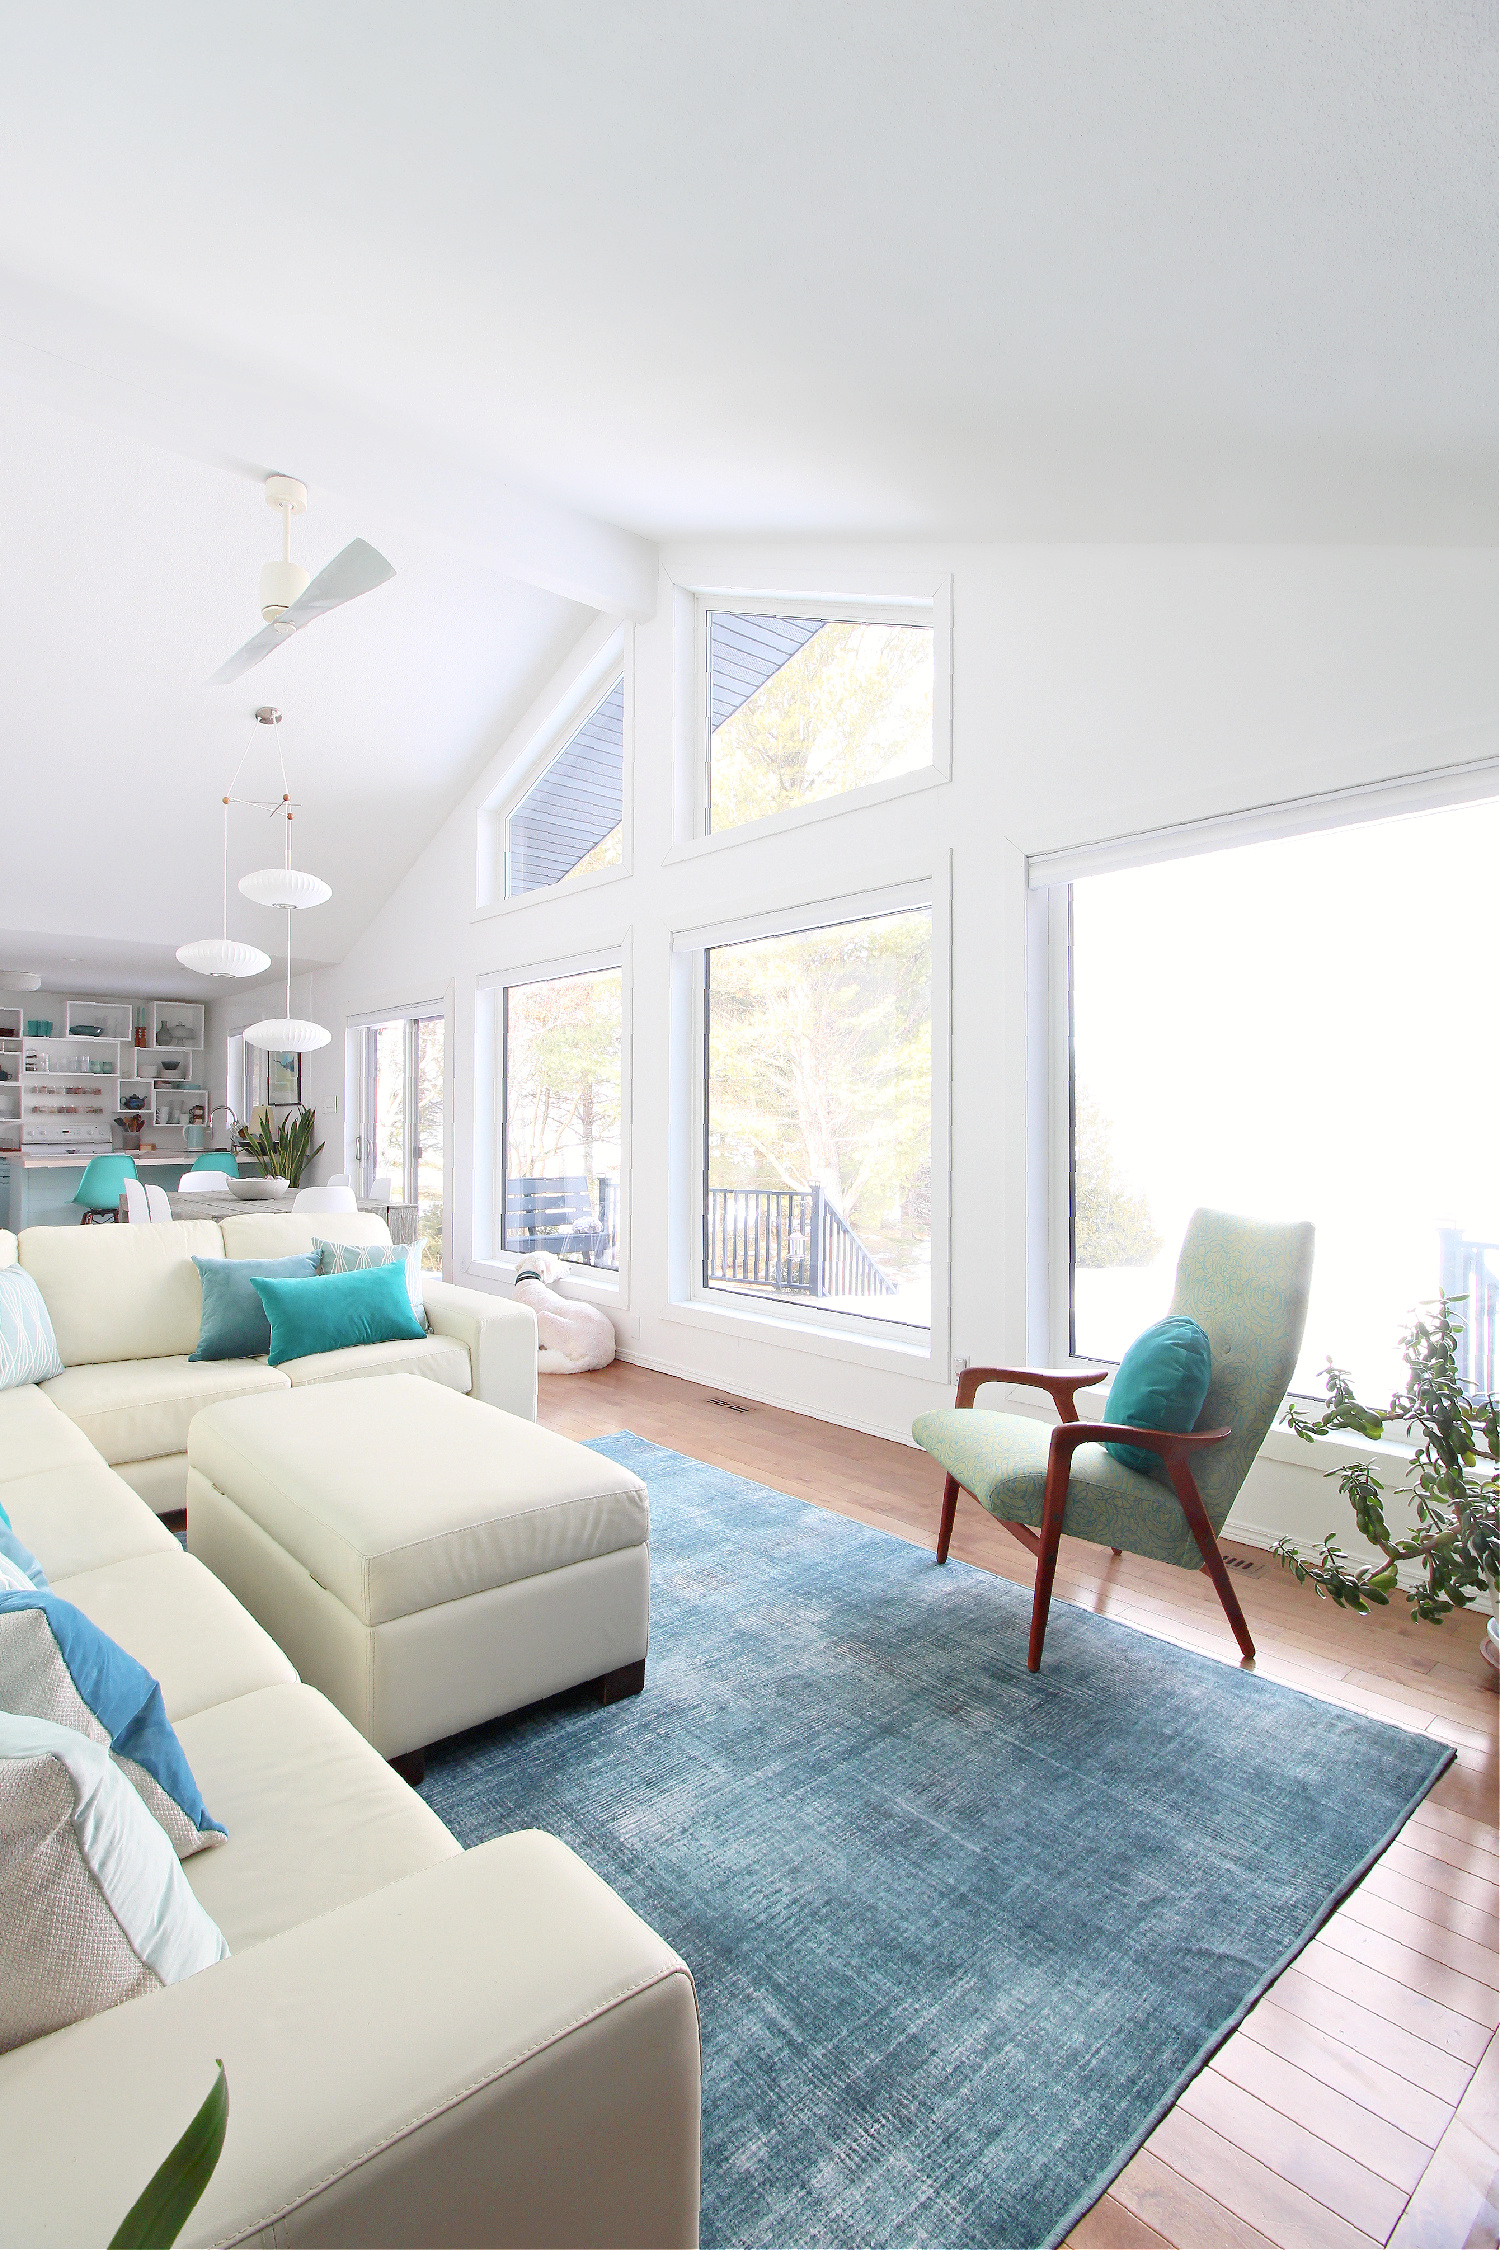
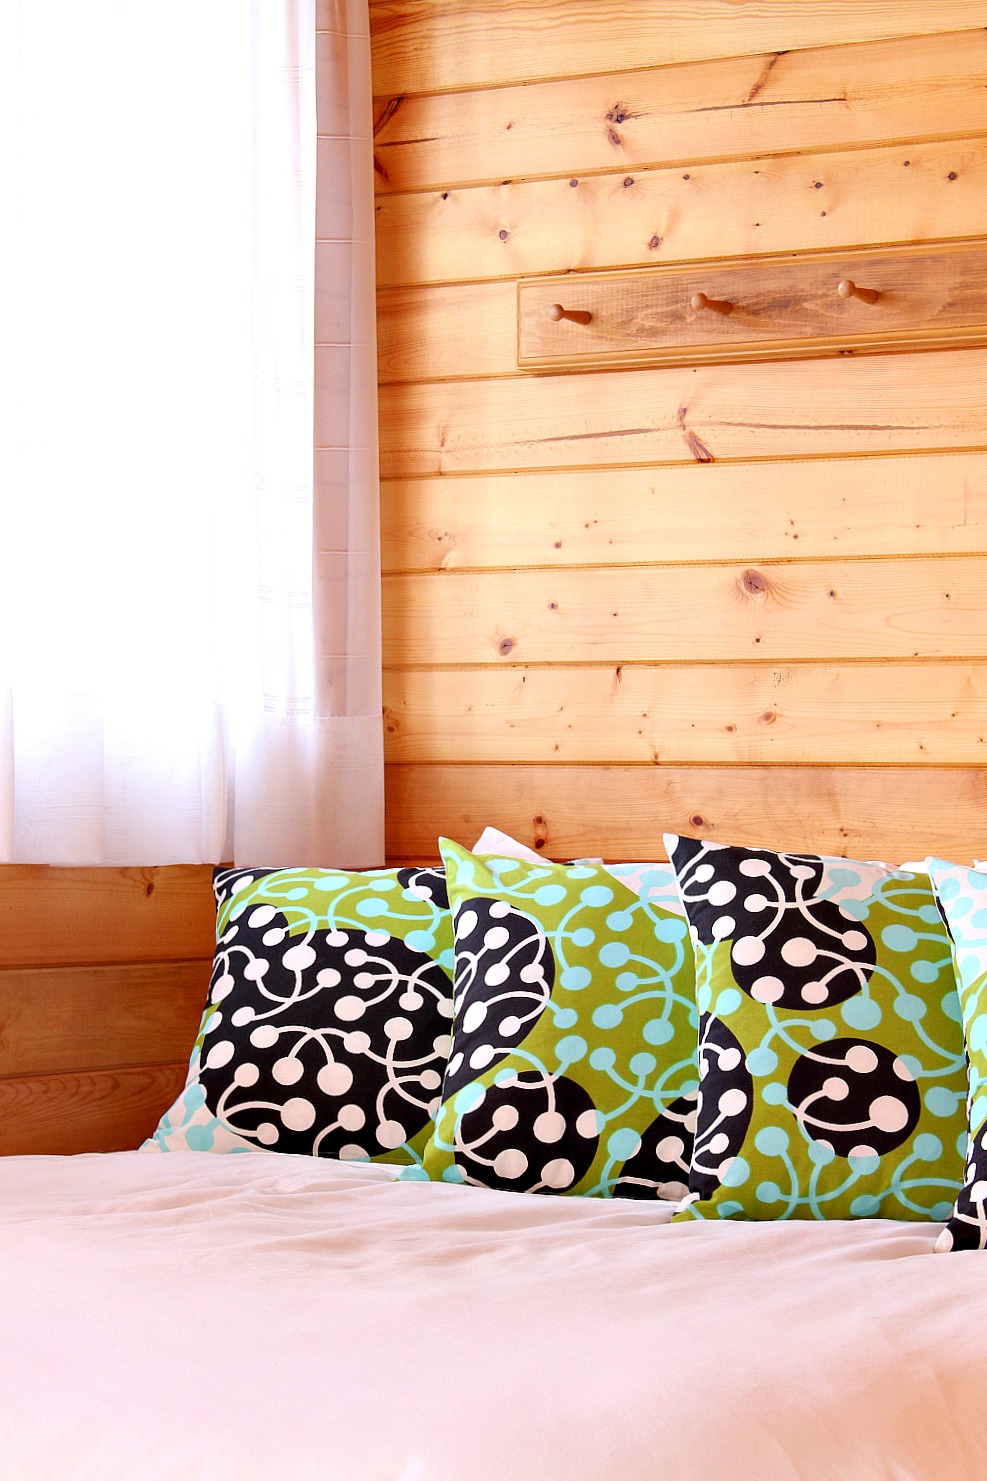
THE LIVING ROOM – AFTER
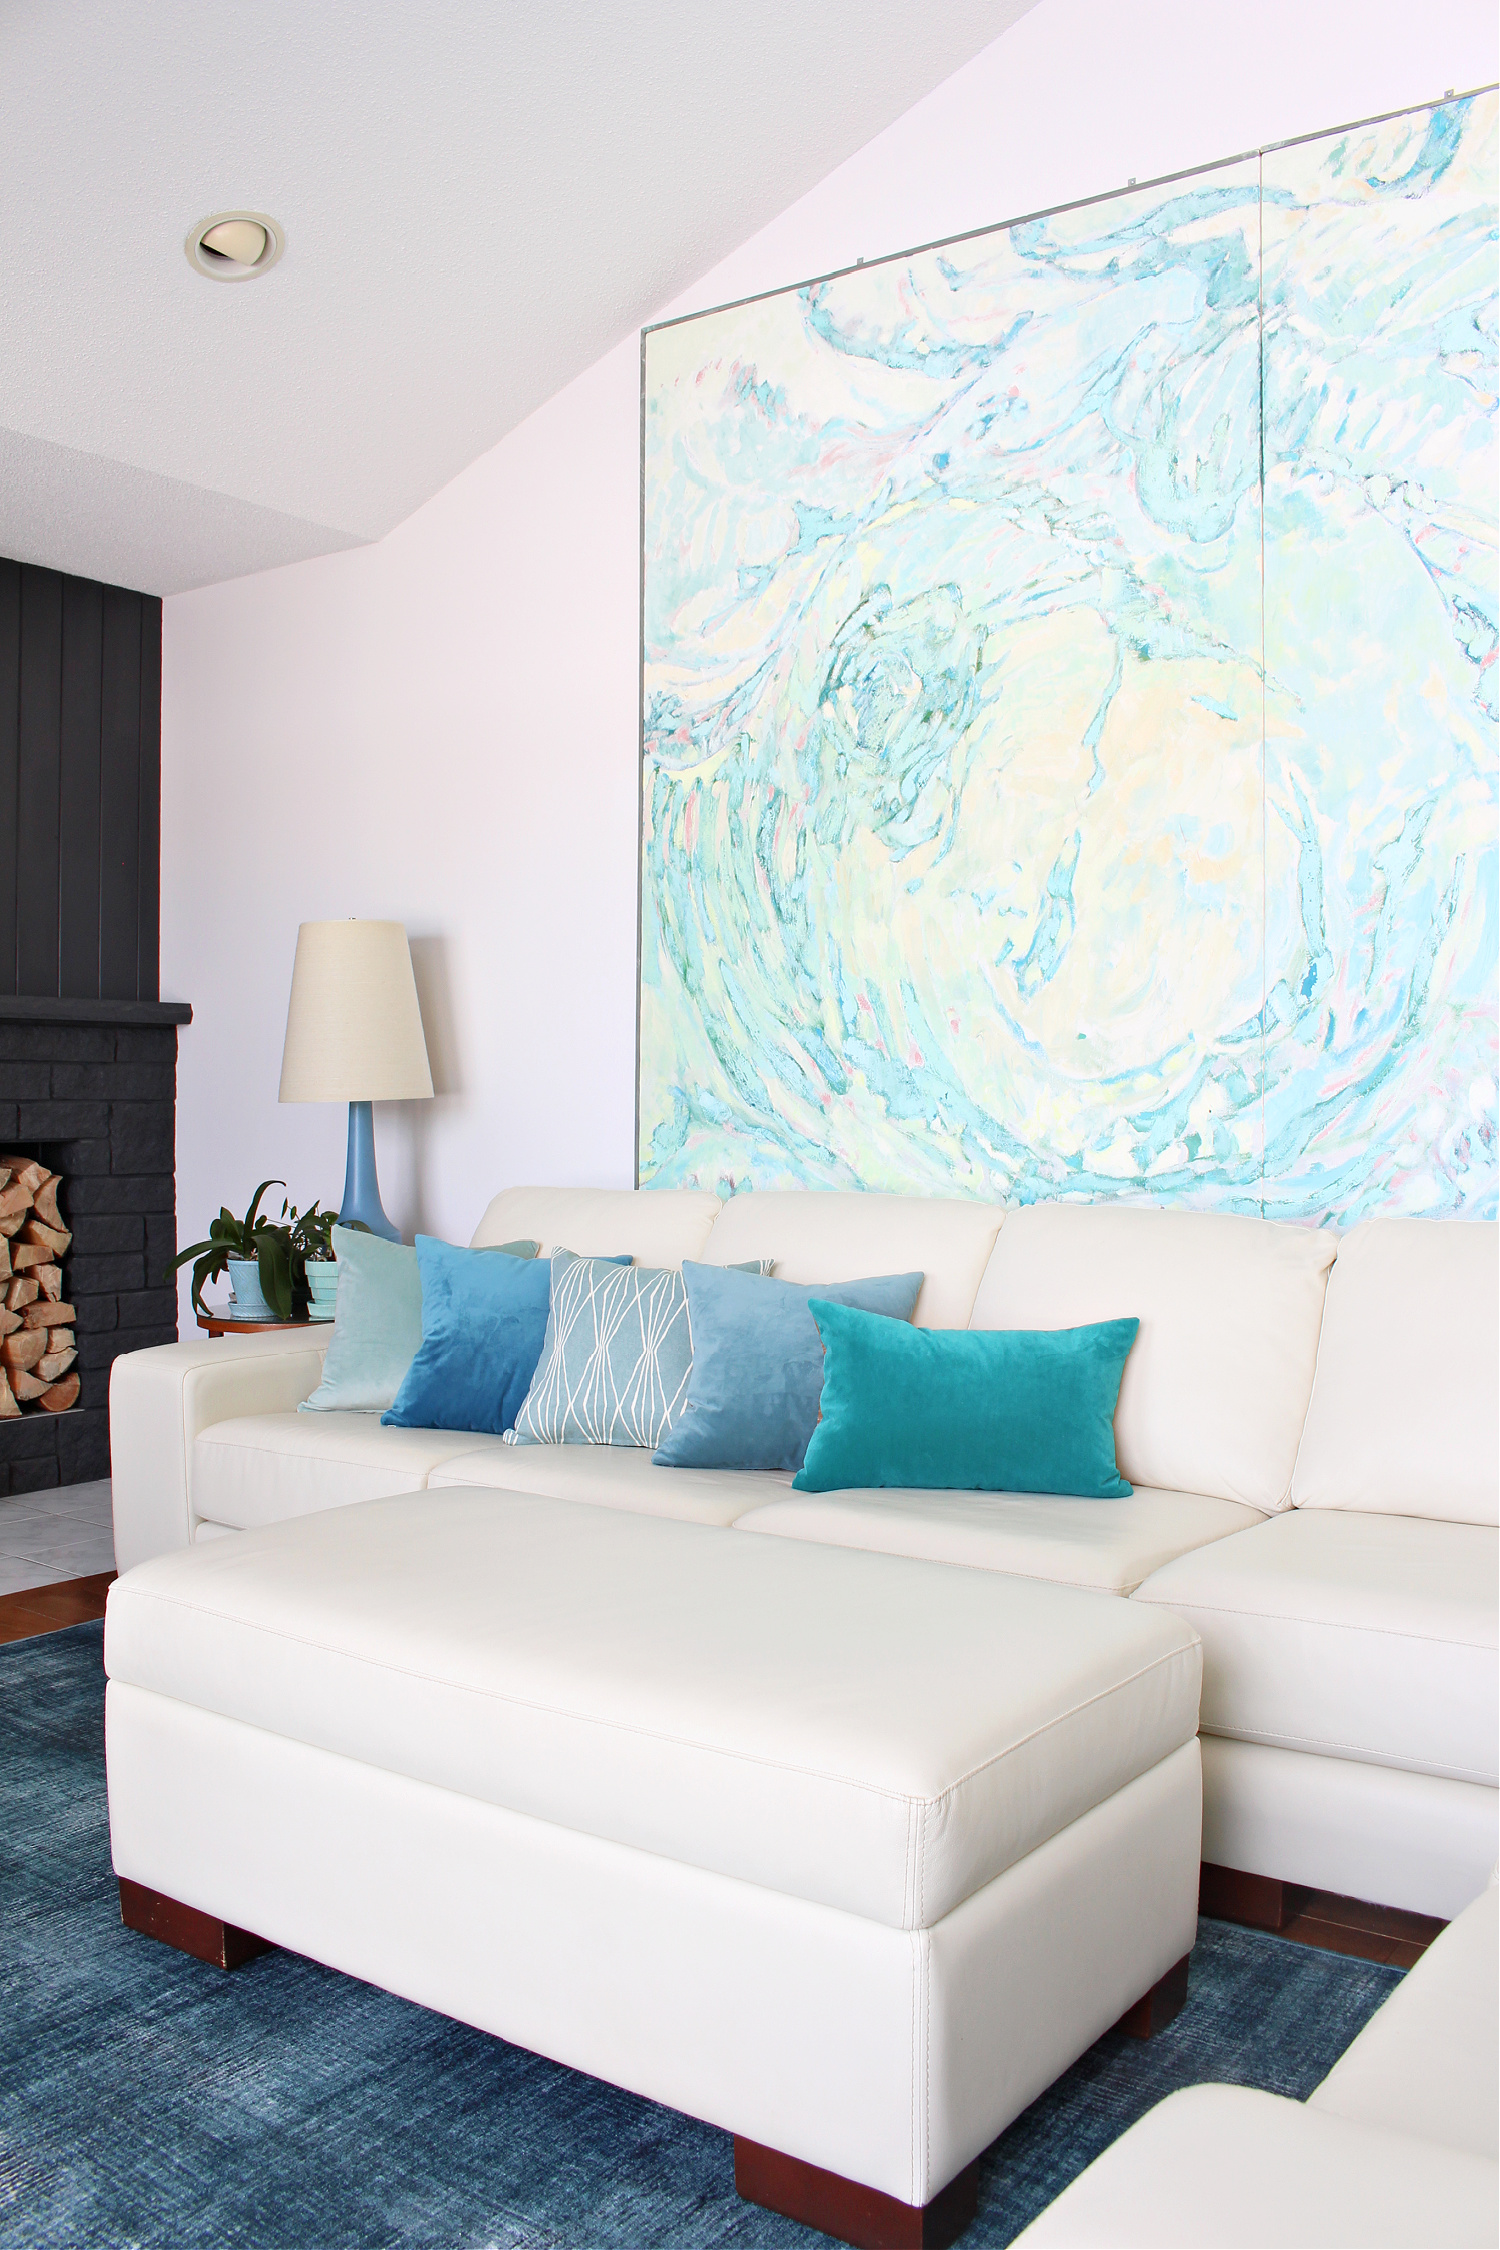
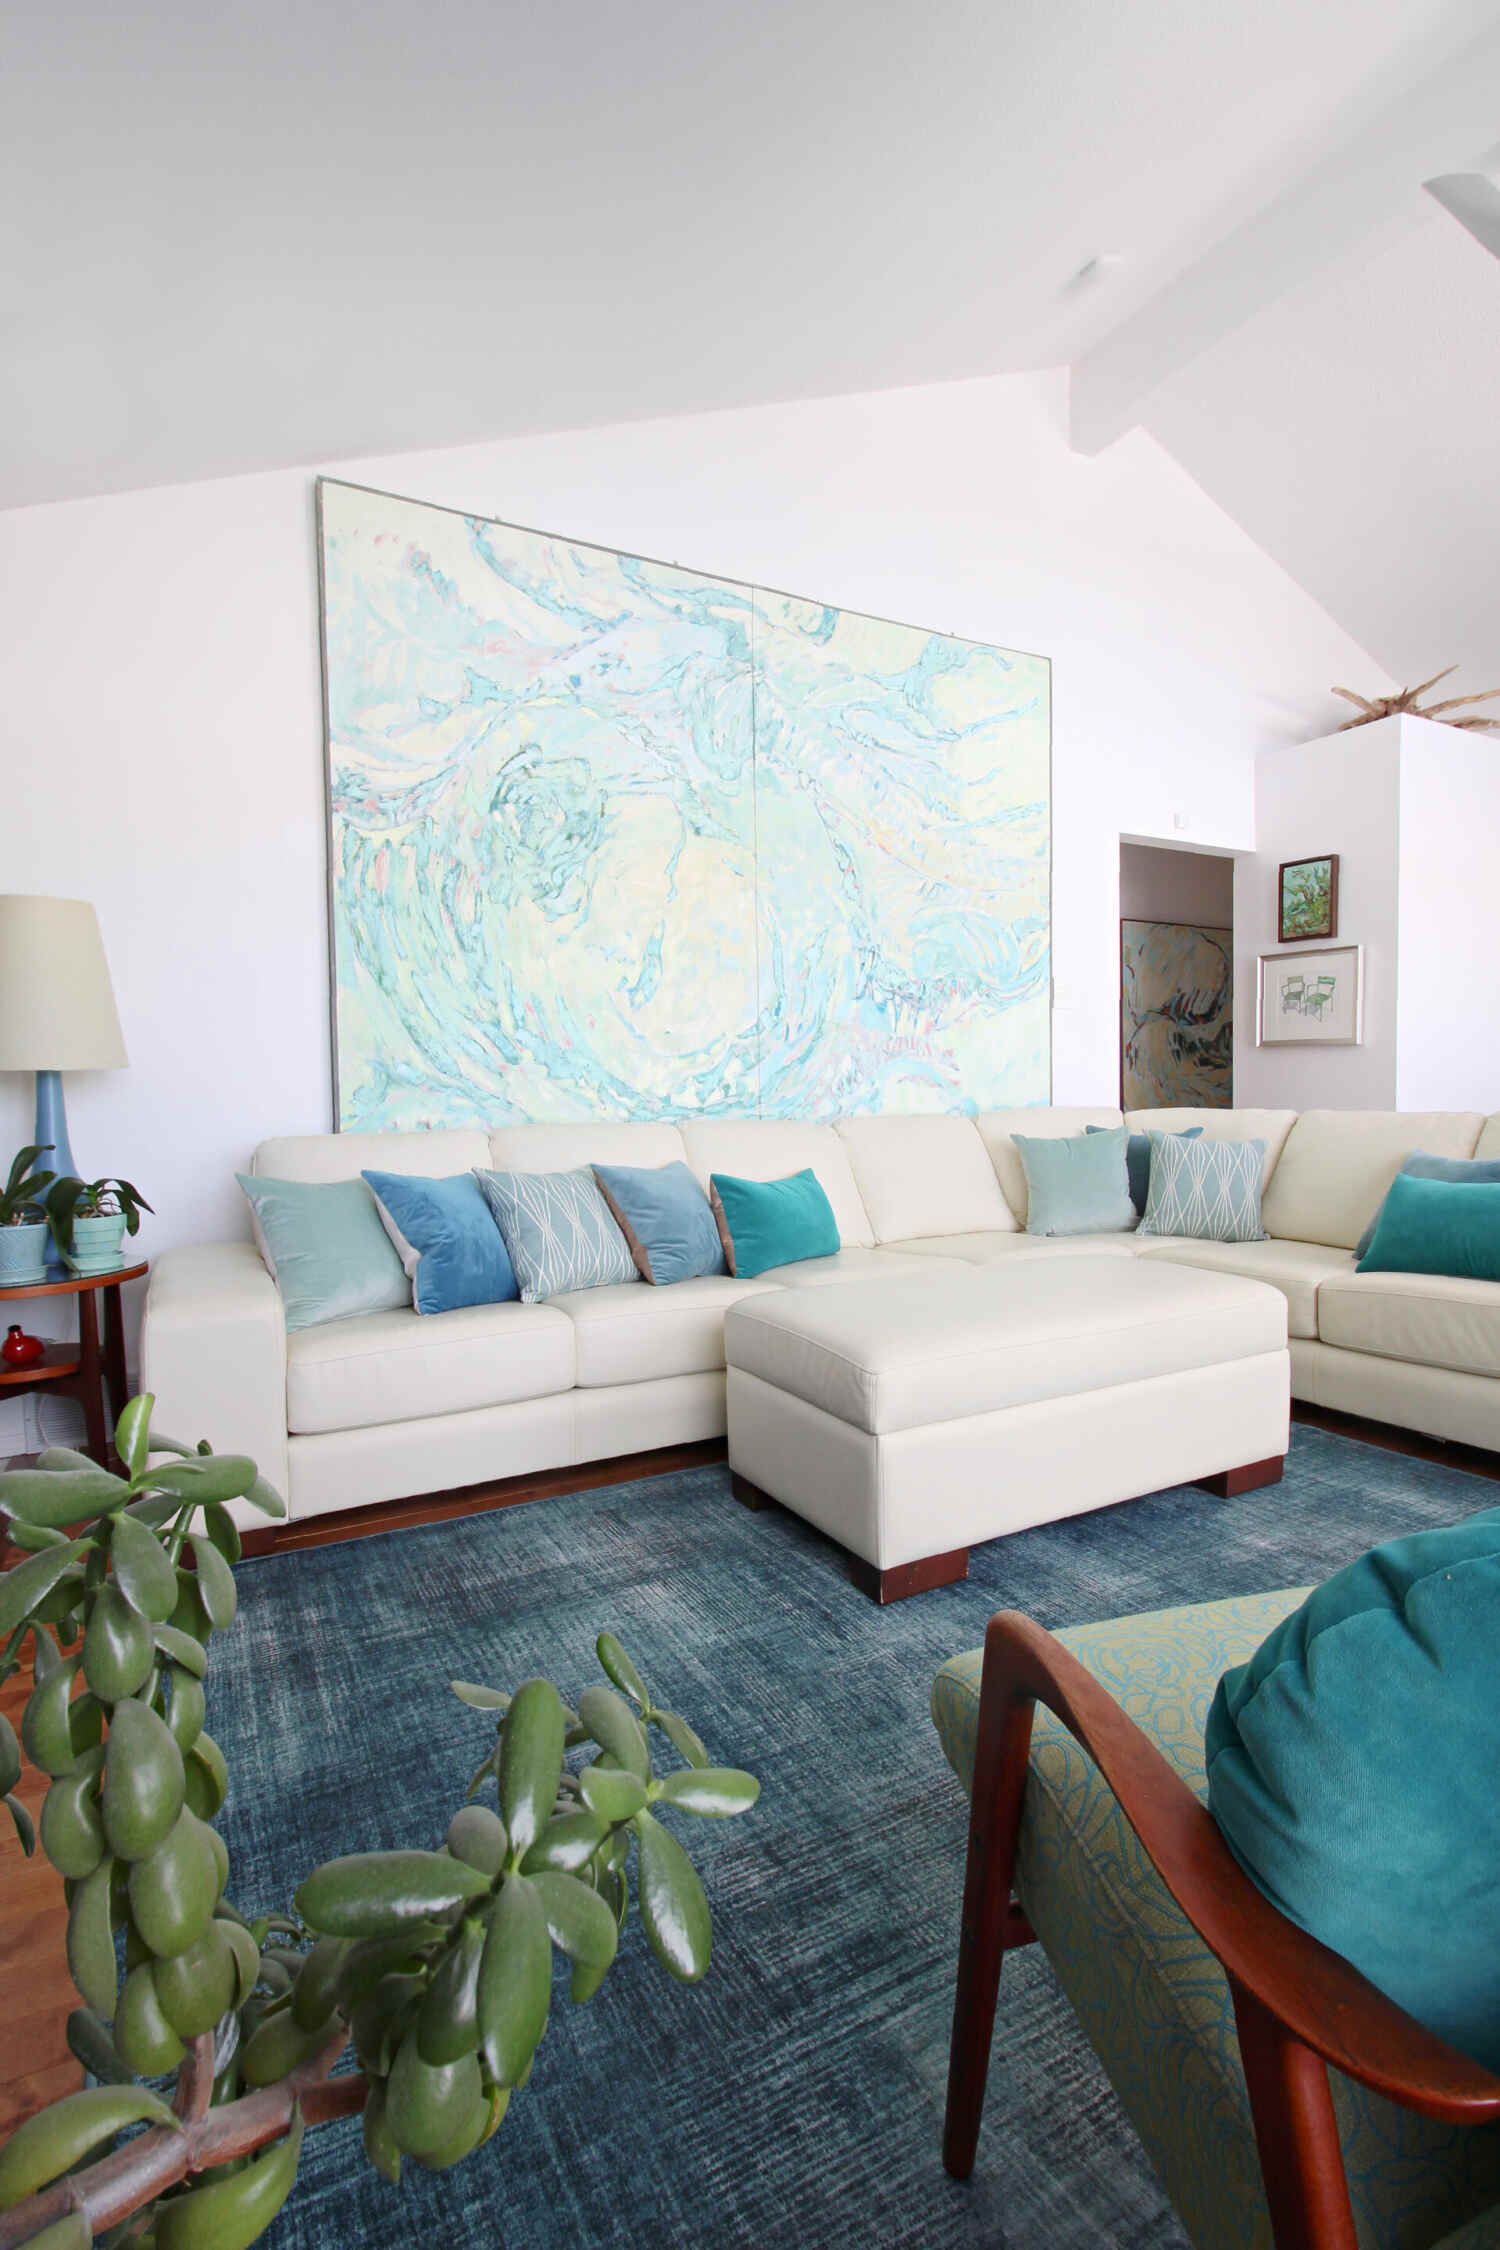
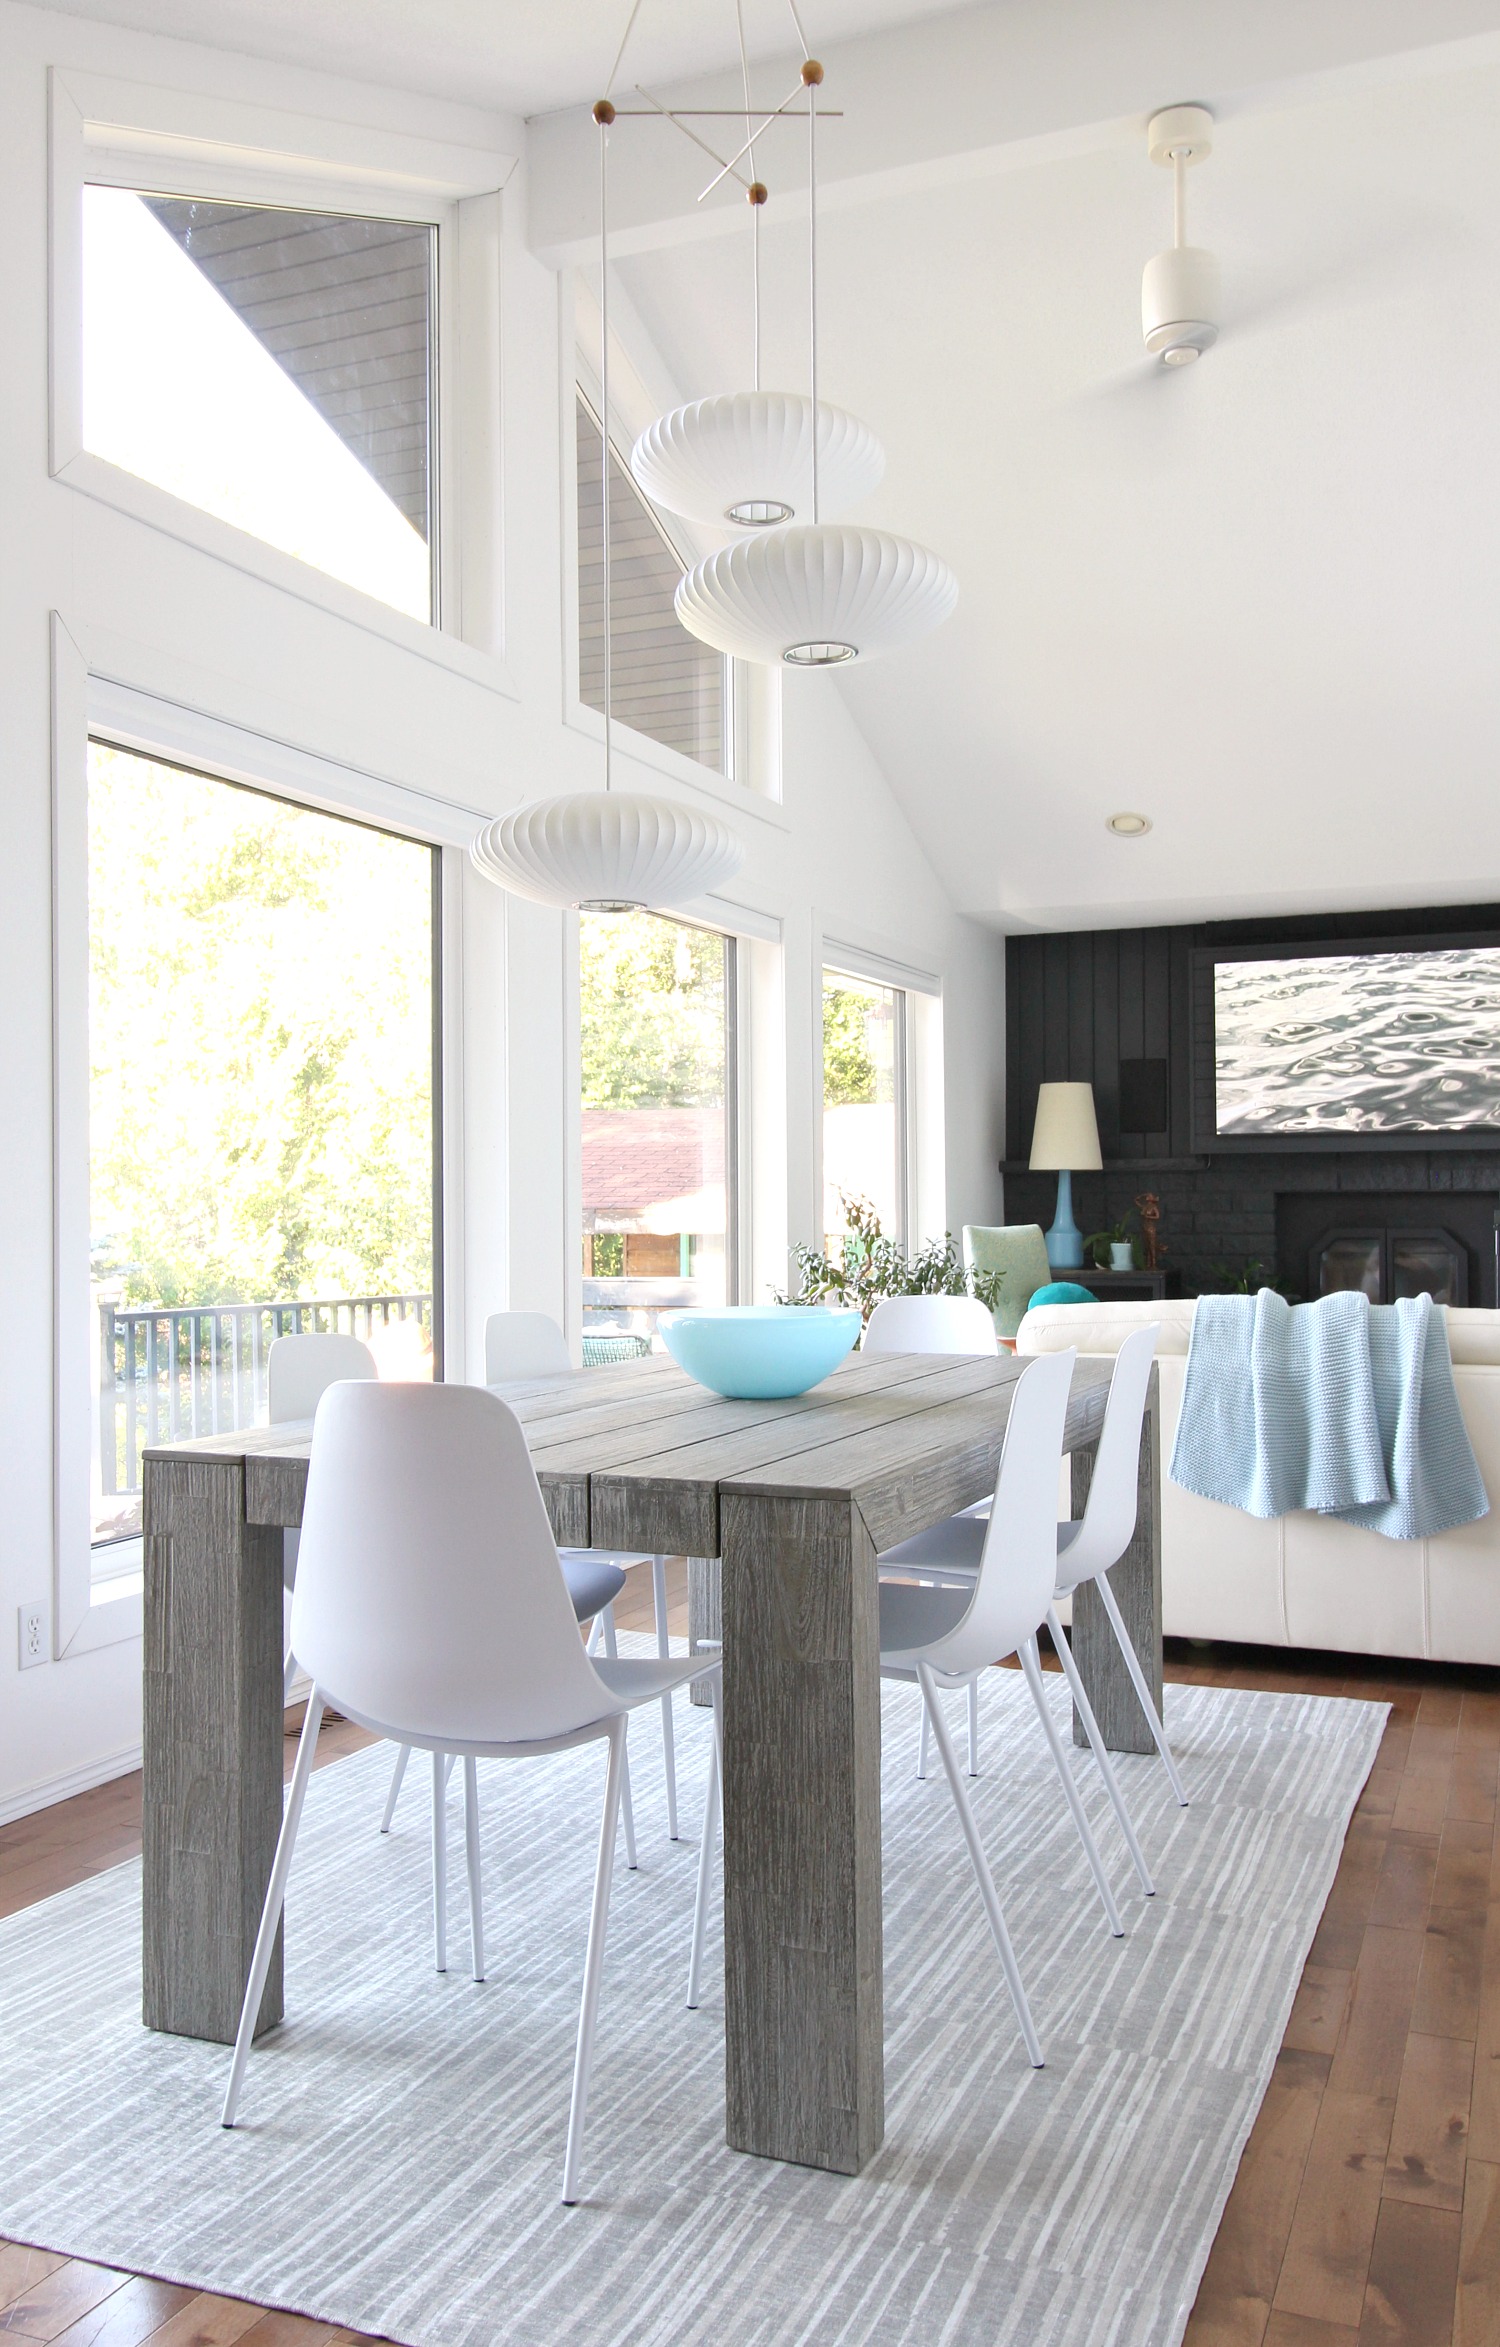
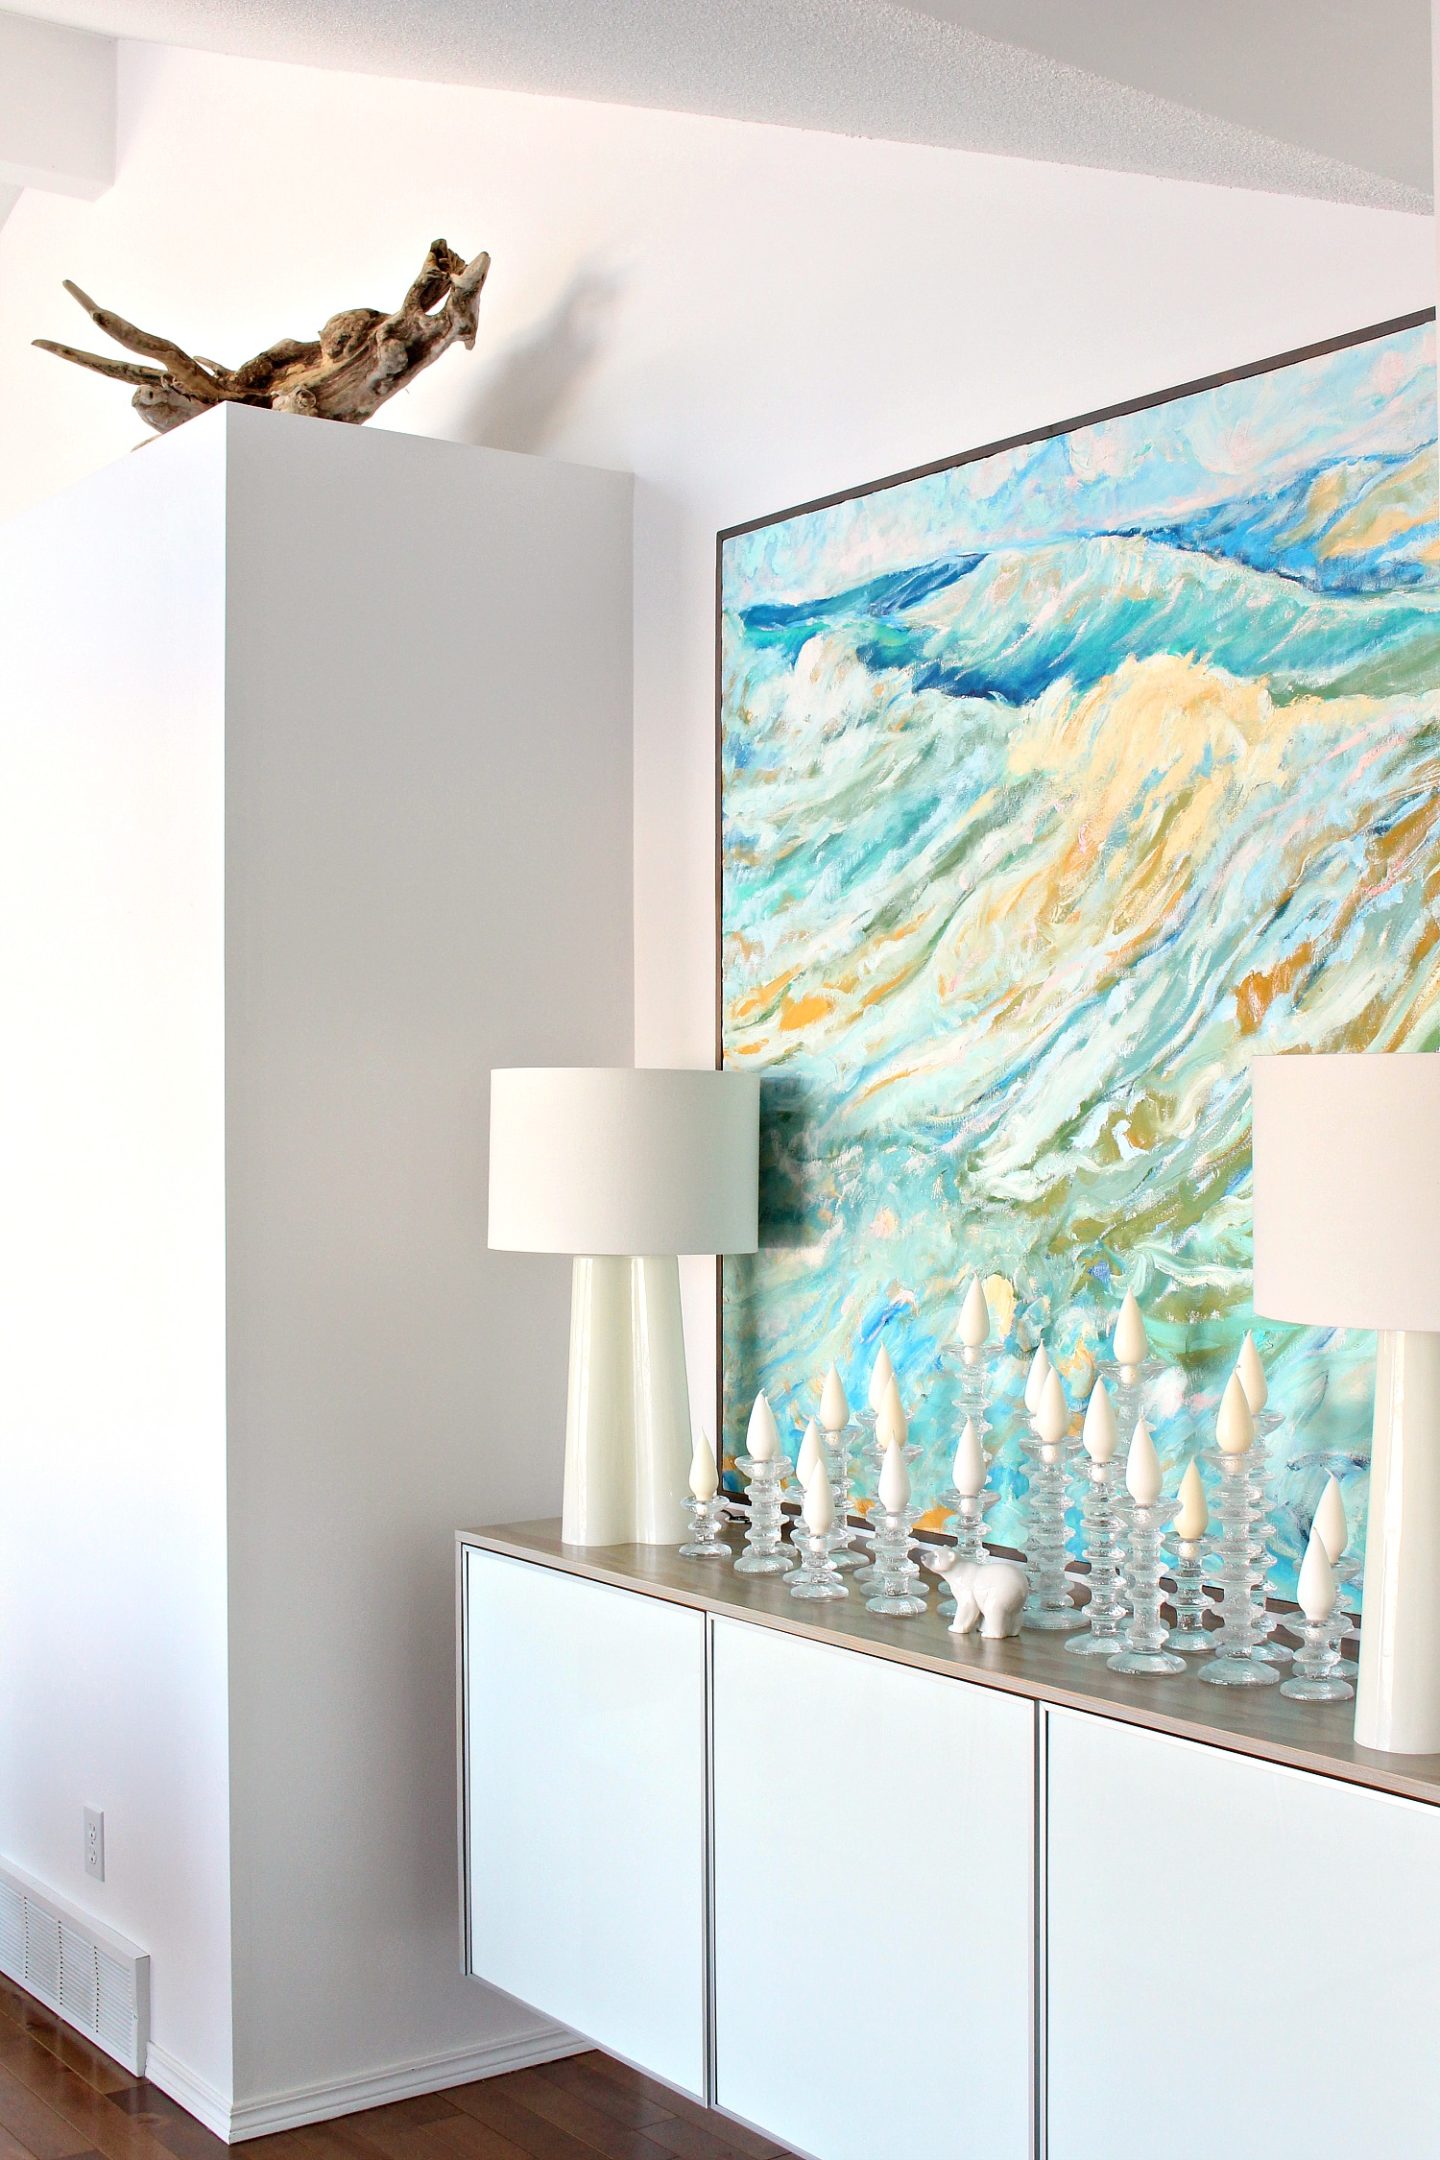
We painted the walls, trim, ceiling and wood beam white and installed a new modern ceiling fan. Dark grey paint on the faux concrete brick, and matte black paint on the gold fireplace door and vents, updated the fireplace really inexpensively. We later hacked the fireplace and built a new DIY facade to enable us to finally mount our TV above the fireplace. This room went through a series of updates and furniture rearranging, but after splurging on a 20 foot sectional sofa that faces the lake, today the living room looks like this (you can see how it has evolved in this post). The velvet pillows are a DIY project and the large painting is by Hubby’s grandfather.
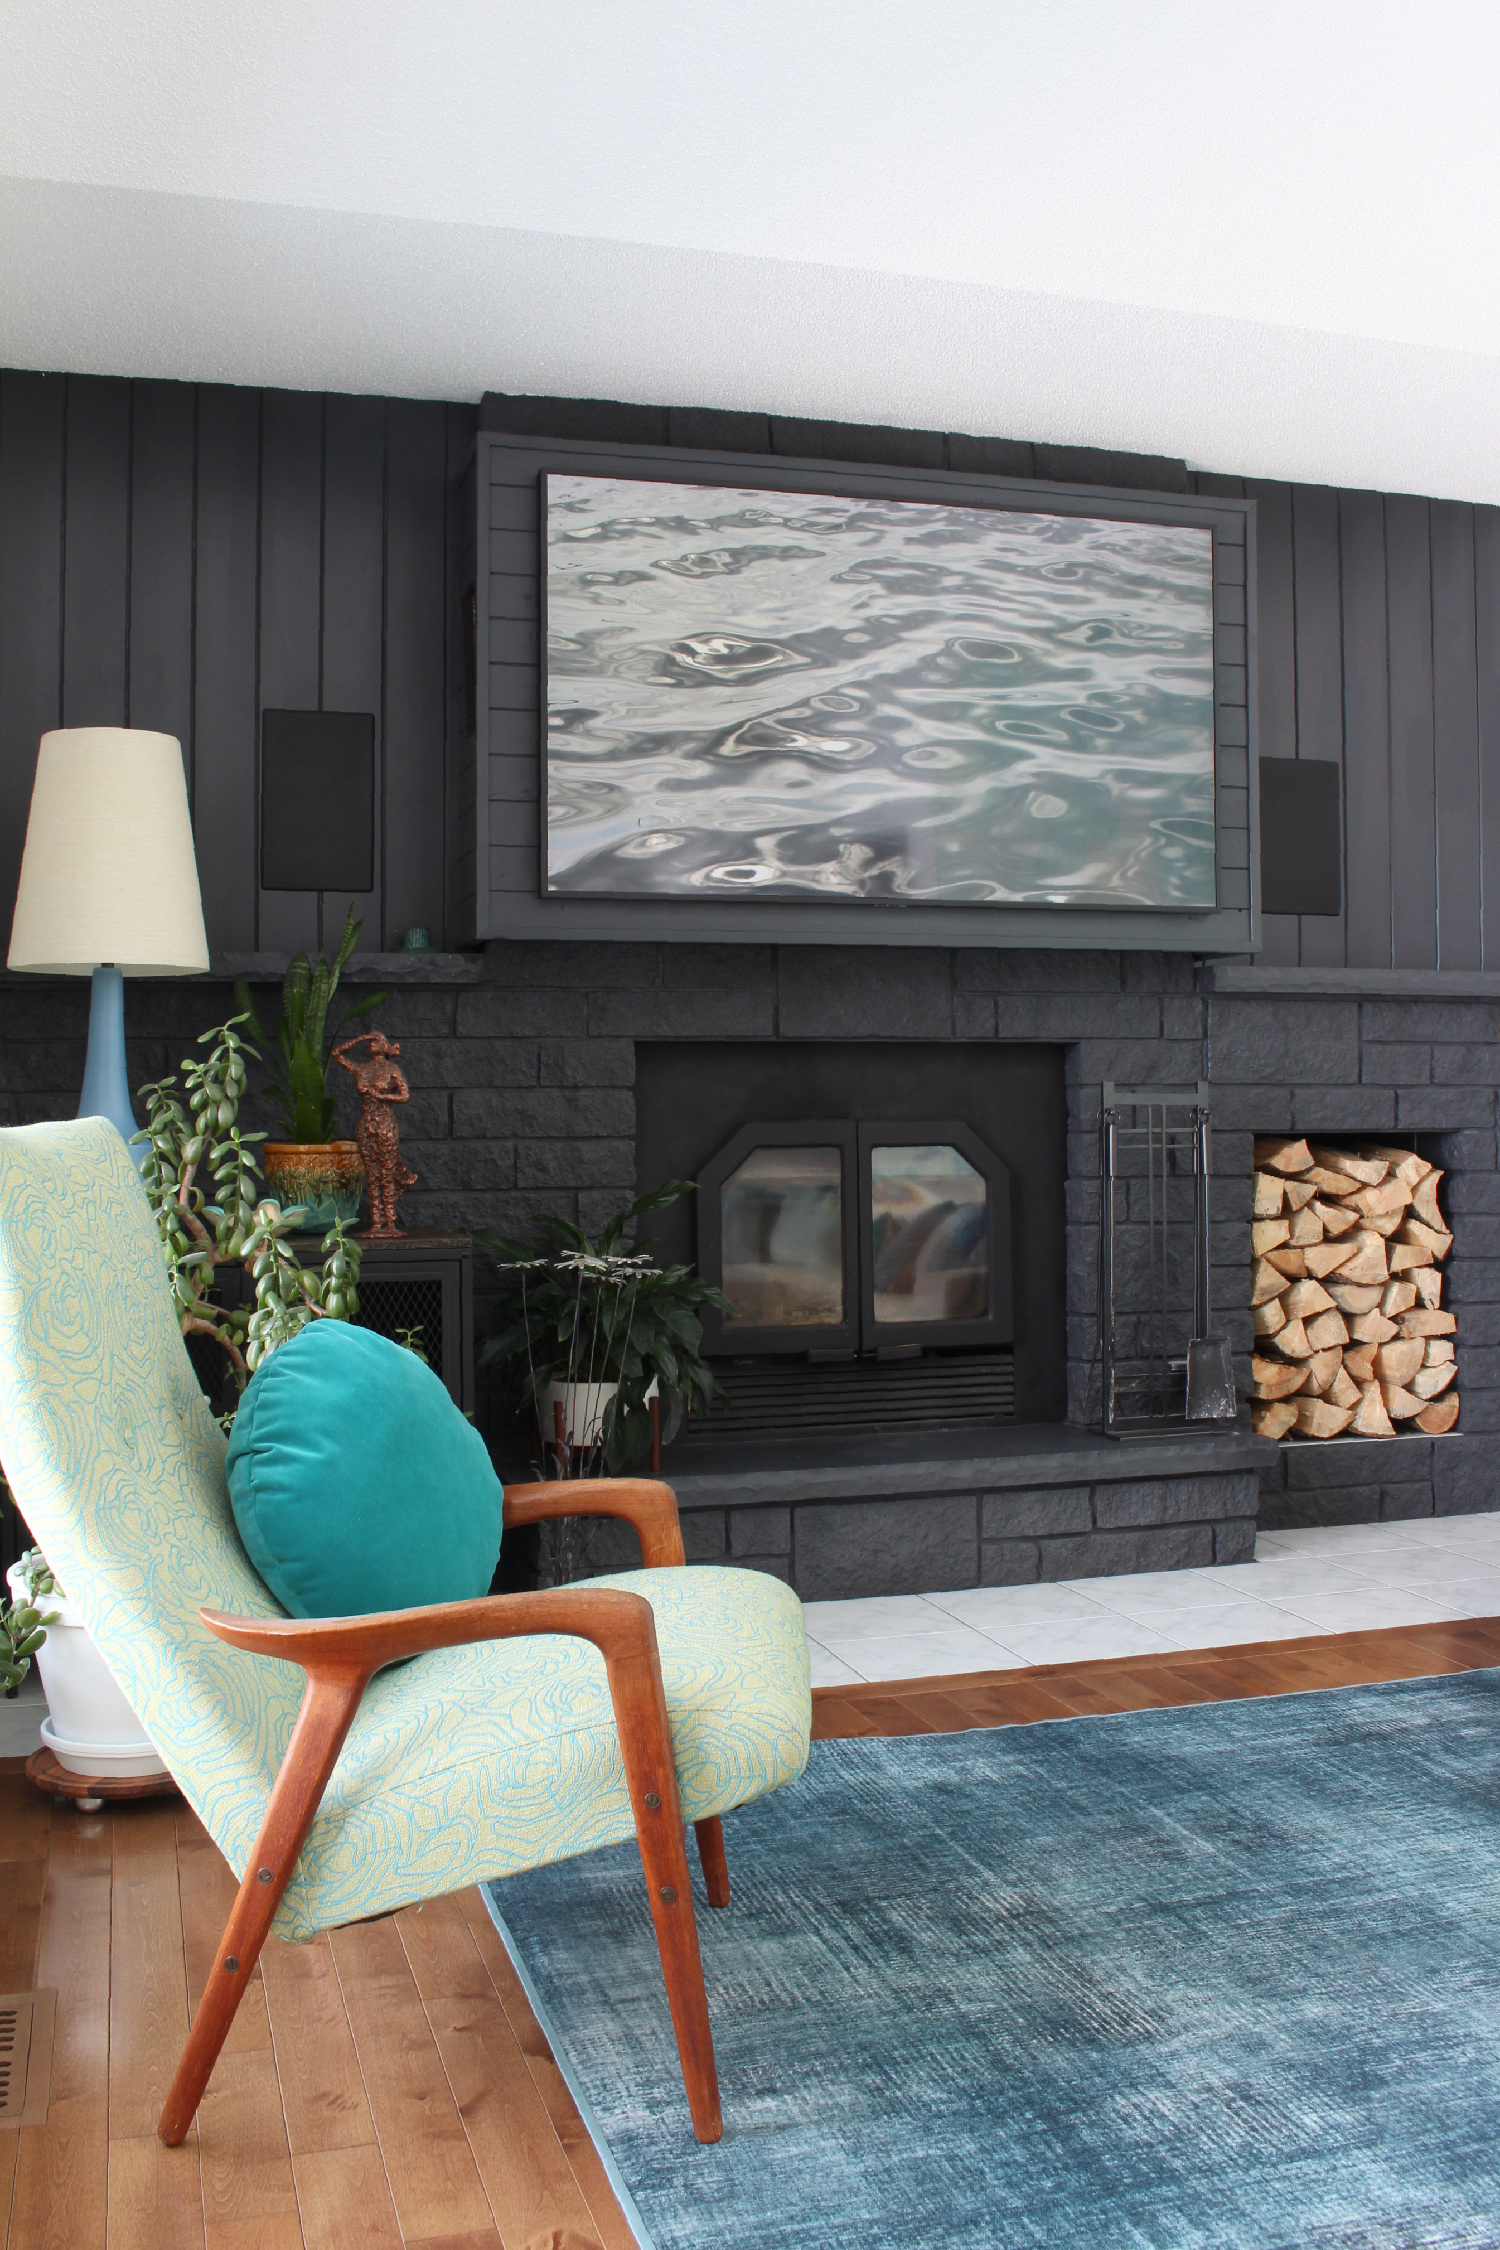
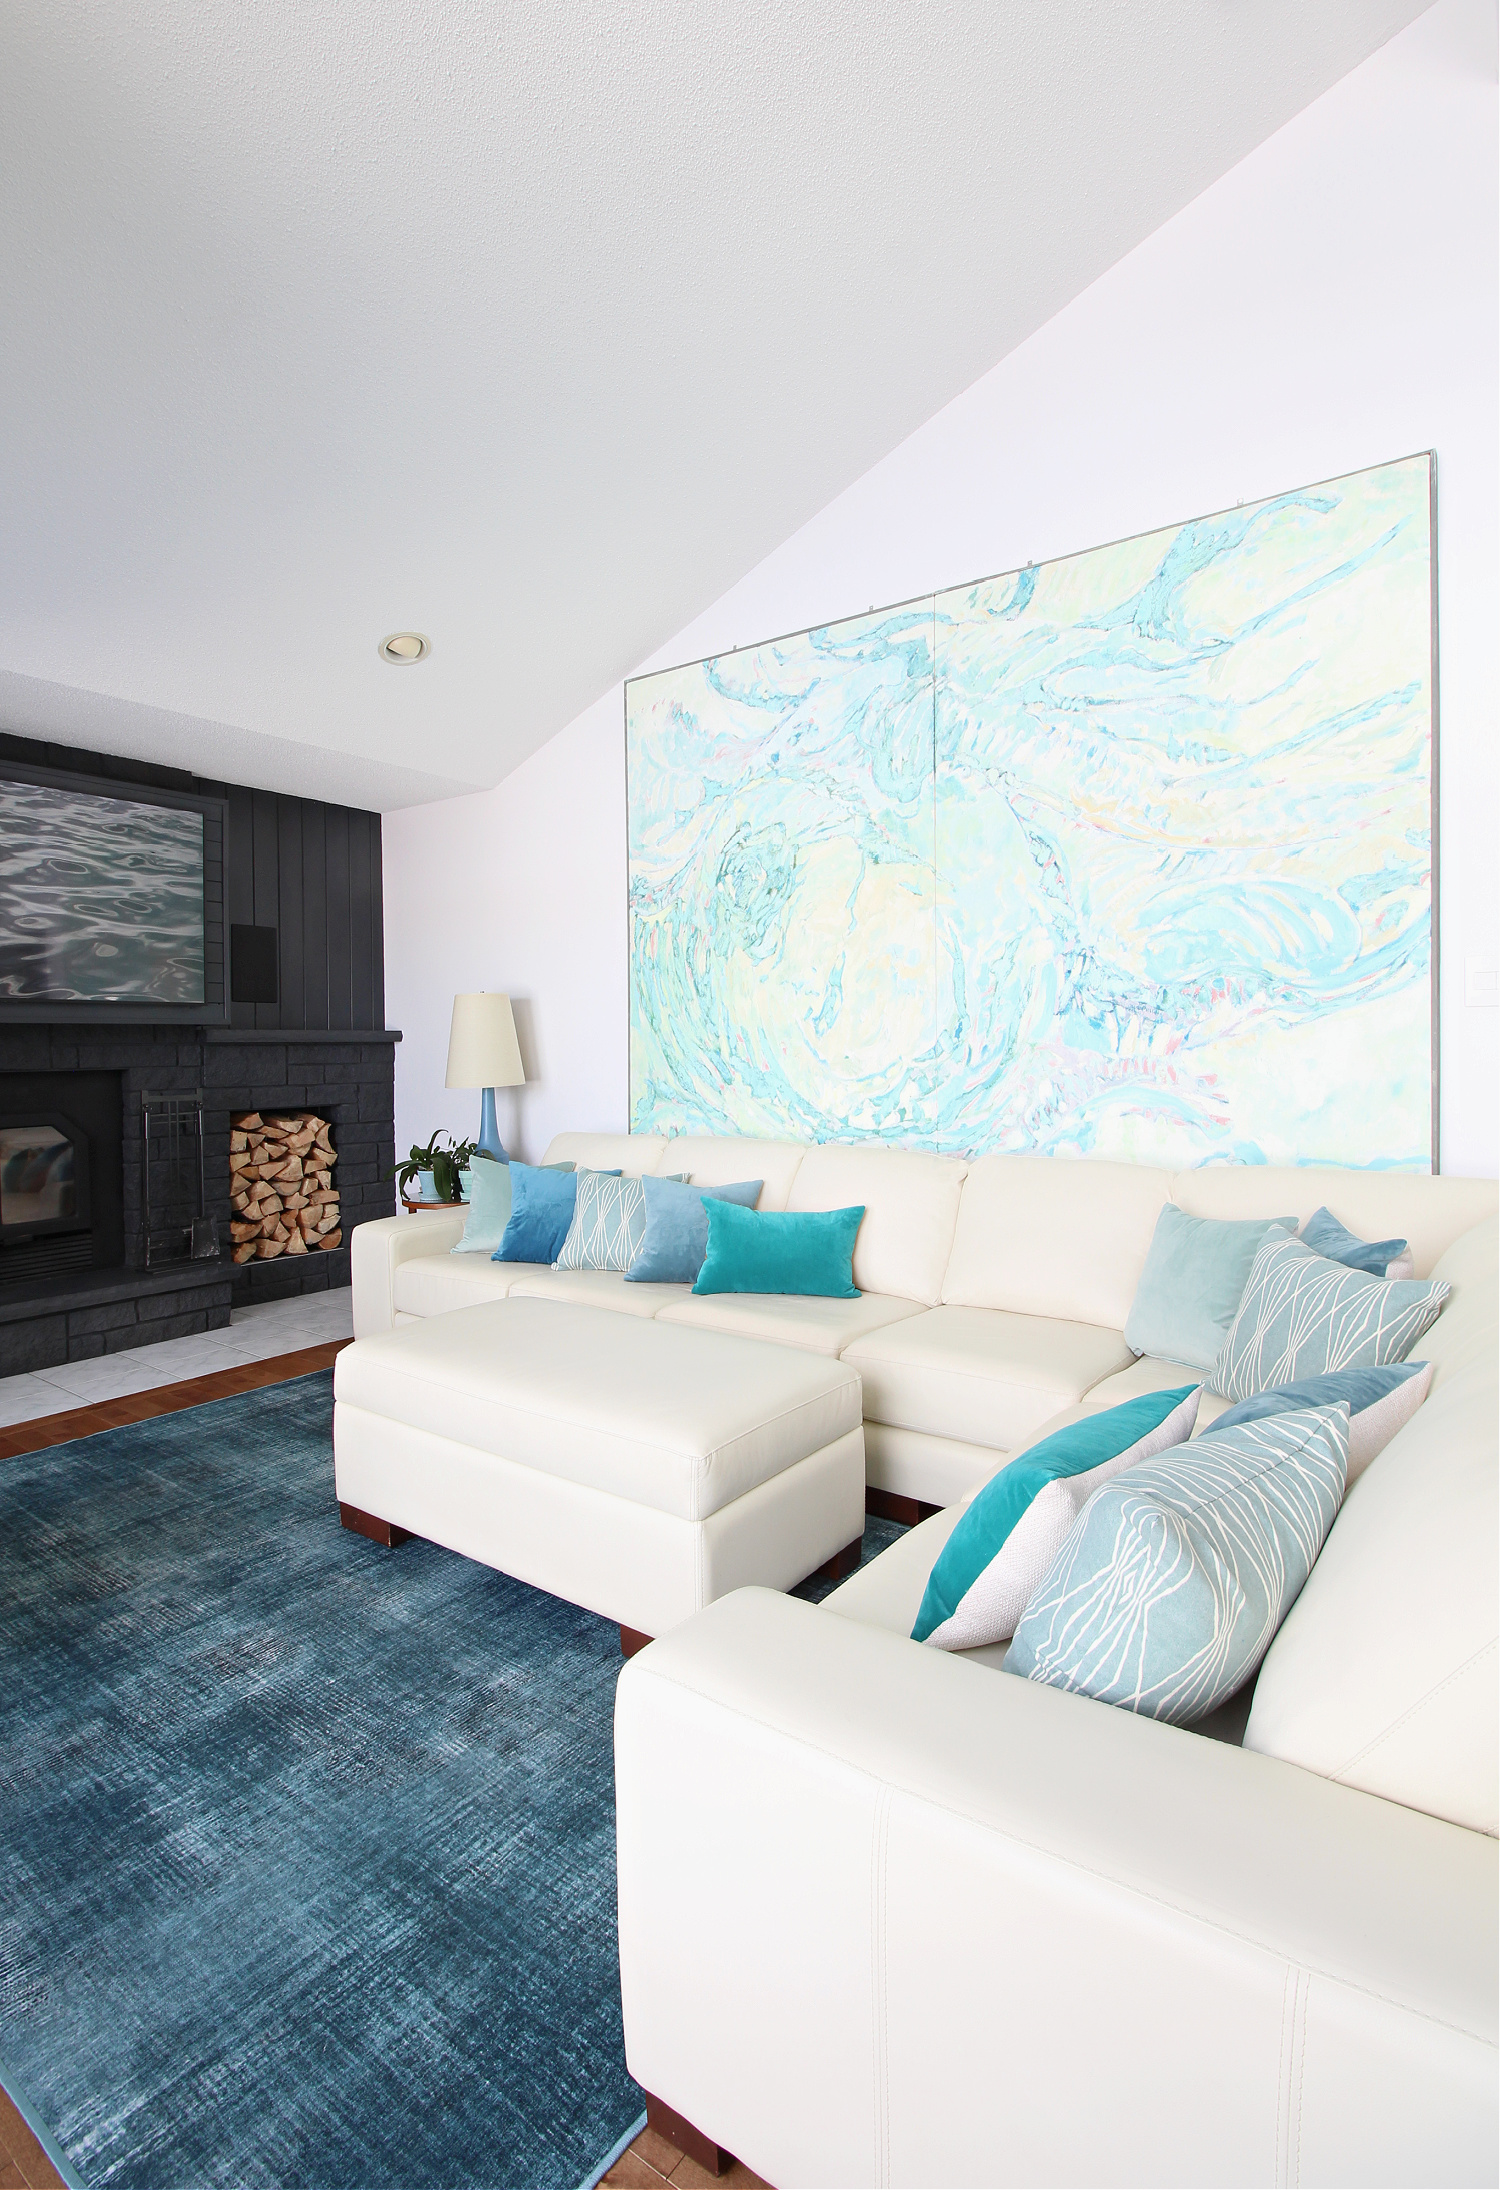

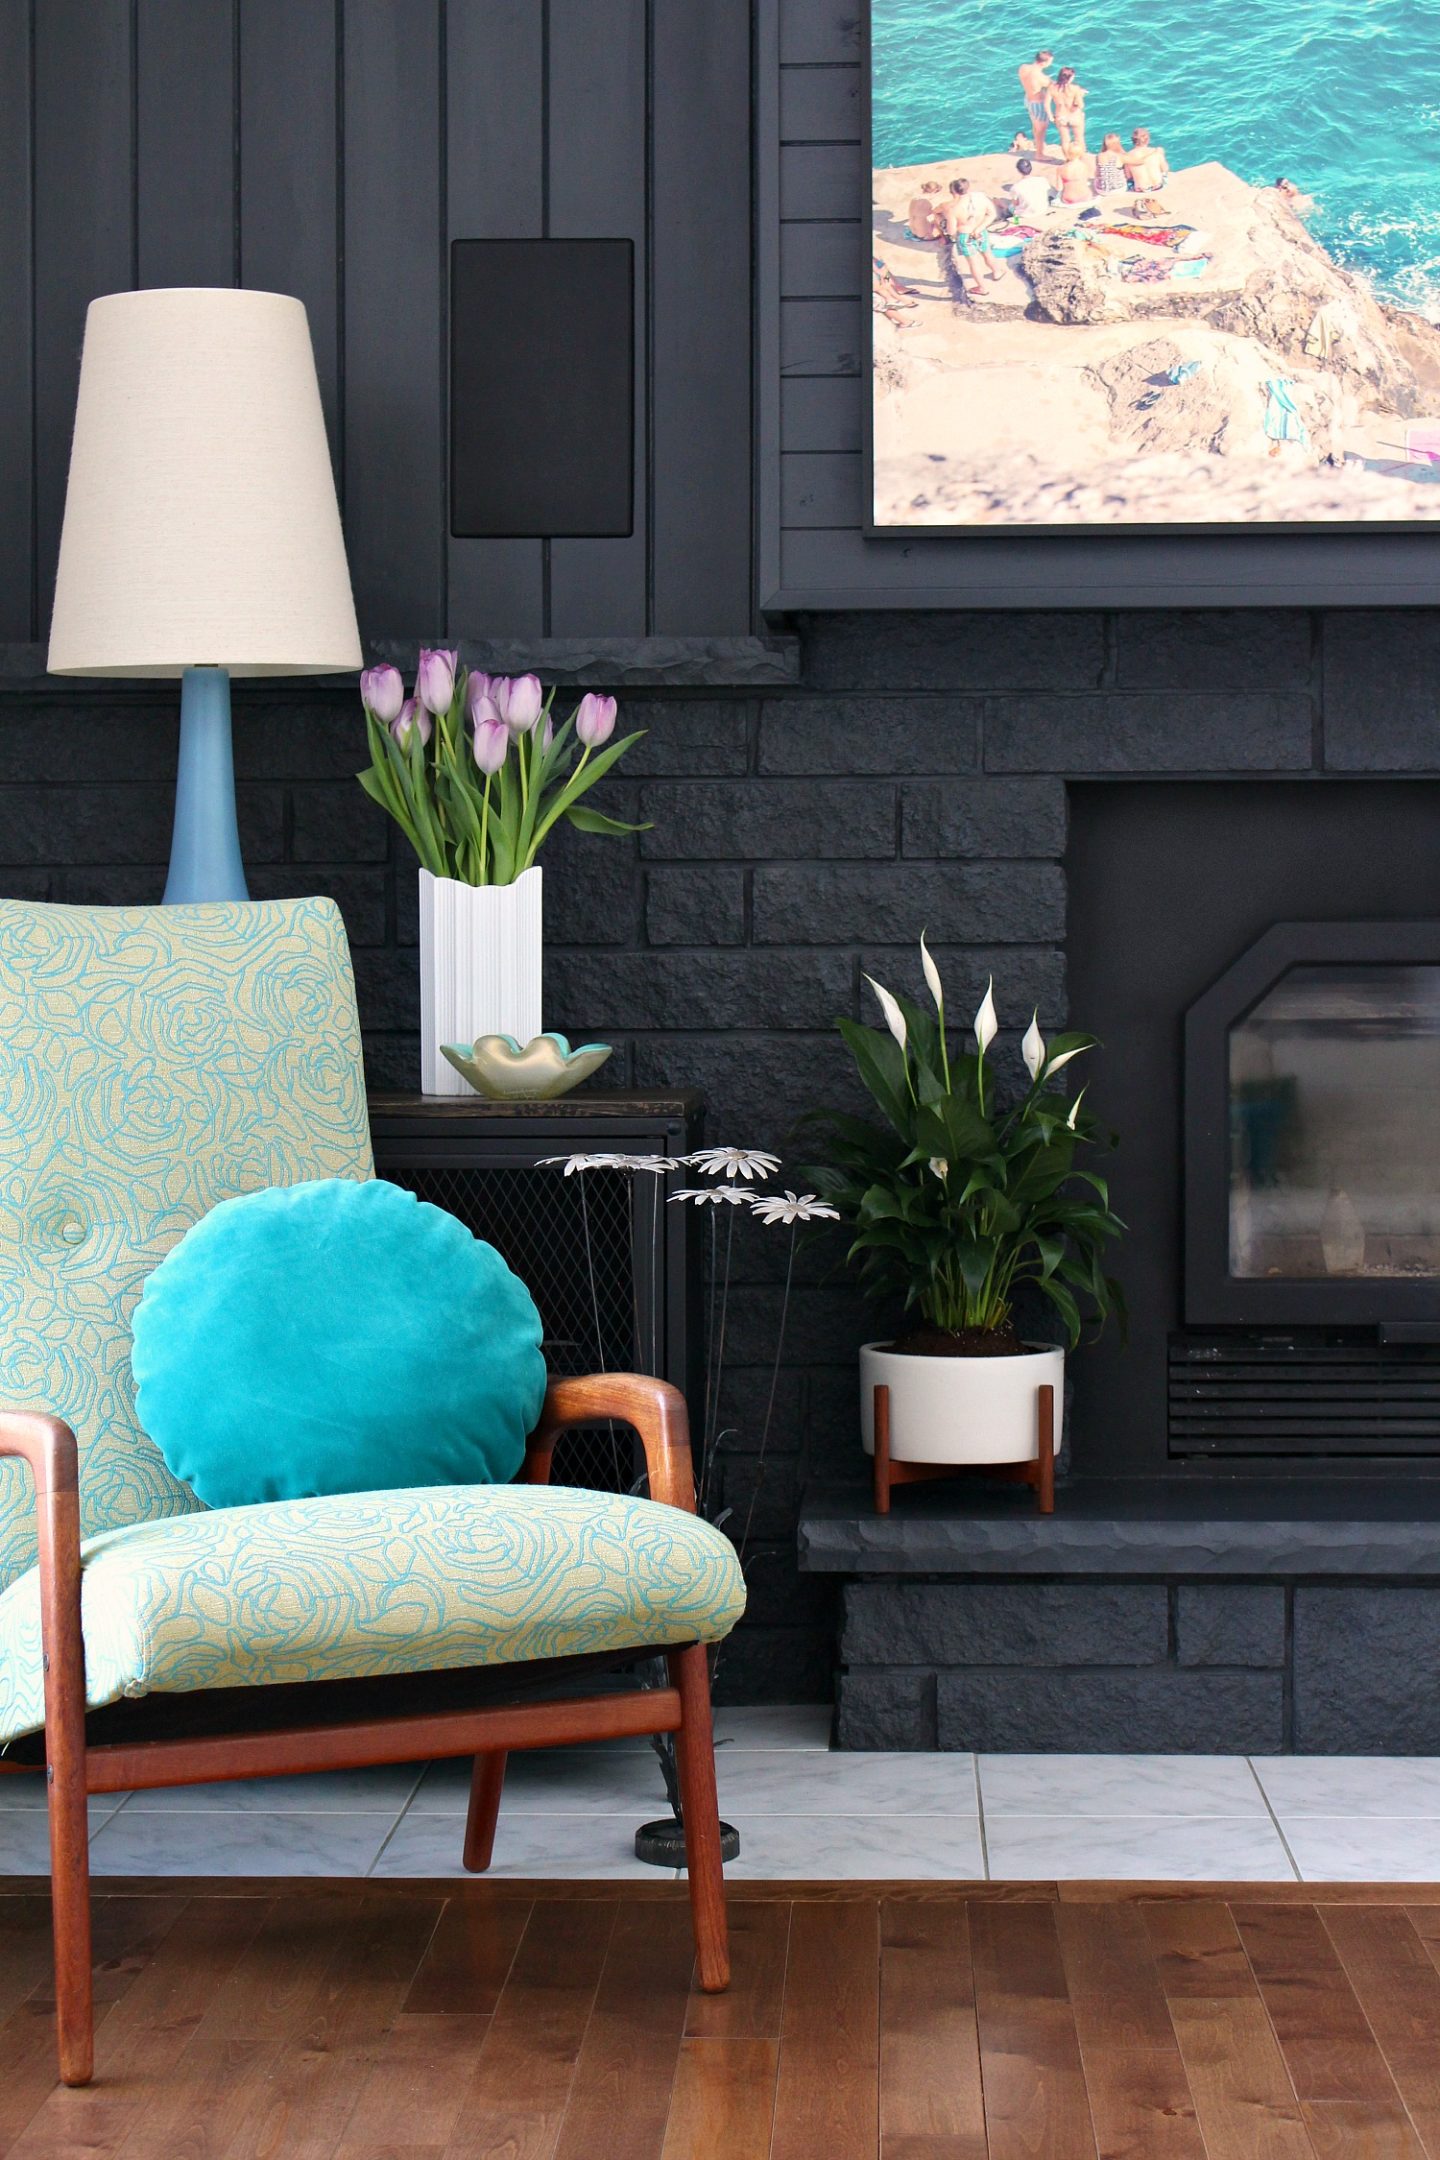
I found the mint green chair in the classifieds and had it reupholstered – you can see the before/after makeover here. Round velvet pillow is a DIY too.

VINTAGE CHAIR MAKEOVER | HOW TO HANG LARGE ART | DIY VELVET PILLOWS | DIY ROUND PILLOW | DIY PAINTED BRICK FIREPLACE | DIY FIREPLACE BUMP OUT HACK
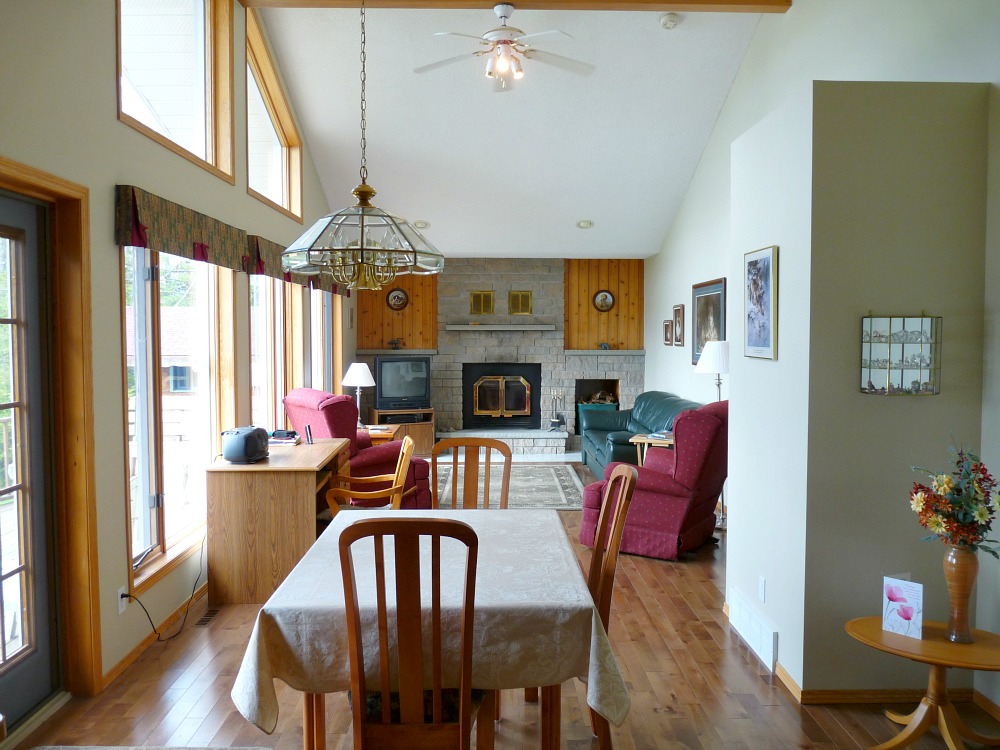
THE DINING ROOM – BEFORE
Like most of the spaces, the dining room has evolved over time. Here’s the before:
Before
Before
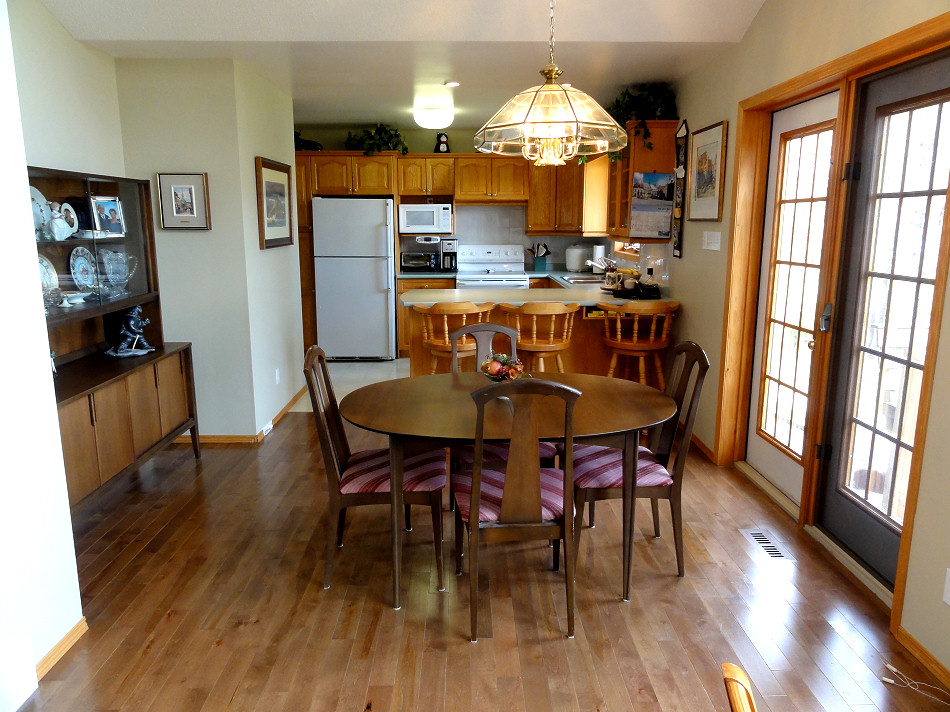
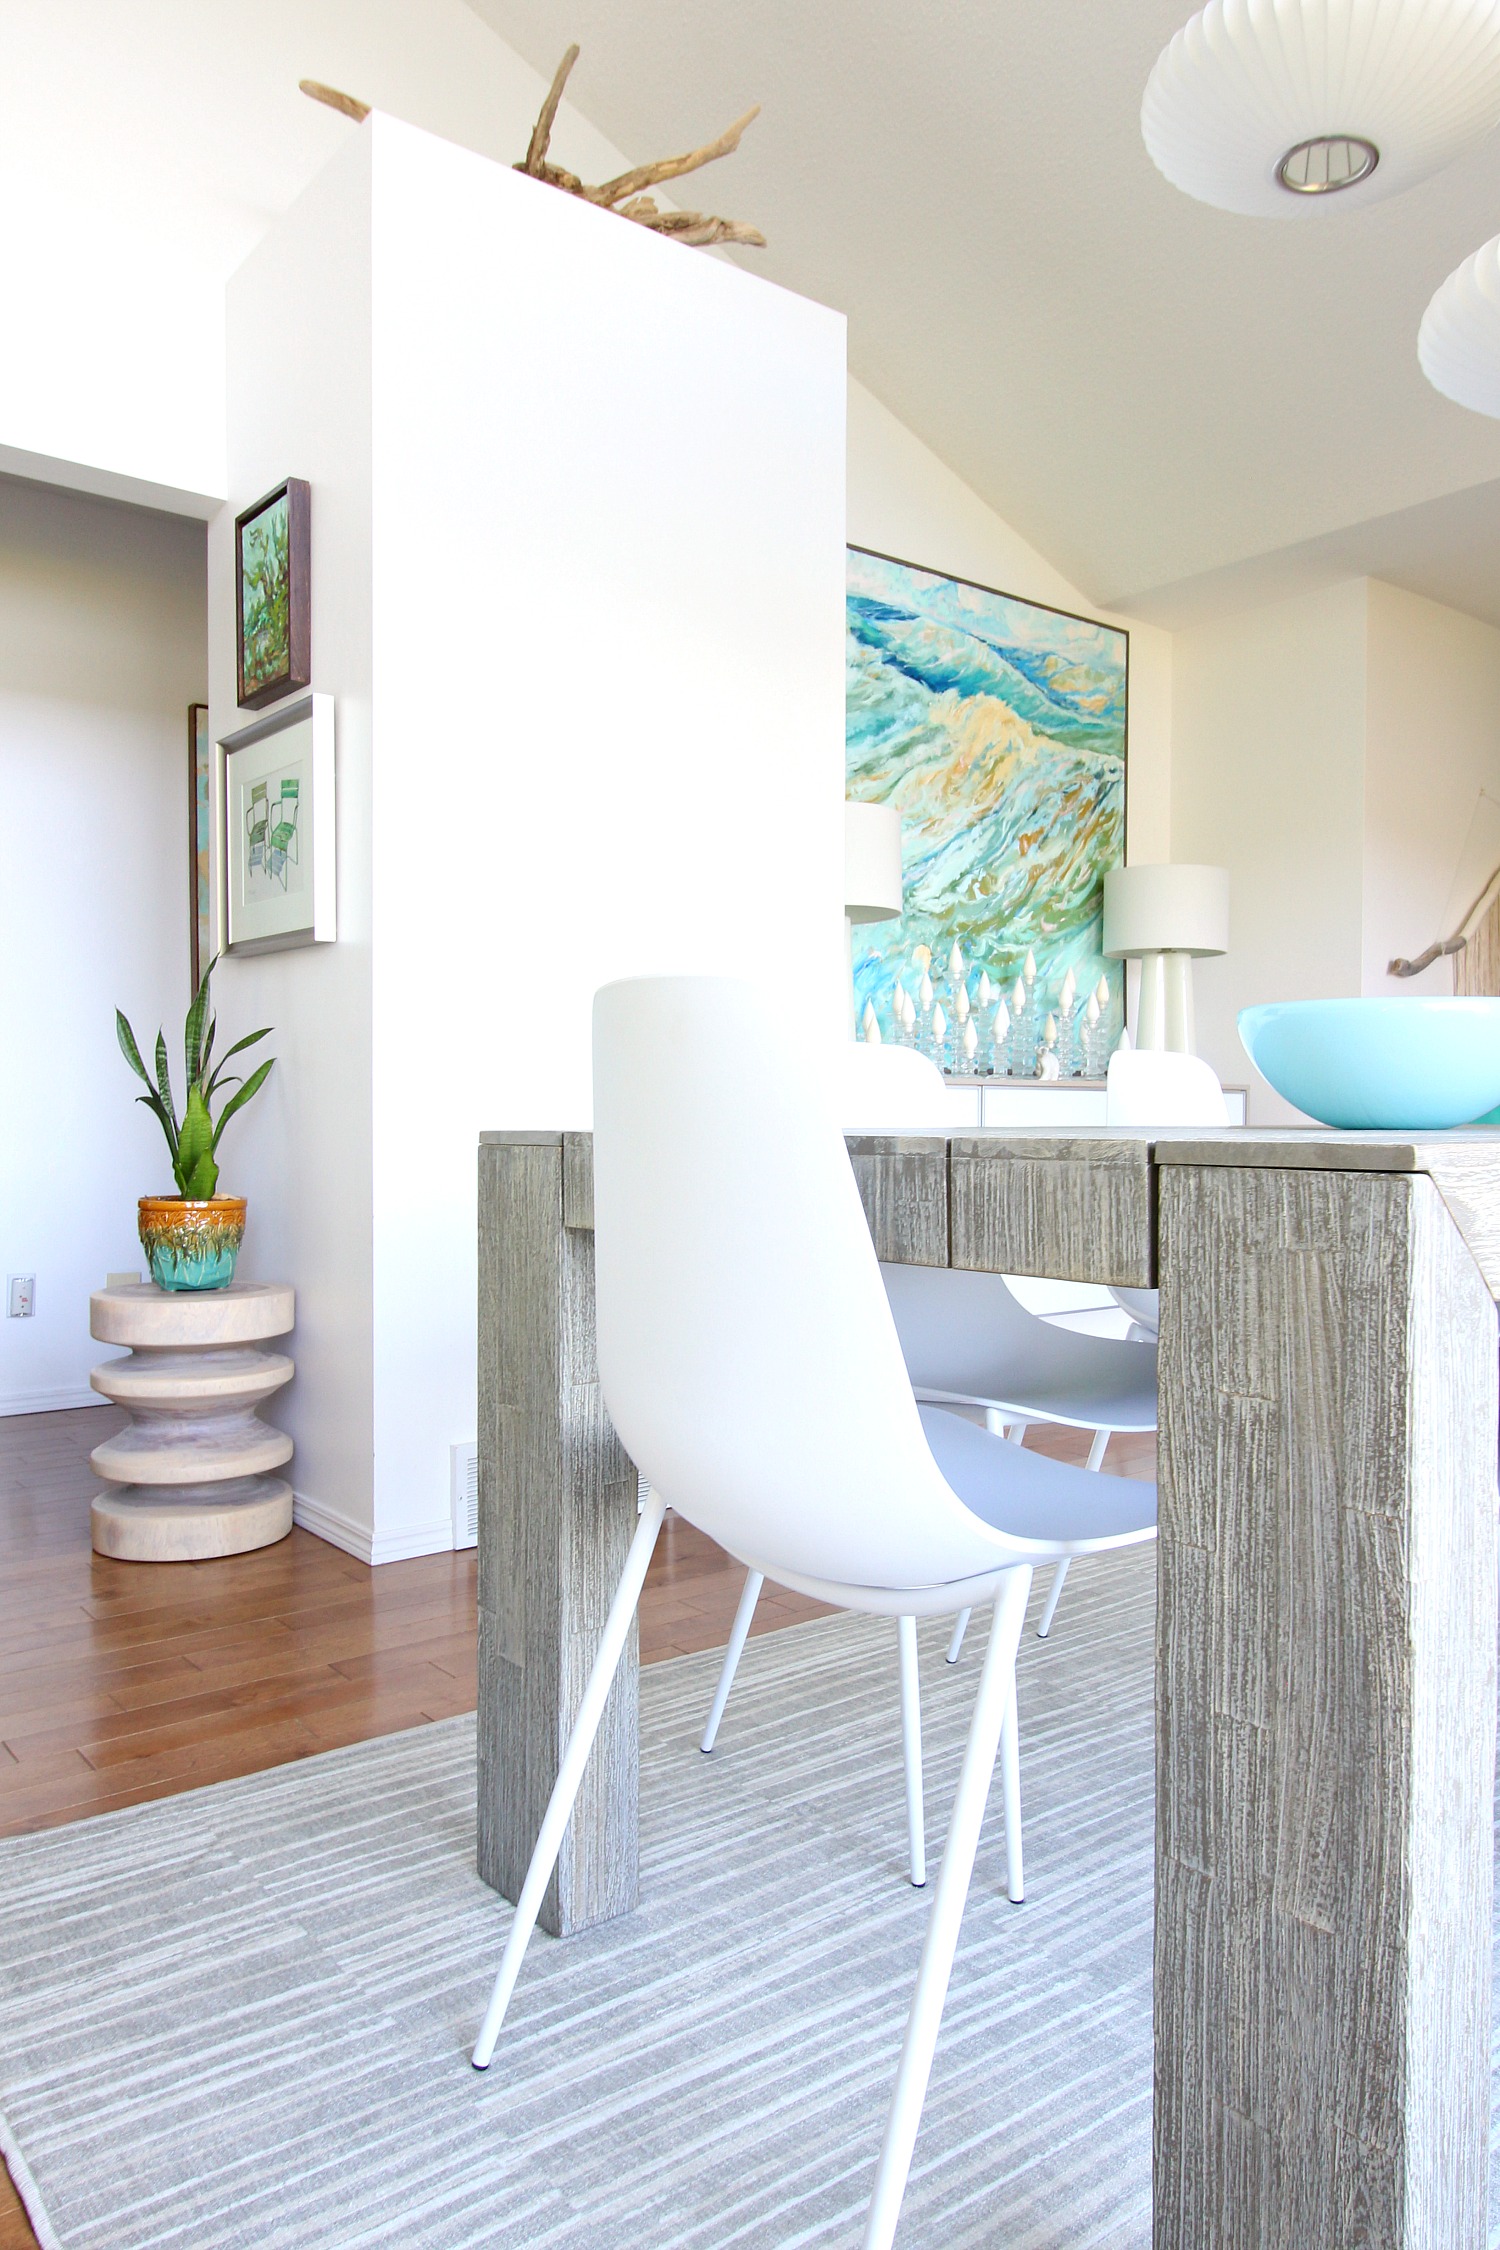
THE DINING ROOM – AFTER
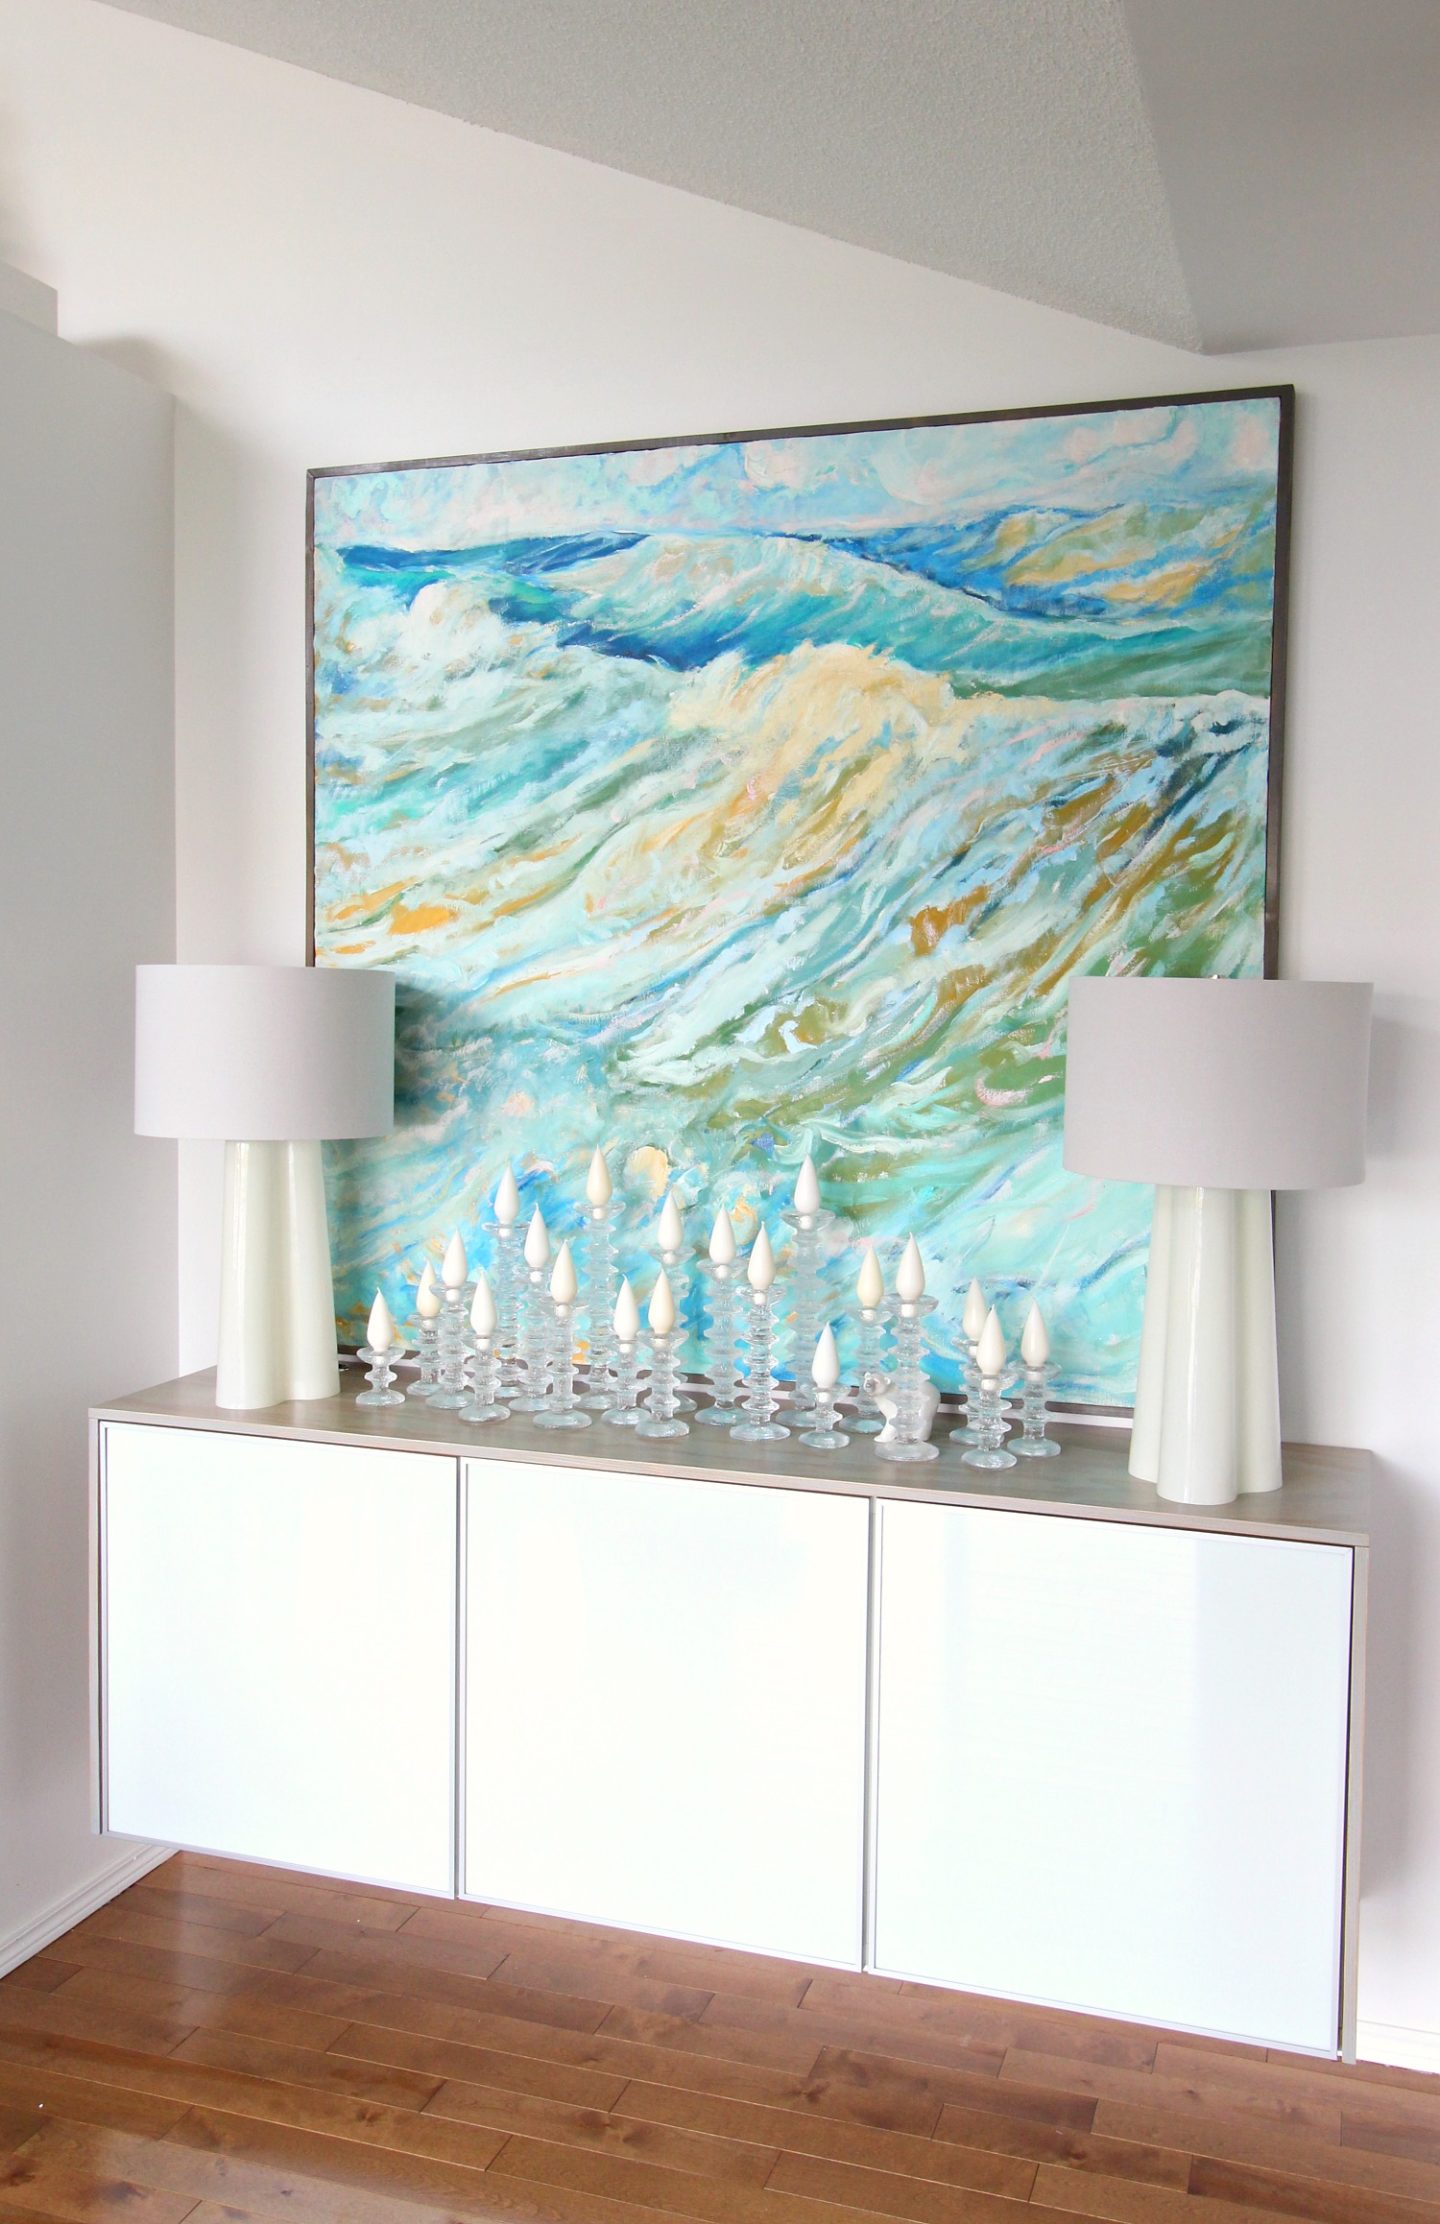
I immediately changed the light fixture, choosing the triple bubble light from Modernica. It suits the 13 foot tall ceiling and looks like a sculpture during the day – at night, it lights up the dining room so beautifully. We created a floating credenza using three Ikea cabinets which we finished off with a DIY waterfall top and sides, made from grey-stained Carribean pine plywood. See the tutorial here. After realizing our MCM teak table was too much work, we opted for an outdoor table and easy-to-wipe chairs – this has been a GAME changer.
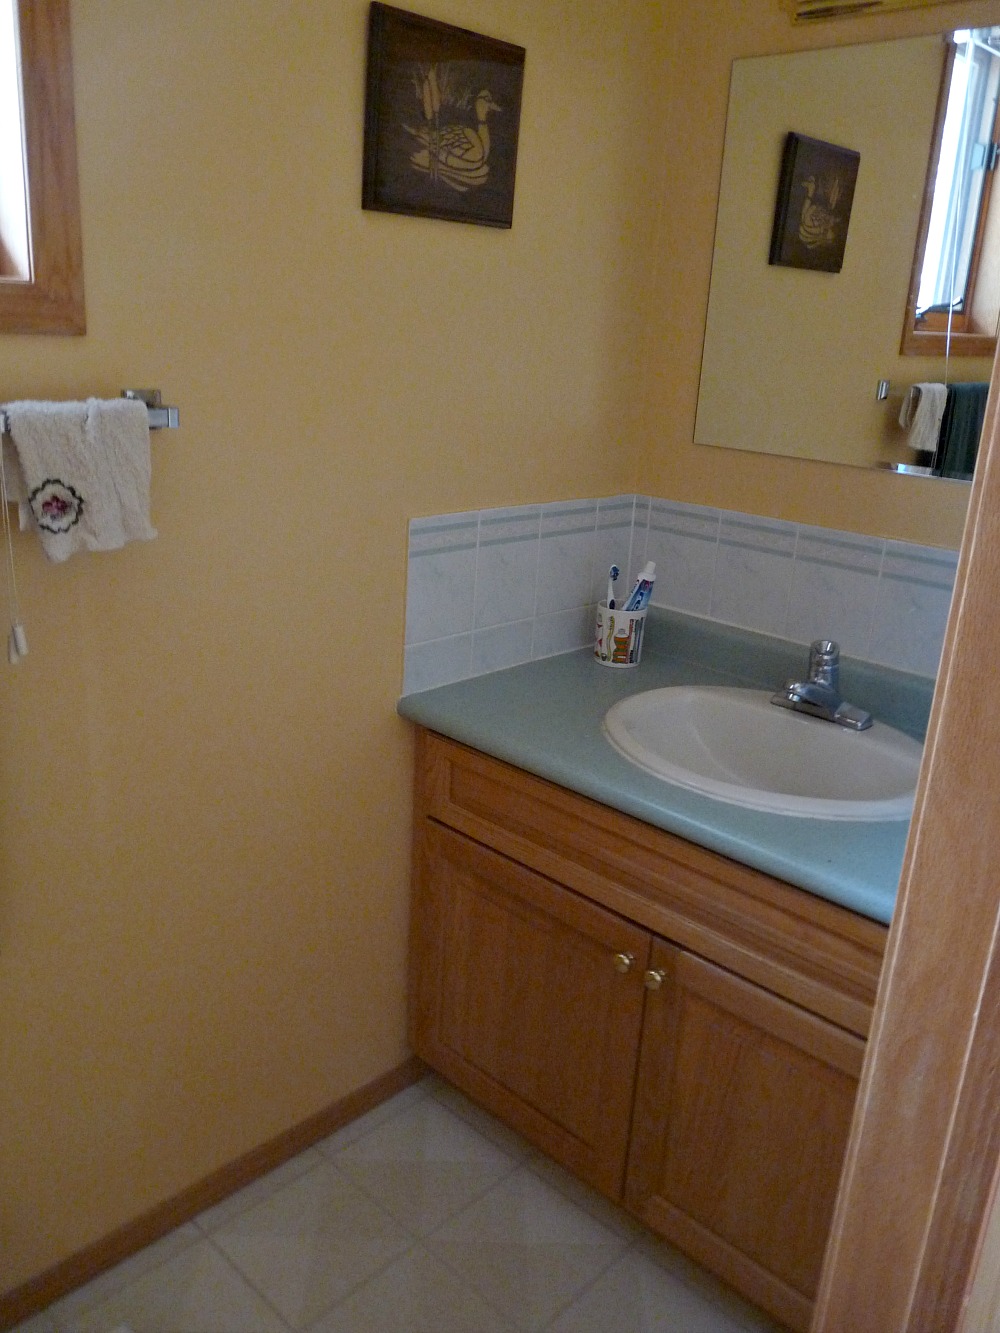
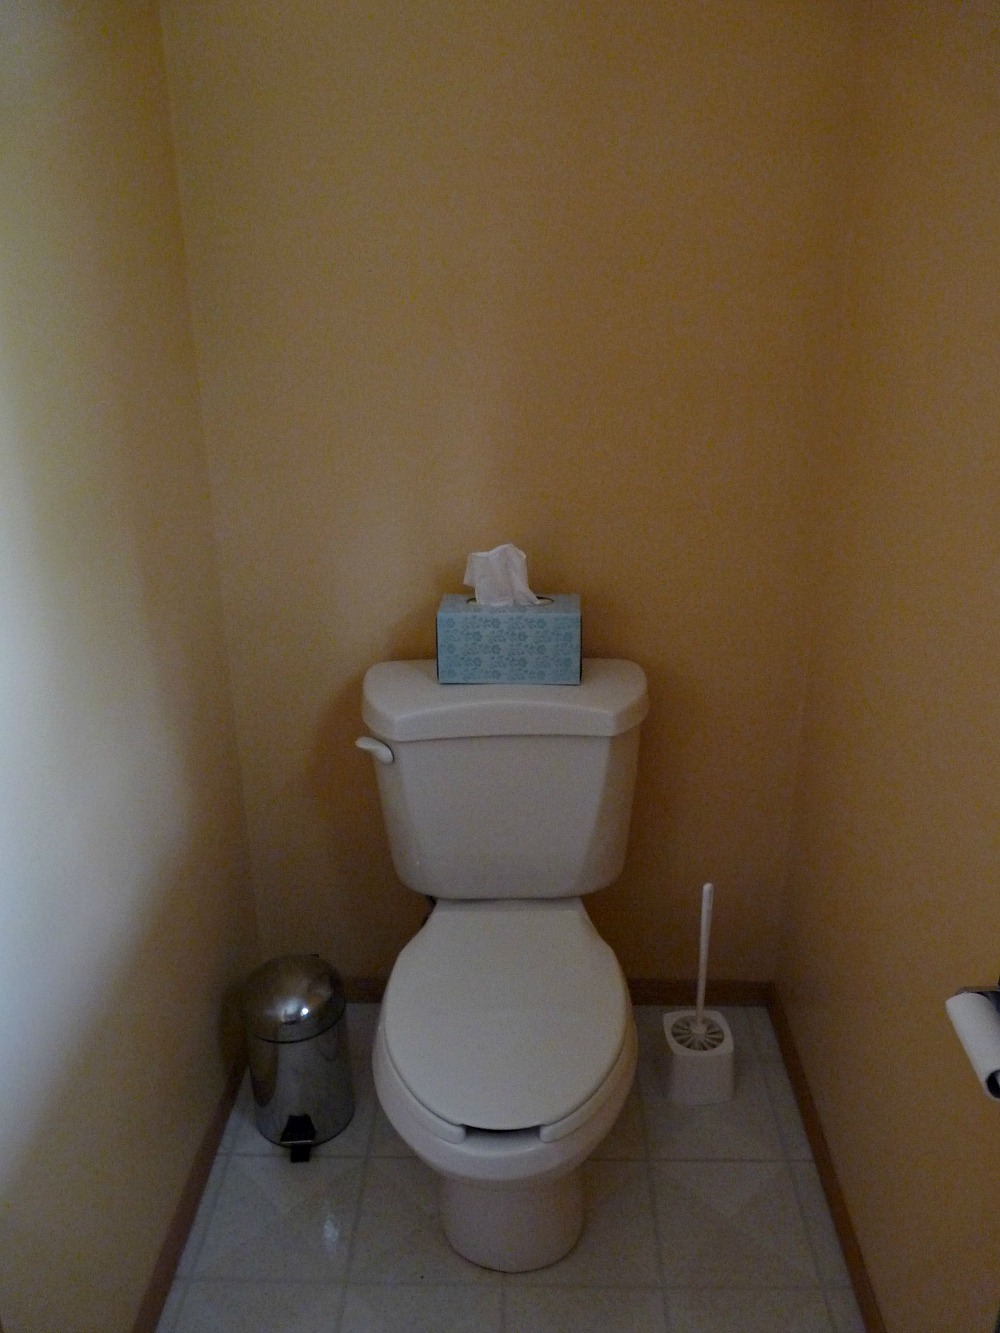
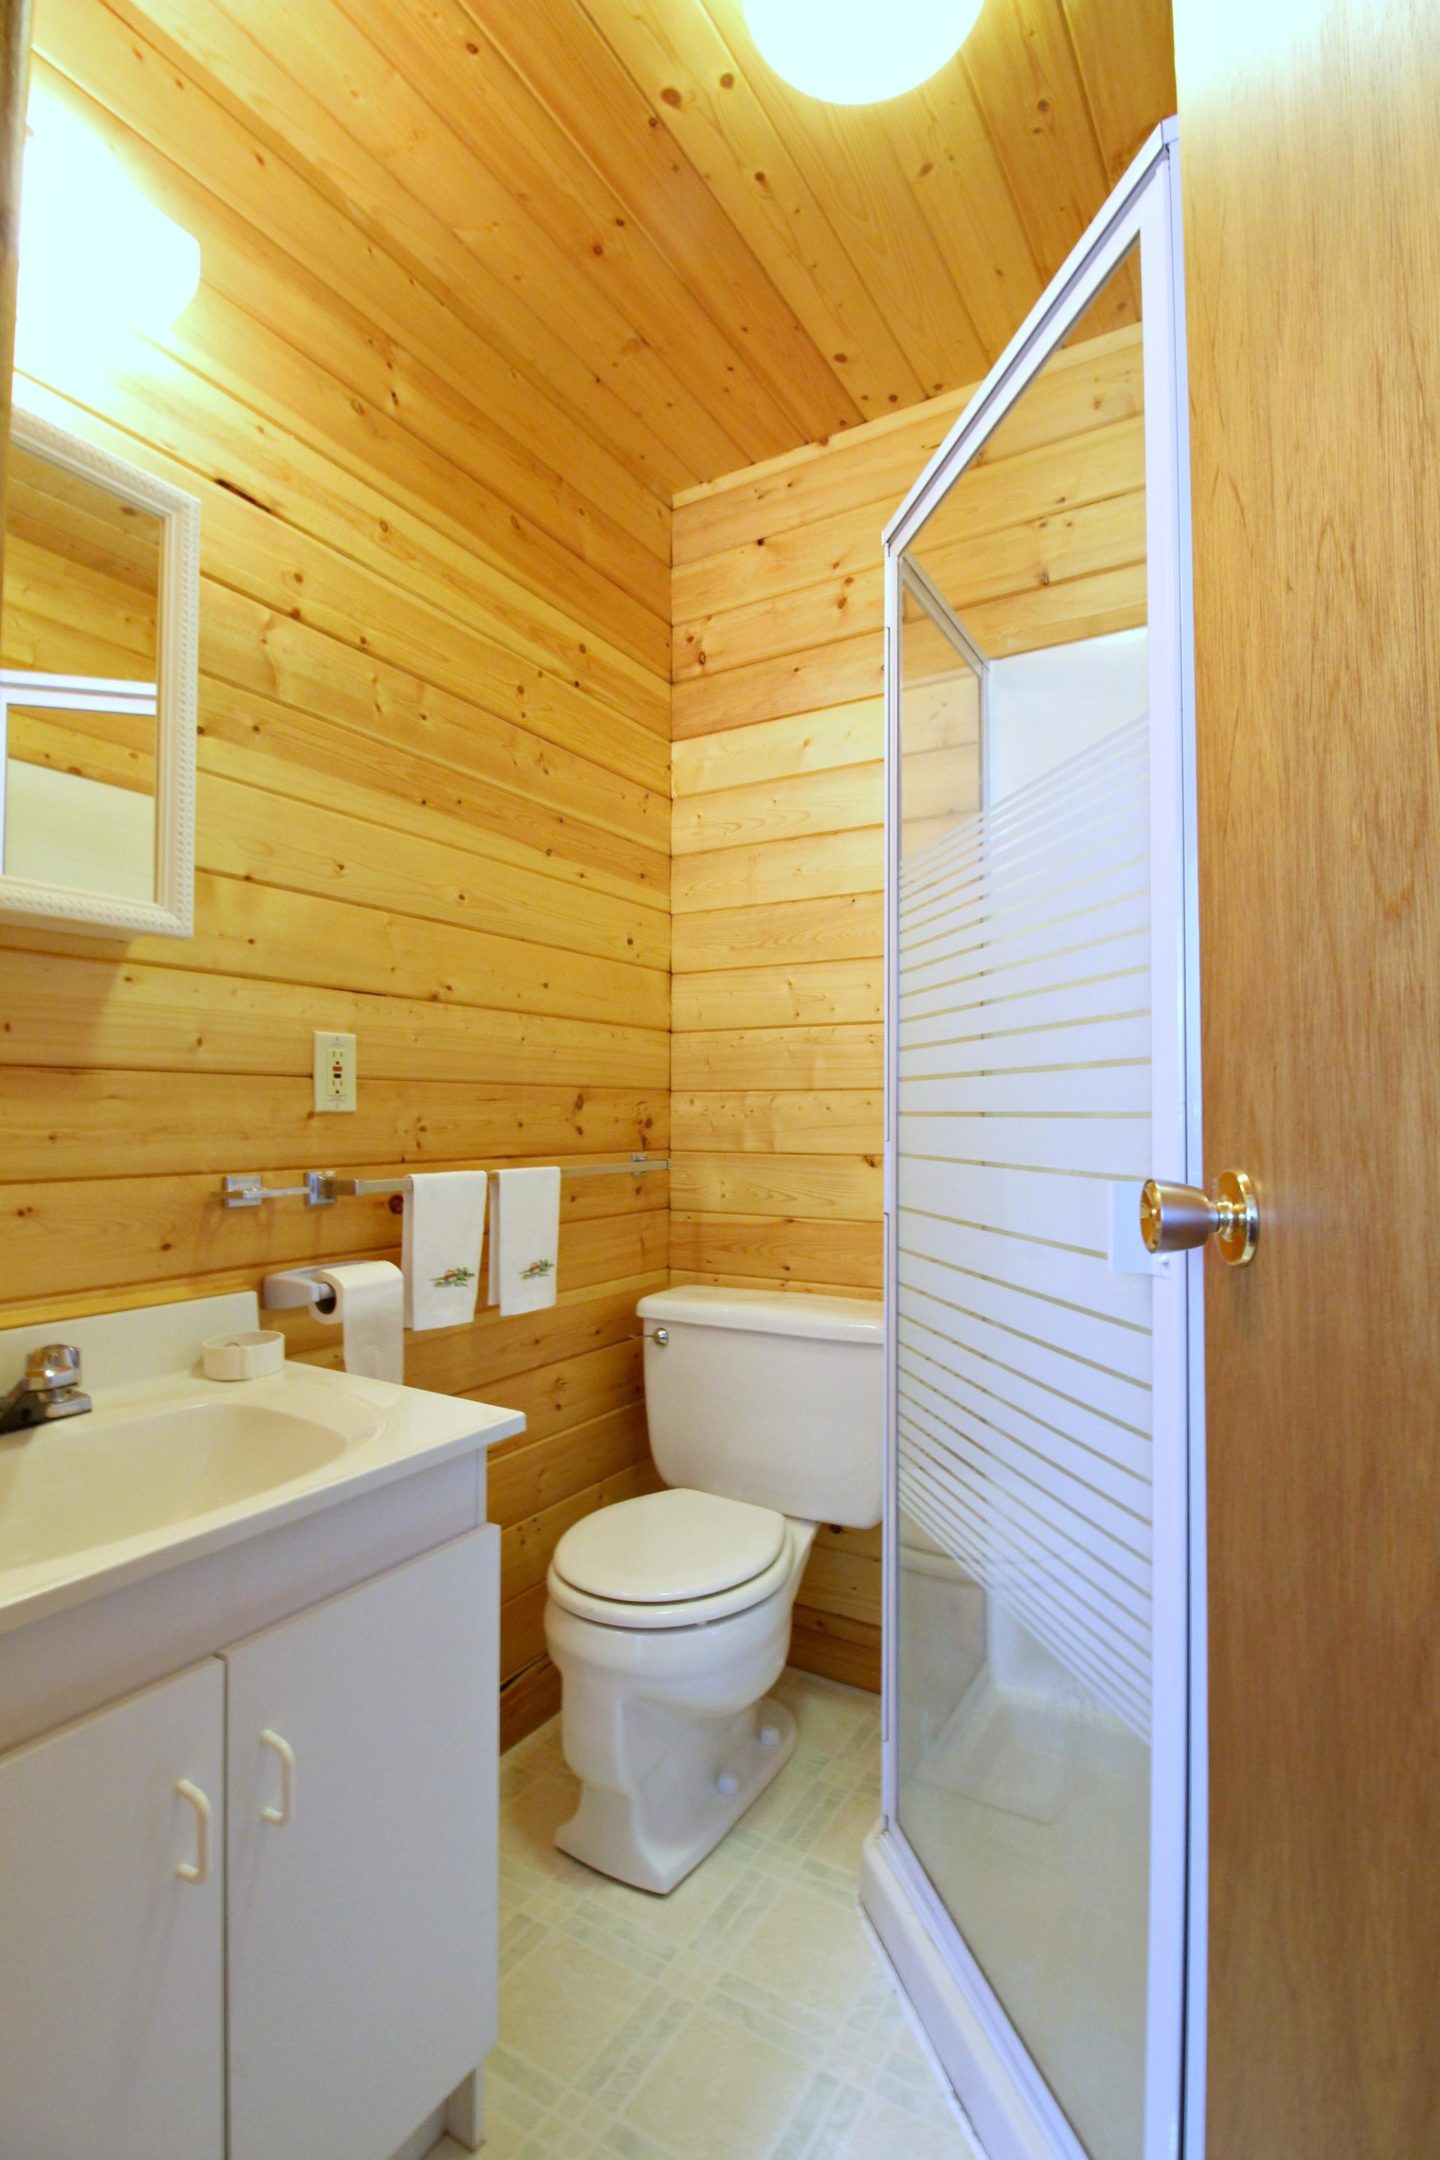
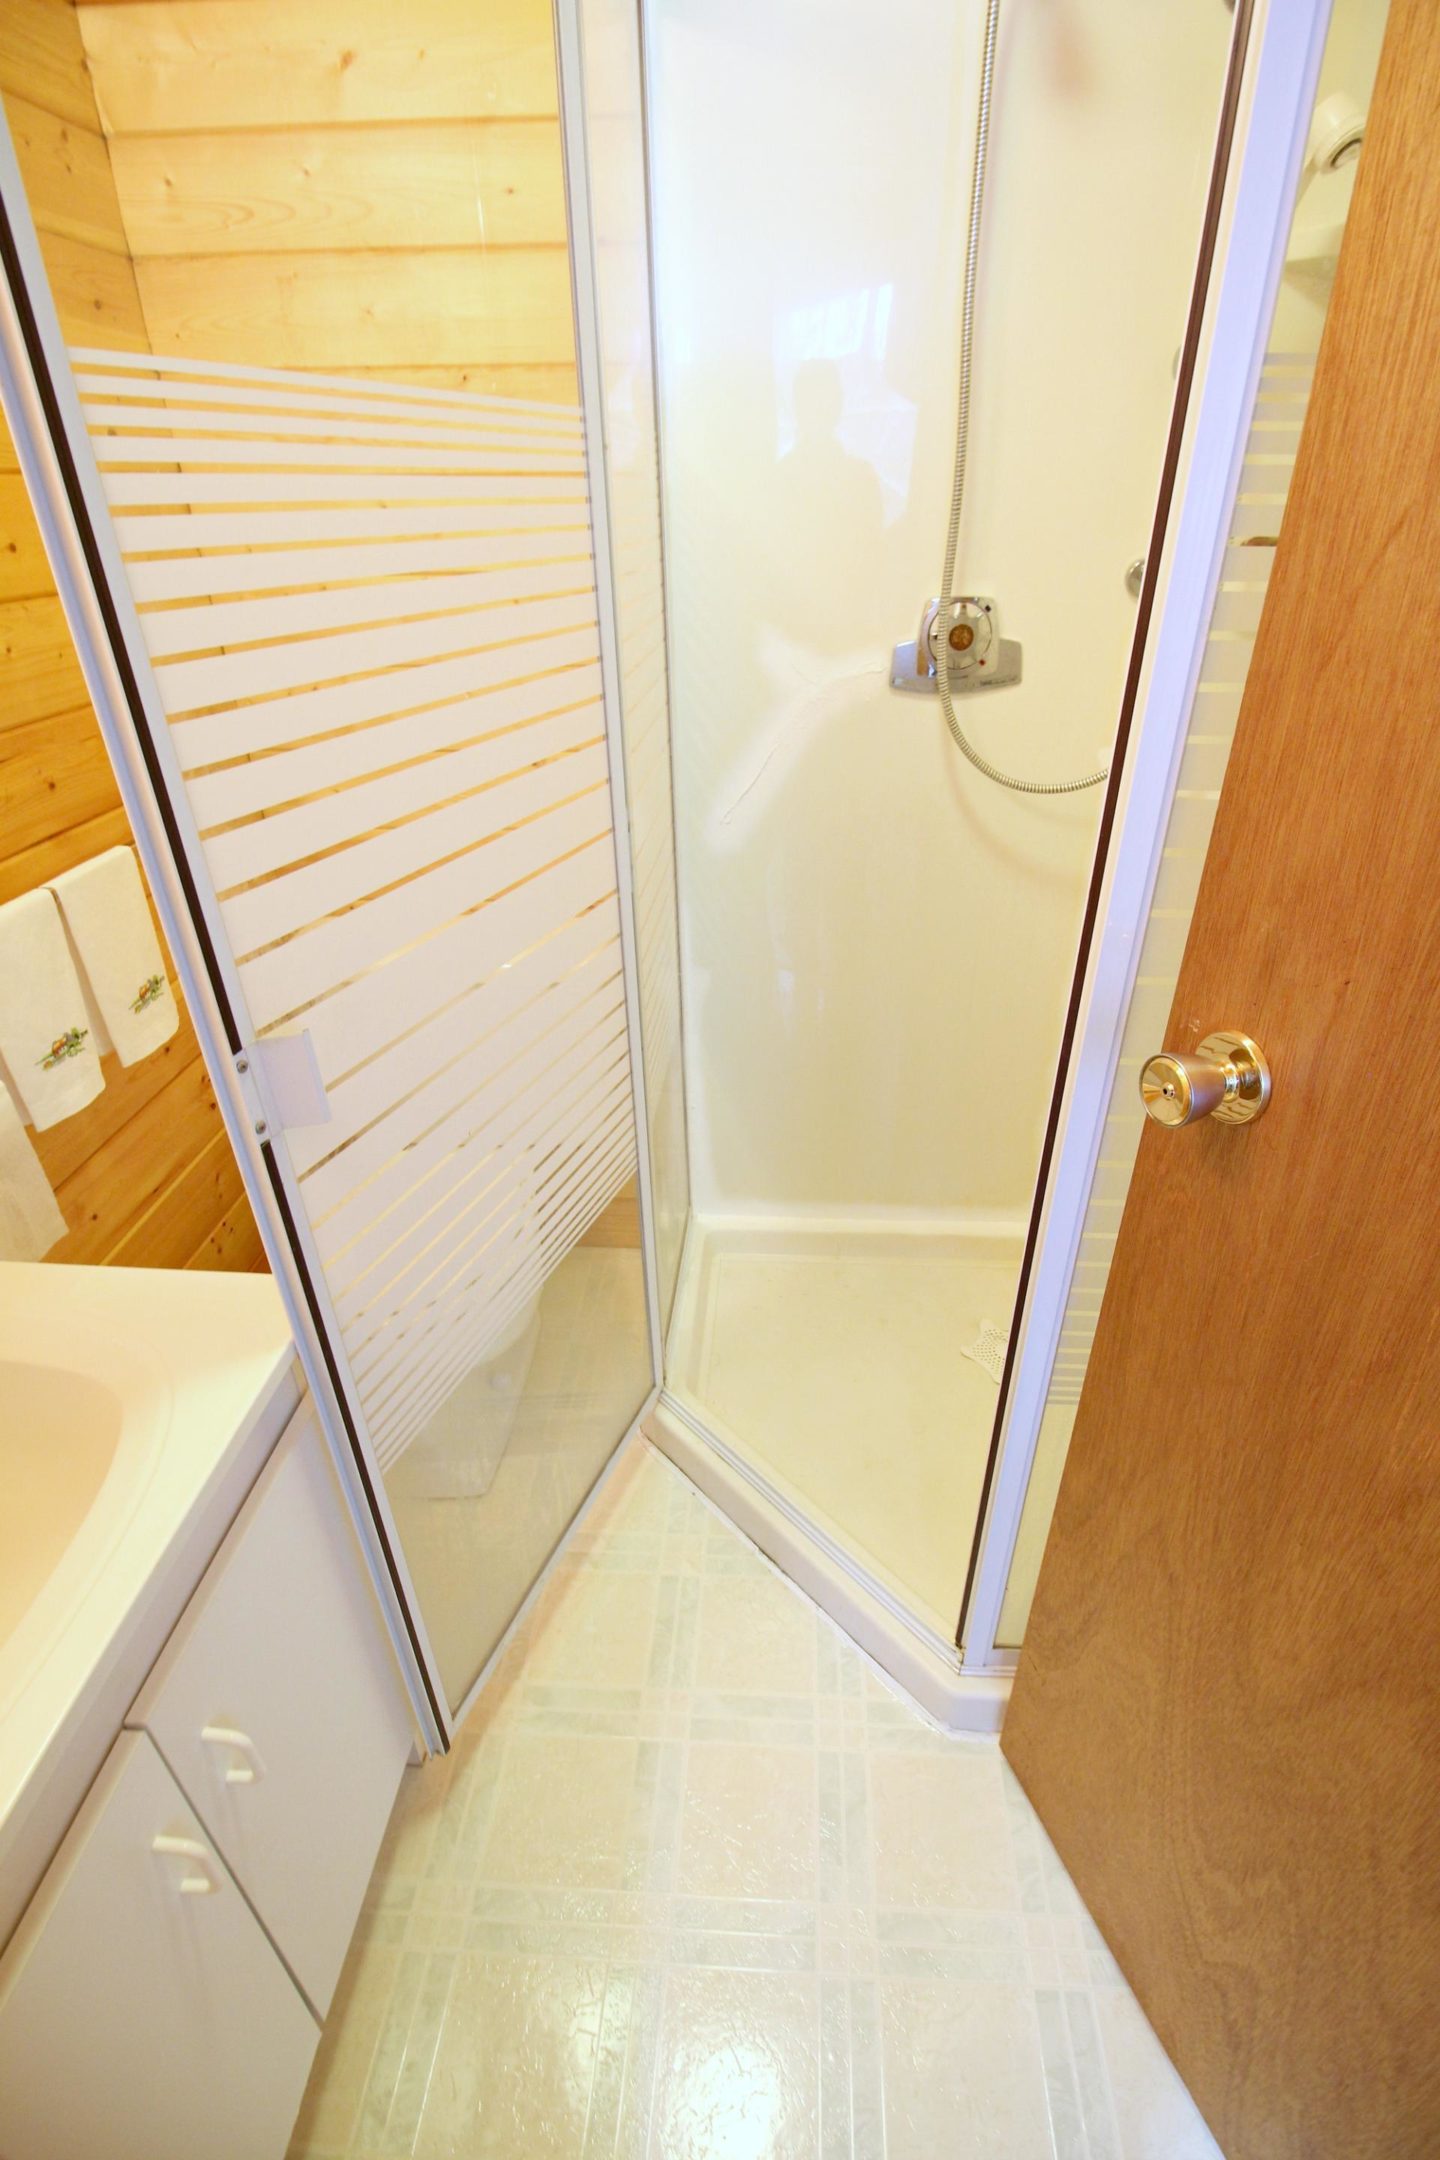
THE MAIN BATHROOM – BEFORE
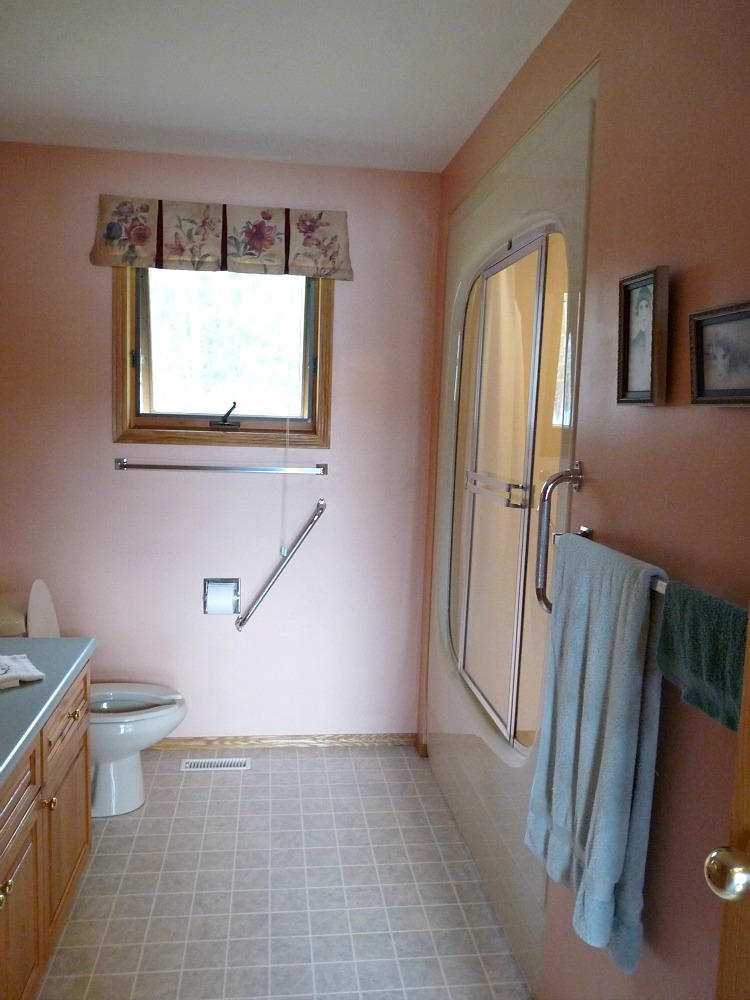
Before
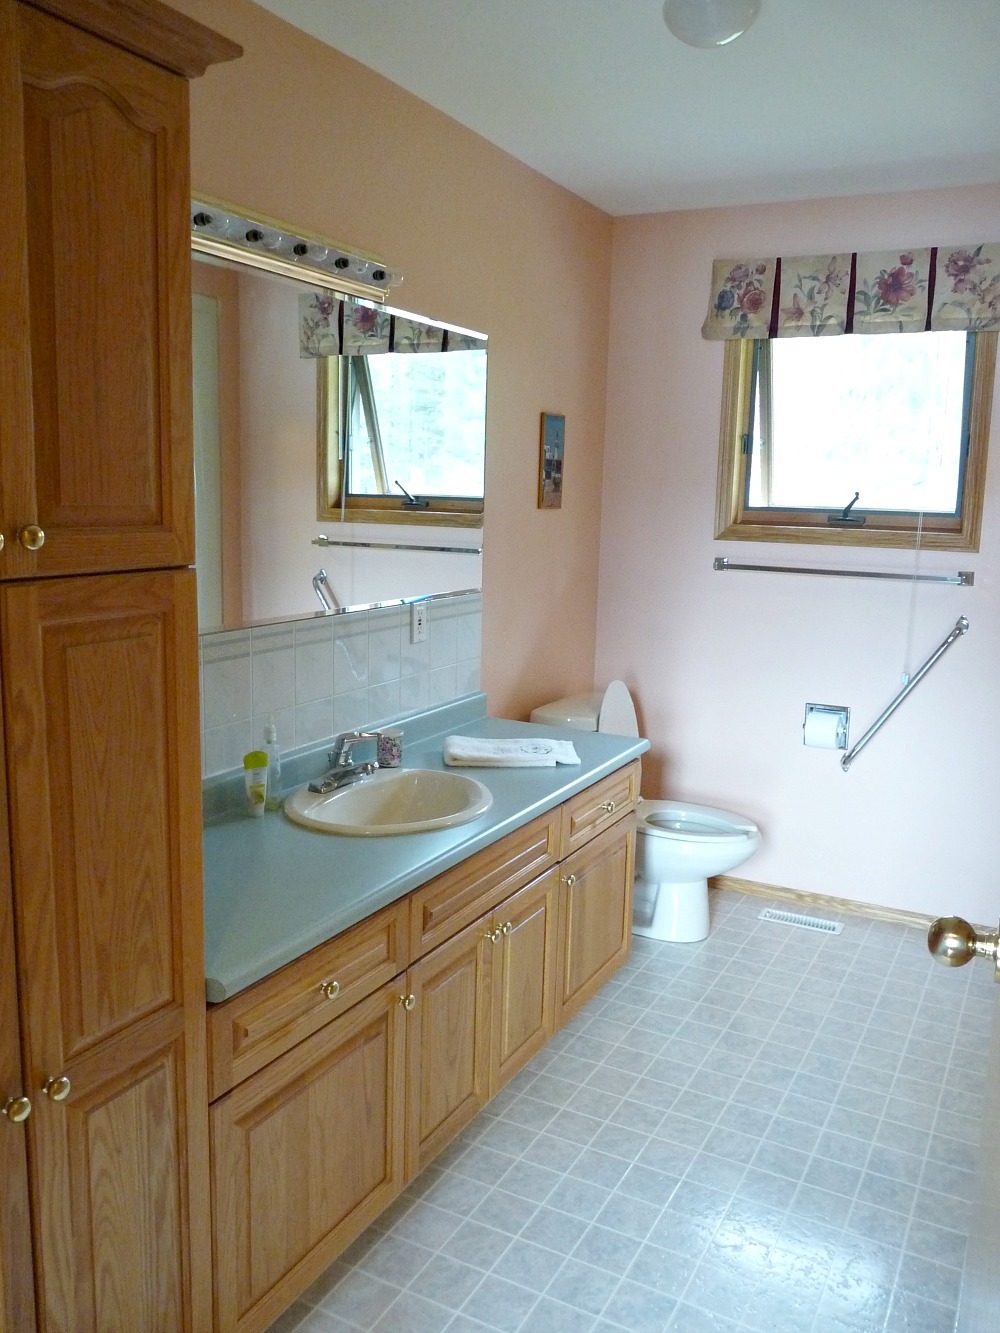
Before
The main bathroom was the first space to receive a top to bottom renovation, but first we tackled a budget–friendly spruce to tide us over while we schemed and dreamed. After the walls, trim, and ceiling were painted white, I removed the trim piece from the top of the cabinet for a cleaner look. Then the cabinets were painted, the tile backsplash was painted, and the gold light and hardware were even painted. I added some large scale art and accessories to make the minty counter seem planned and all of a sudden, the bathroom seemed more “us”. It was a great choice to invest in this mini makeover because our bathroom renovation was delayed a year.
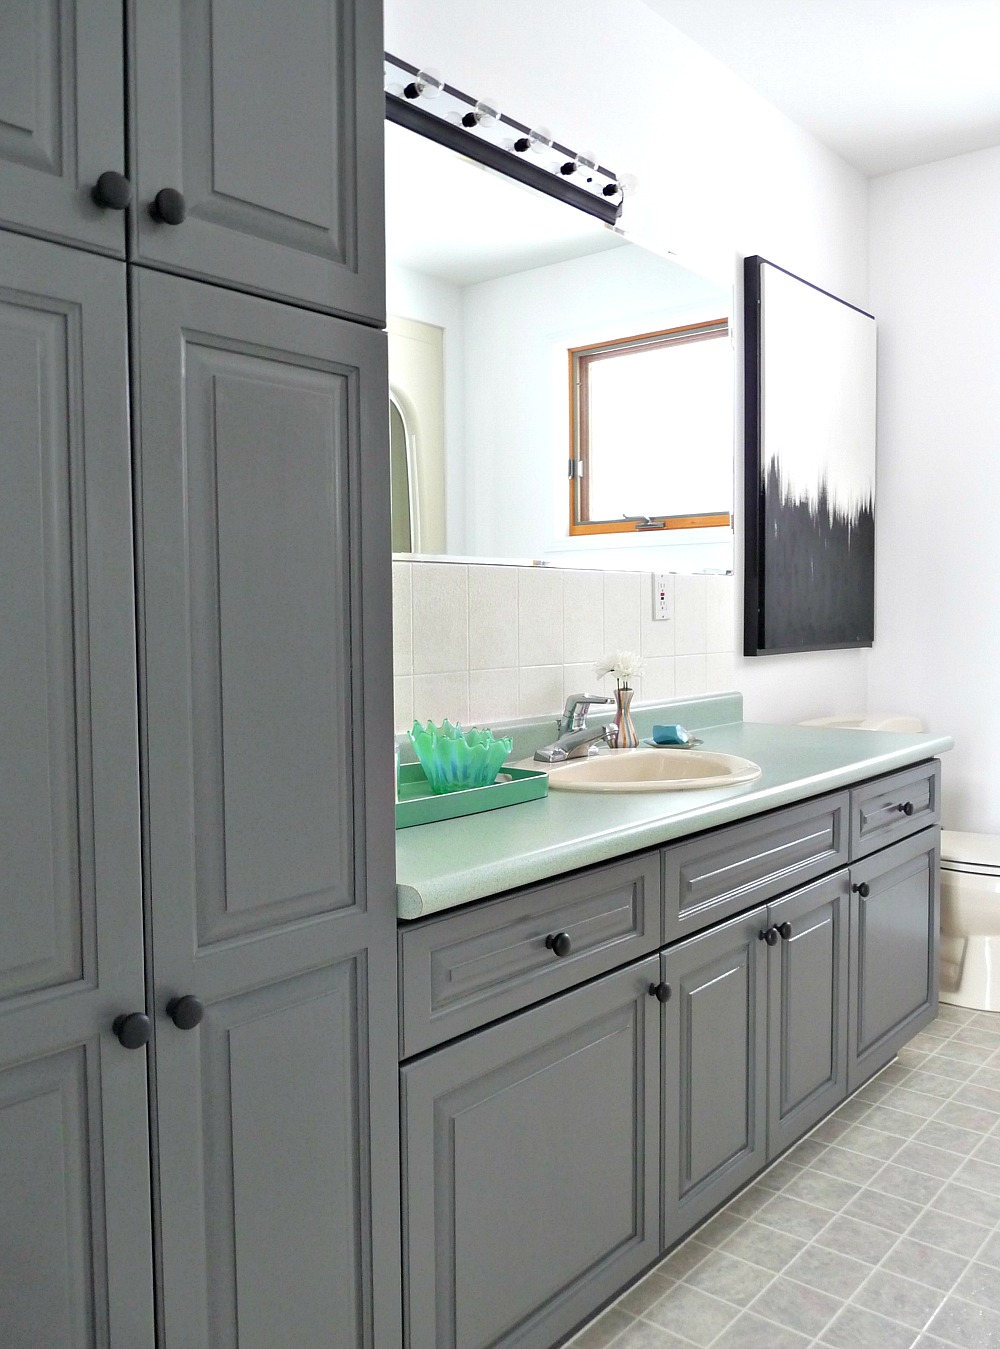
The Mini Makeover
DIY PAINTED CABINETS | DIY PAINTED TILE | DIY PAINTED LIGHT & HARDWARE | DIY ART
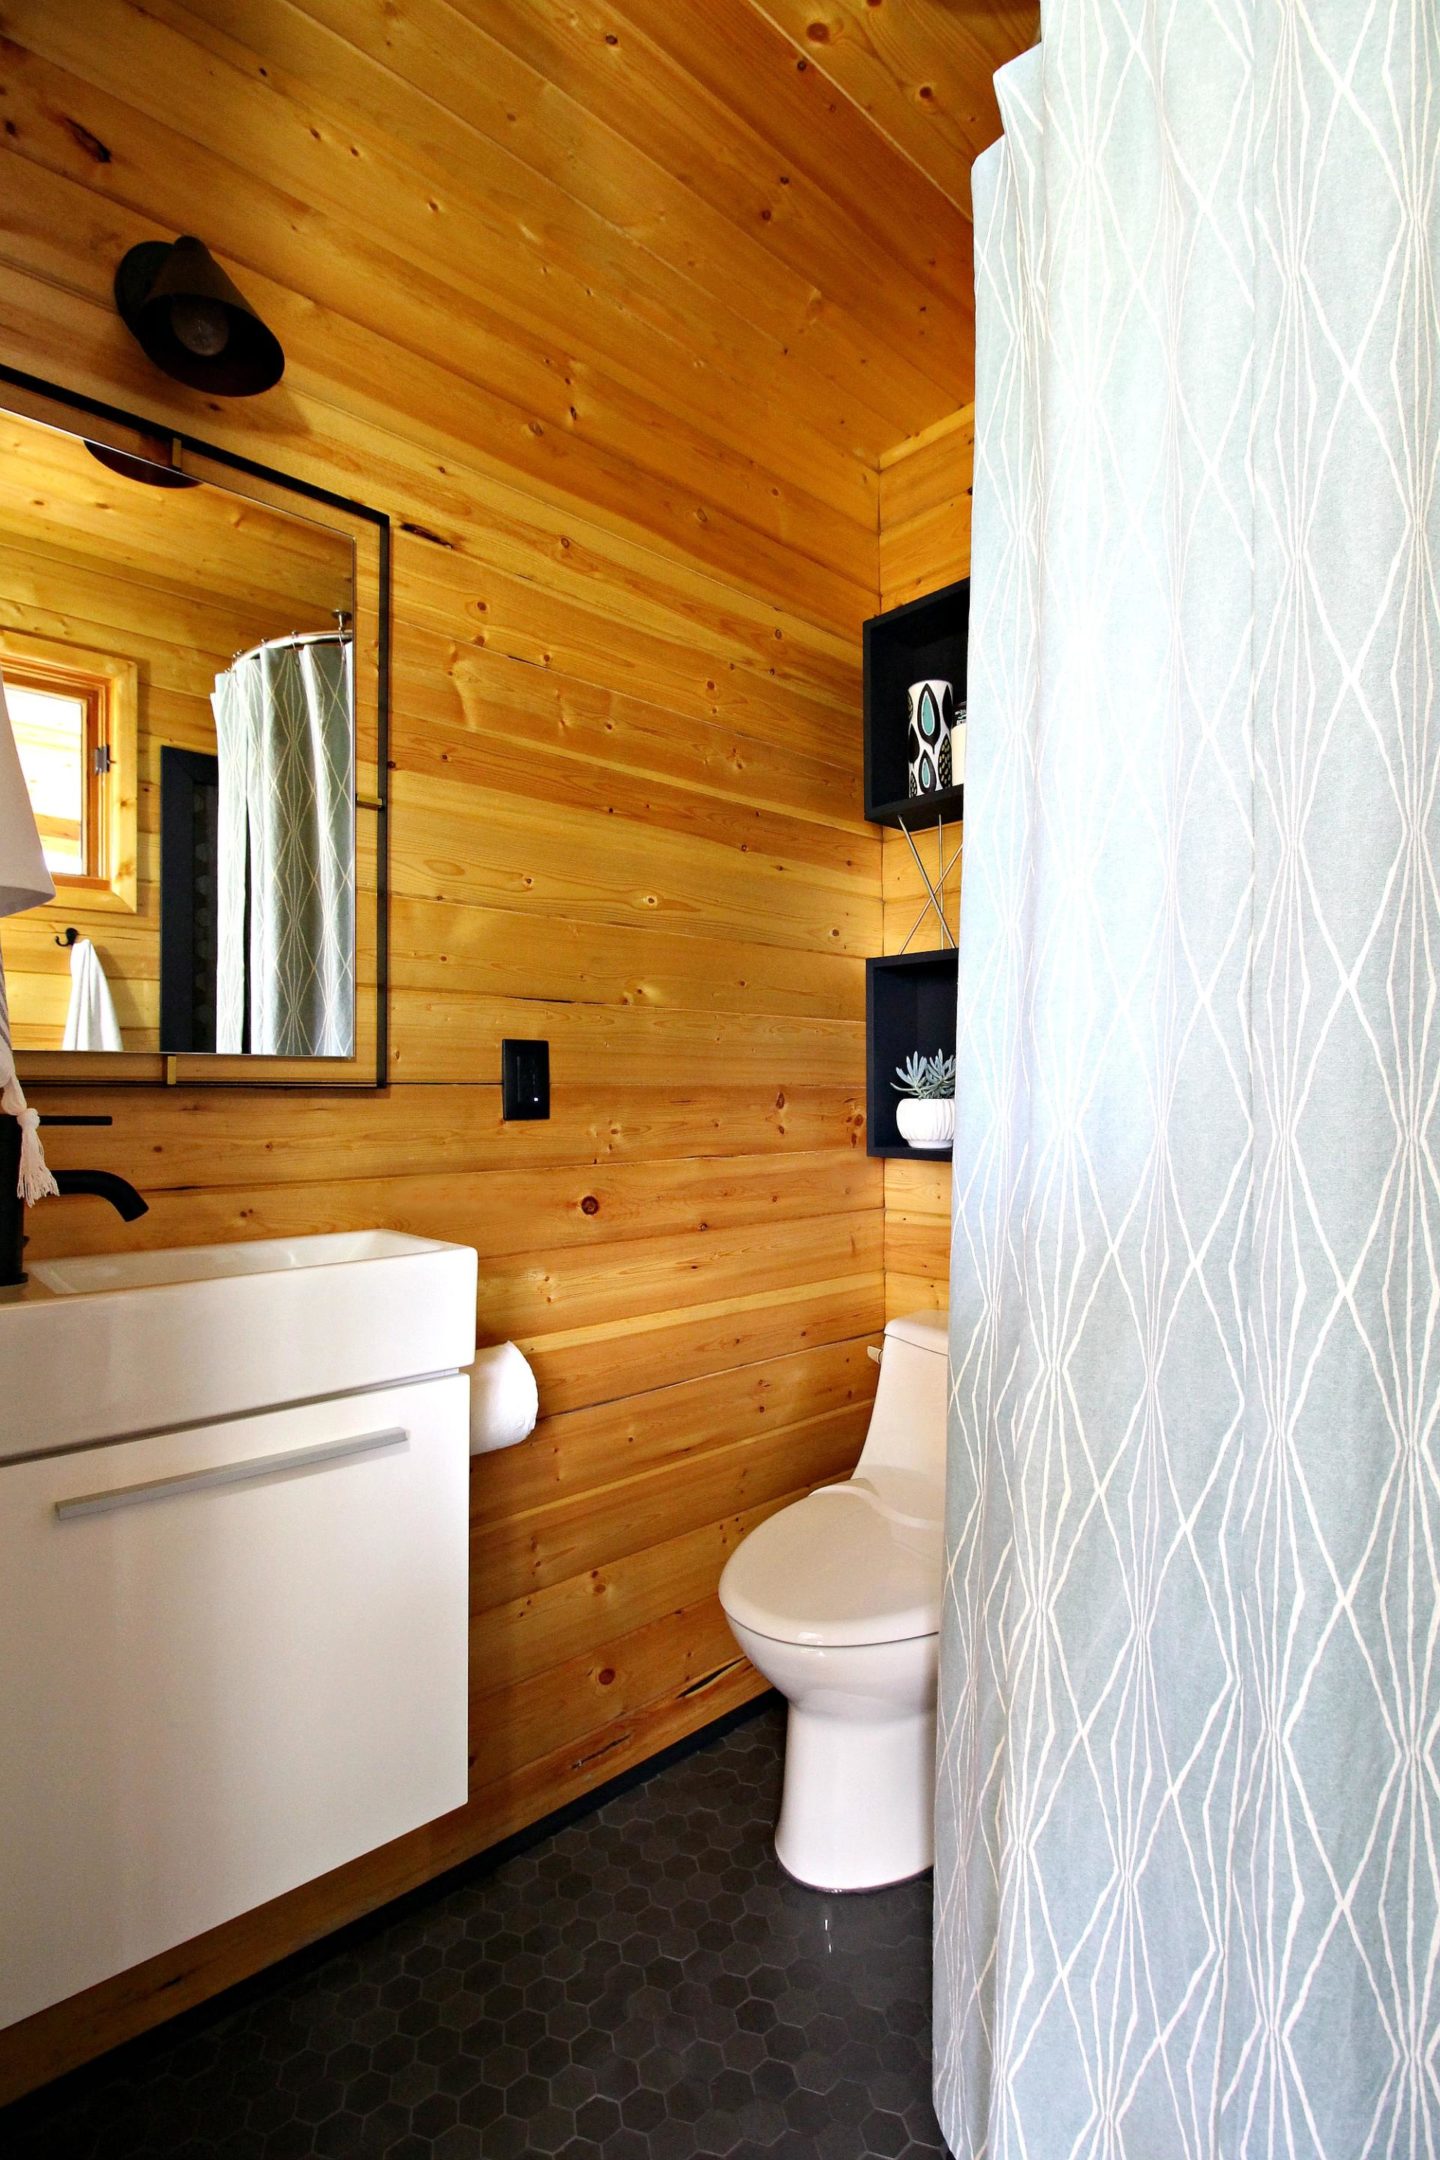
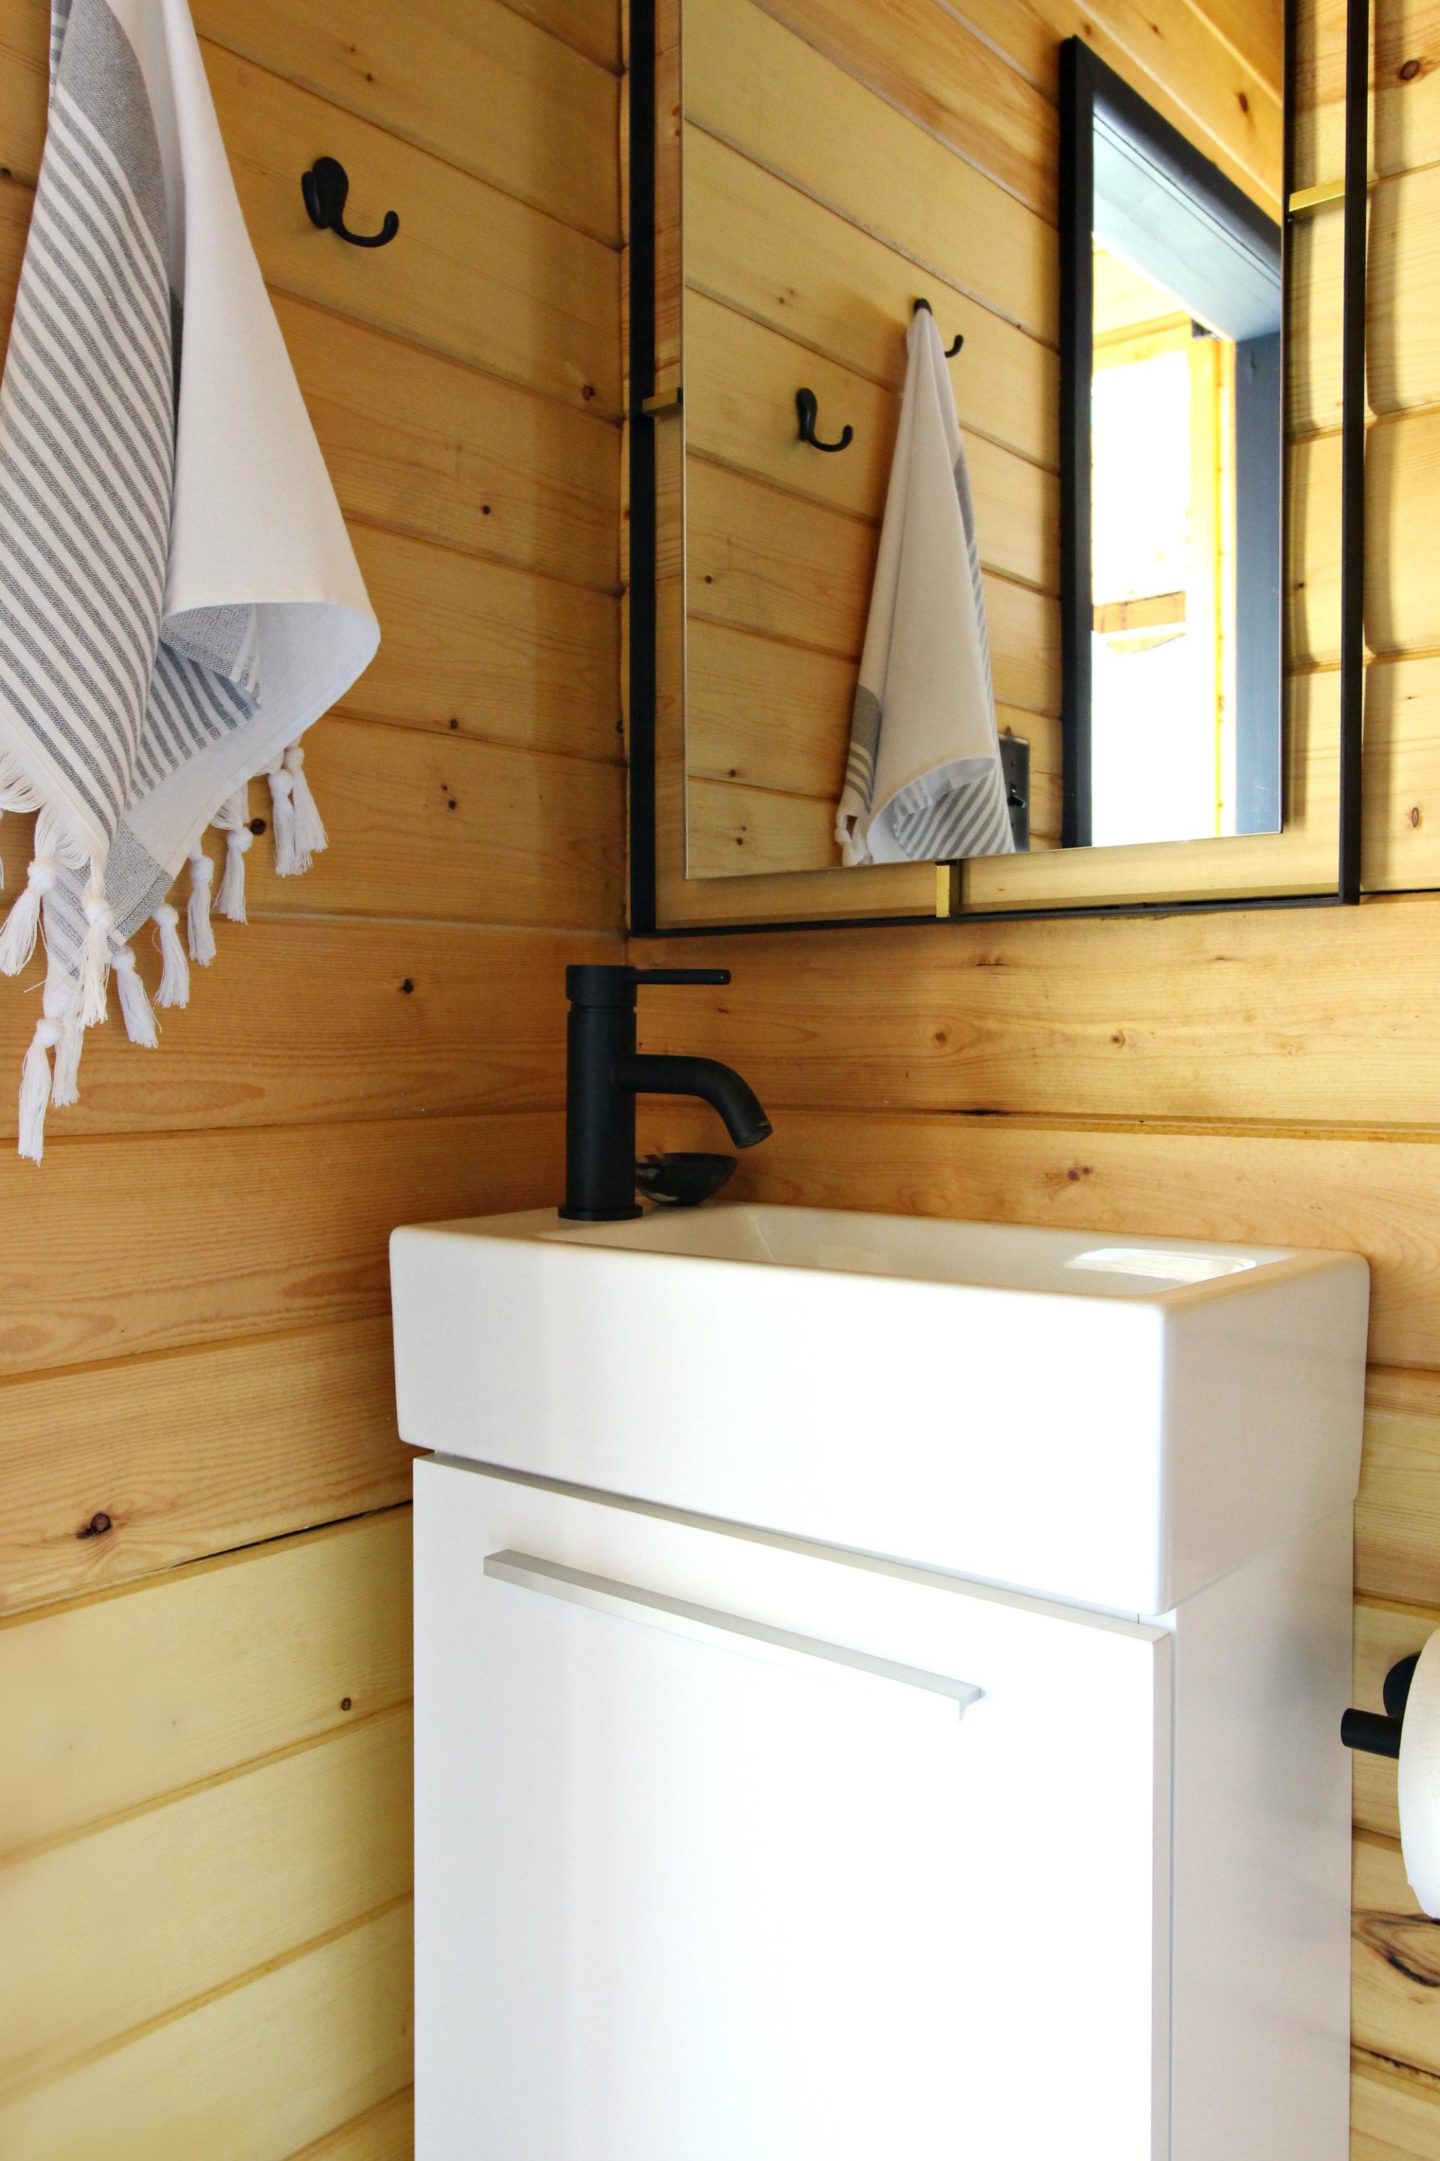
THE MAIN BATHROOM – AFTER
Today the bathroom looks a lot different! We did some of the work: tearing out the old bathroom, installing the blocking for the floating walnut vanities and installing the tub. Then we handed it over to the pros for tiling and installing the quartzite counters and turquoise sinks. Then we stepped back in and painted, installed the lights on the mirror, the towel warmer, trim, and other finishing touches, like the DIY ceiling mounted shower curtain. Mixing DIY and with professional installation saved us some money – and saved us from tiling, which we hate! – and now the bathroom looks like this. Catch up on all of the lakehouse bath reno posts here.
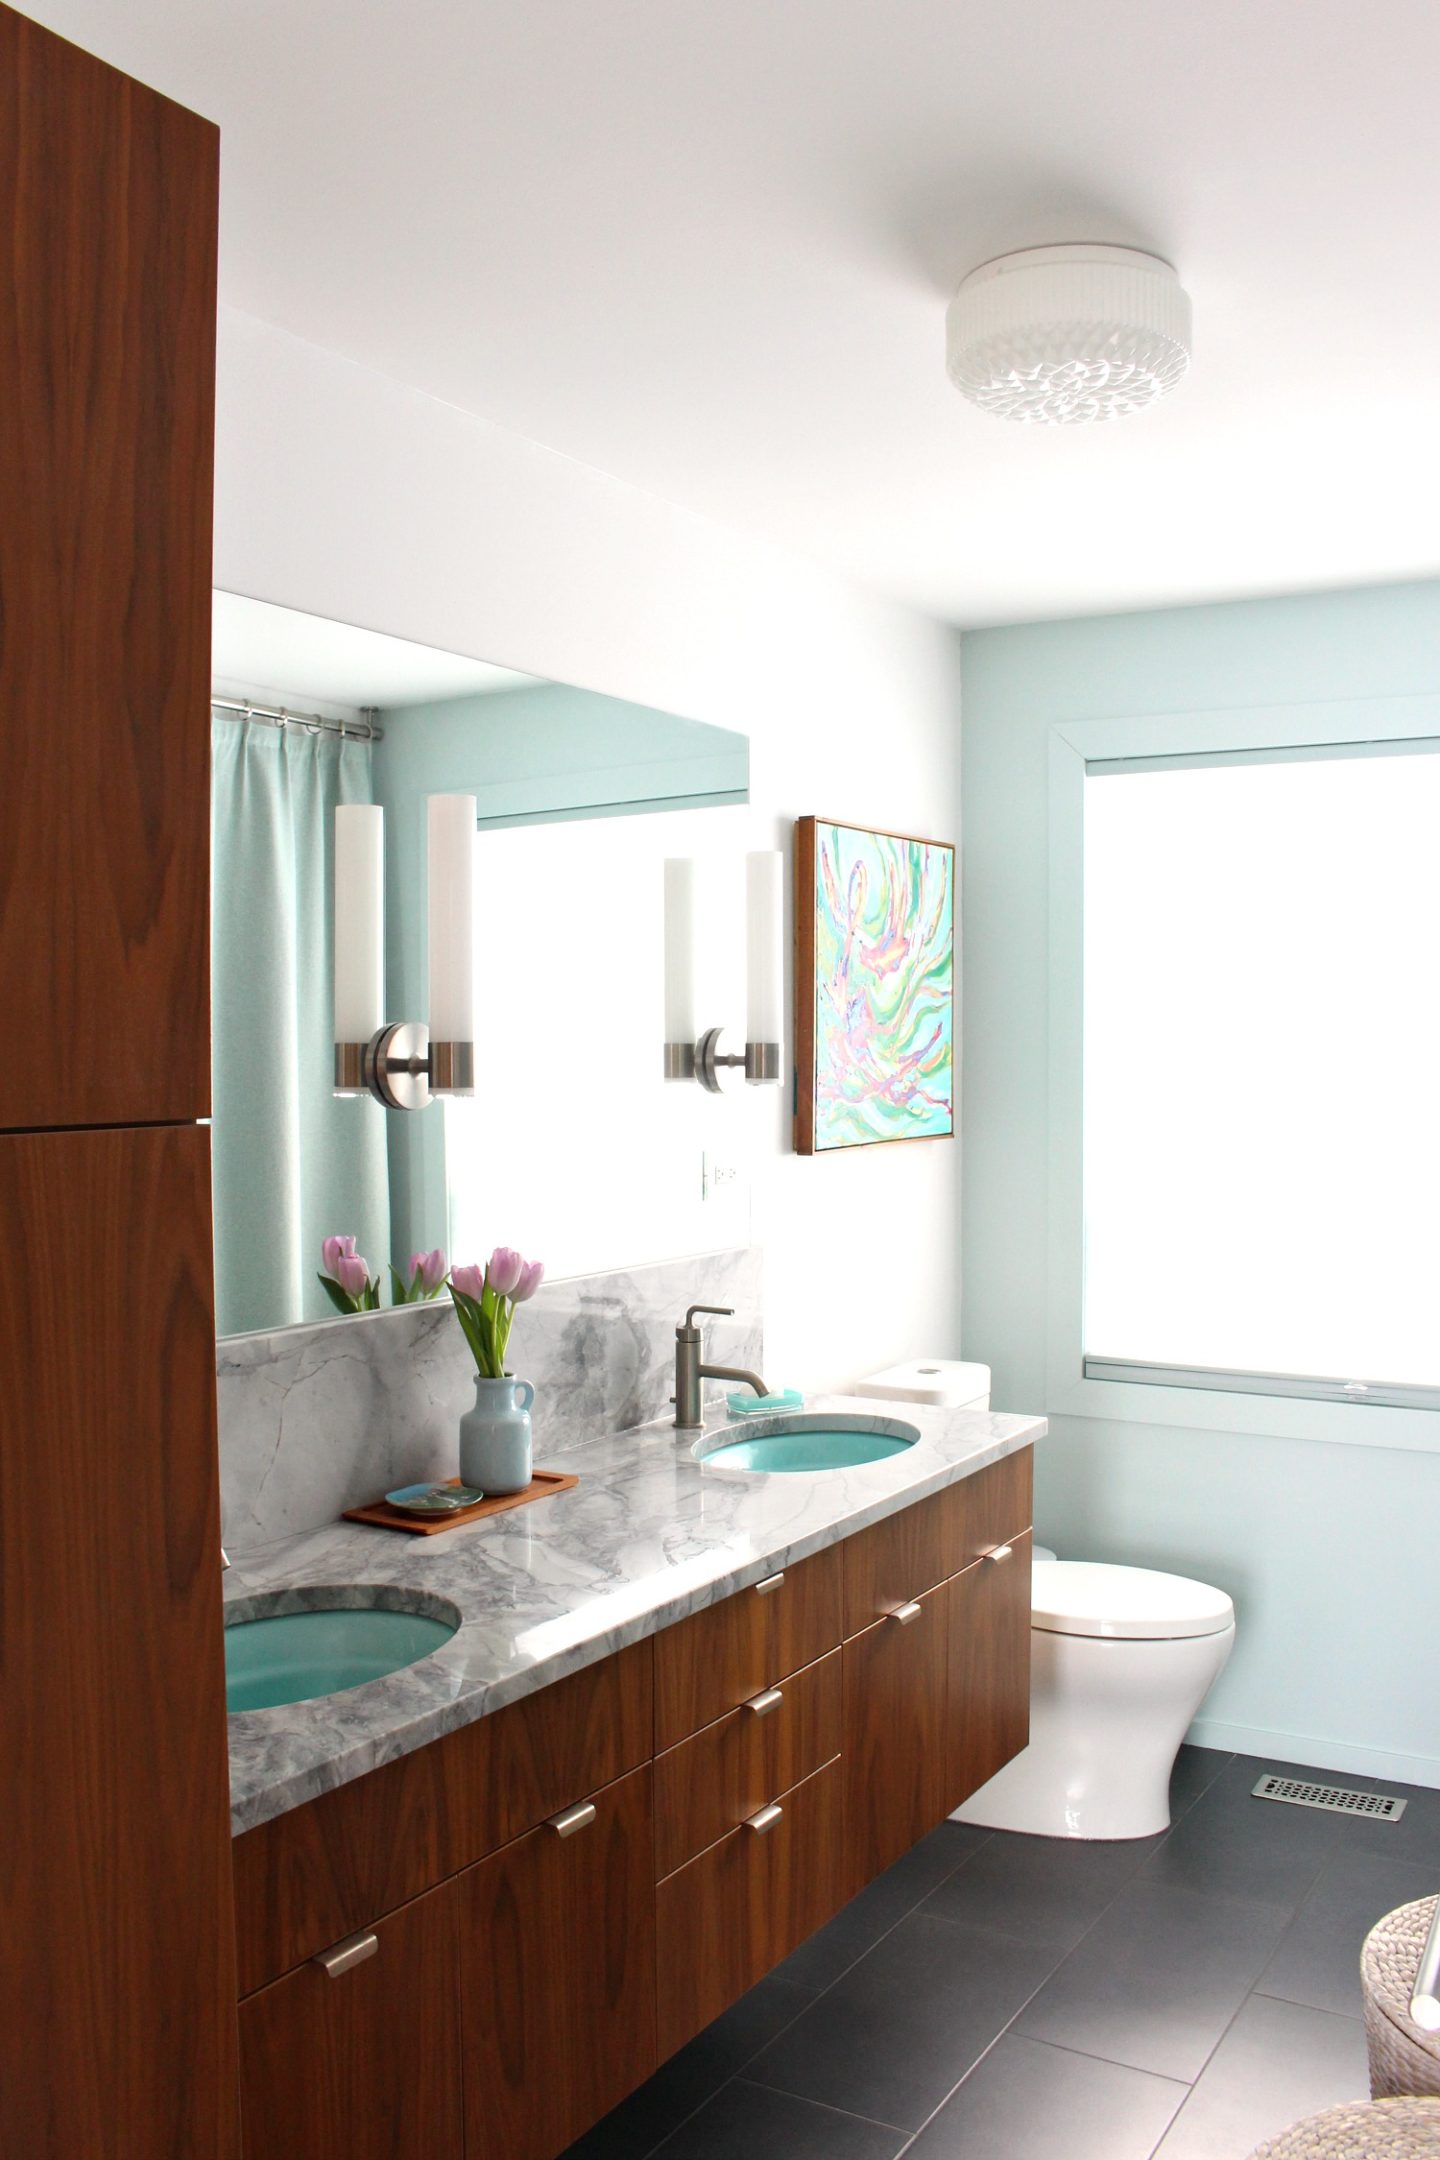
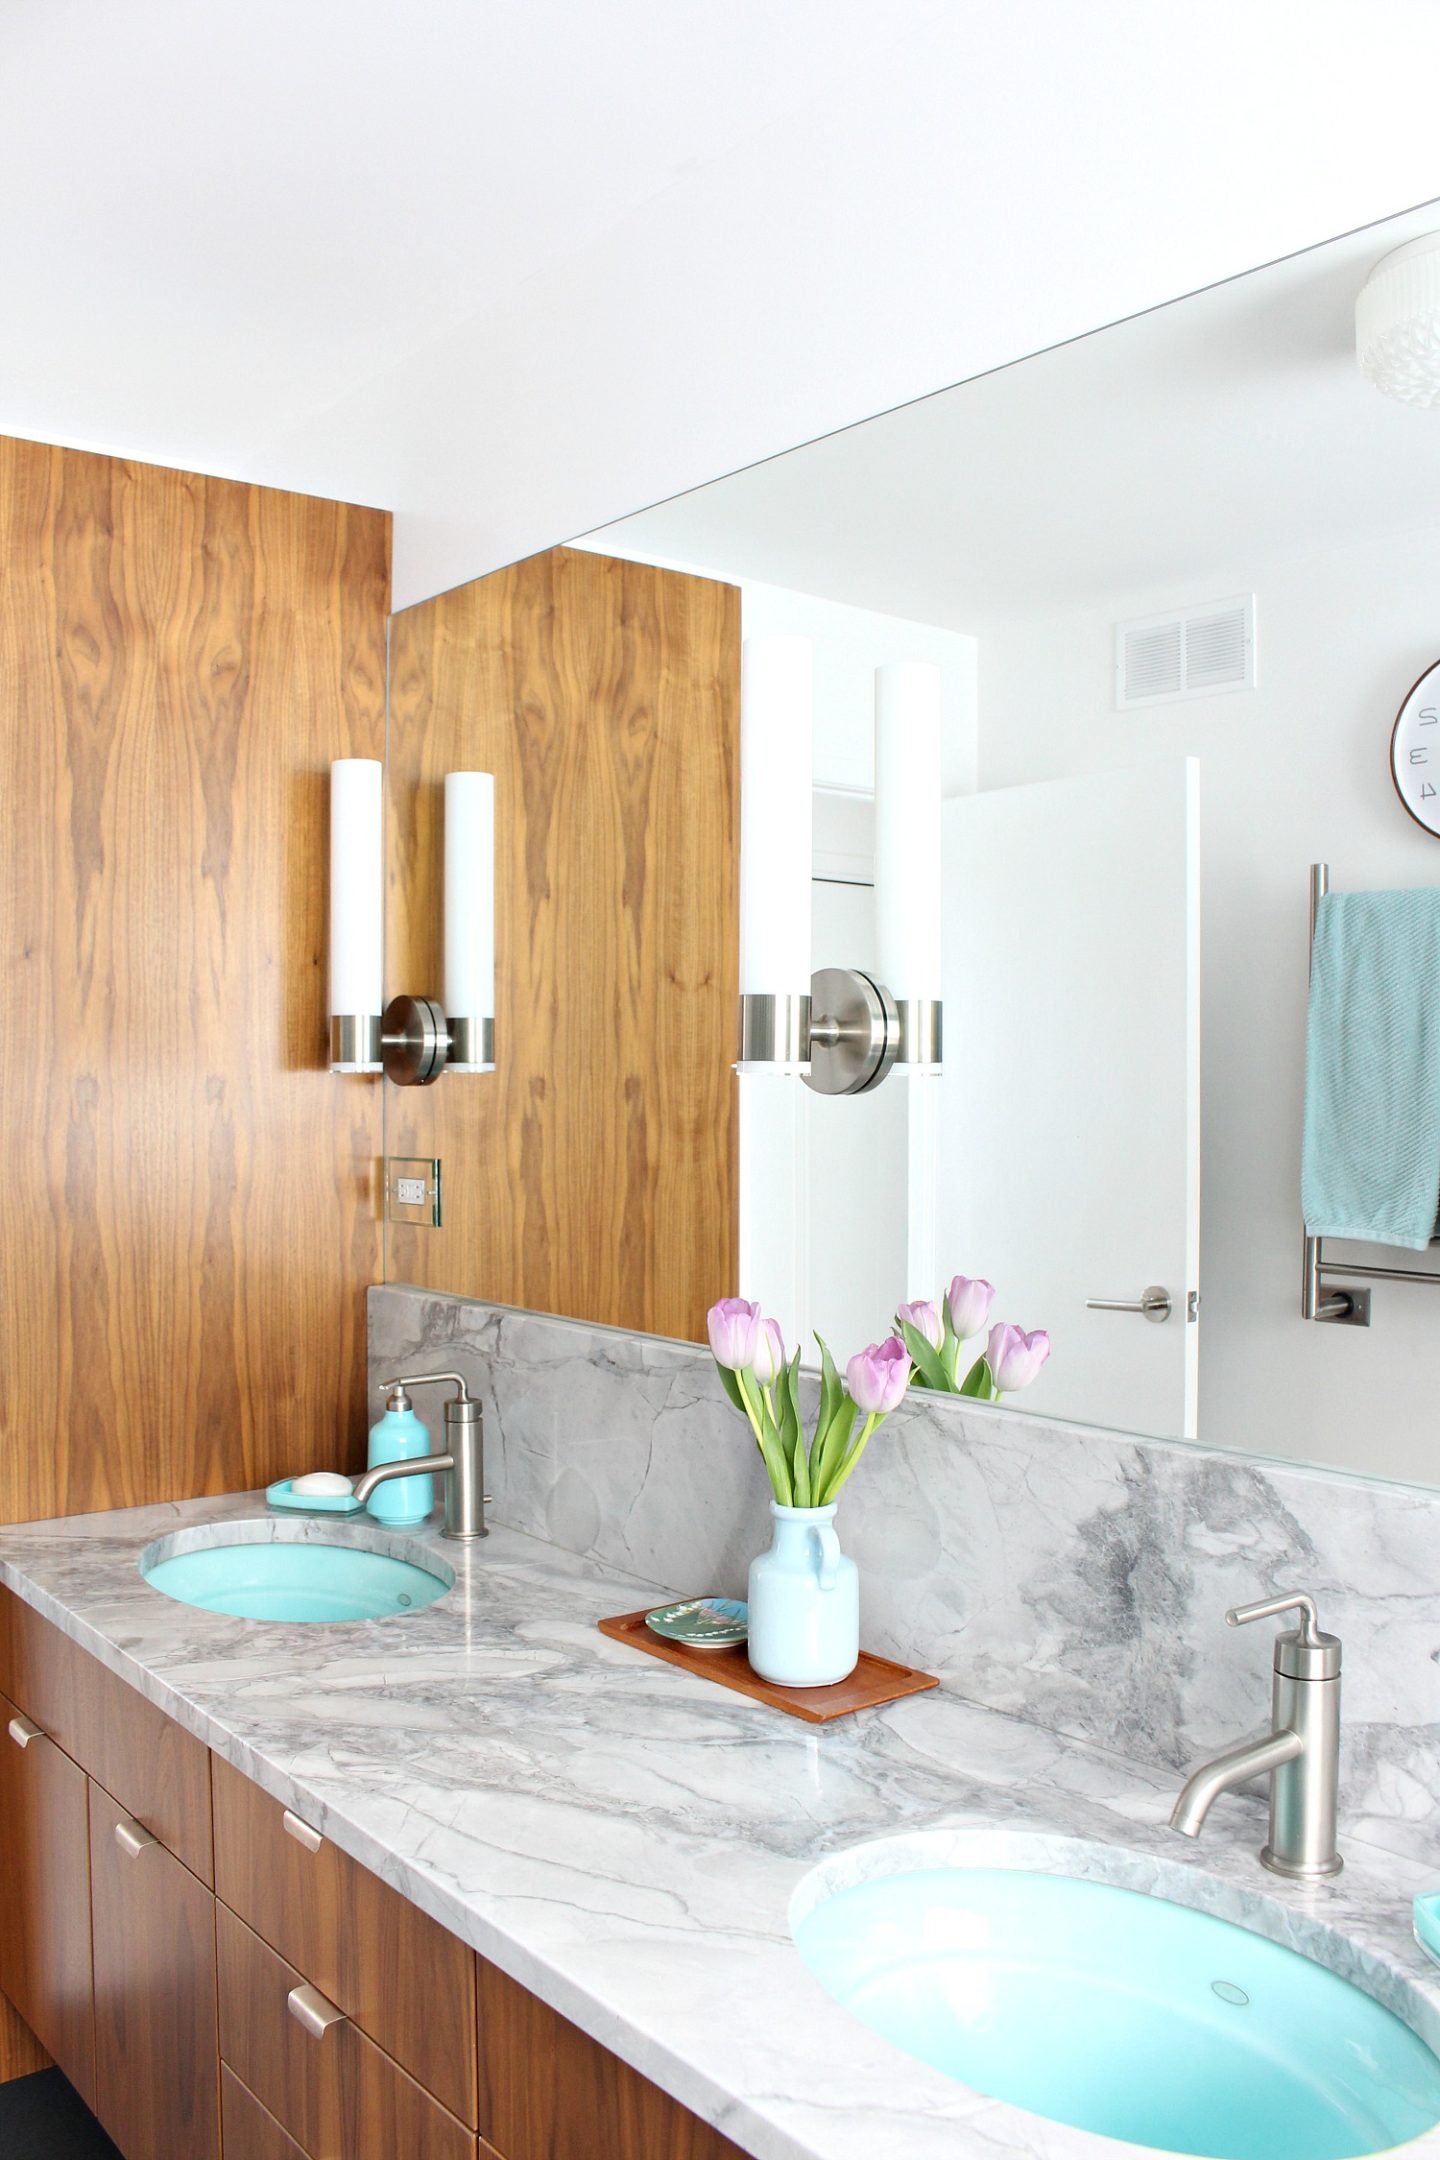
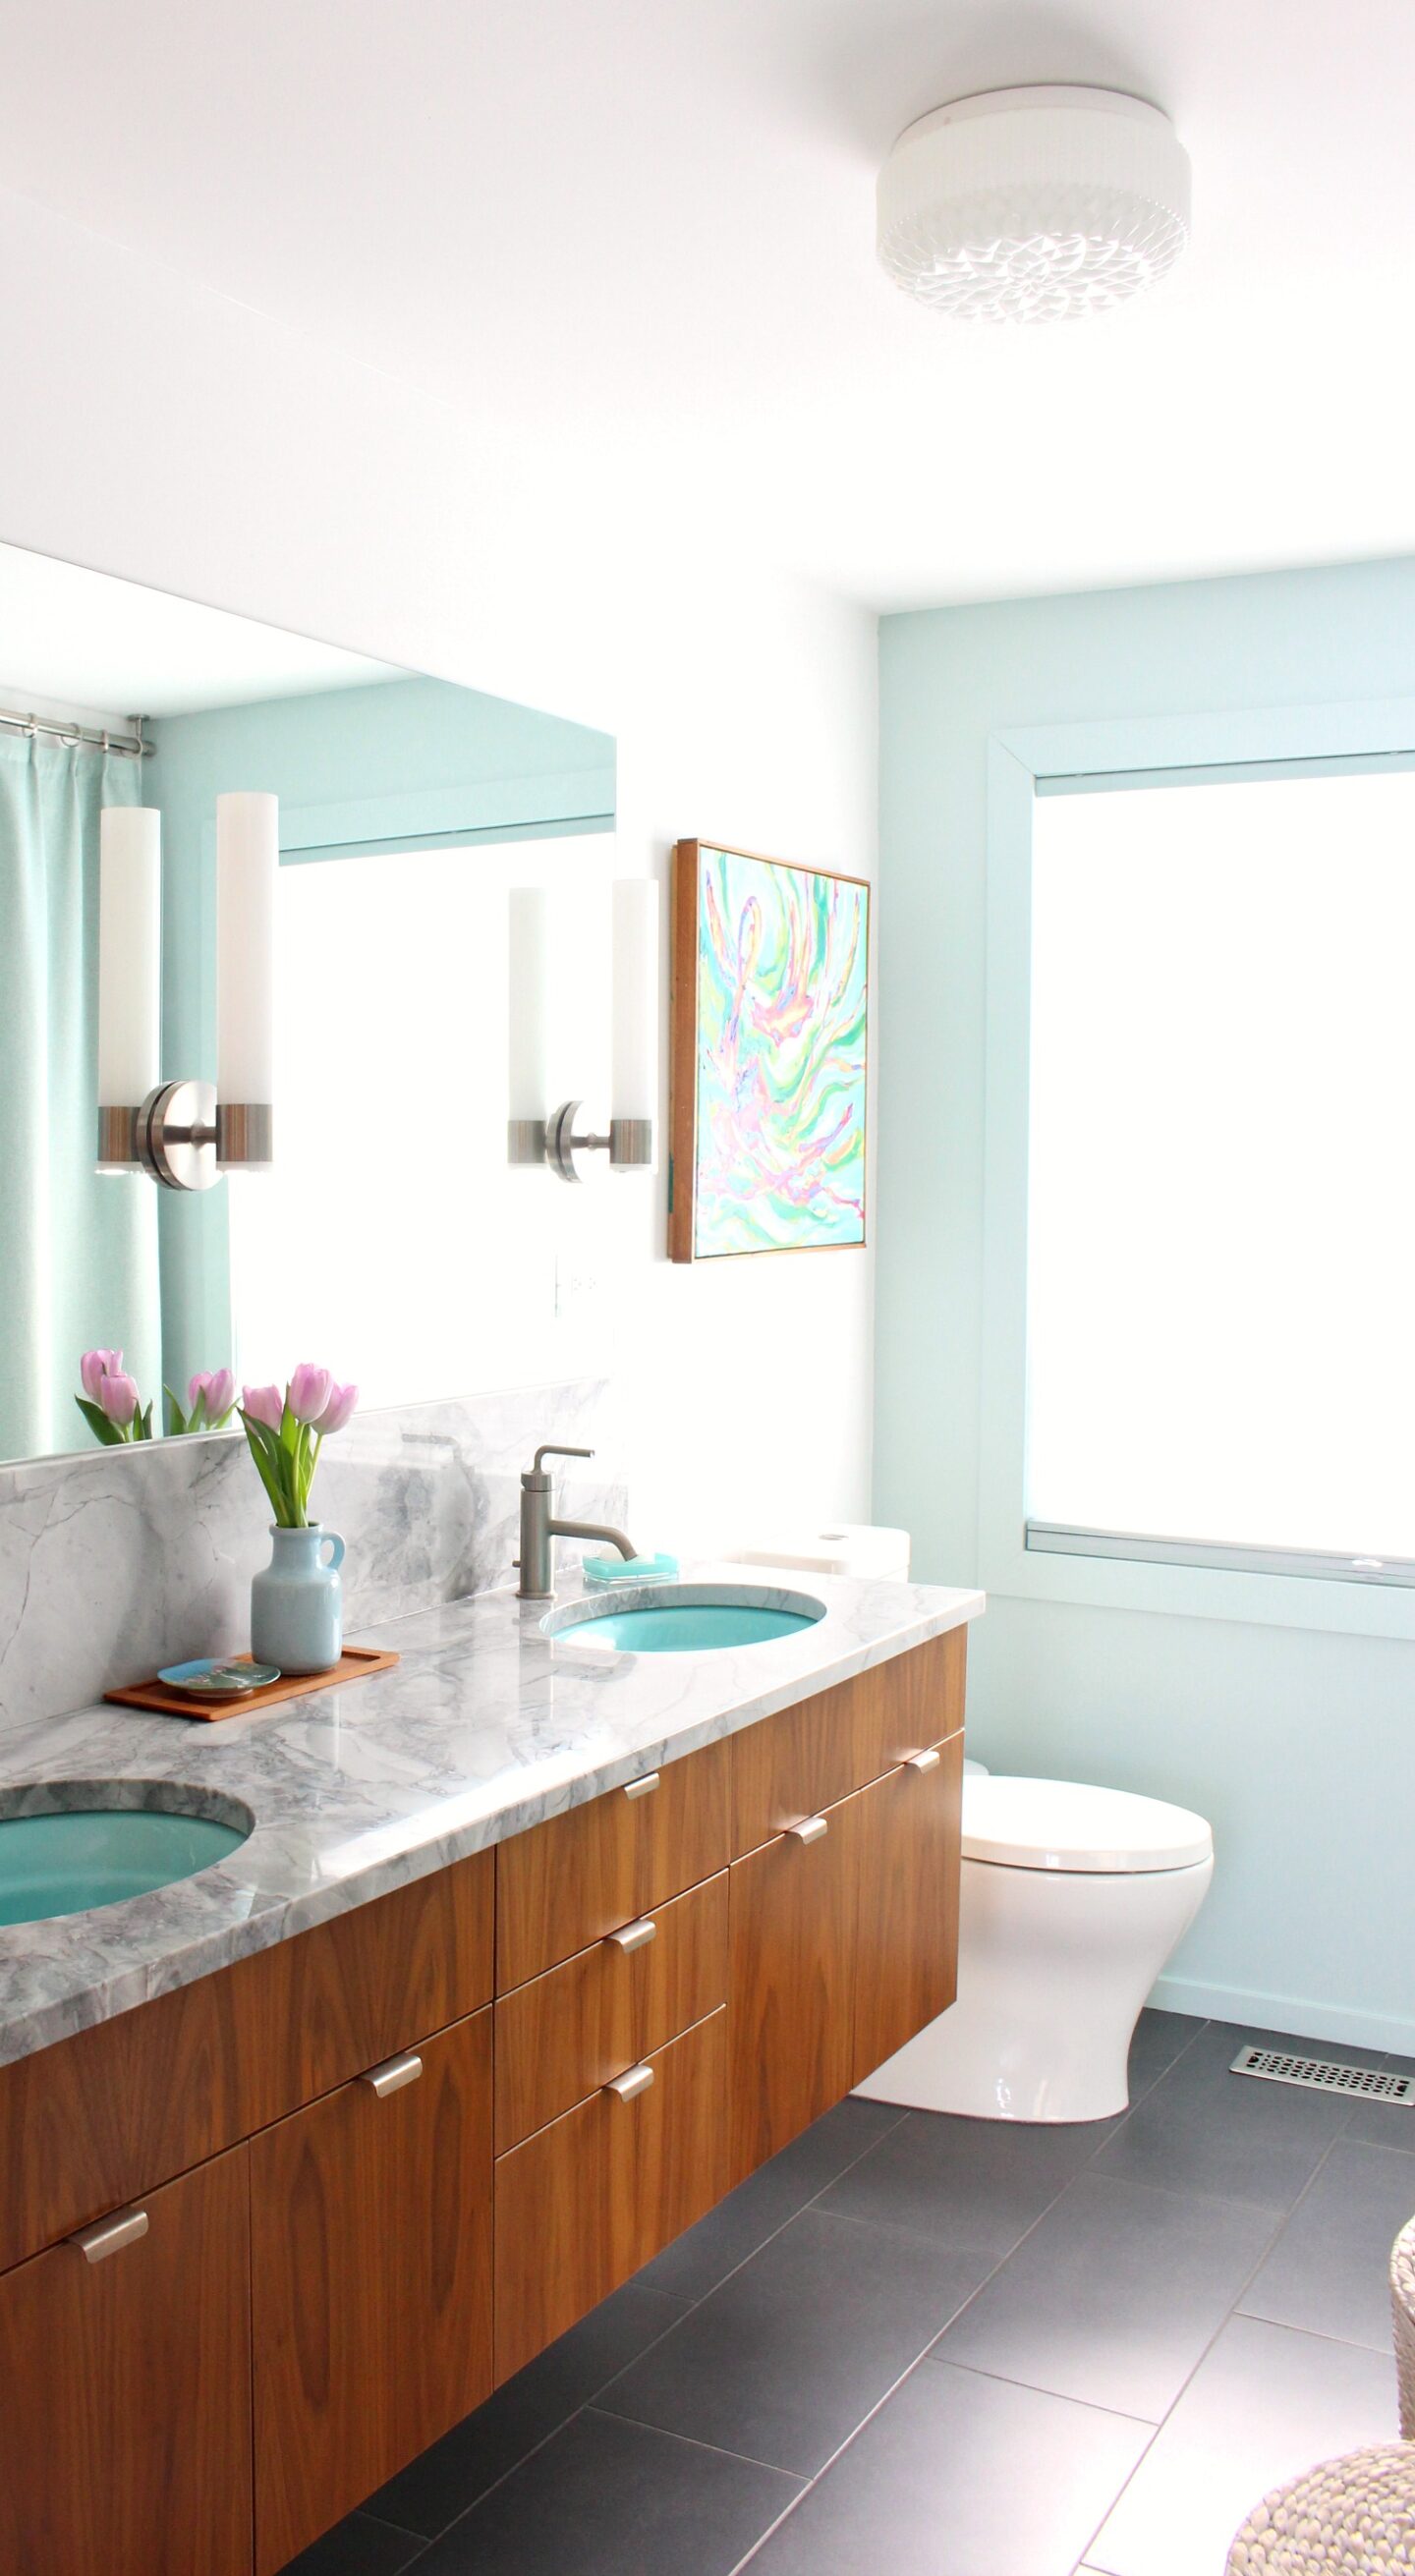
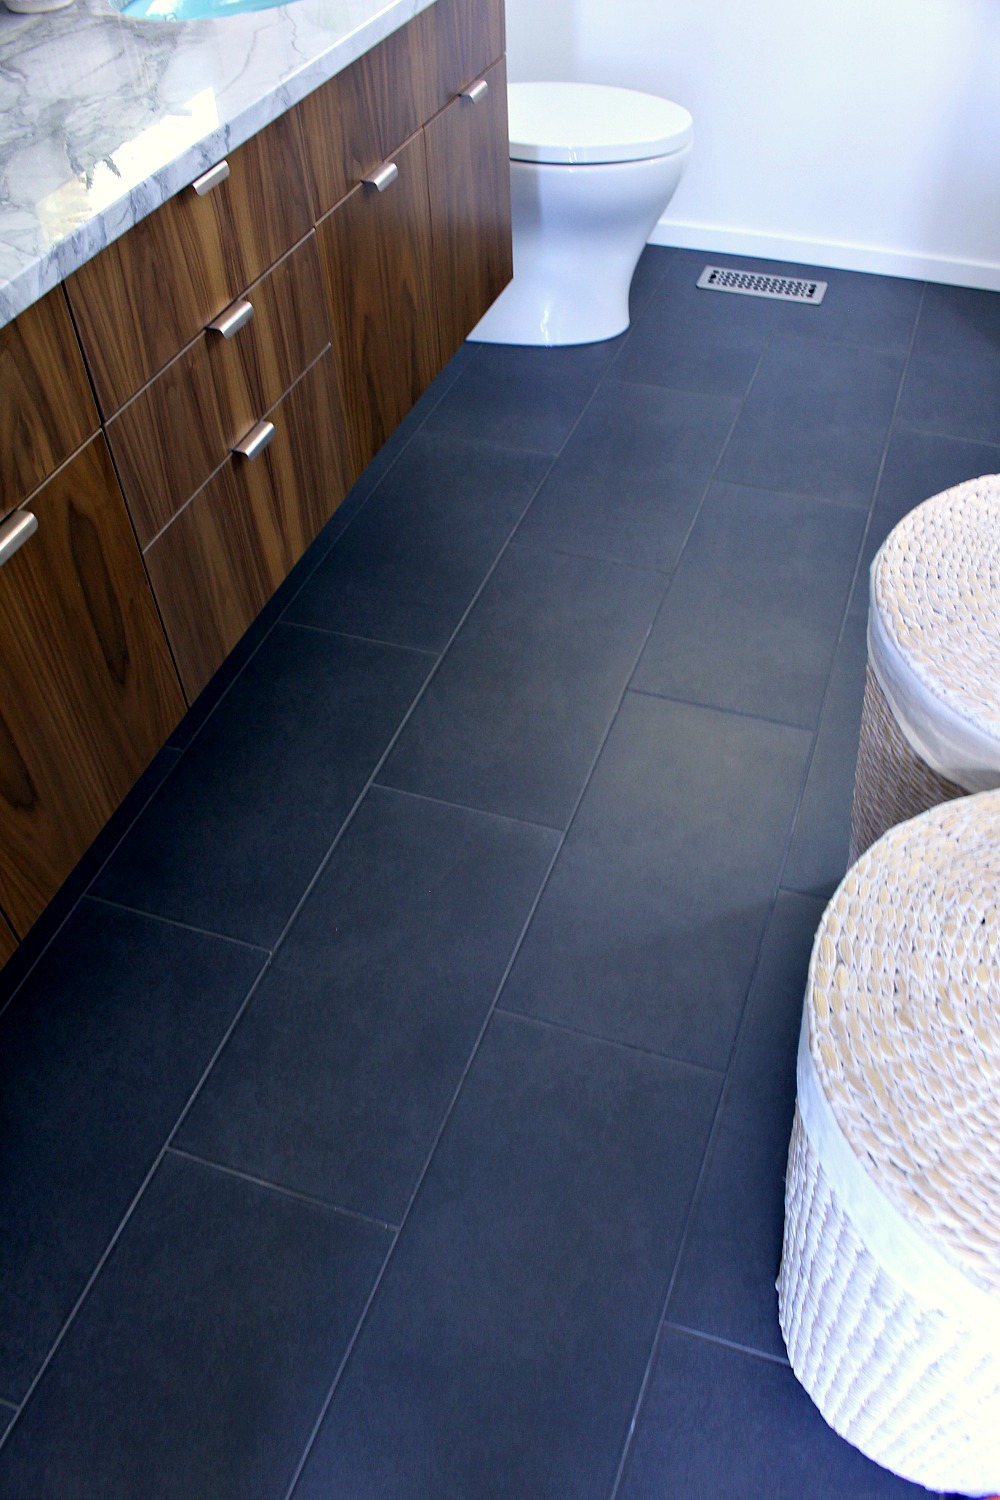
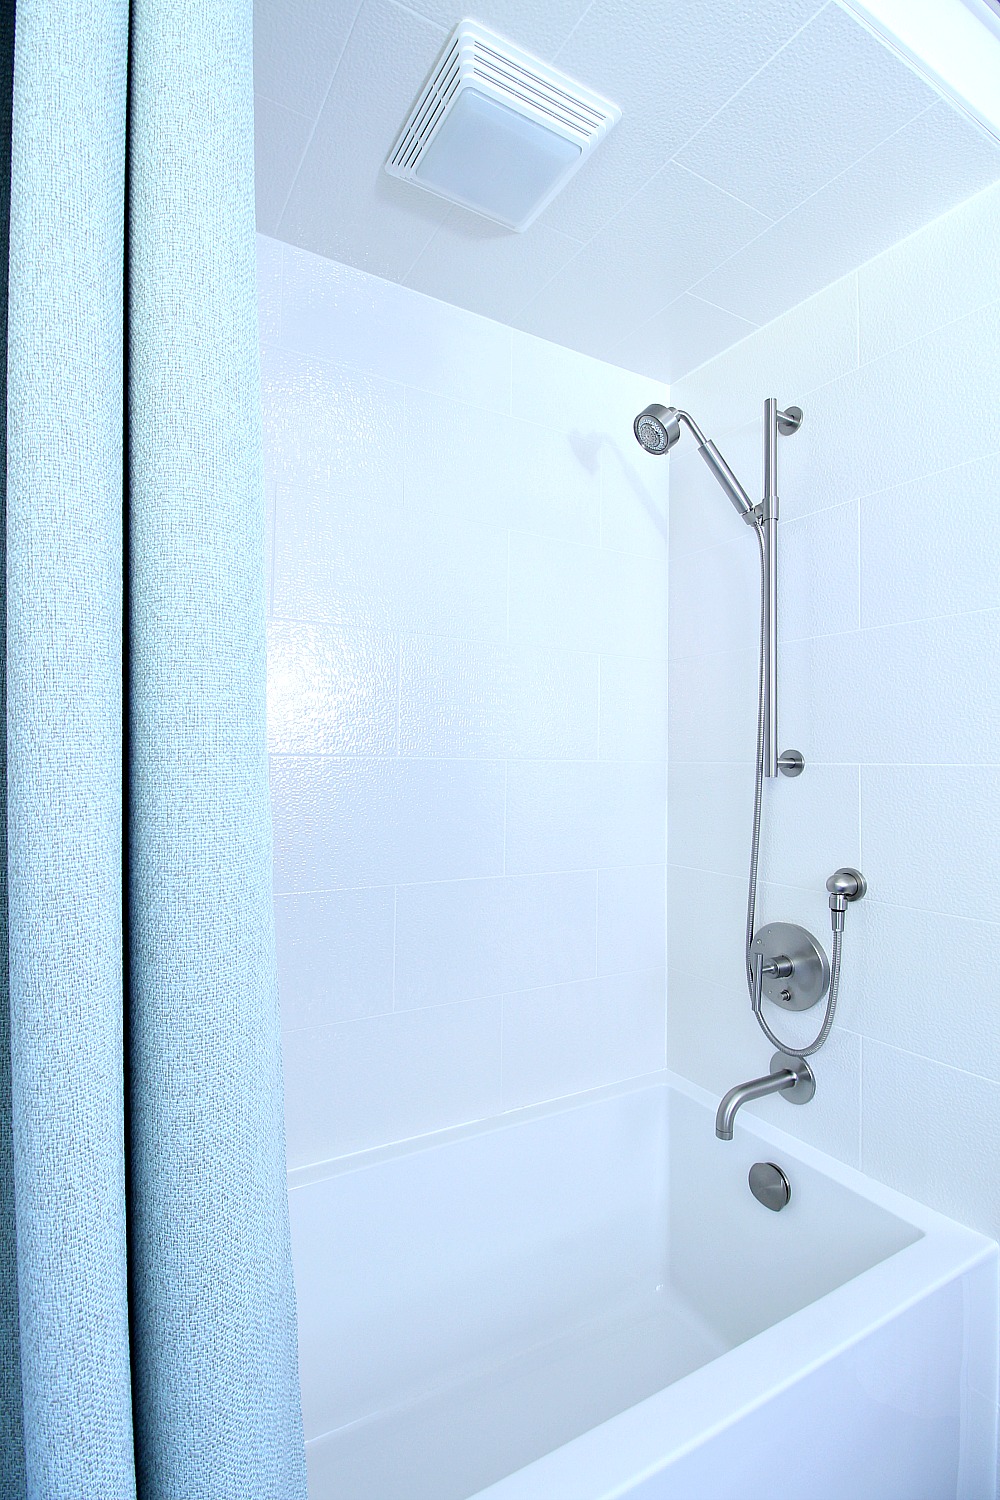

DIY BLOCKING FOR VANITY | HOW TO INSTALL SCONCES ON A MIRROR | DIY SHOWER CURTAIN | QUARTZITE COUNTERS & AQUA SINKS | BATHROOM TILING
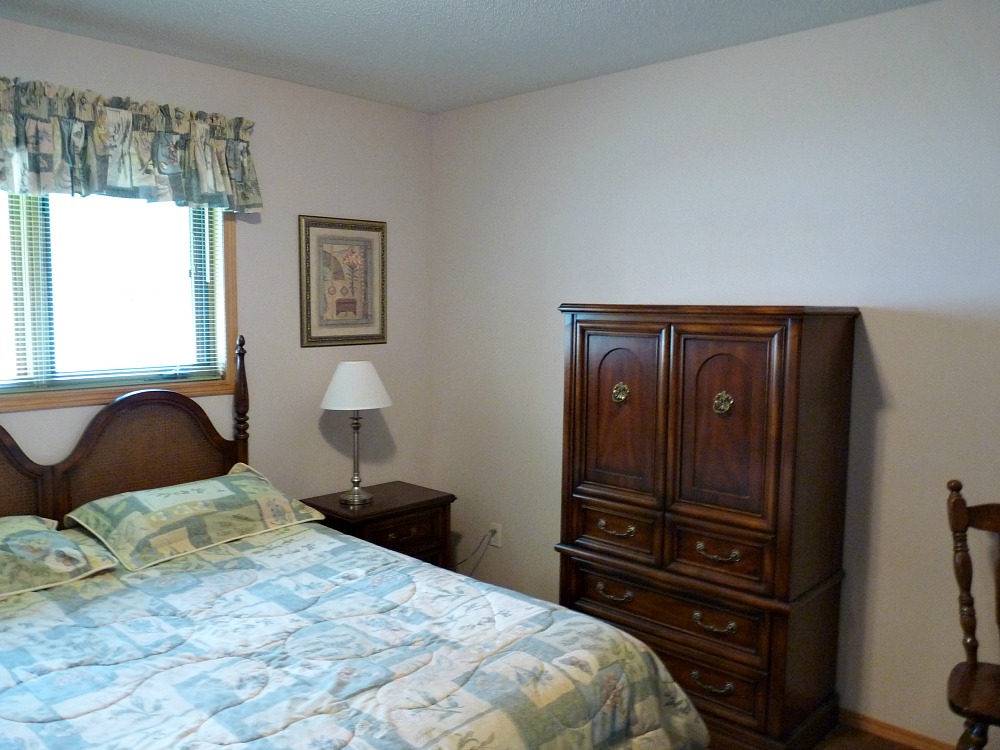
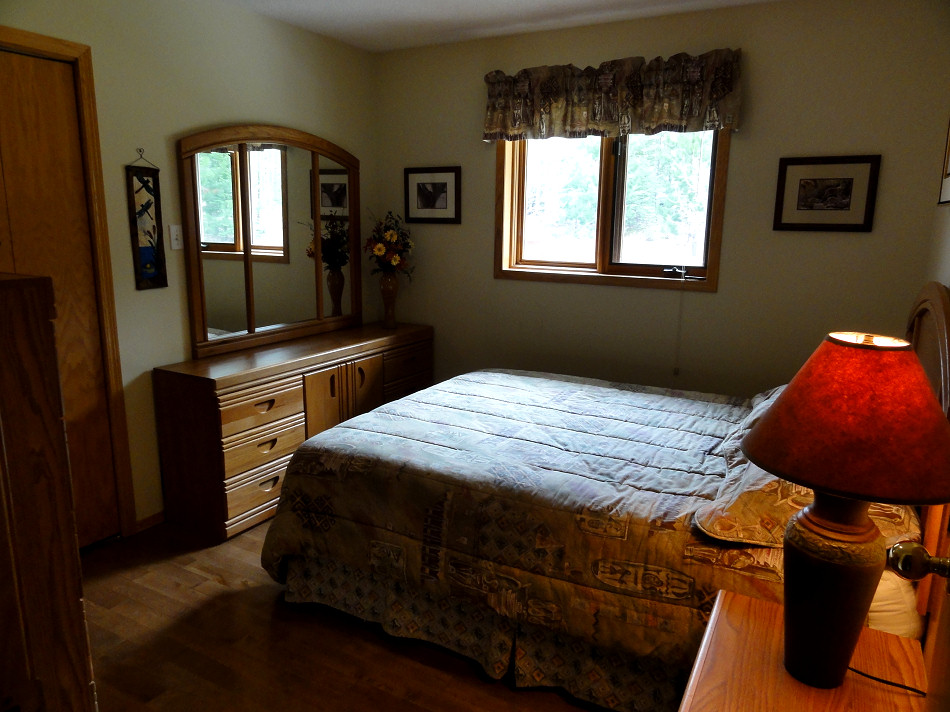
THE MAIN BEDROOM – BEFORE
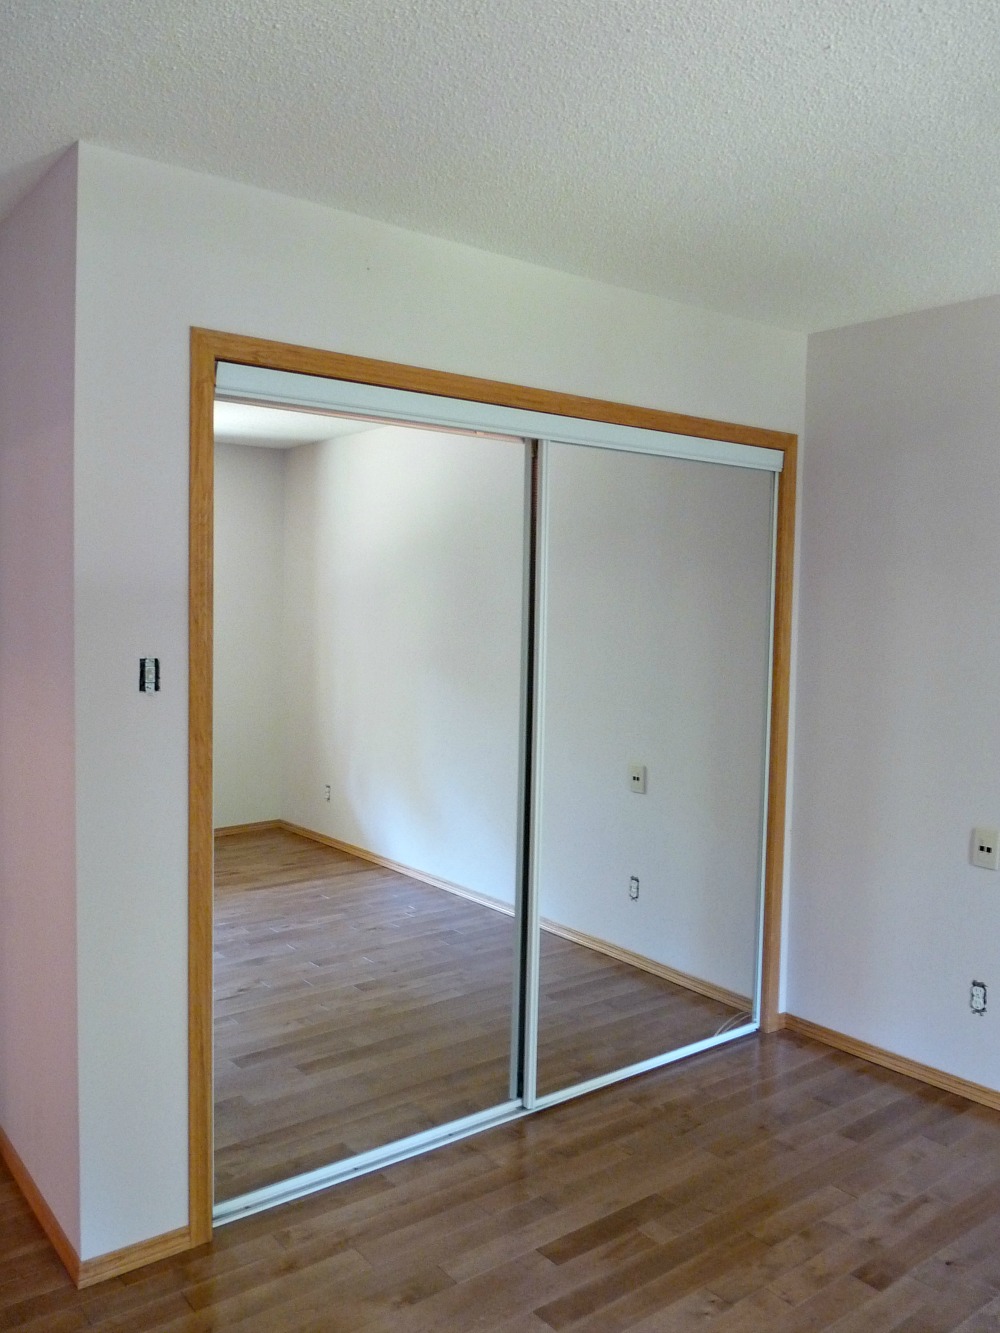
The main bedroom was originally a pale pink confection with oak trim. The mirrored closet door was broken, hiding a terribly worn out closet fitting with missing areas of hardwood flooring.

Before
Before
Before
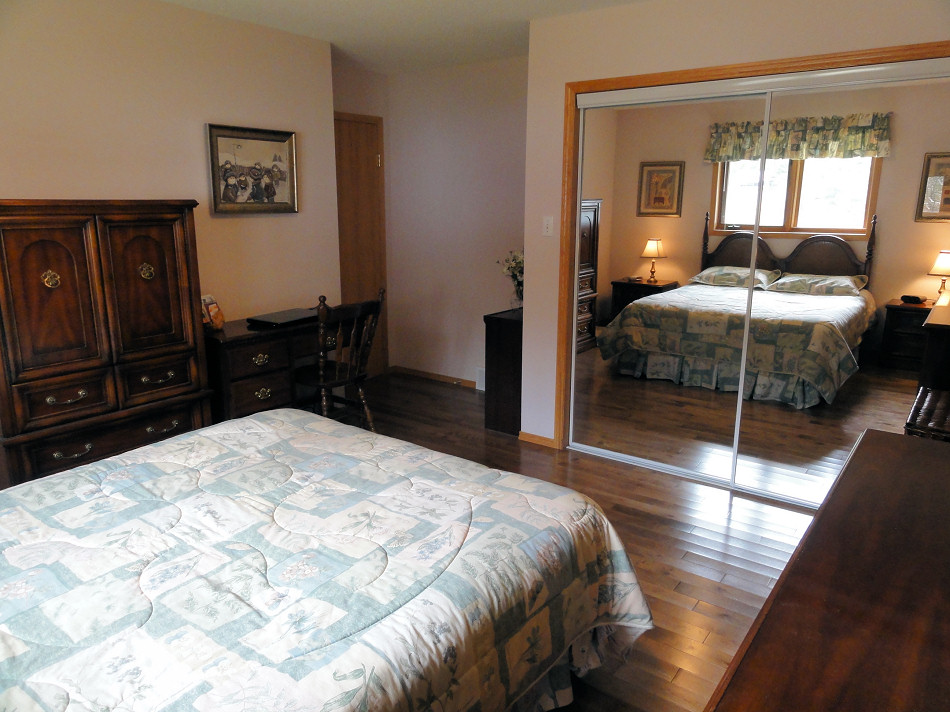
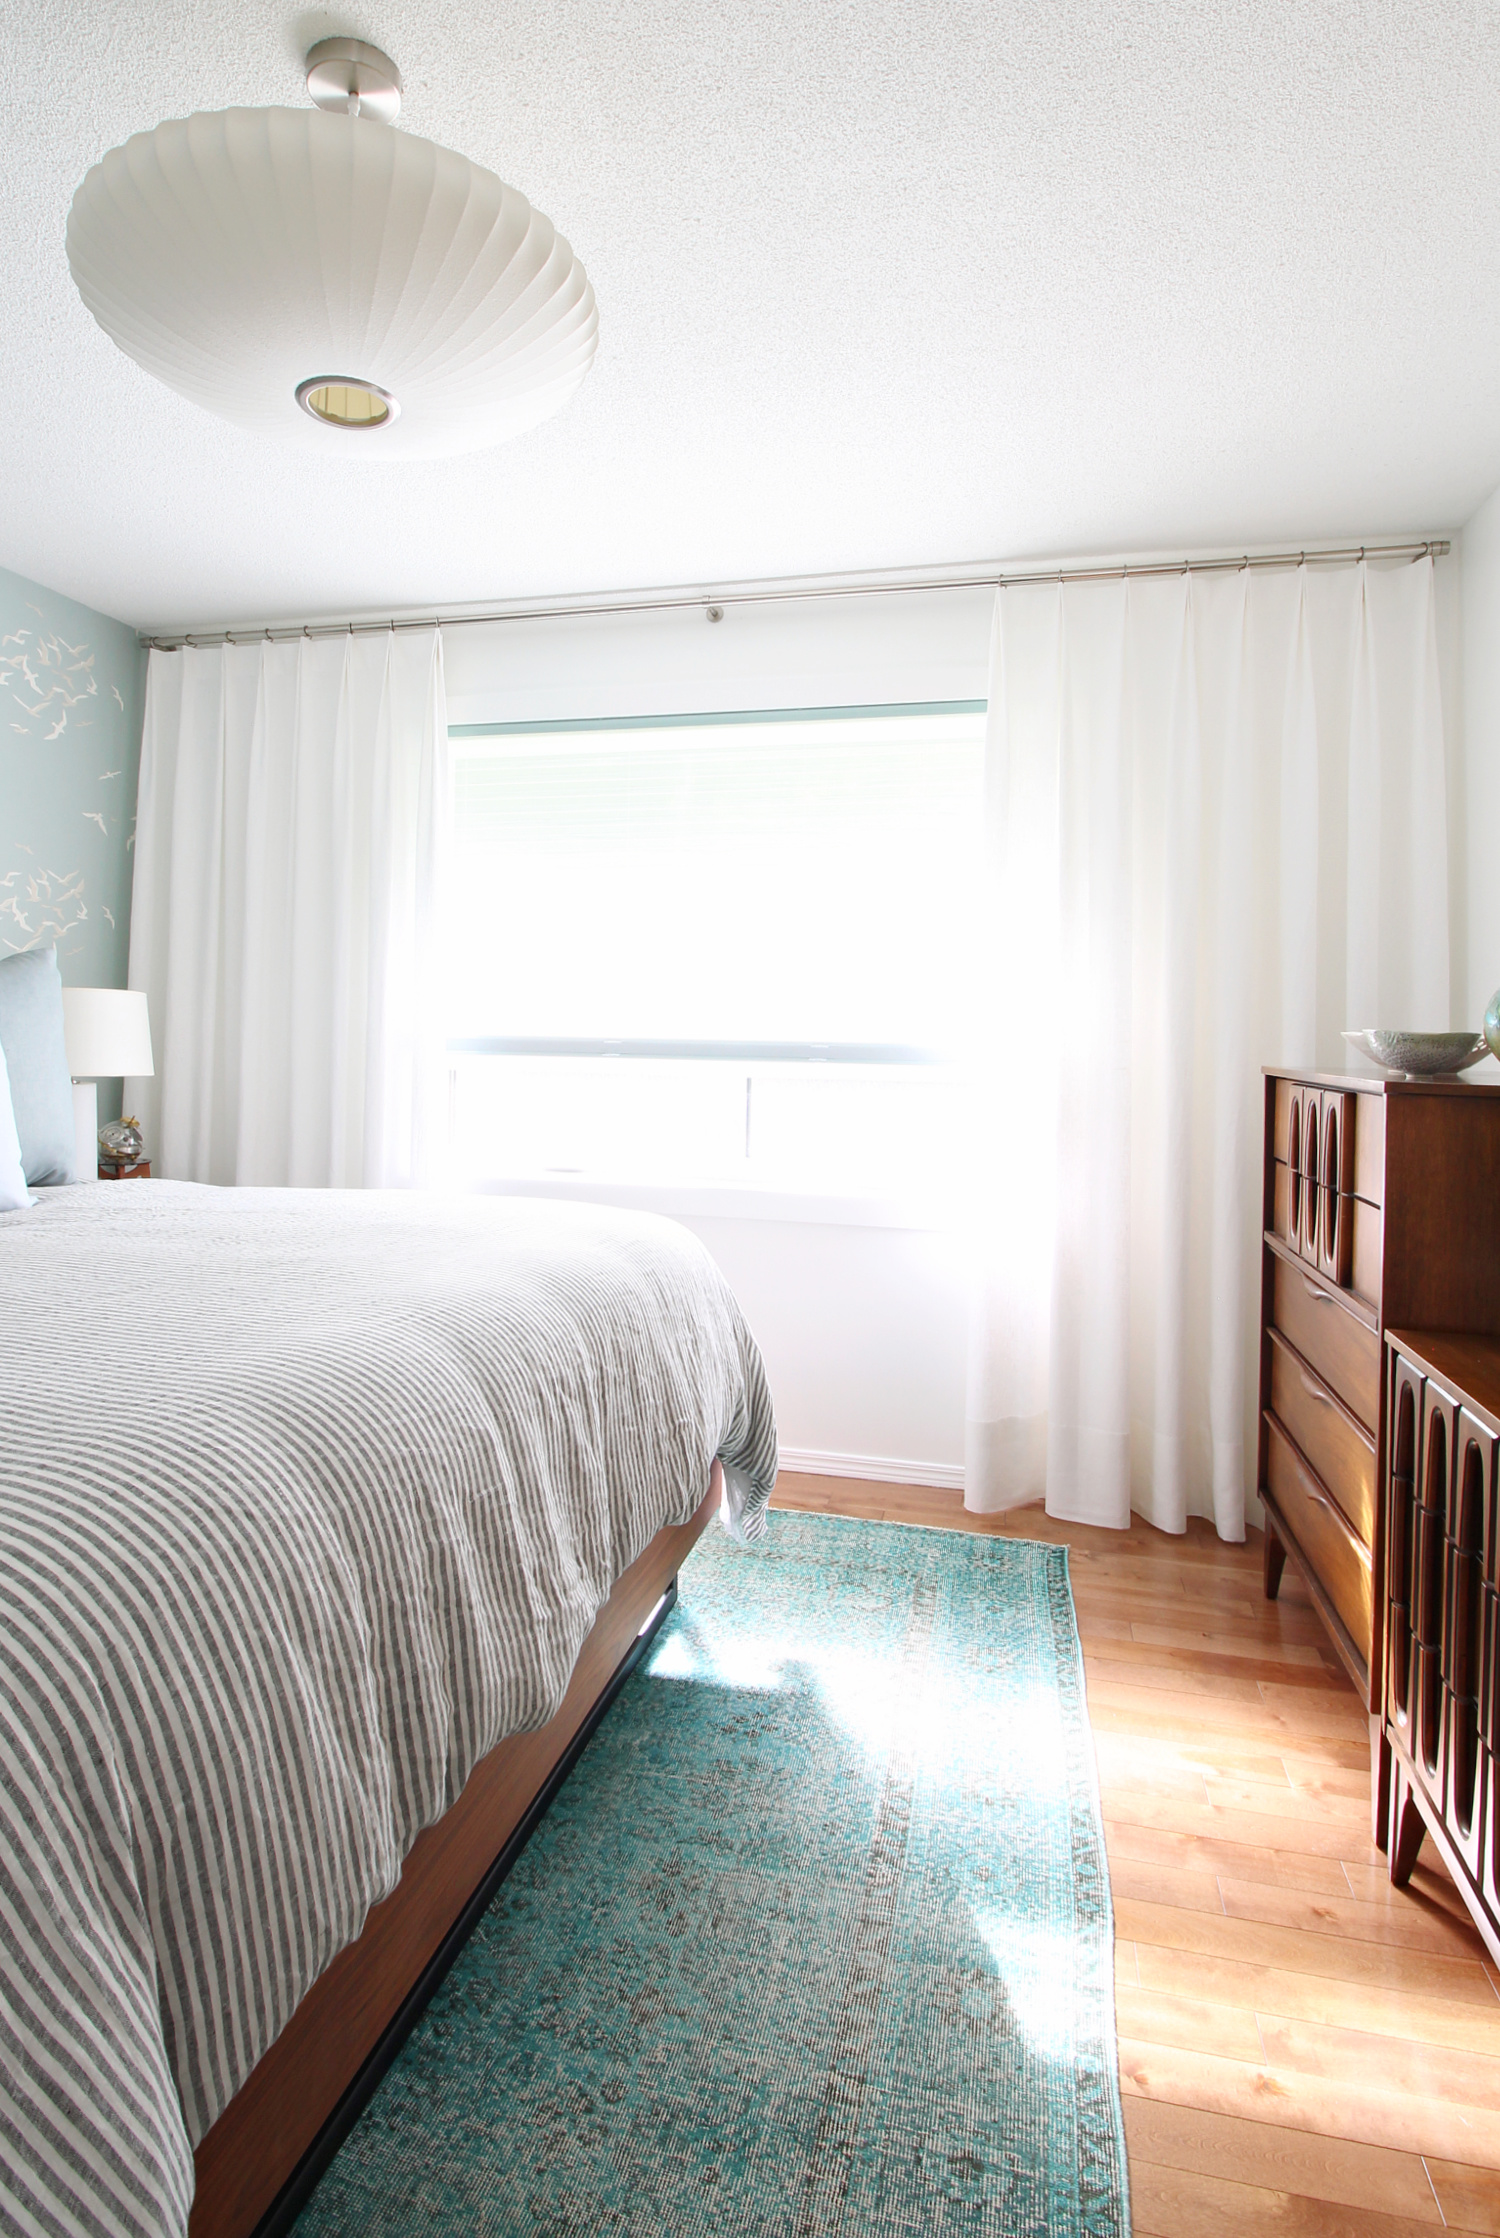
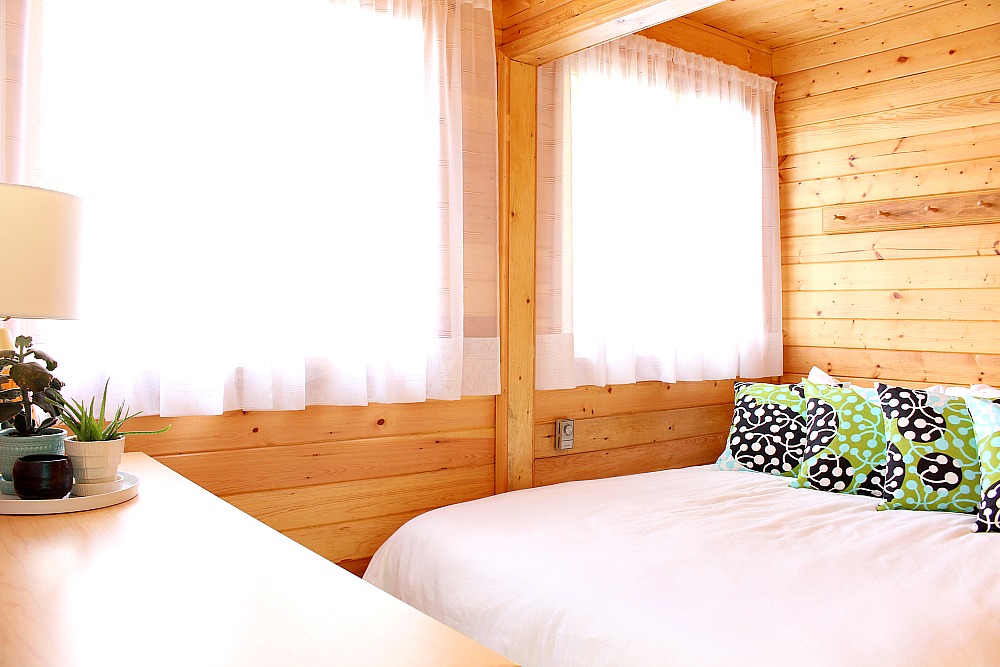
THE MAIN BEDROOM – AFTER
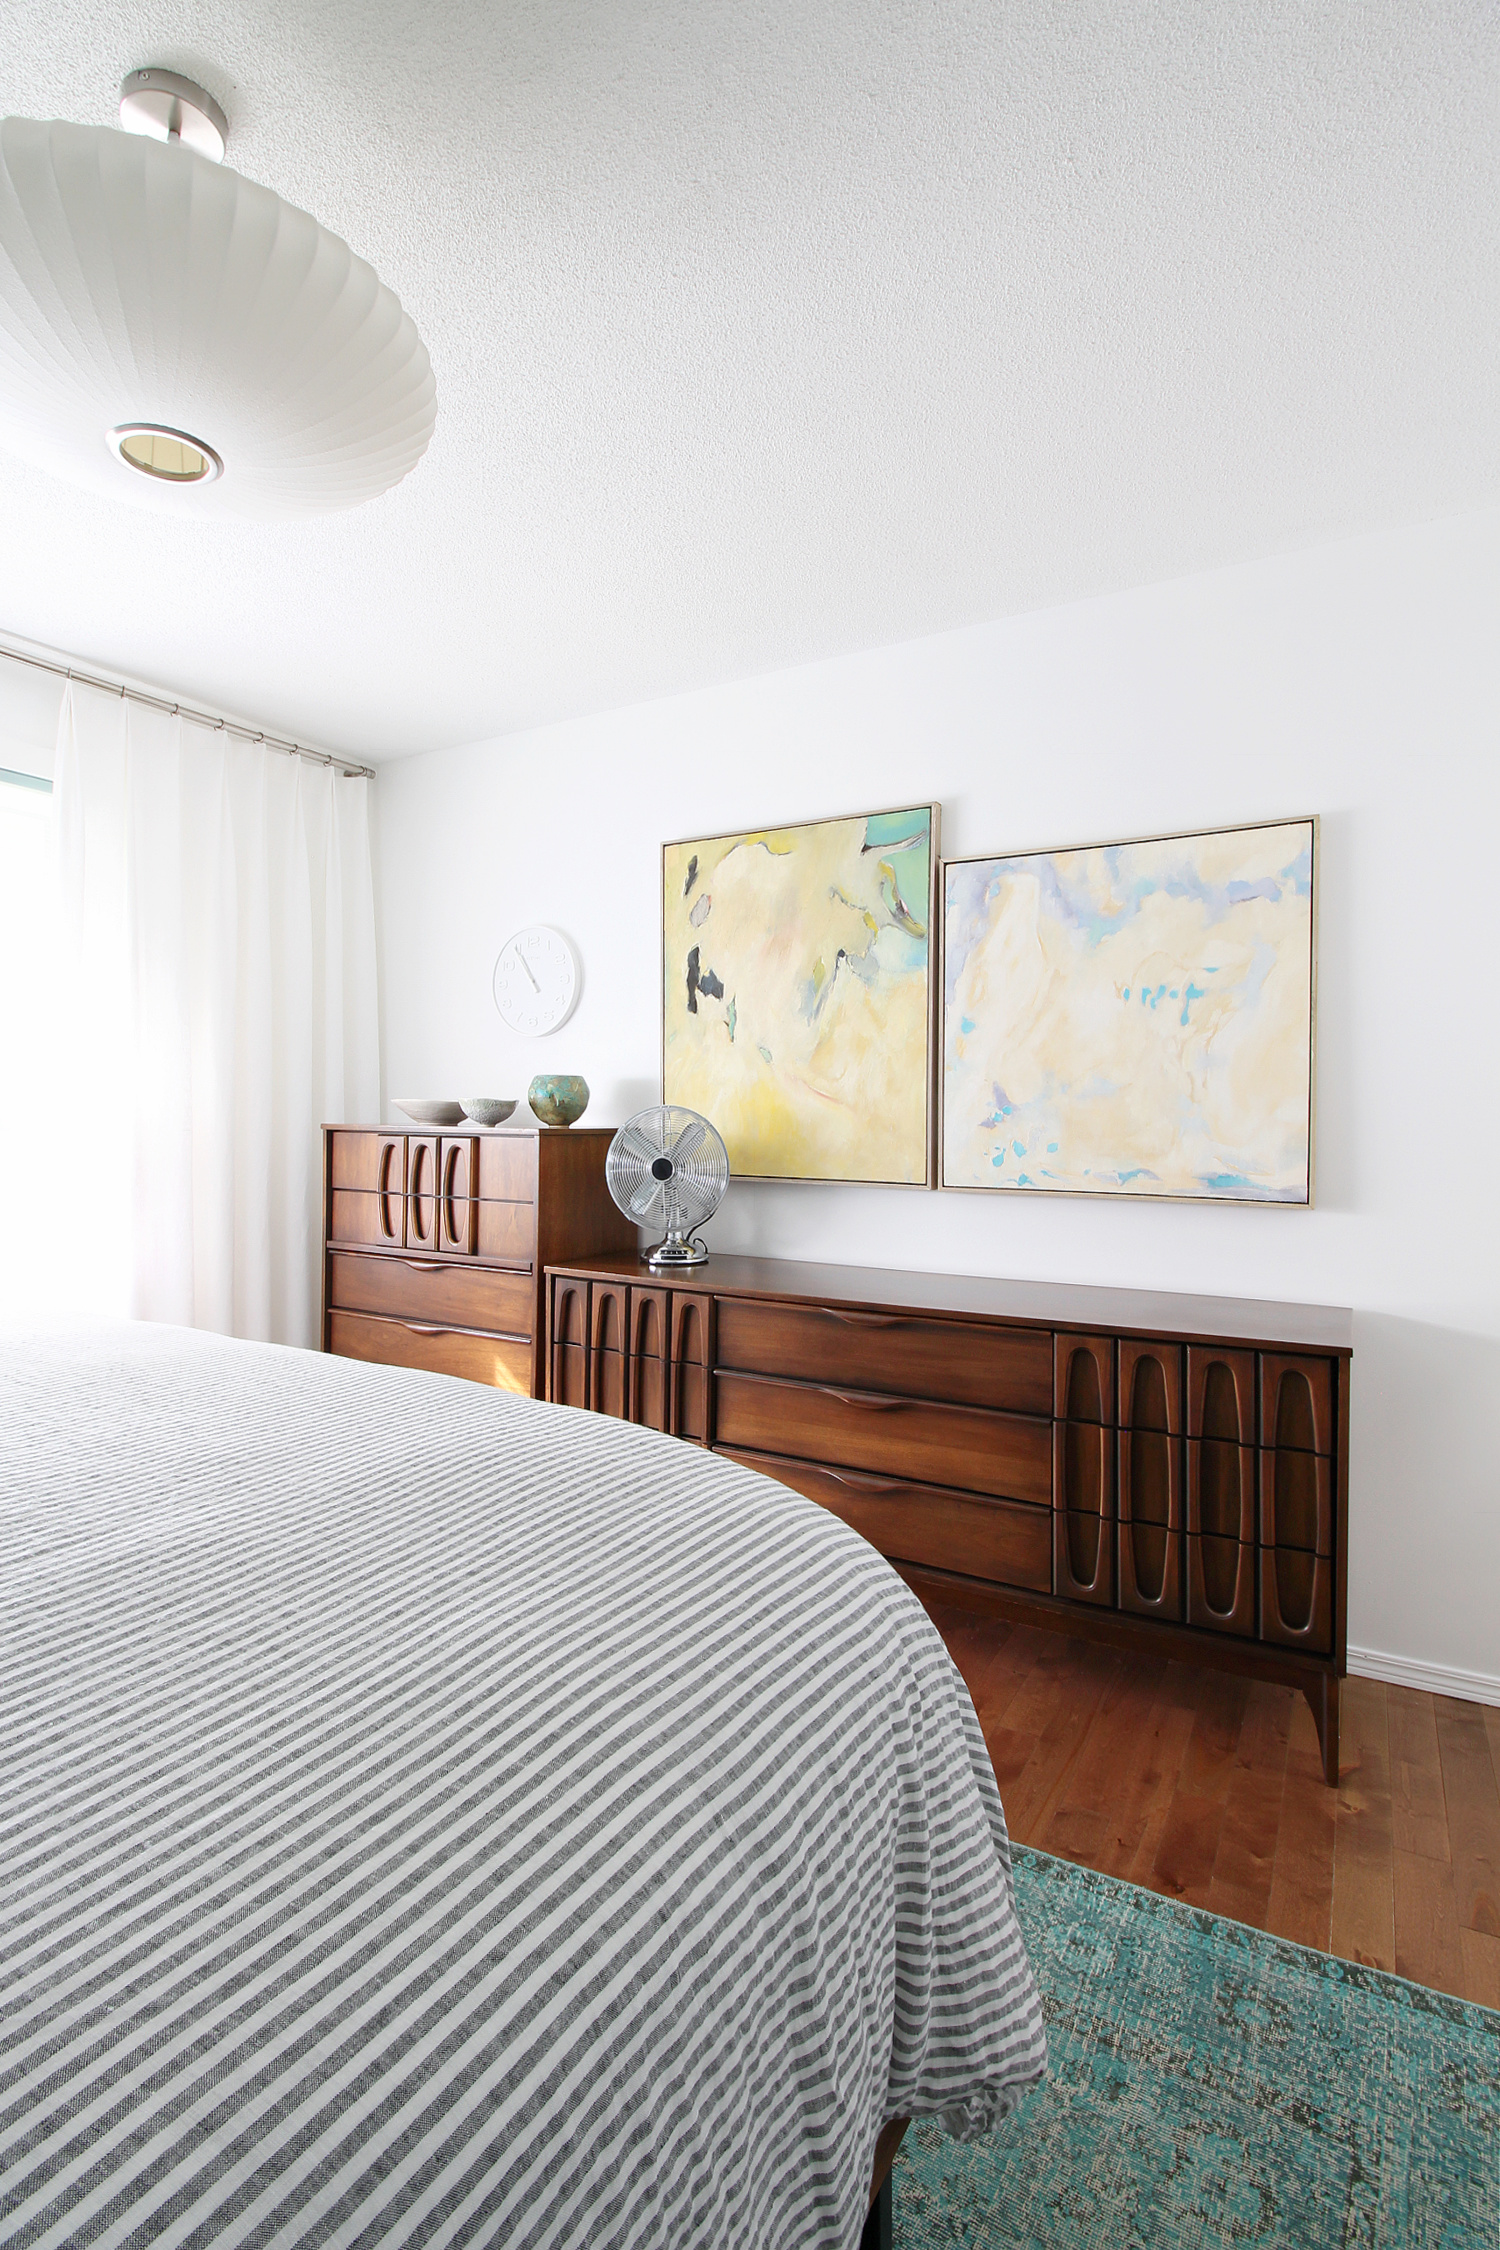
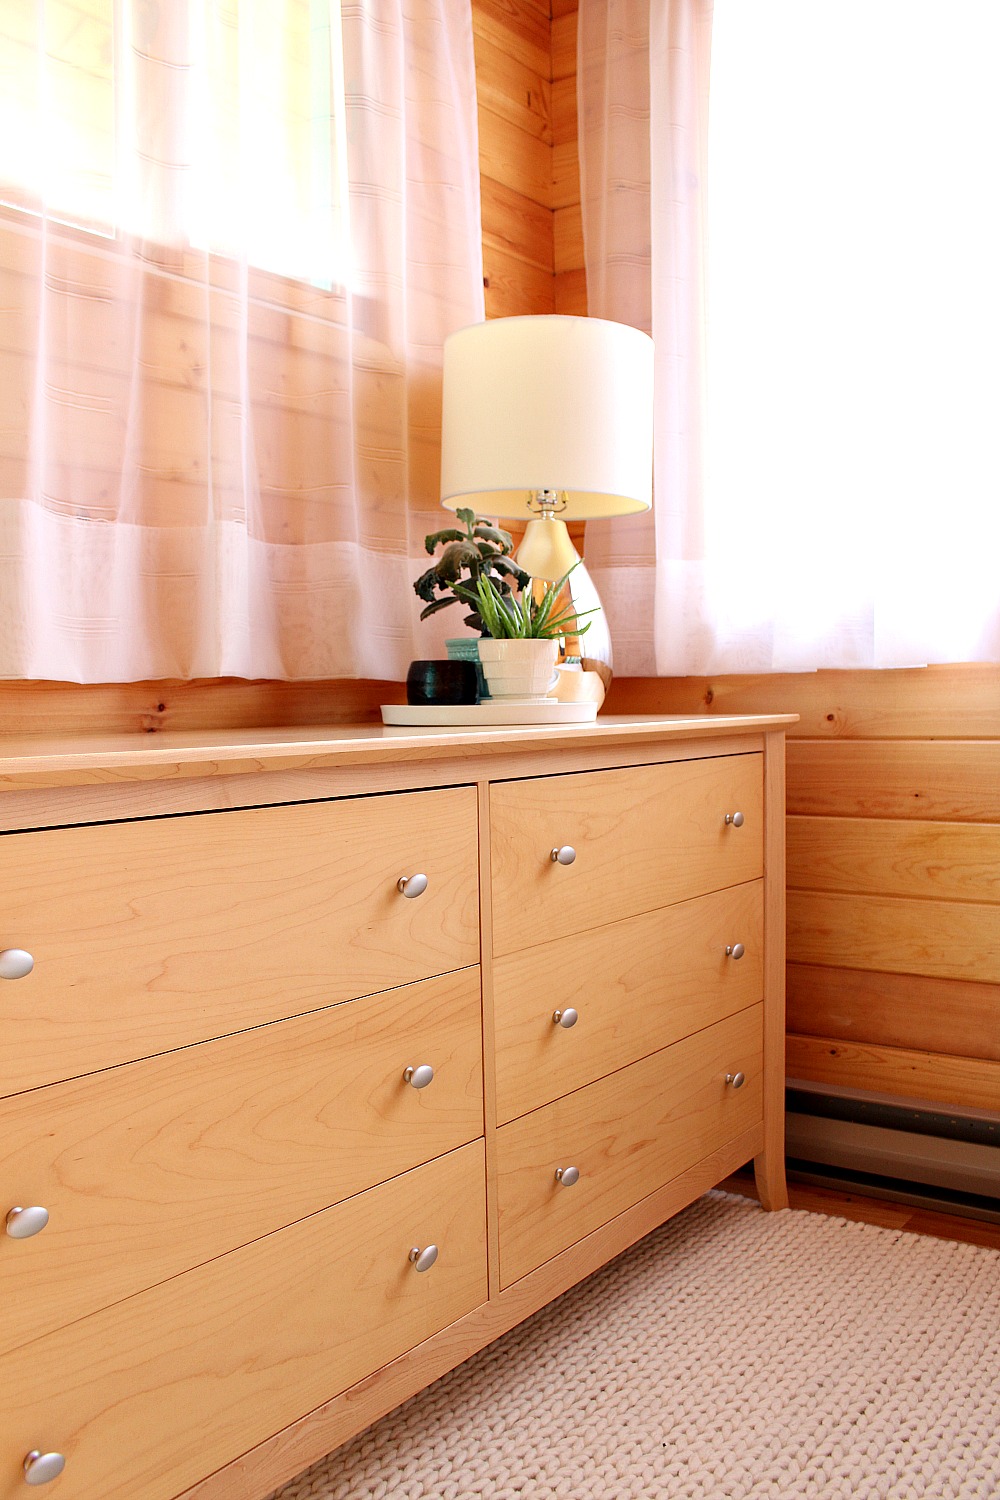
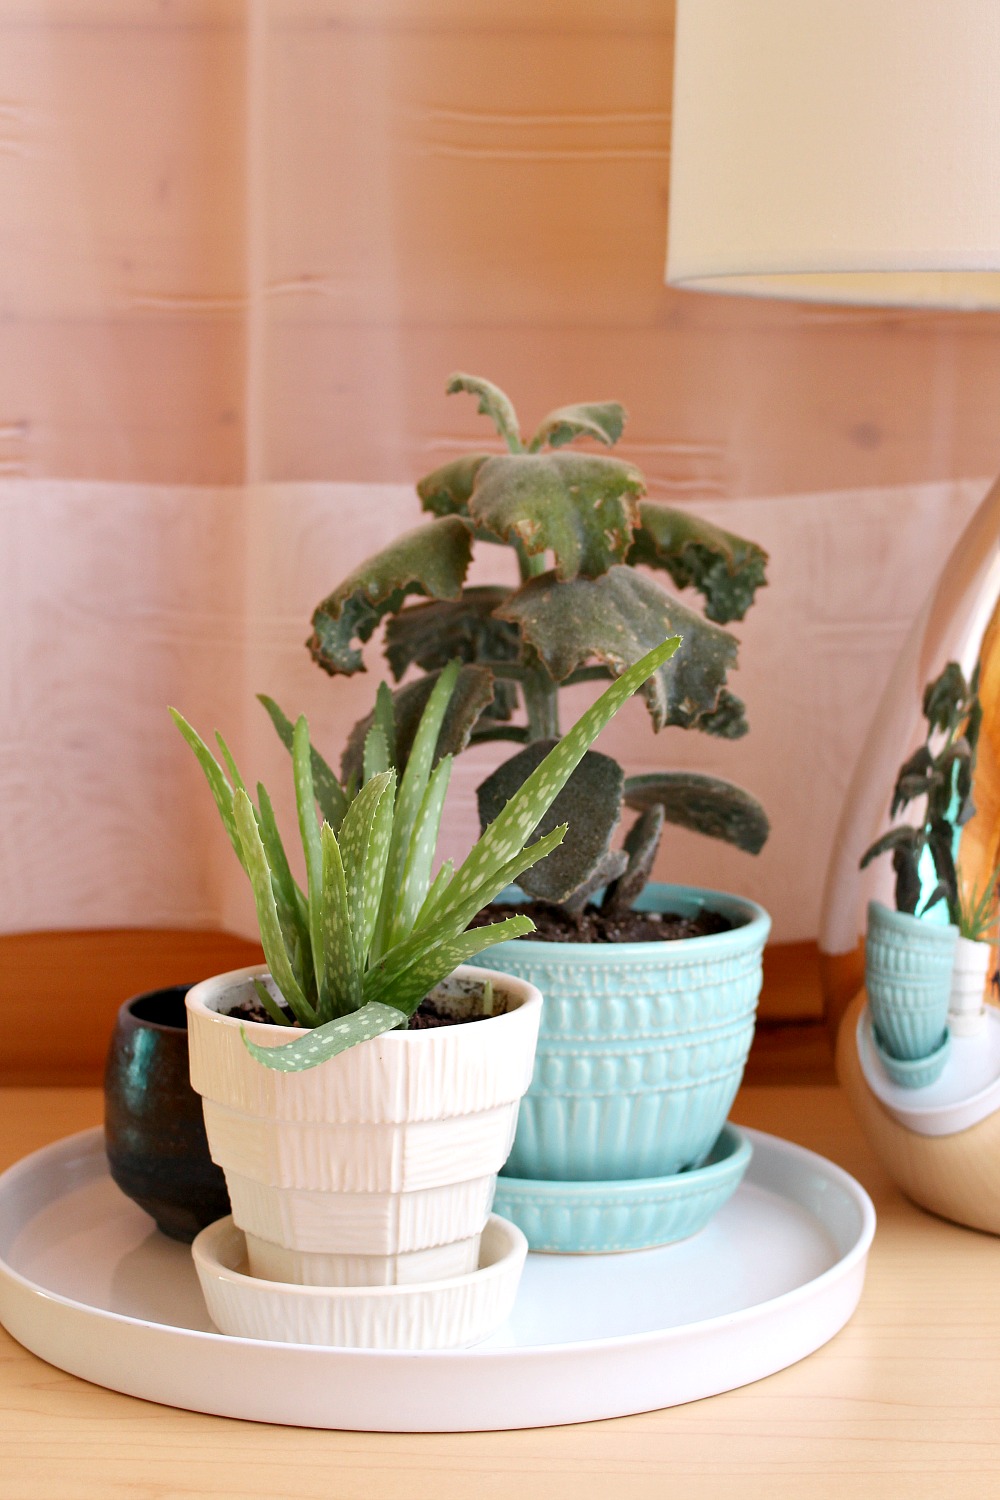
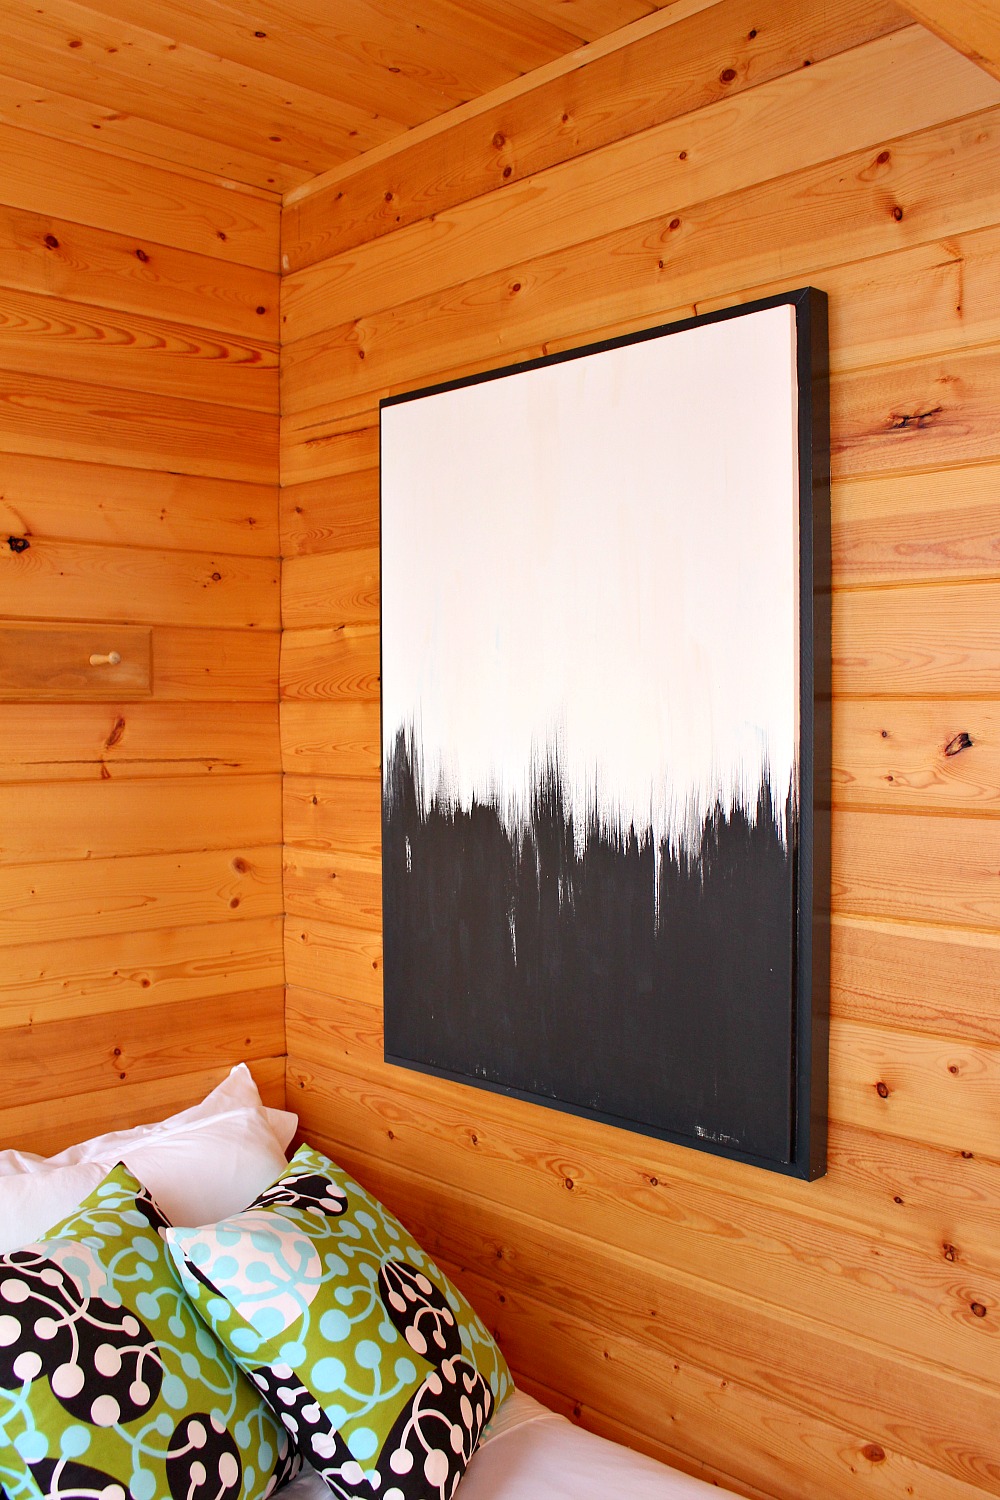
The bedroom walls, ceiling, and trim were all painted white. We moved in our headboard (I designed it and my grandfather welded it, along with the two nightstands) – and then decided to build a DIY walnut bed with welded legs to match. Next we hacked out nightstands with DIY drawers. Along the way, we wallpapered behind the bed, inherited MCM walnut dressers, and installed a thrifted bubble lamp ($20!).

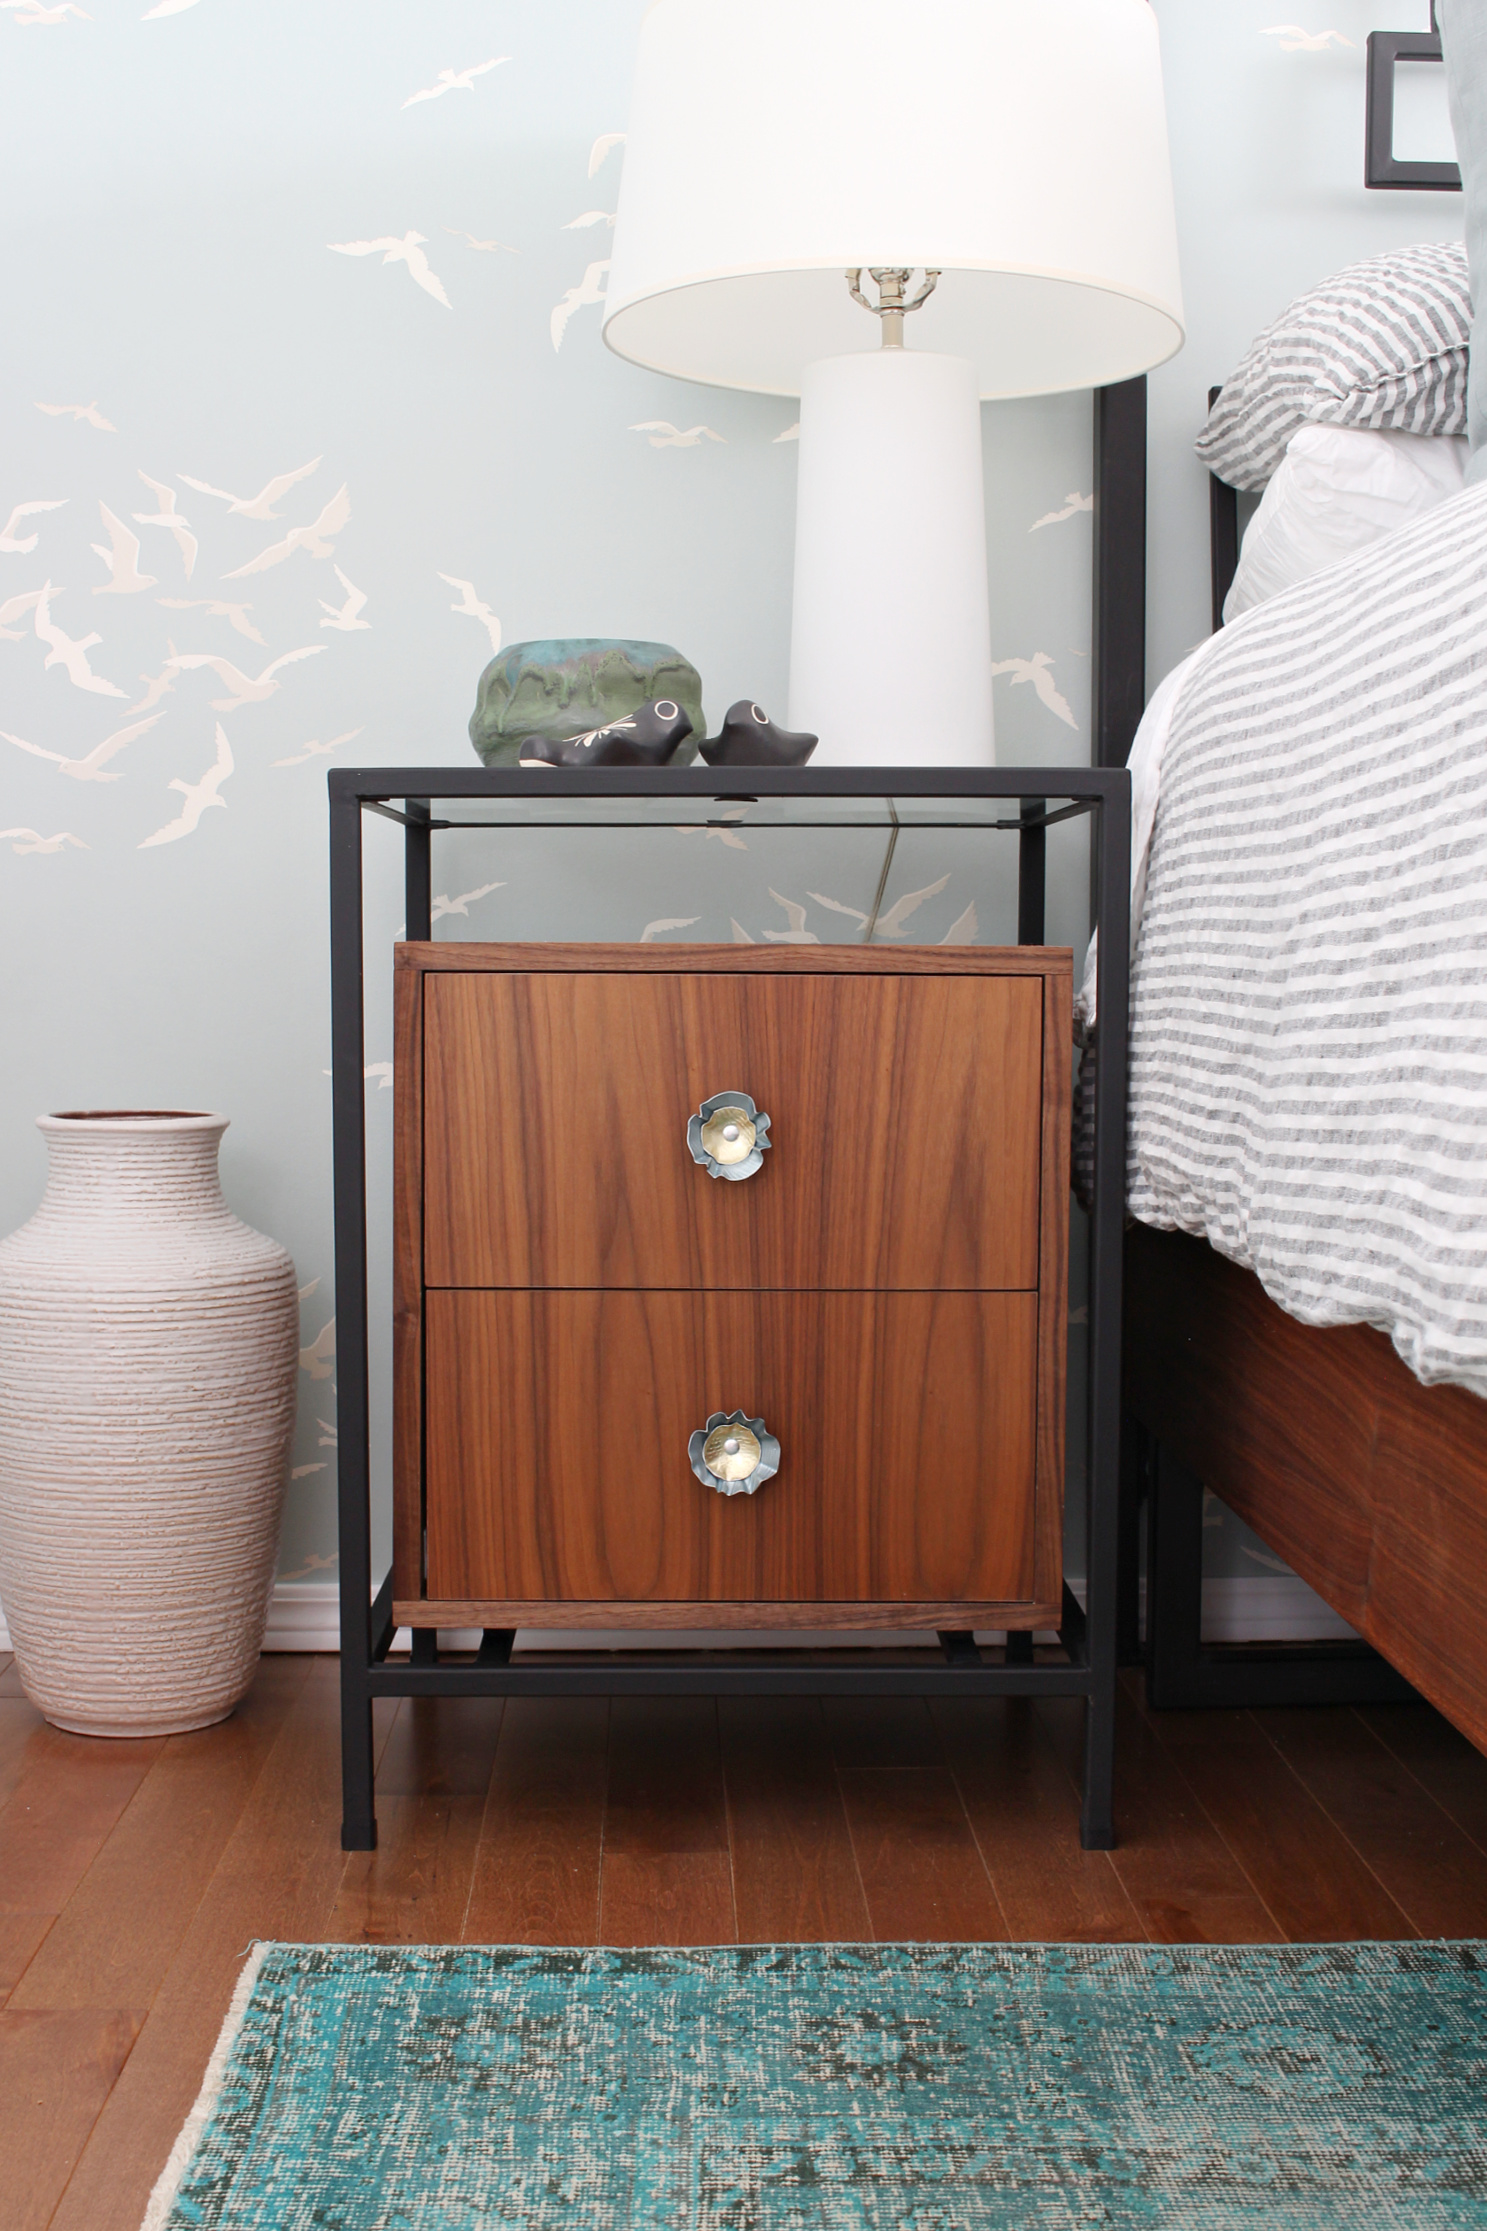

We ditched the mirrored doors, repaired the repaired replaced the missing hardwood flooring inside the closet, painted the closet interior bright orange (Hubby’s choice), and installed a new closet fitting system.
Before
Here’s what you see today, with brand new back painted glass closet doors:
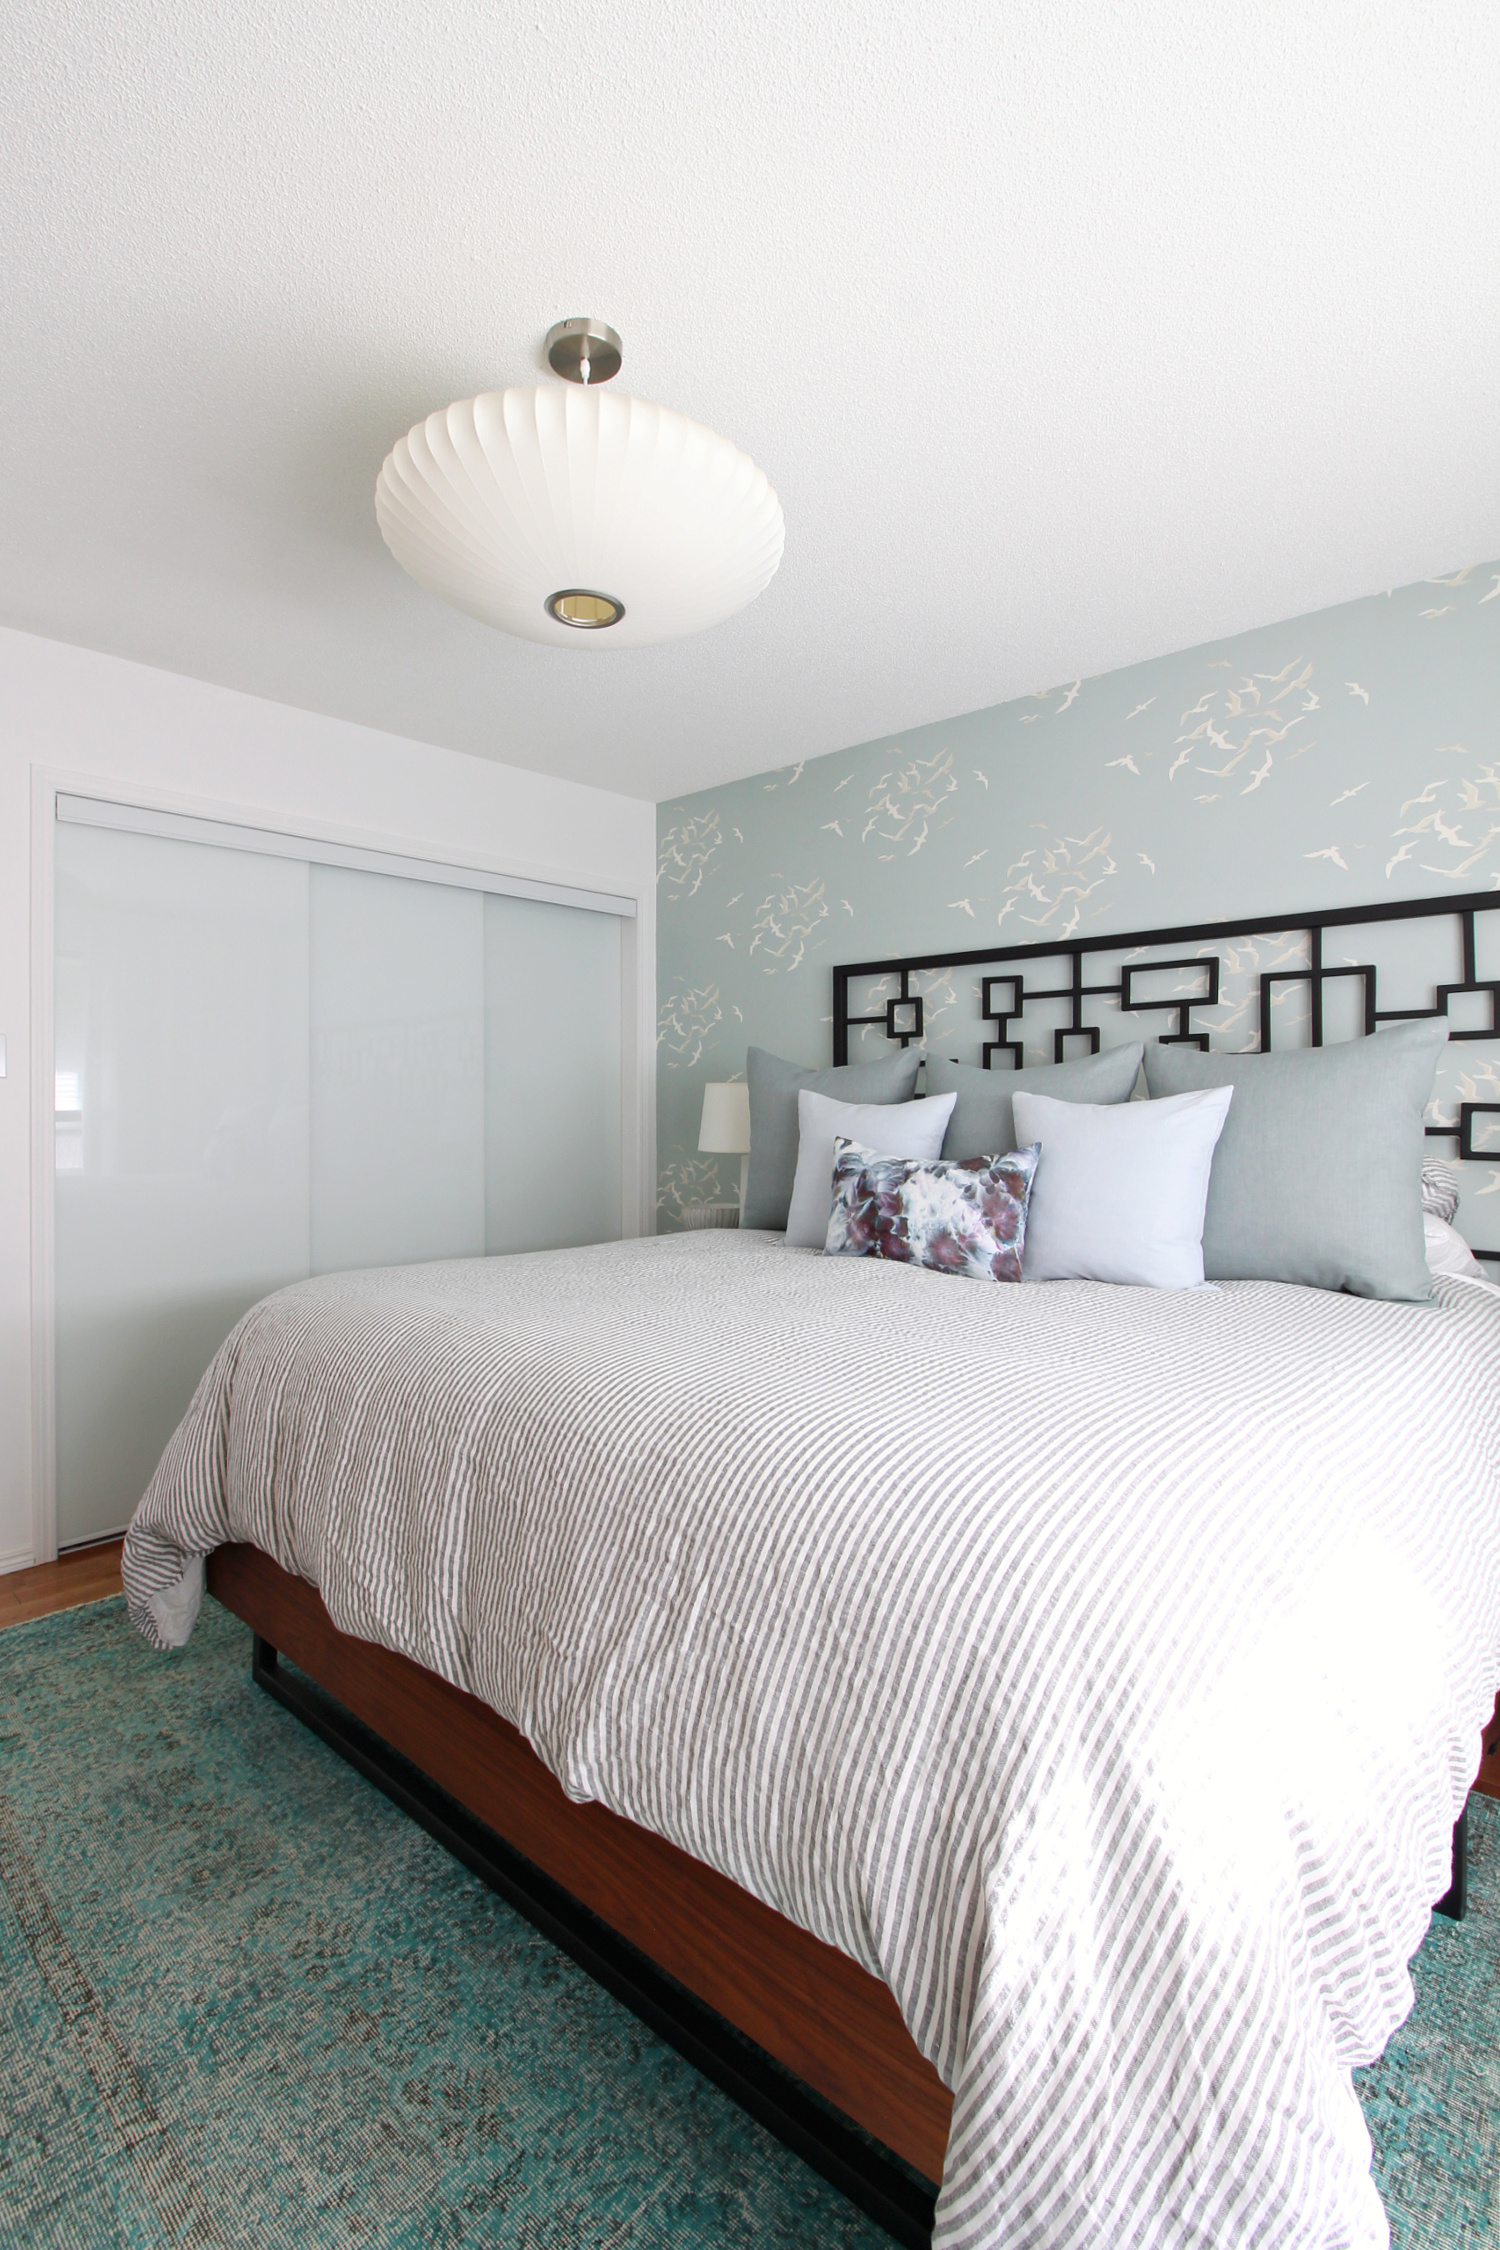
DIY WELDED HEADBOARD | DIY WALNUT BED | DIY WALNUT NIGHTSTAND | DIY UPCYCLED METAL KNOBS | HOW TO REPAIR FLOORBOARDS | DIY CLOSET MAKEOVER | HOW TO HANG WALLPAPER | DIY EURO PLEATED DRAPES | DIY THROW PILLOWS
THE SECOND BEDROOM – BEFORE
Before
Before
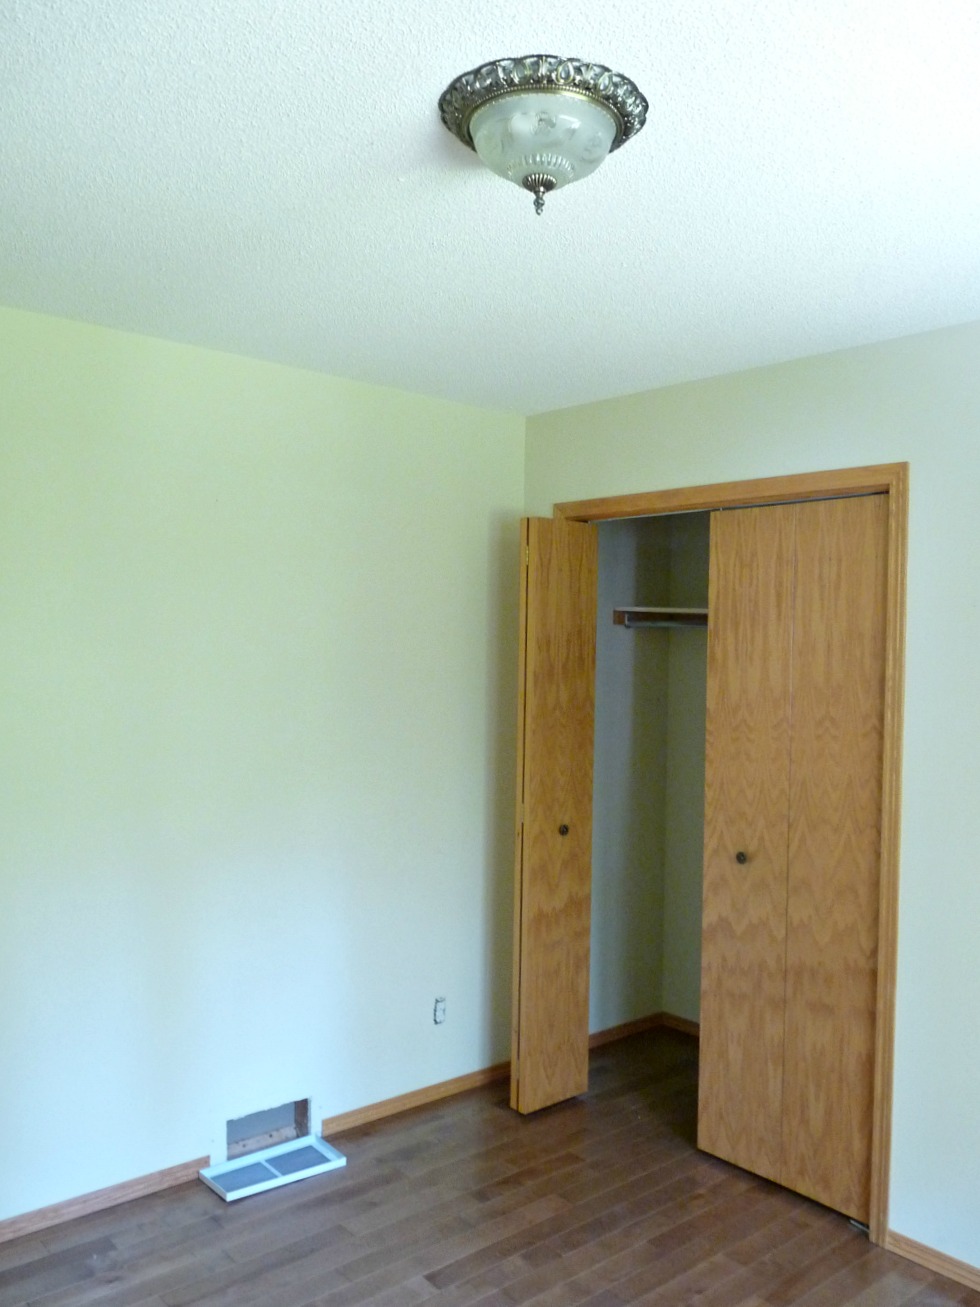
Before
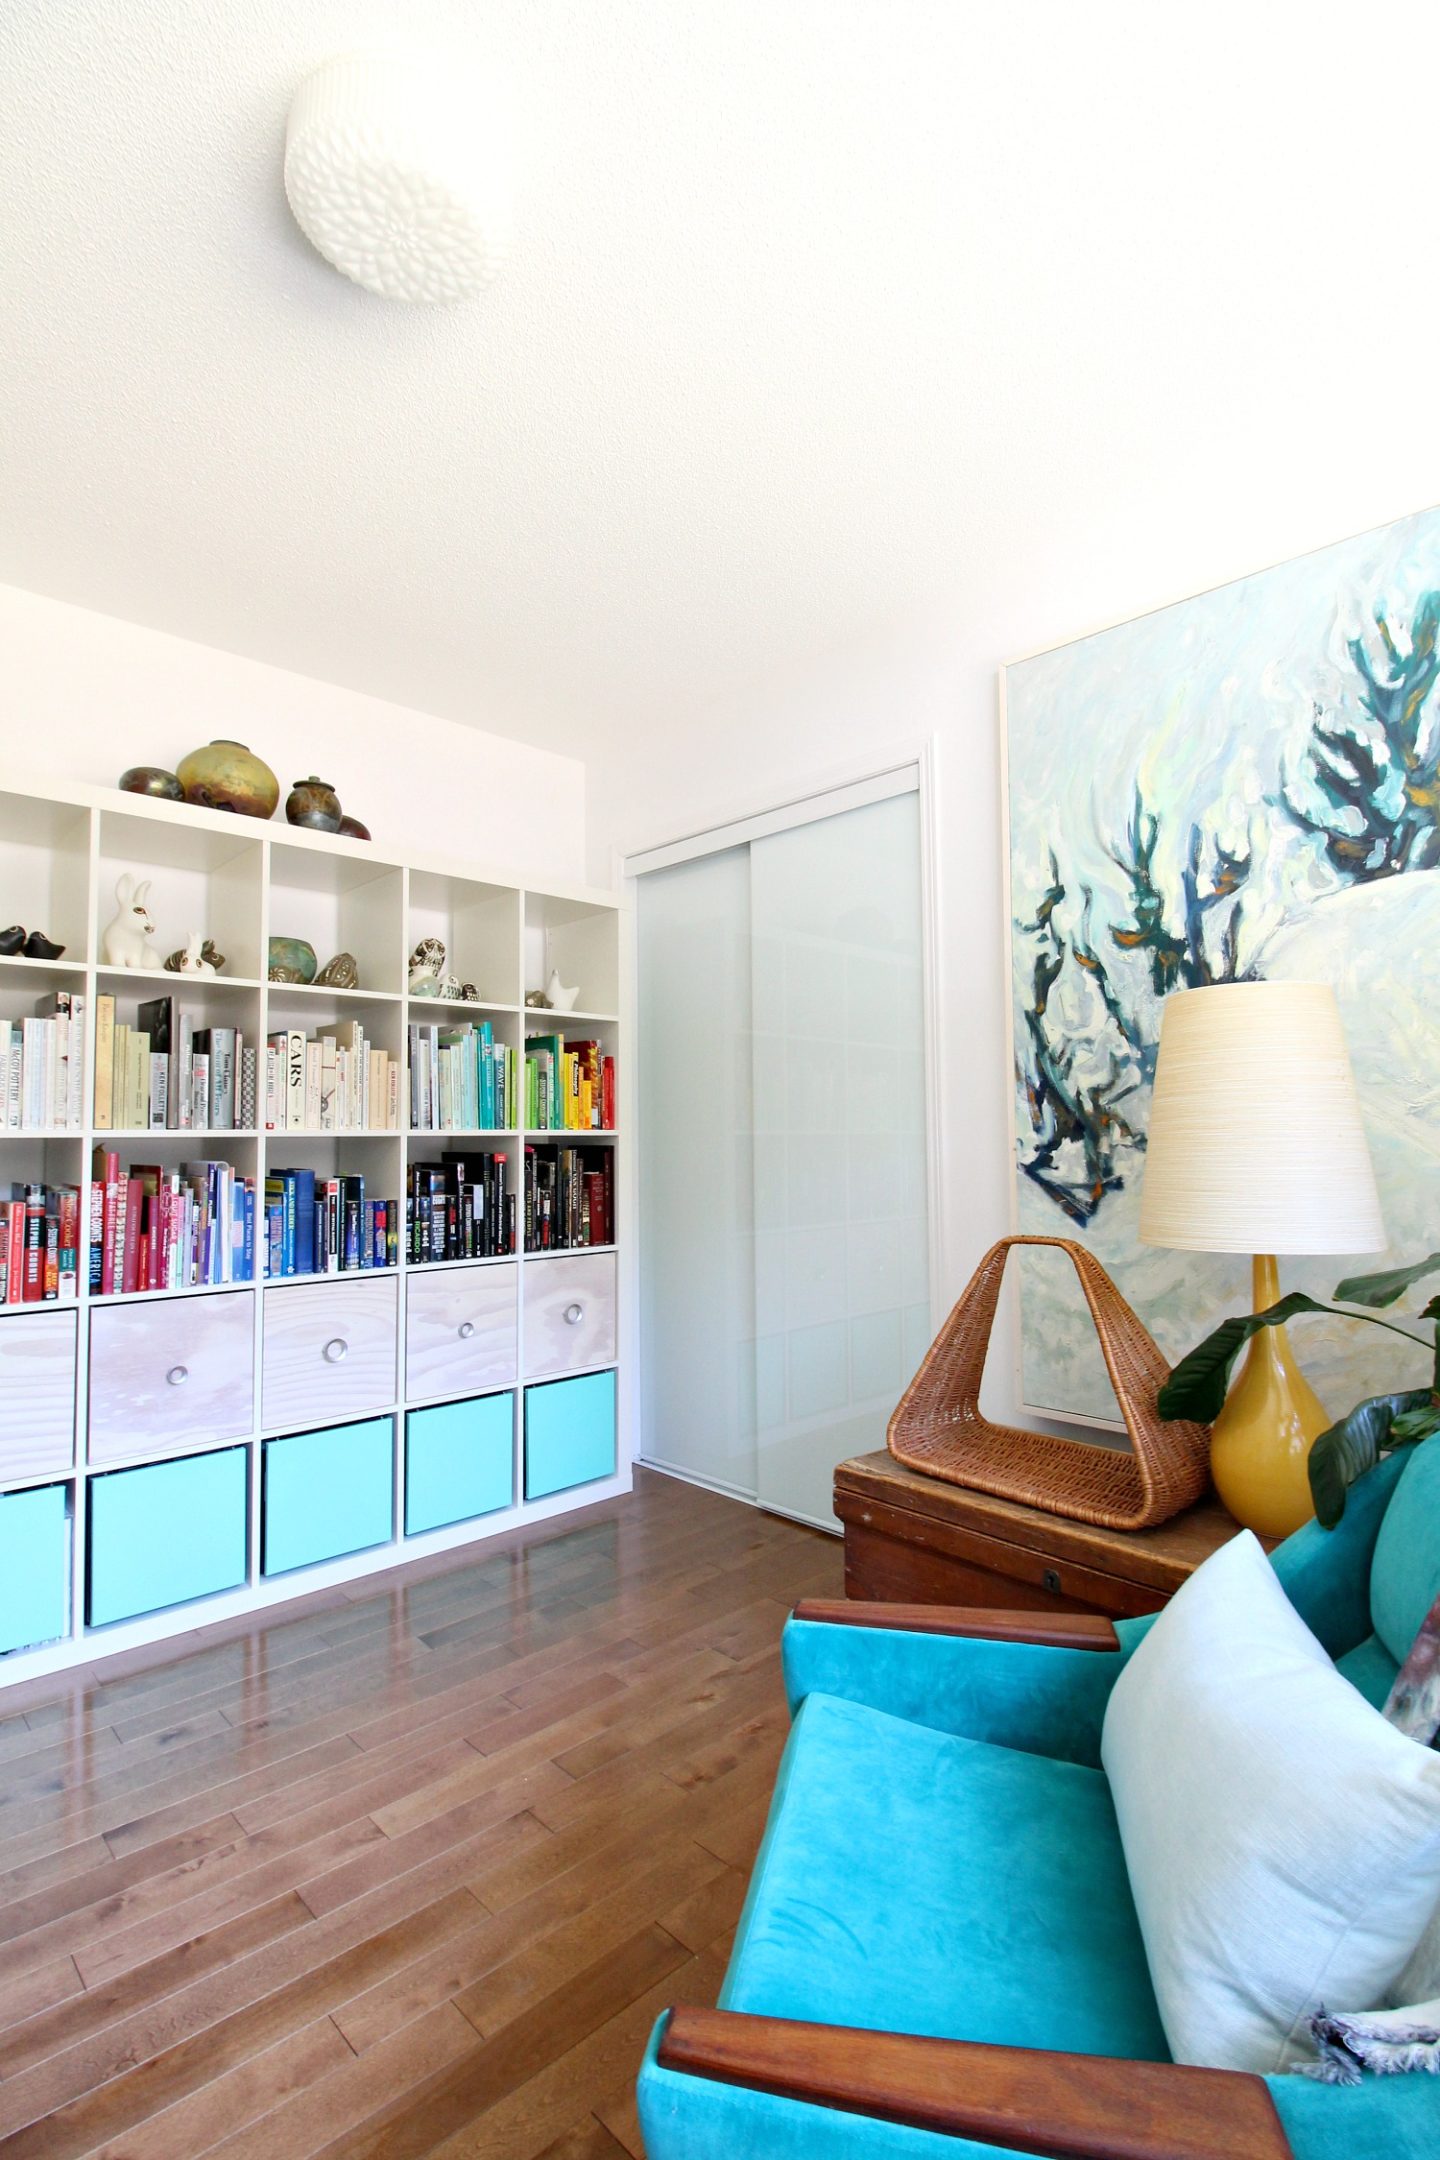
THE HOME OFFICE – NOW
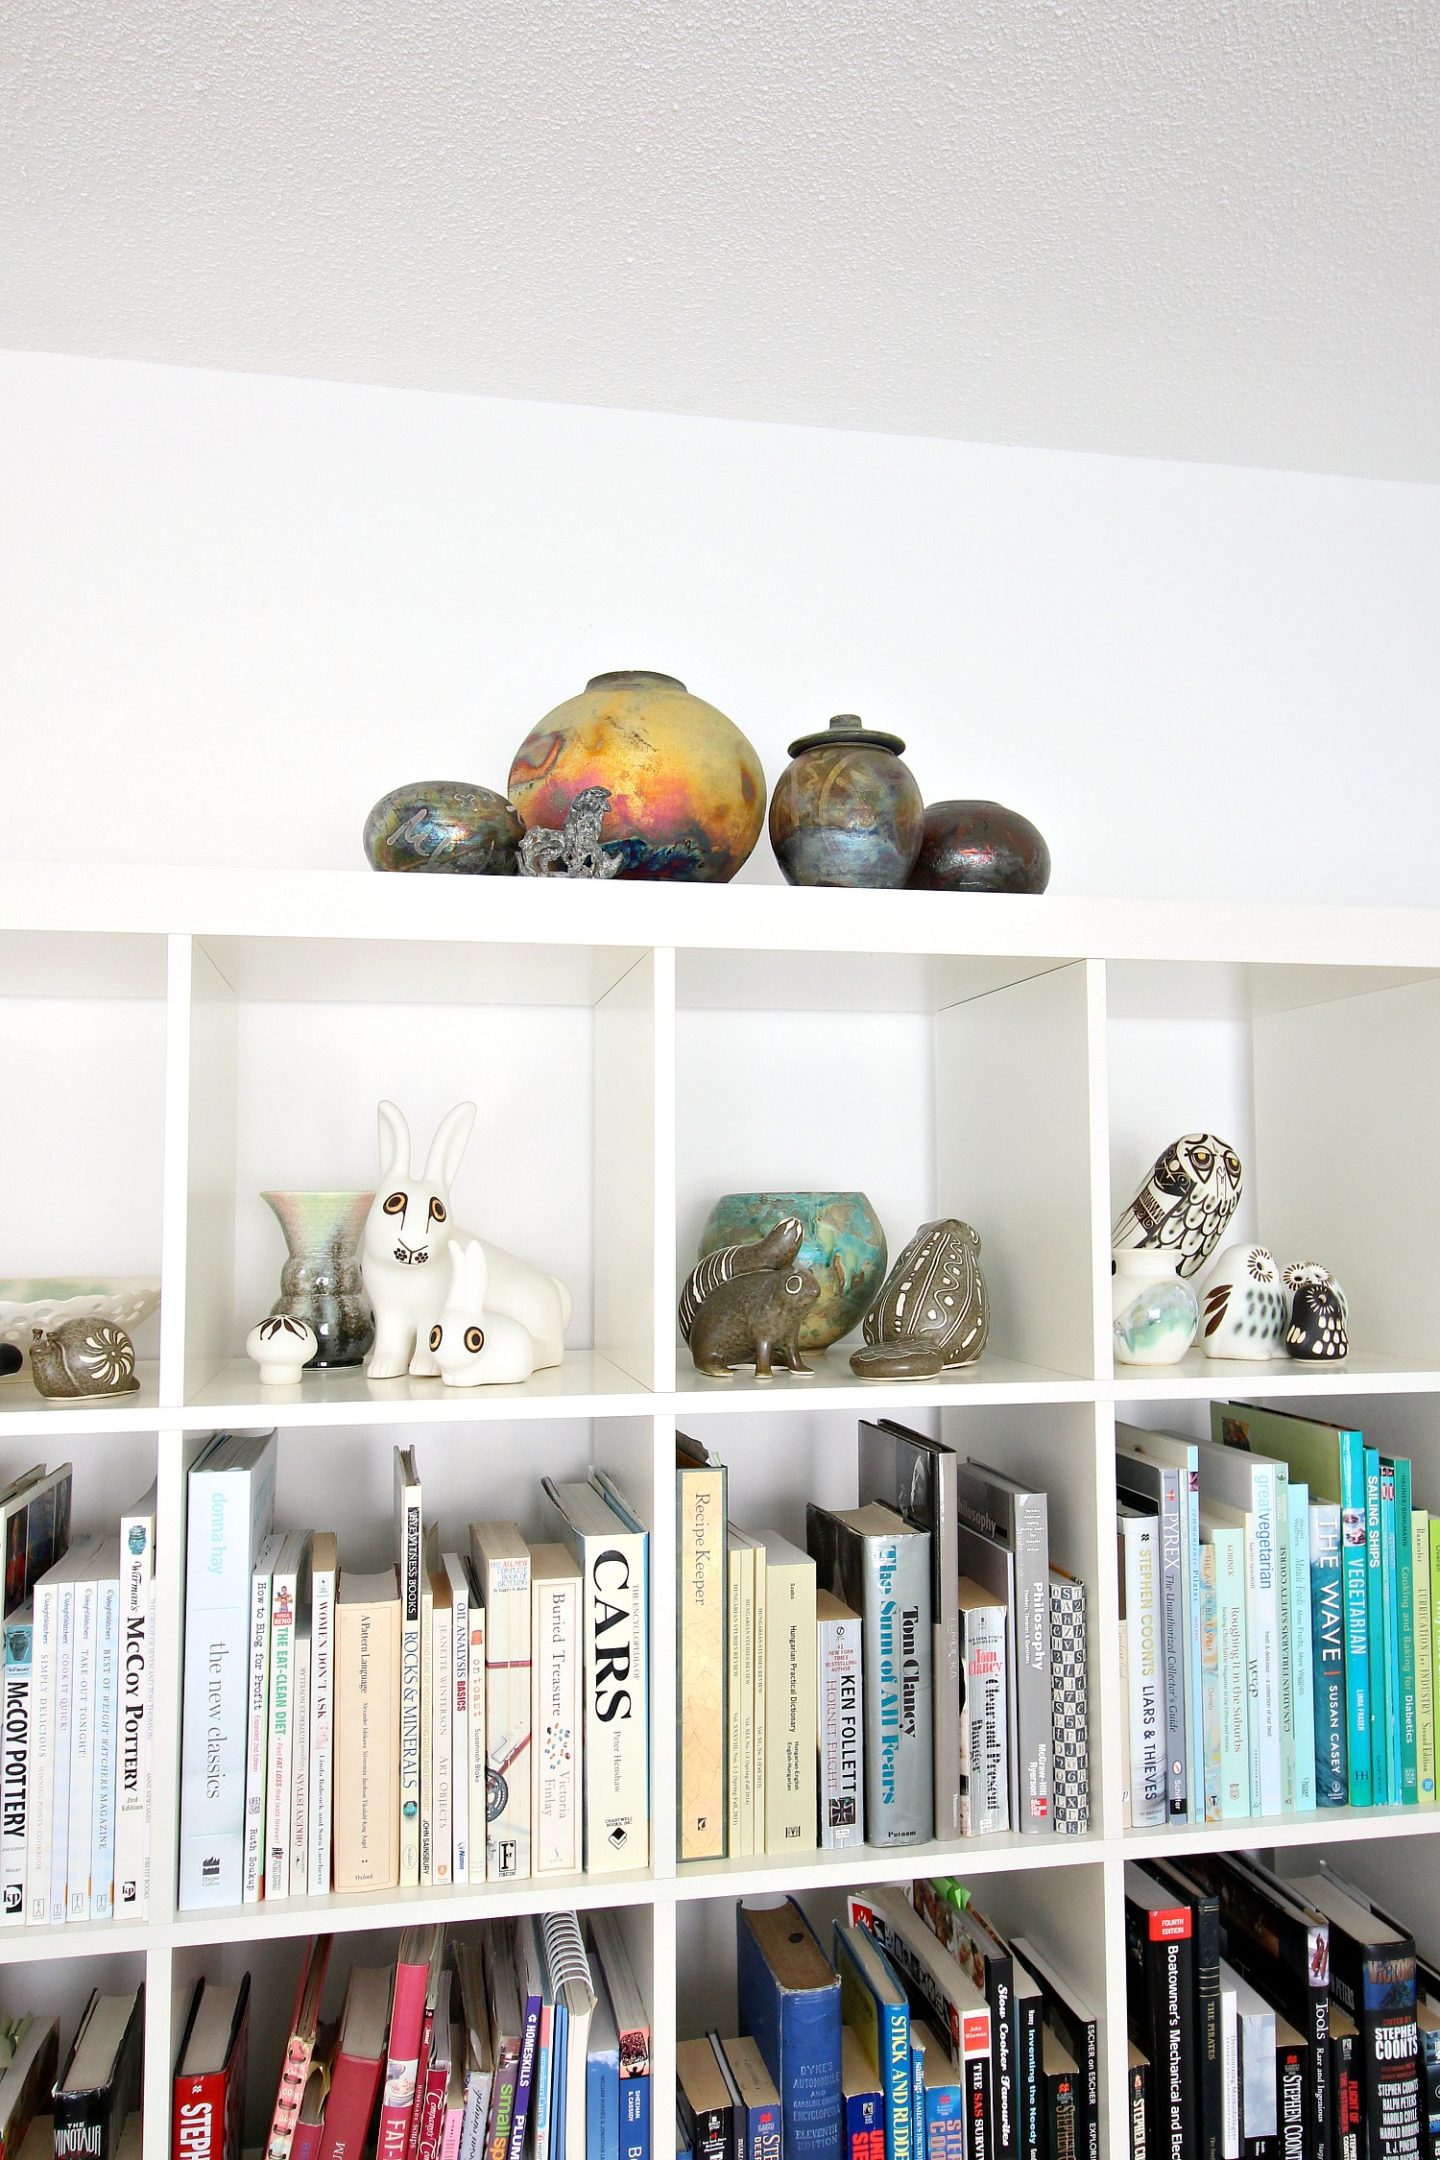
We redecorated the home office to carve out a functional workspace for two. We created a modern walnut desk and moved in my beloved mid-century teal velvet chair (heaved from a trash heap on the way to a Weezer concert). We also made DIY magazine holders and swinging “doors” for the Expedit bookcase.
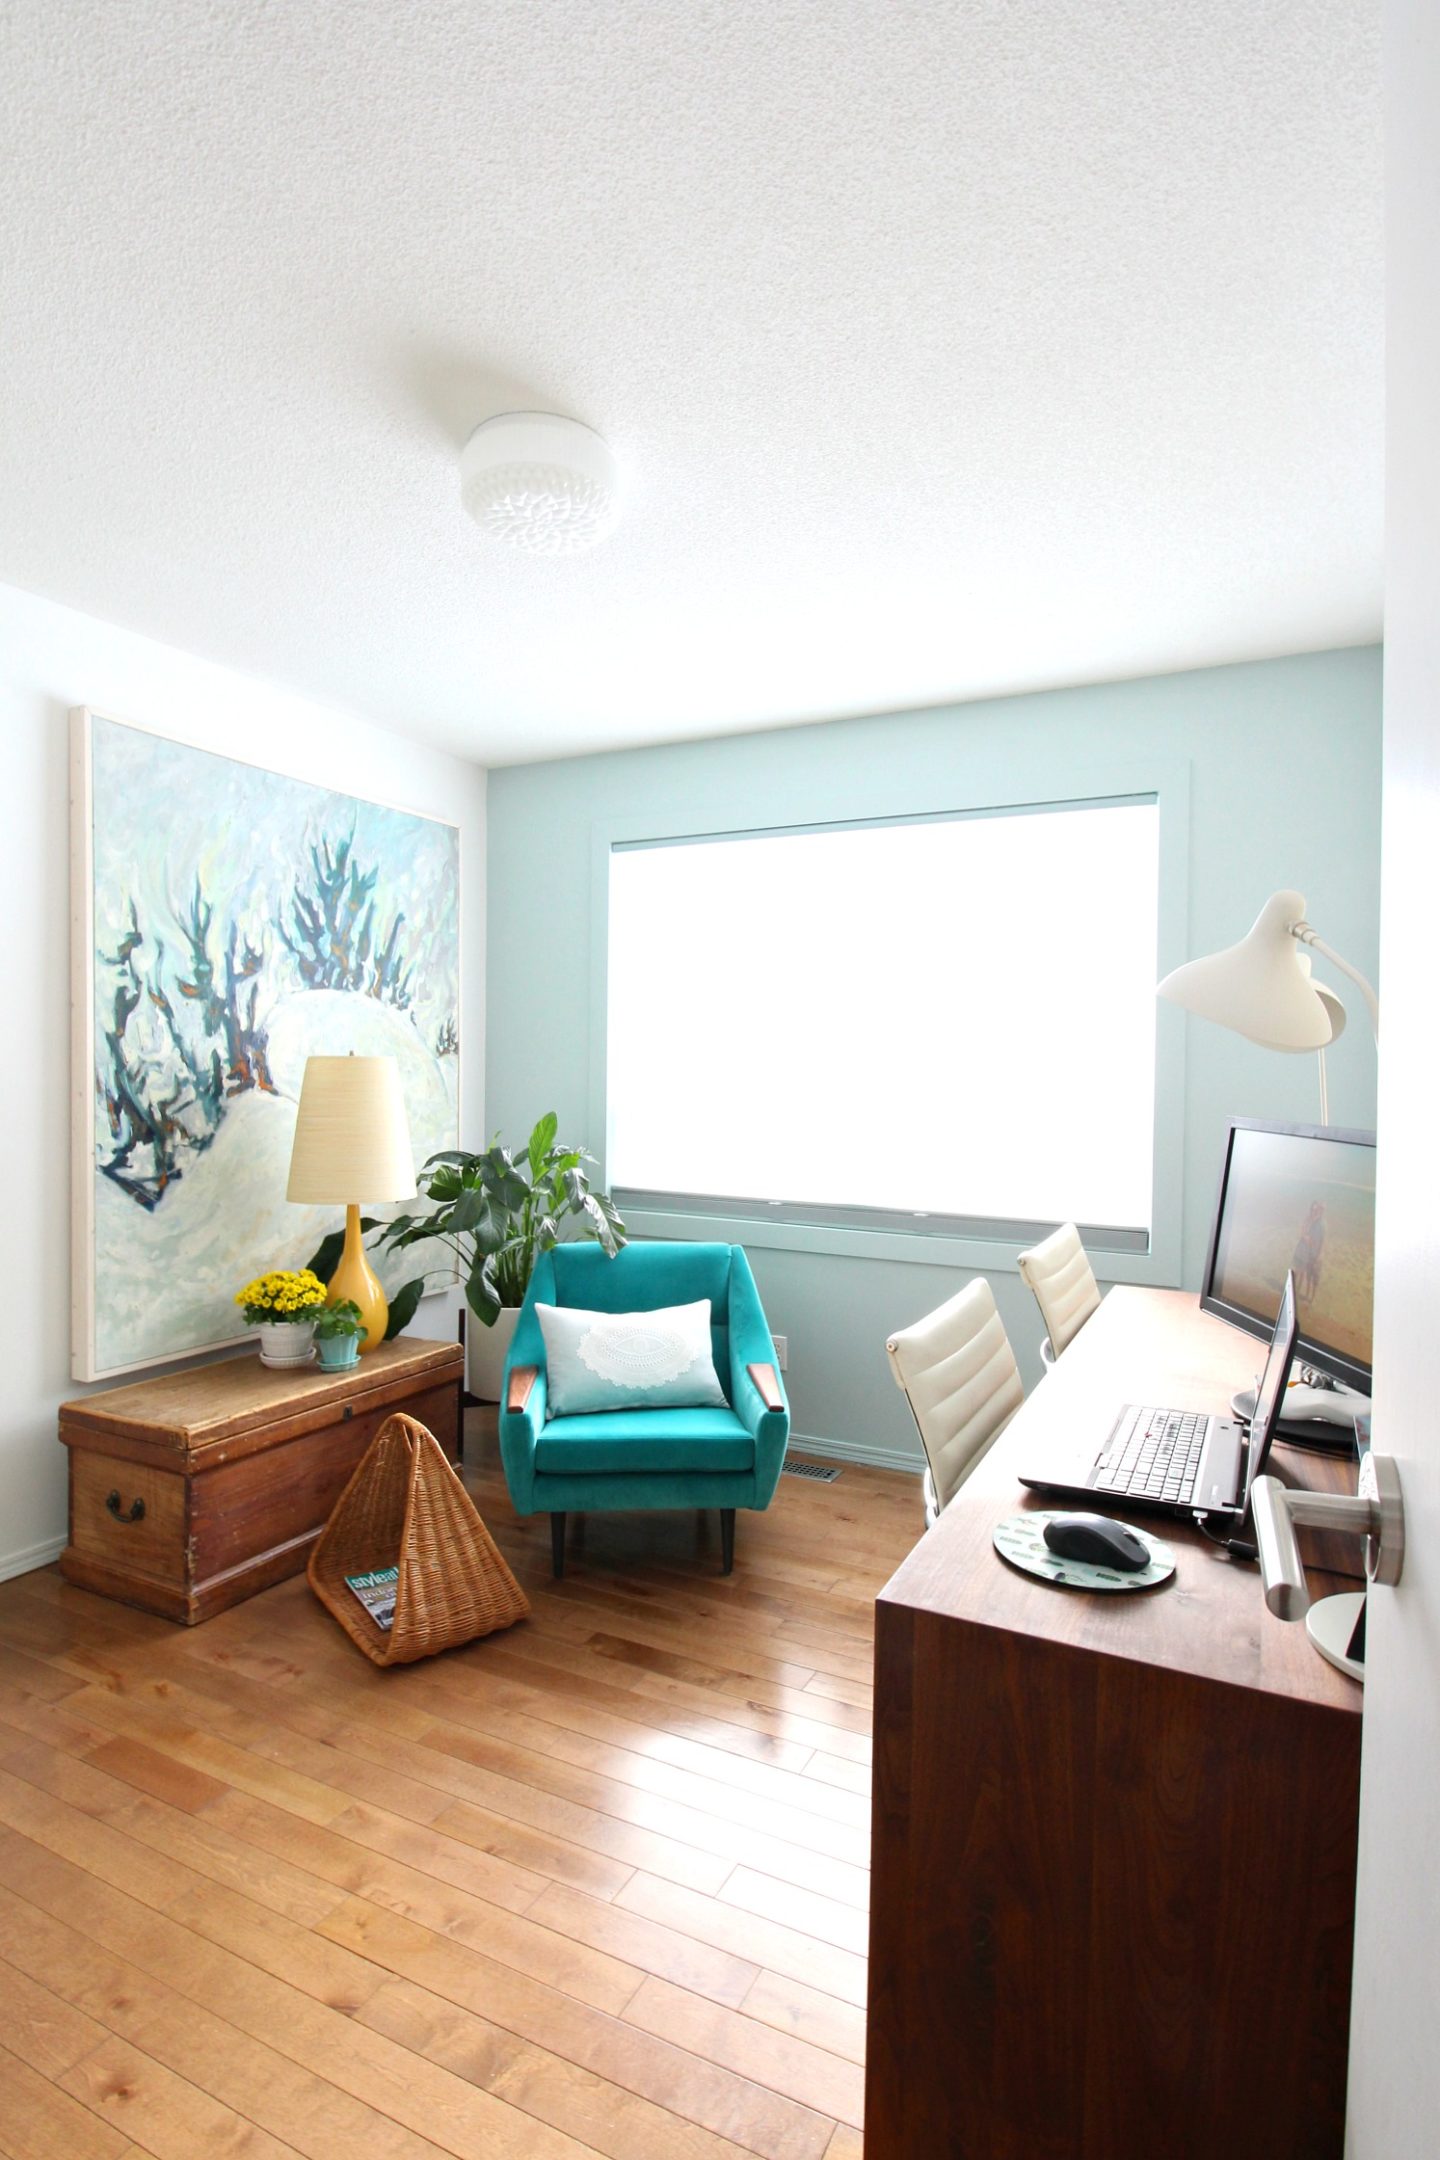
All of the artwork is by Hubby’s grandfather – see how we made a simple DIY frame here.
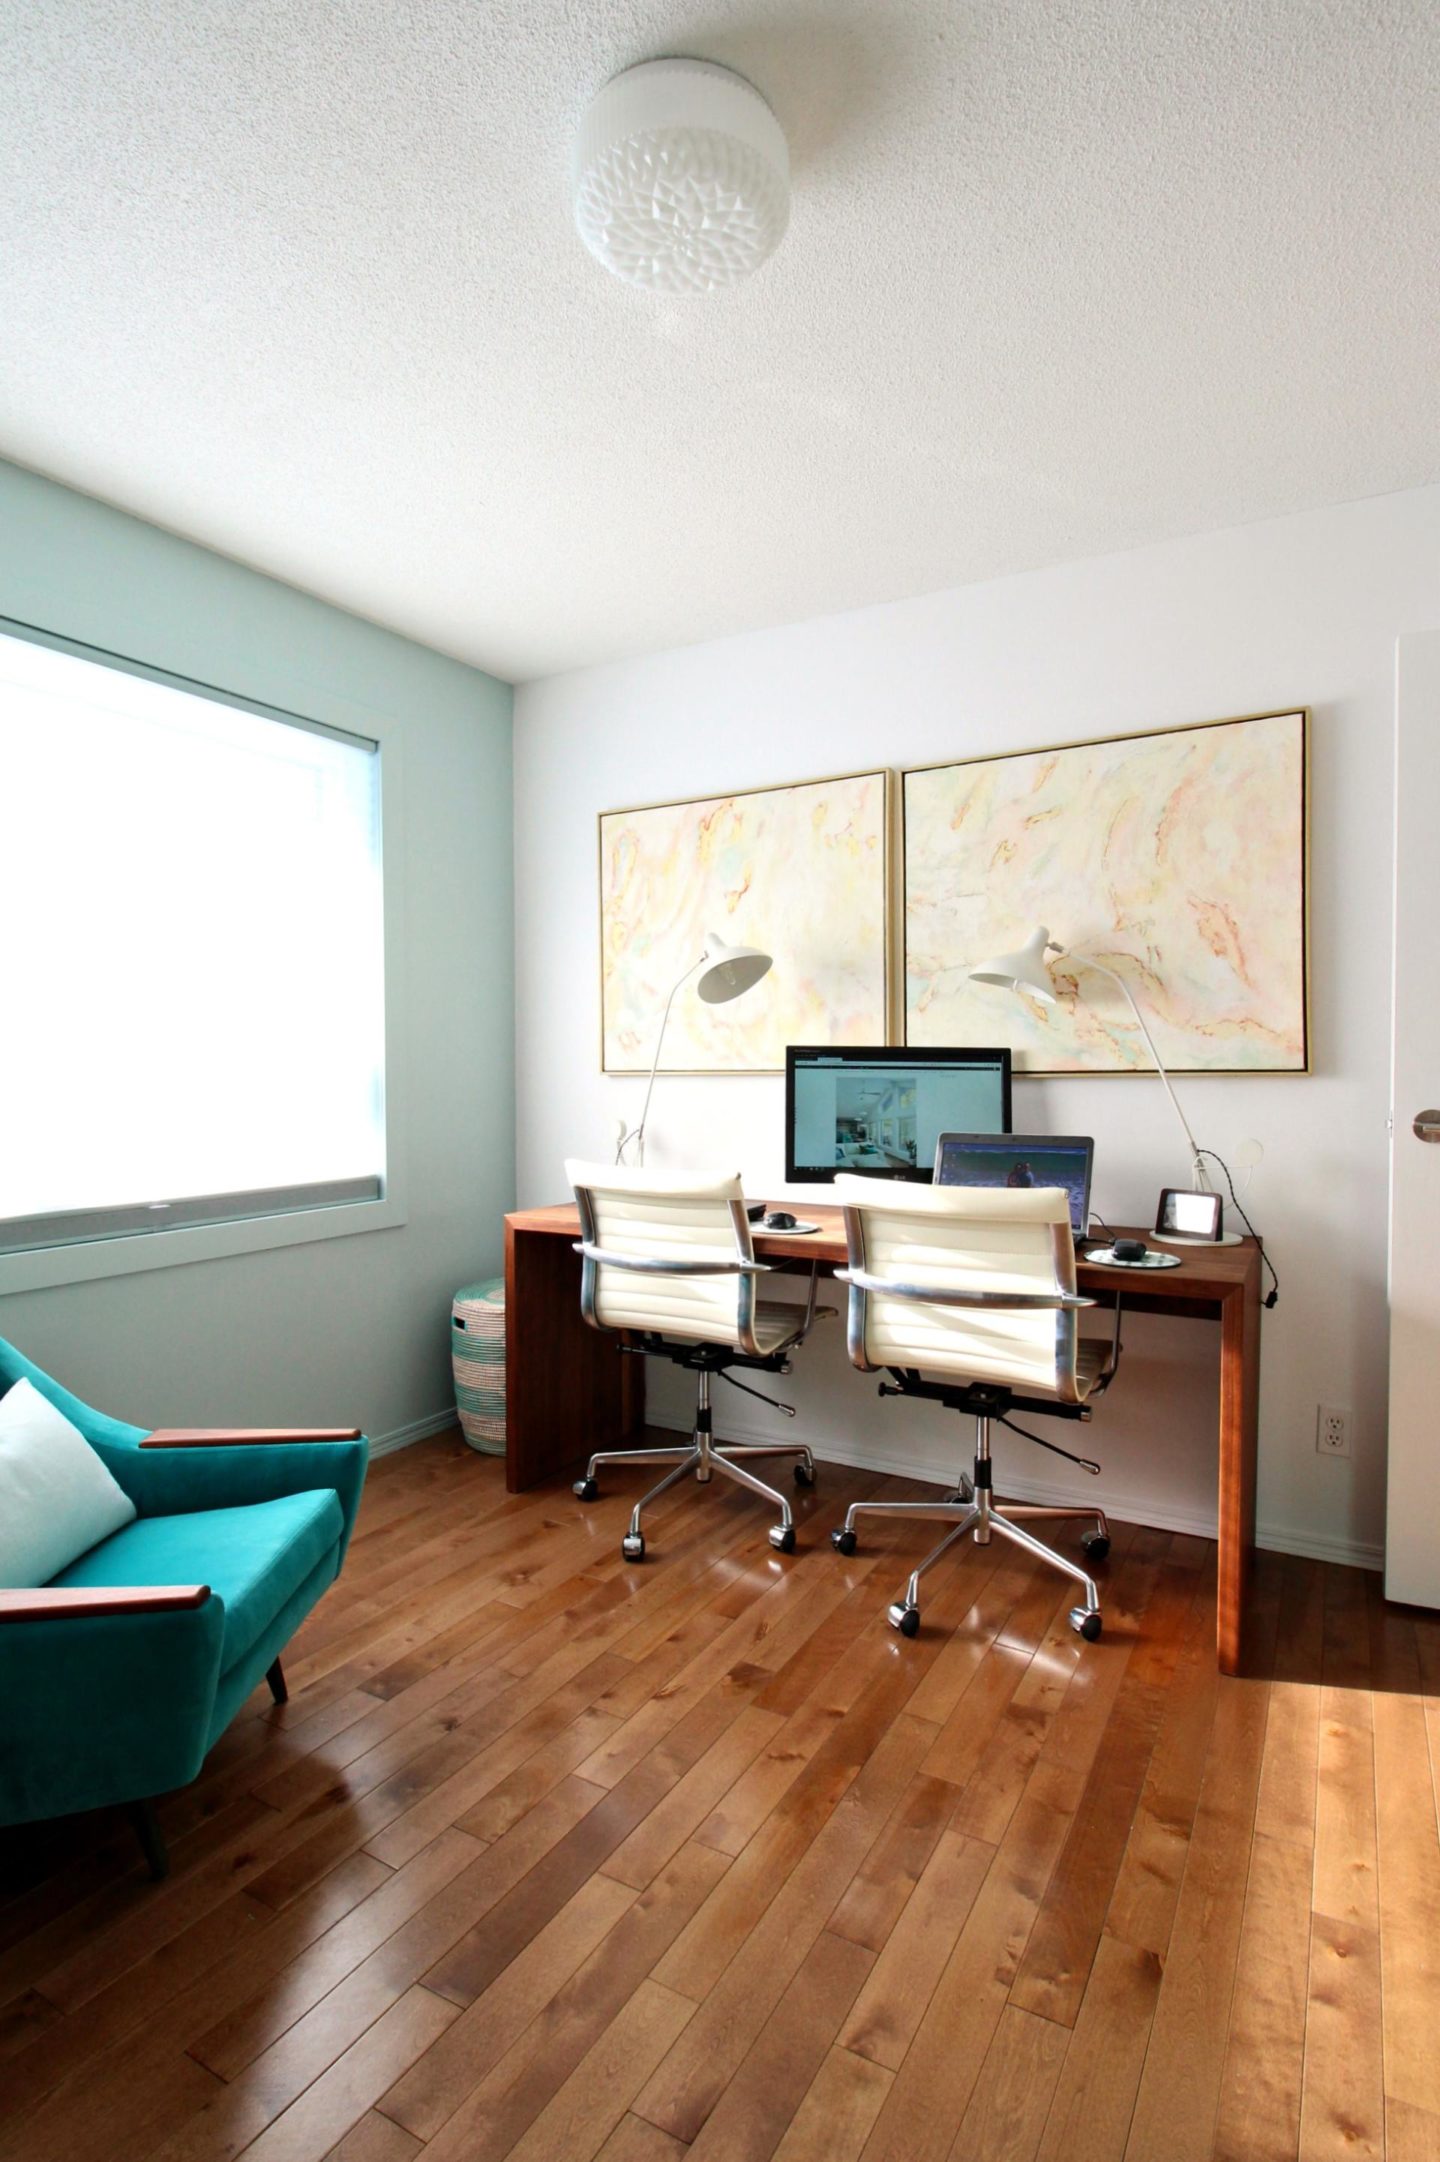


DIY EXPEDIT HACK | DIY MAGAZINE STORAGE BINS | DIY WALNUT DESK | DIY FRAME FOR ART
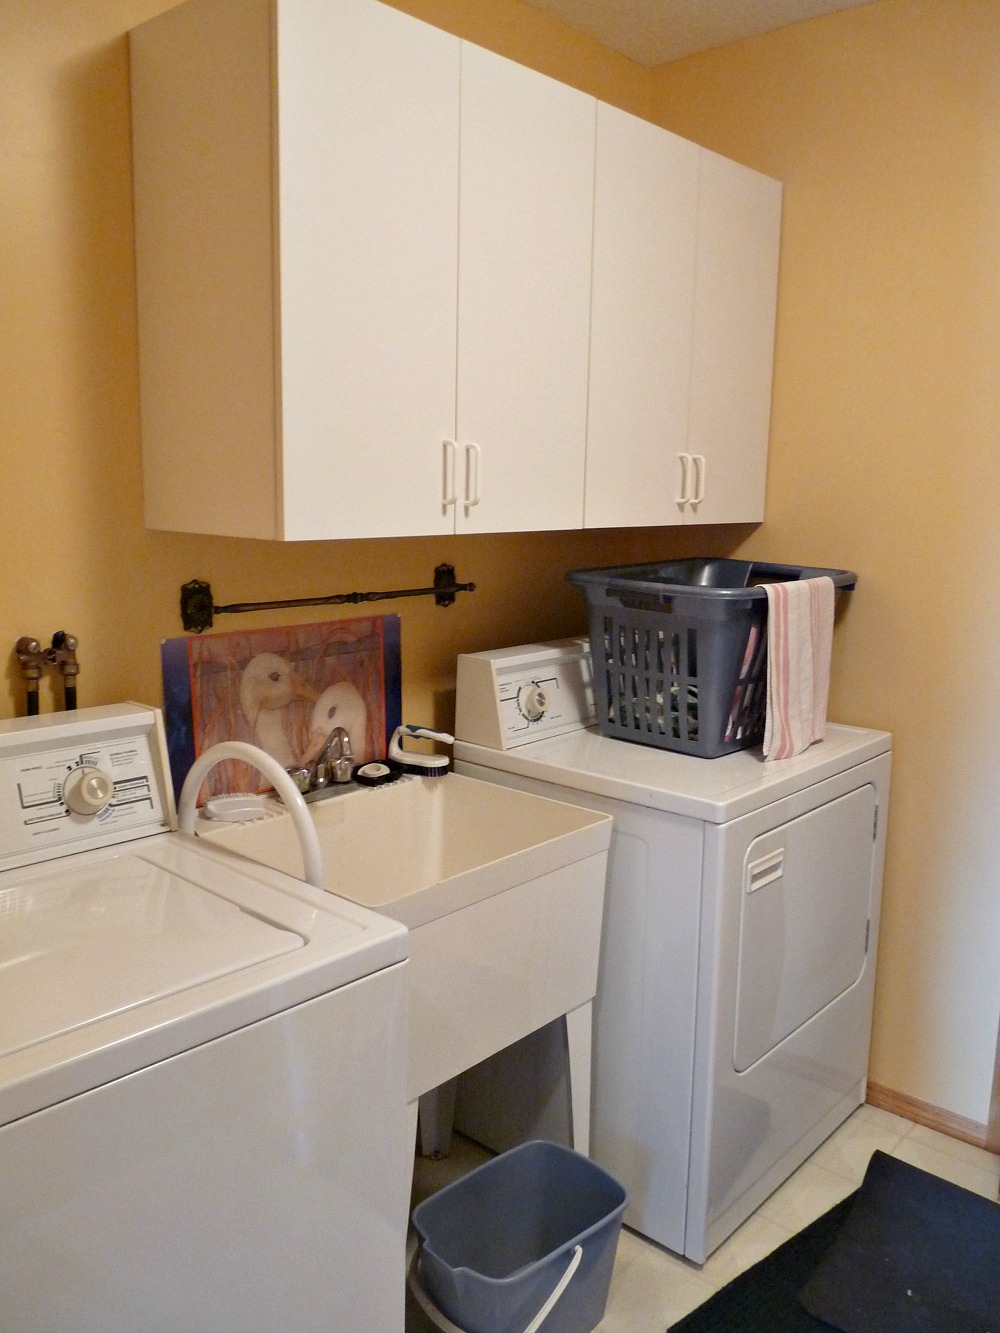
THE LAUNDRY ROOM – BEFORE
The laundry room has some serious pros and cons. Pro: mainfloor! Con: it’s the first room you see when you come into the house, and a thoroughfare for getting to the powder room. It houses the electric panel and attic access, so it’s a busy room. Plus, it’s the space my two pups use, so their bowls, toys and other stuff is stored in here. Before, everything was out in the open:
Before
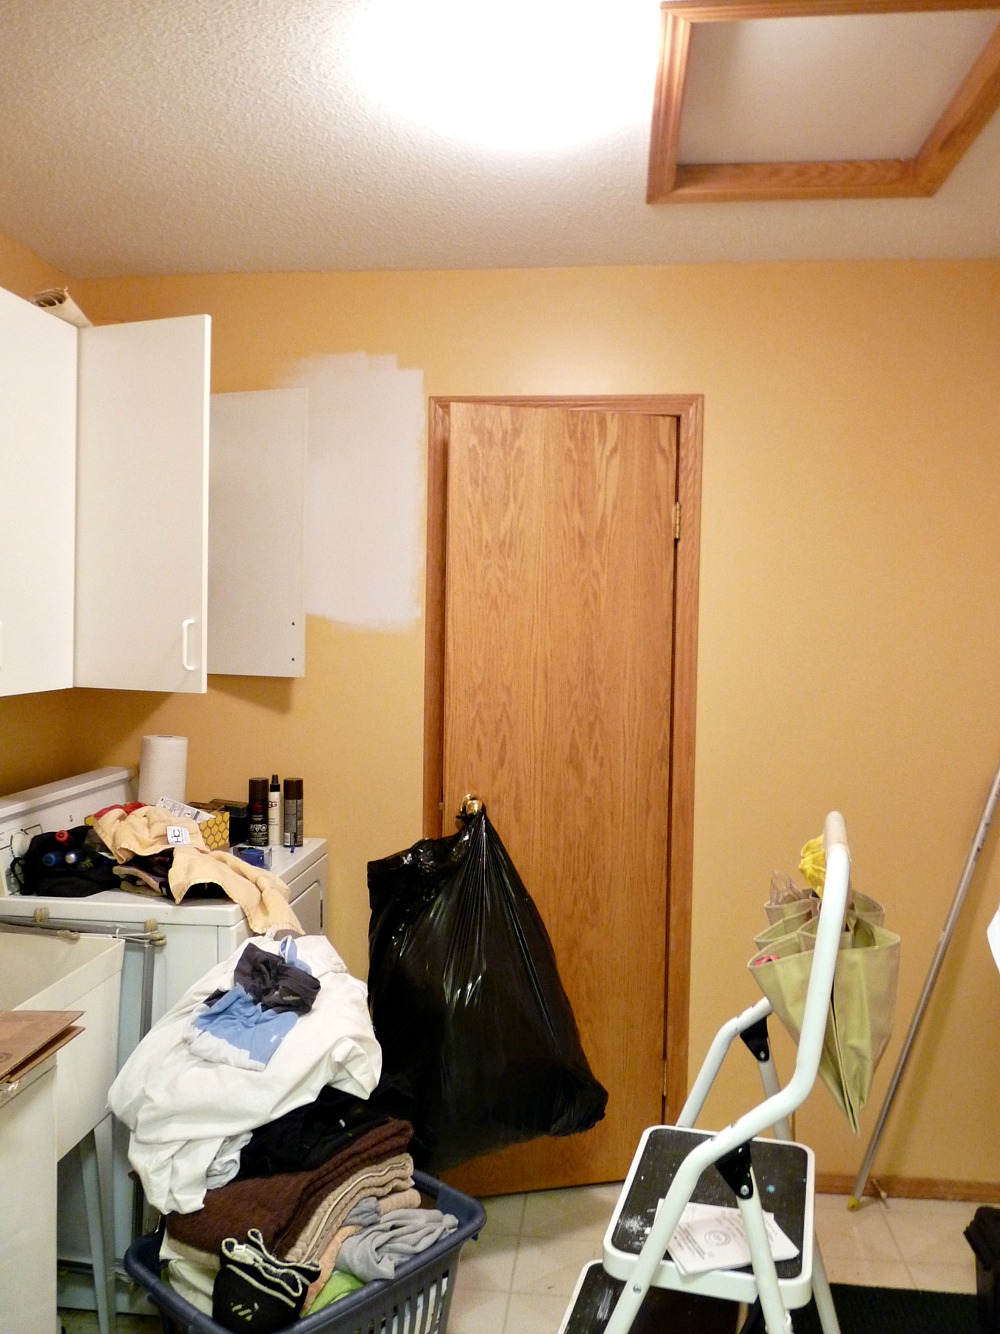
Before
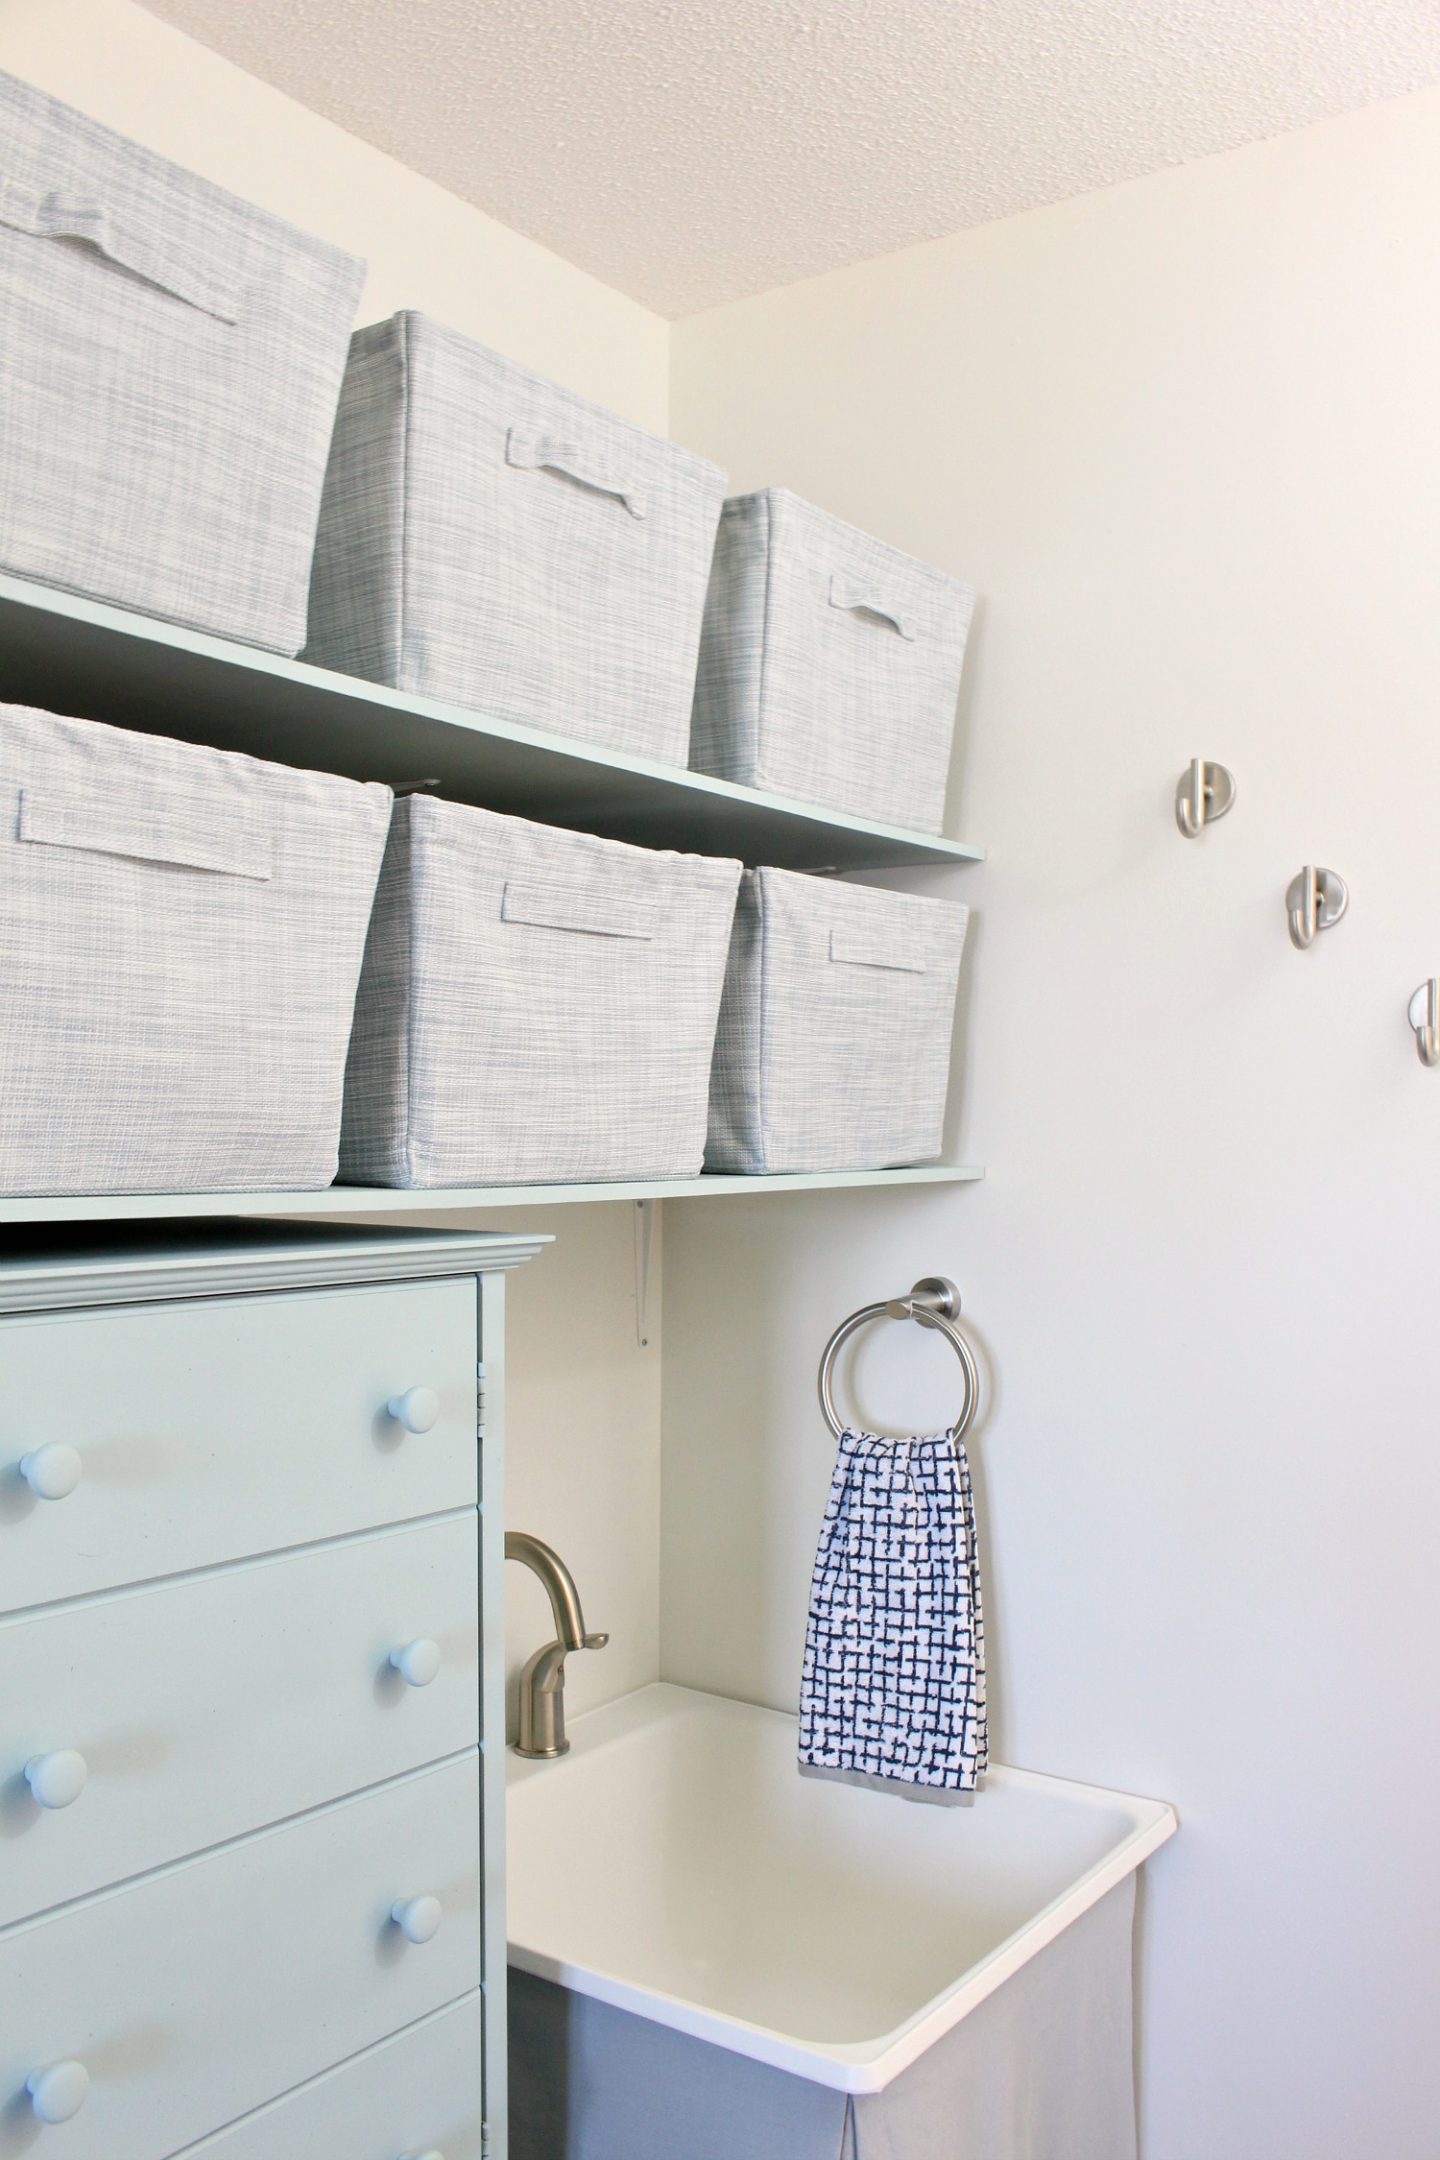
THE LAUNDRY ROOM – CURRENTLY
We made a huge improvement just painting the walls, ceiling, oak trim and wood door a bright white. We also swapped out the light fixture for something prettier. But until a major reno – and new machines – happens, we needed a quick fix. To hide the old washer, dryer and laundry tub we devised a simple solution: heavy drapes on an easy-to-slide curtain track. My Mom and I sewed in some gathers so the curtains can be quickly closed and look great – no fussing with folds, they billow just so!


DIY LAUNDRY ROOM MAKEOVER | DIY CURTAIN ON A TRACK
THE POWDER ROOM – BEFORE
Before
Before
THE POWDER ROOM – AFTER
I entered the One Room Challenge as a guest participant and chose the powder room for my first time doing the six-week challenge. My Mom and I wallpapered, I painted the cabinetry and trim, and then Hubby and Installed a new wood counter with a stunning copper sink. You can read all about the makeover right here, but check out the transformation below!


POWDER ROOM MAKEOVER | DIY IKEA WALNUT COUNTER | DIY WALLPAPER INSTALLATION
THE FISH ROOM – BEFORE
Welcome to our hilarious little “fish room”: a narrow room with two doors, a window, and sink – perfect for gutting a particularly stinky fish. I guess this is handy when you live on the lake, but I’m not sure we’ll be gutting enough fish to dedicate a space to the art, so we gave it a budget-friendly makeover and I now use it for craft/sewing storage. This room is behind the living room fireplace and inaccessible from inside (why?) so one day I want to put a secret entrance from the living room and turn this into a mudroom/laundry room and convert the current laundry room into an epic pantry/storage.
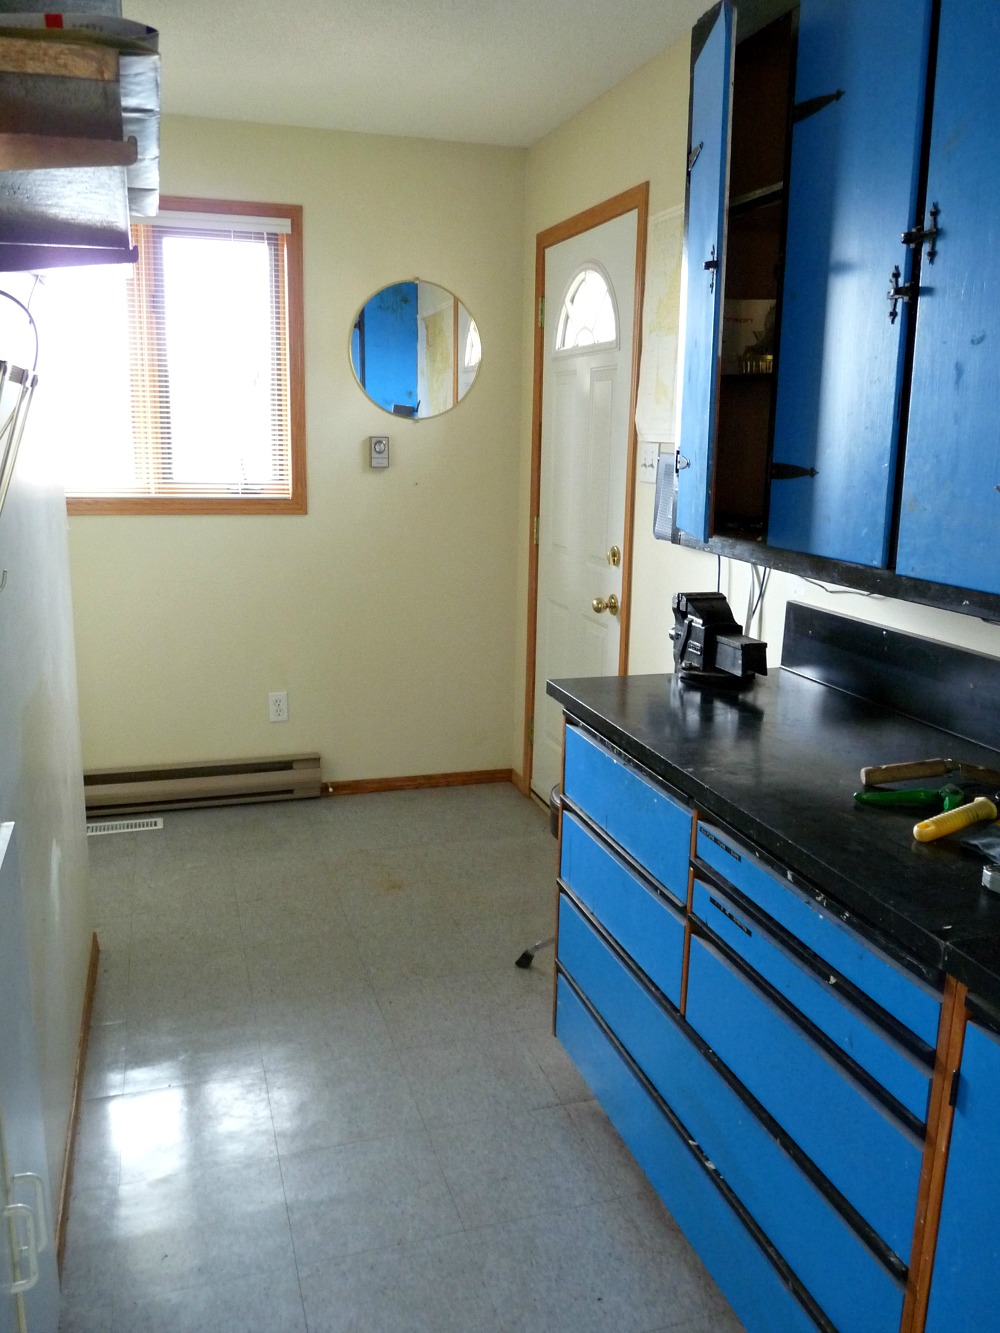
Before
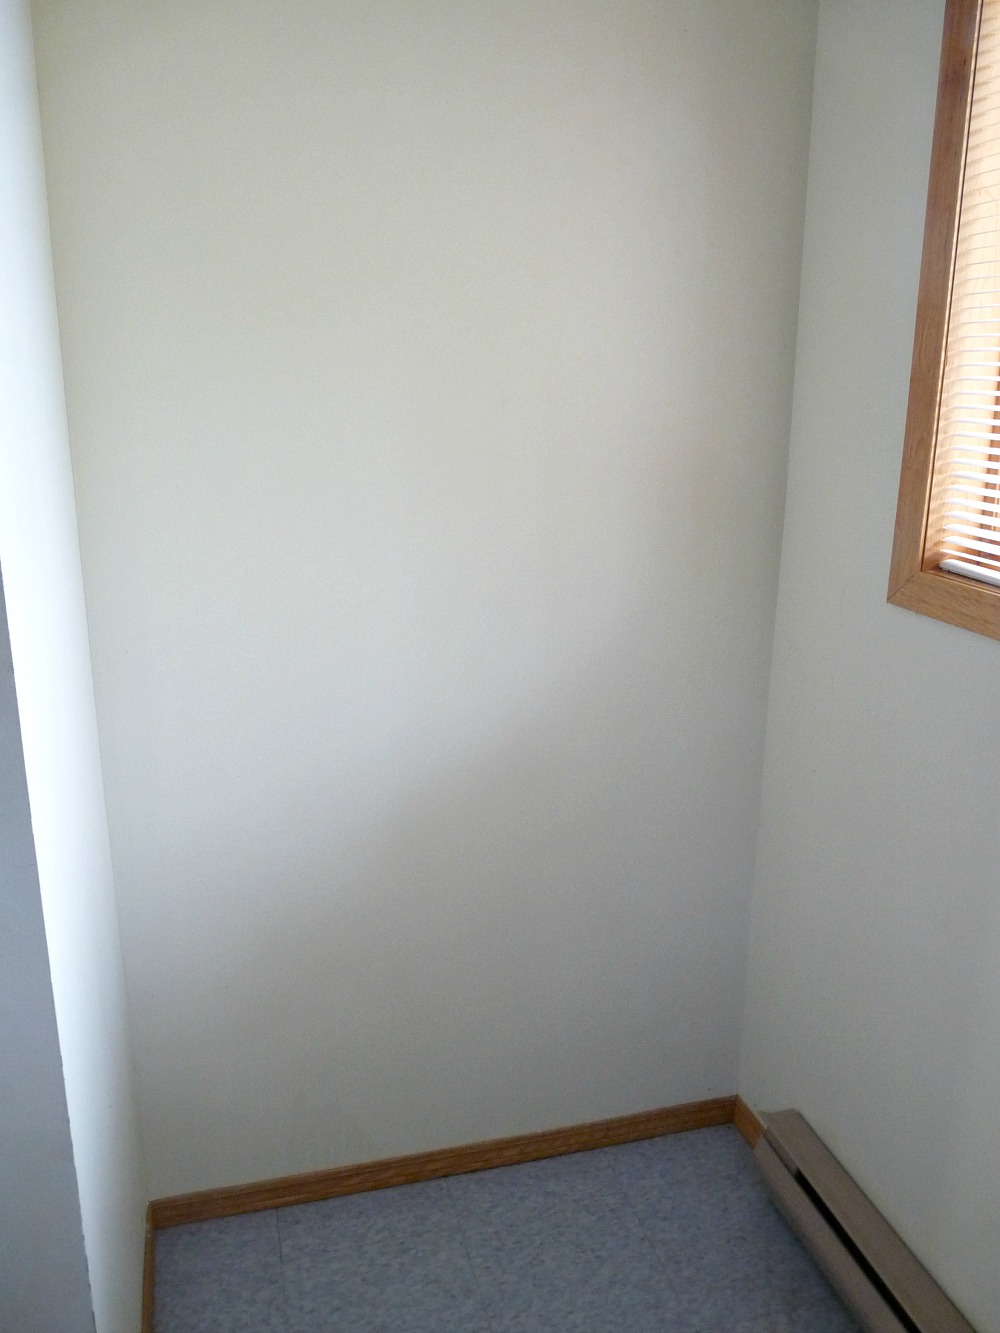
Before
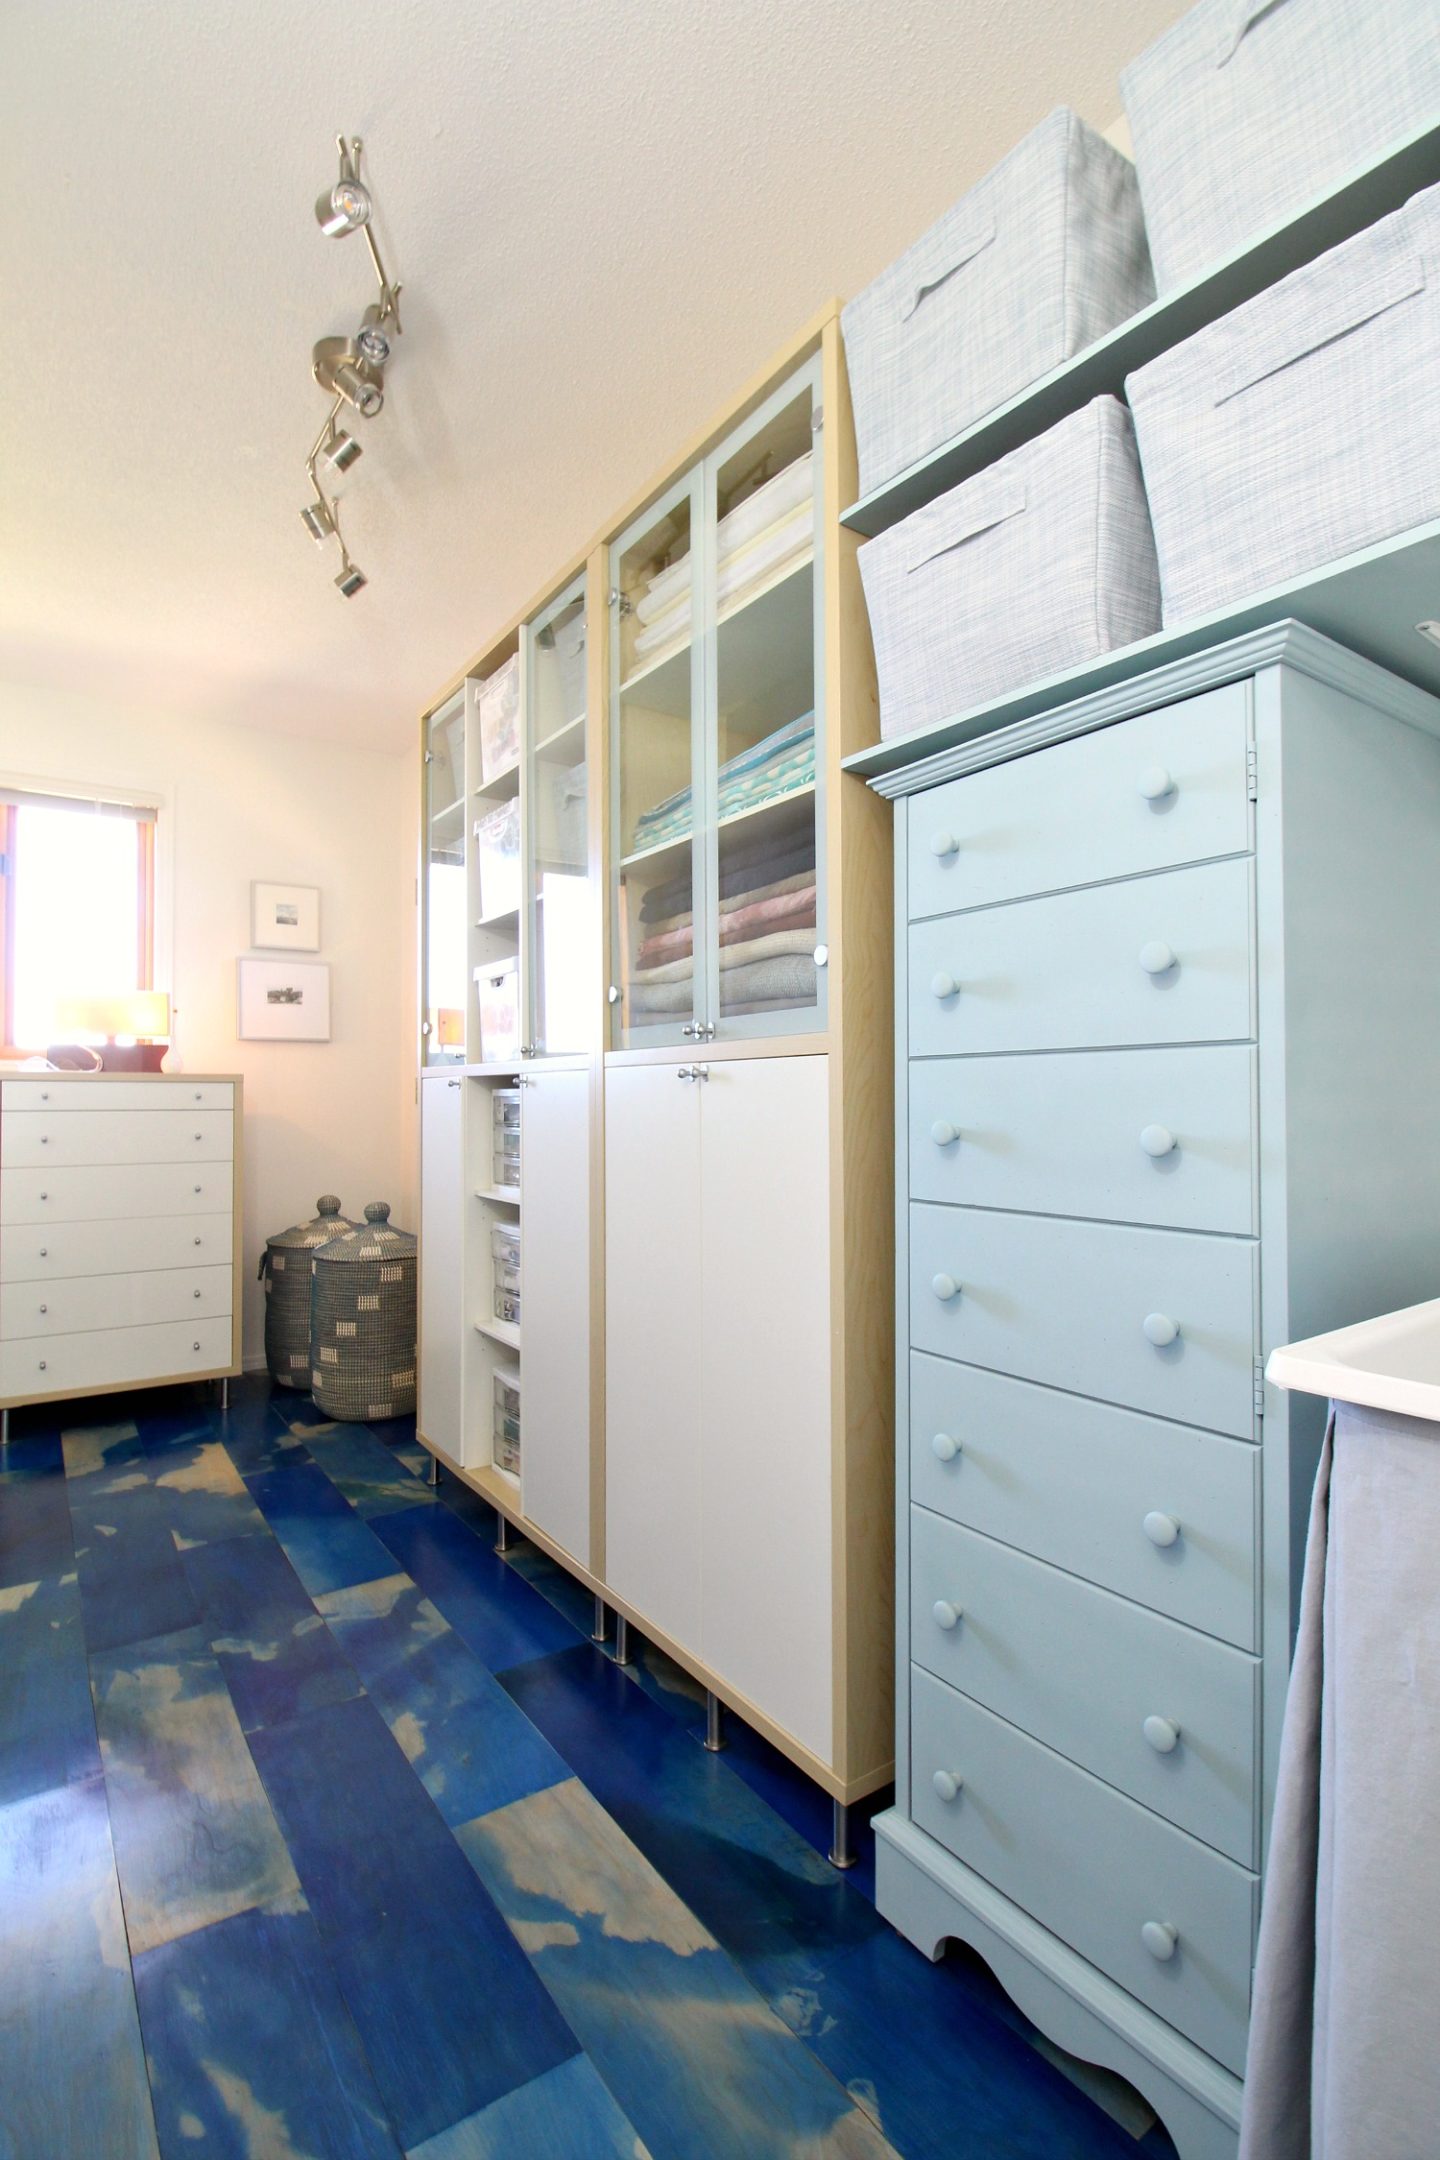
THE FISH ROOM – AFTER
Because my Mom was downsizing, she has some IKEA furniture – along with a bunch of sewing supplies – that wouldn’t fit in her new place. We did a trade: I could have the furniture (sweet!) and she could store some things here. We combined our craft supplies and upgraded the fish room into this sweet storage space. To save money – and add some FUN – I dyed plywood with a DIY marbled effect and made DIY plywood plank floors. An old cabinet was made to match the new IKEA furniture with a coat of pale blue chalk paint. We kept the plumbing and got a new sink and sewed a DIY laundry tub skirt. See the full makeover right here!
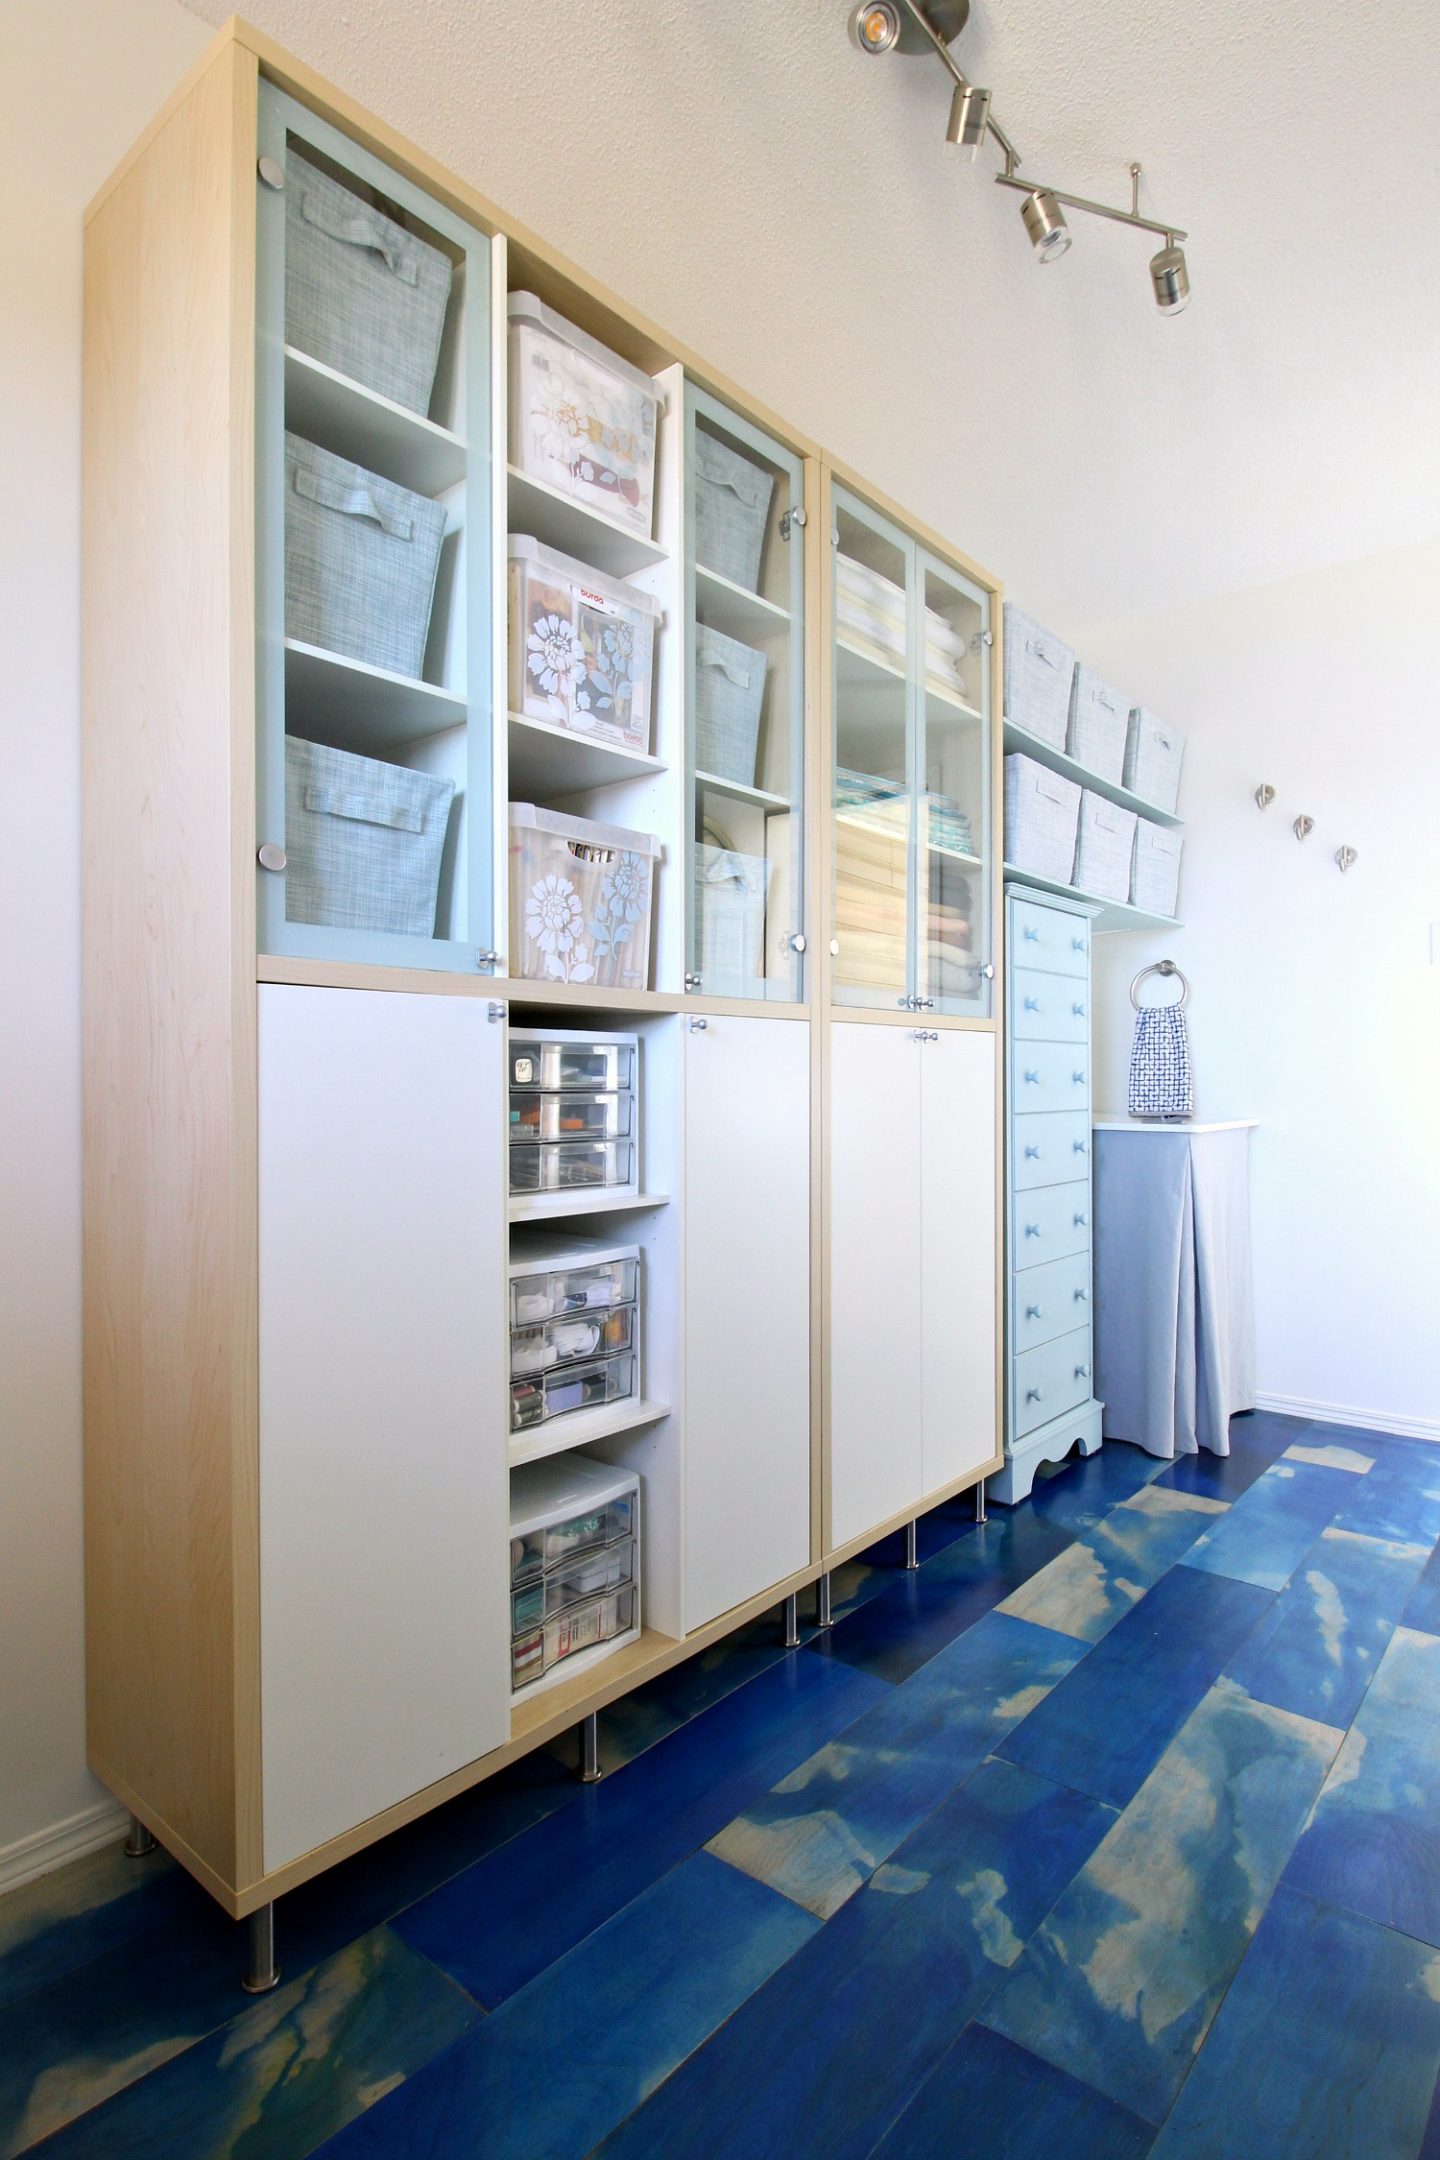
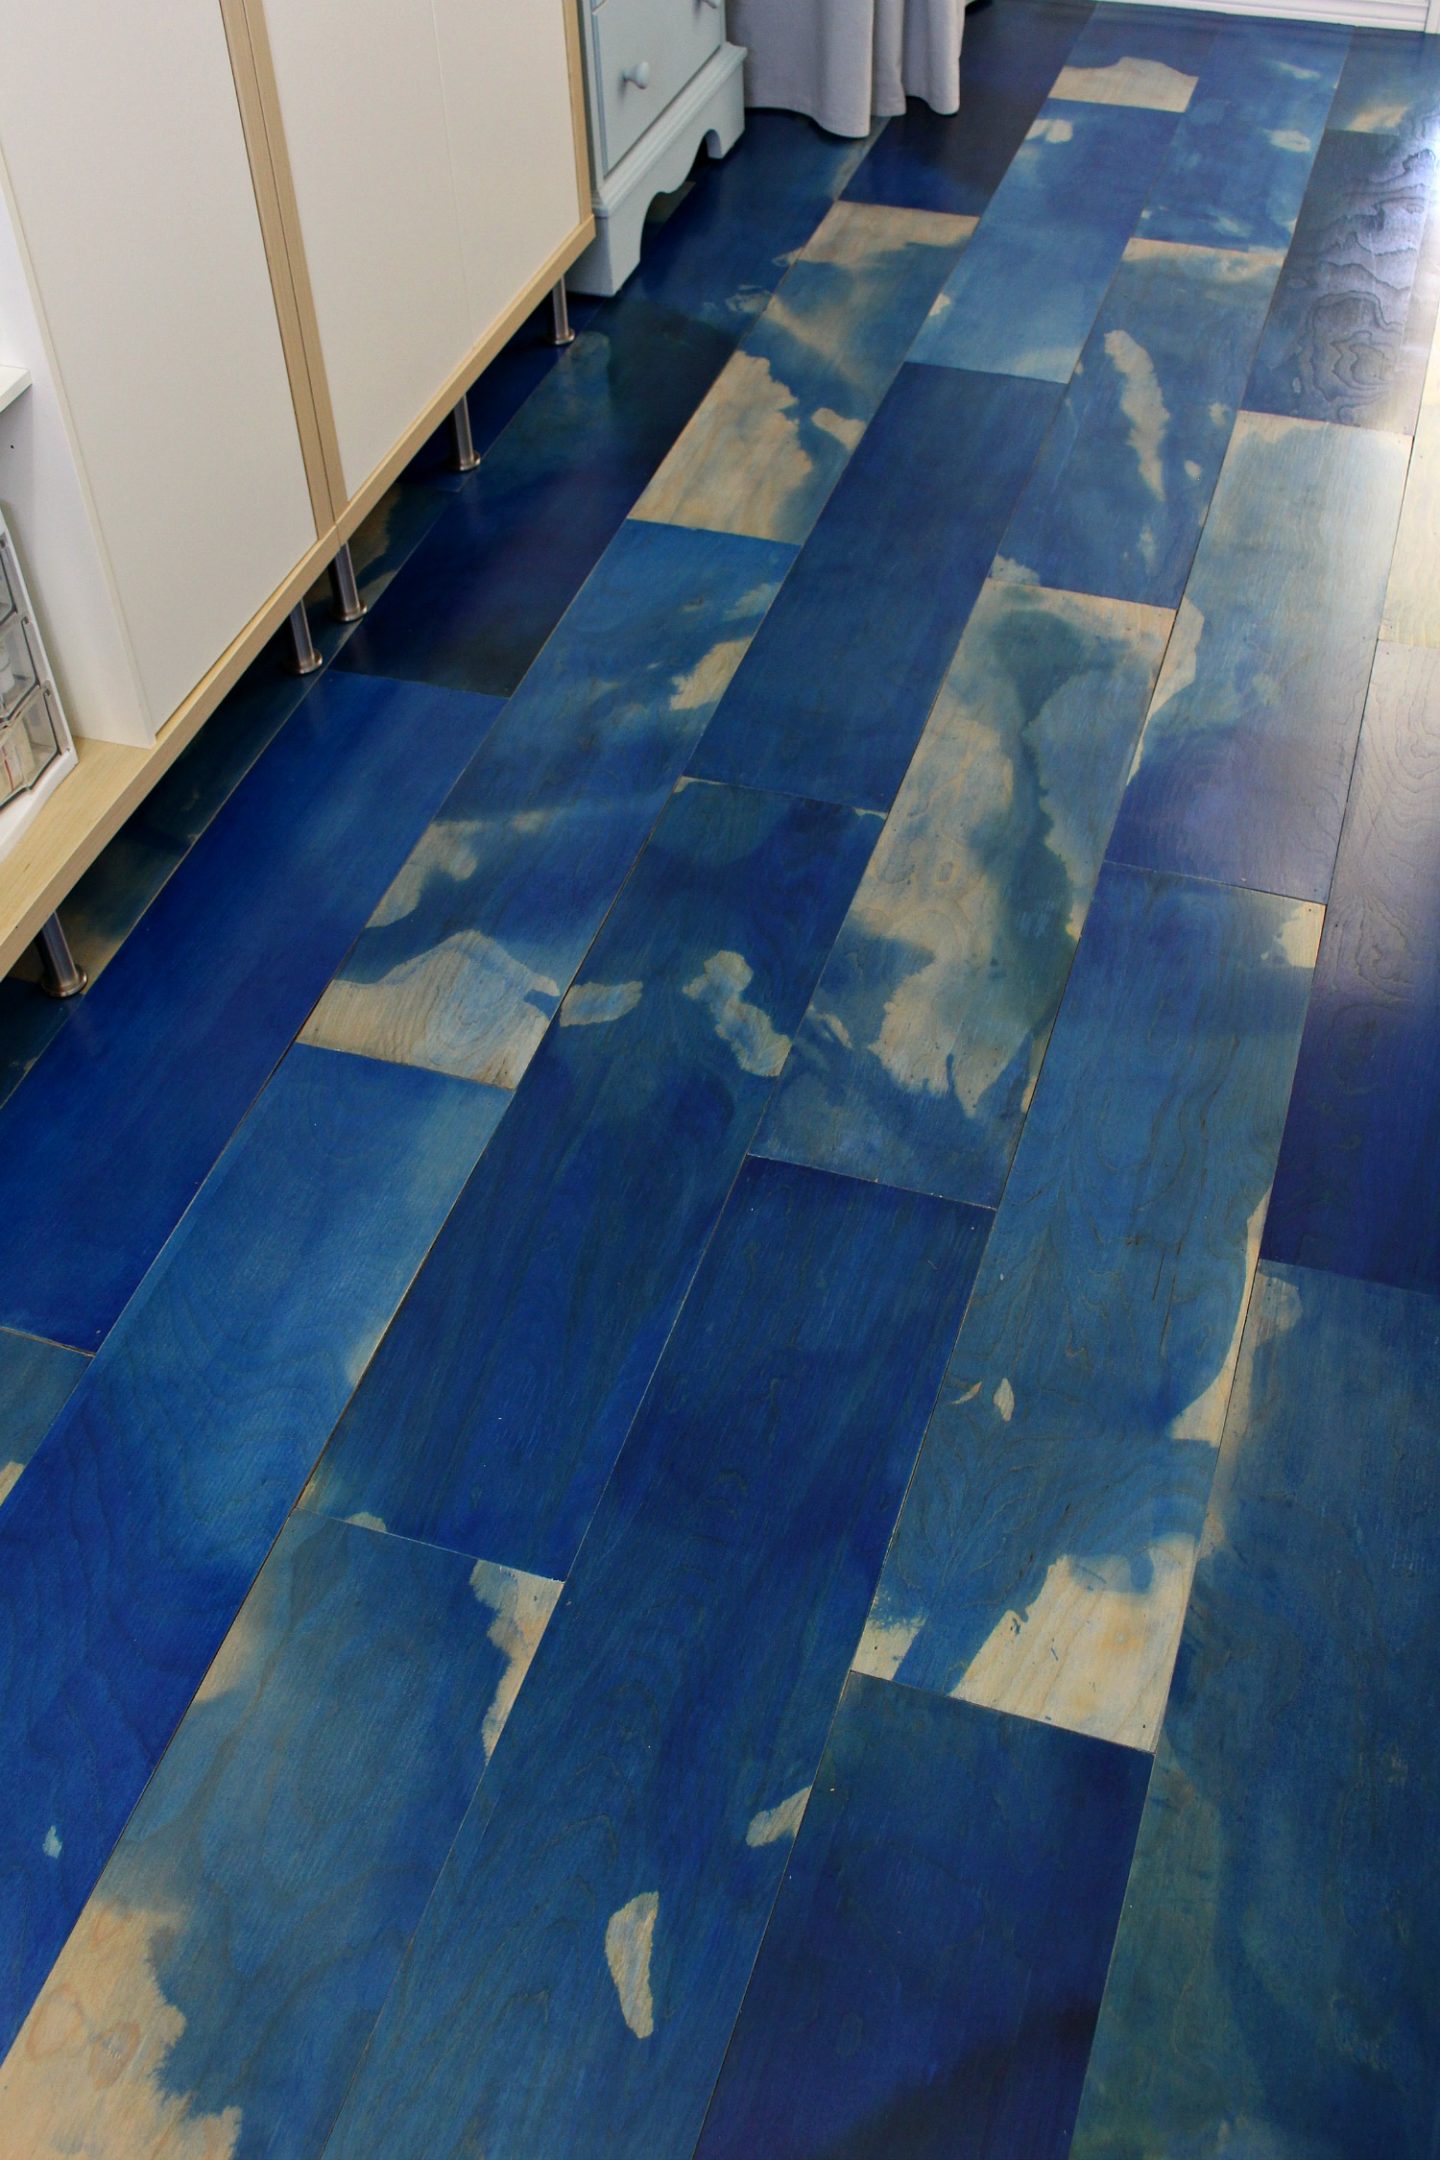
FISH ROOM DIY MAKEOVER | DIY MARBLED WOOD STAIN | DIY PLYWOOD FLOORS | DIY LAUNDRY SINK SKIRT | DIY CHALK PAINT CABINET
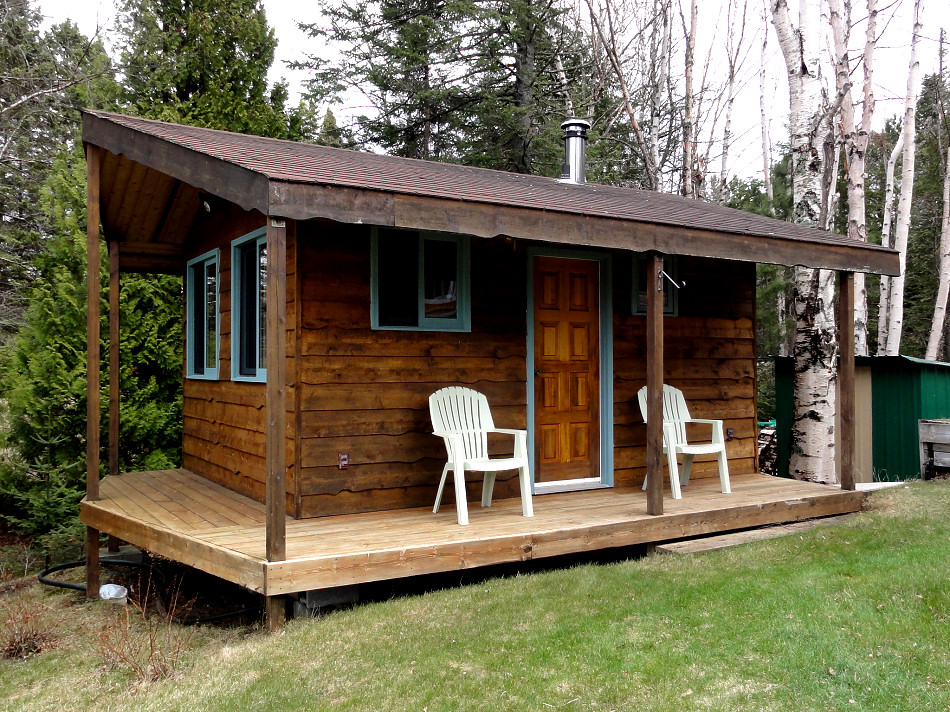
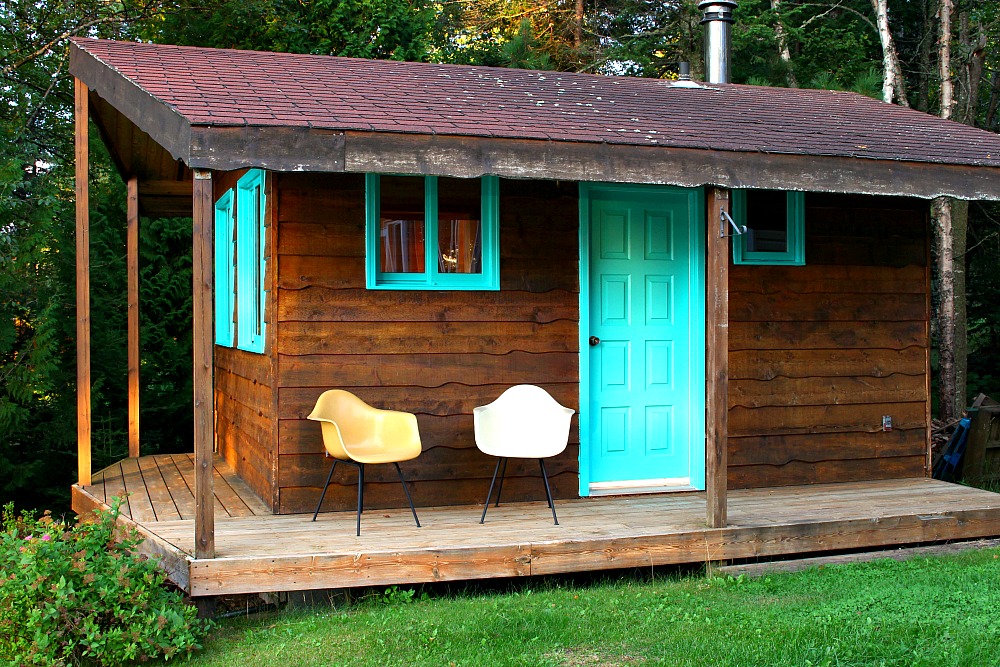
THE GUESTHOUSE – BEFORE
It feels strangely fancy to type “guesthouse” but here it is! It’s a small little building with the teeniest three-piece bathroom, a ratty old sauna and small living area that just barely fits a queen size bed (but you have to dive onto it from the foot of the bed). But it’s awesome and cute and I love having this little bonus!
Before
THE GUESTHOUSE – CURRENTLY
I painted the trim and door bright aqua to refresh the exterior a little:
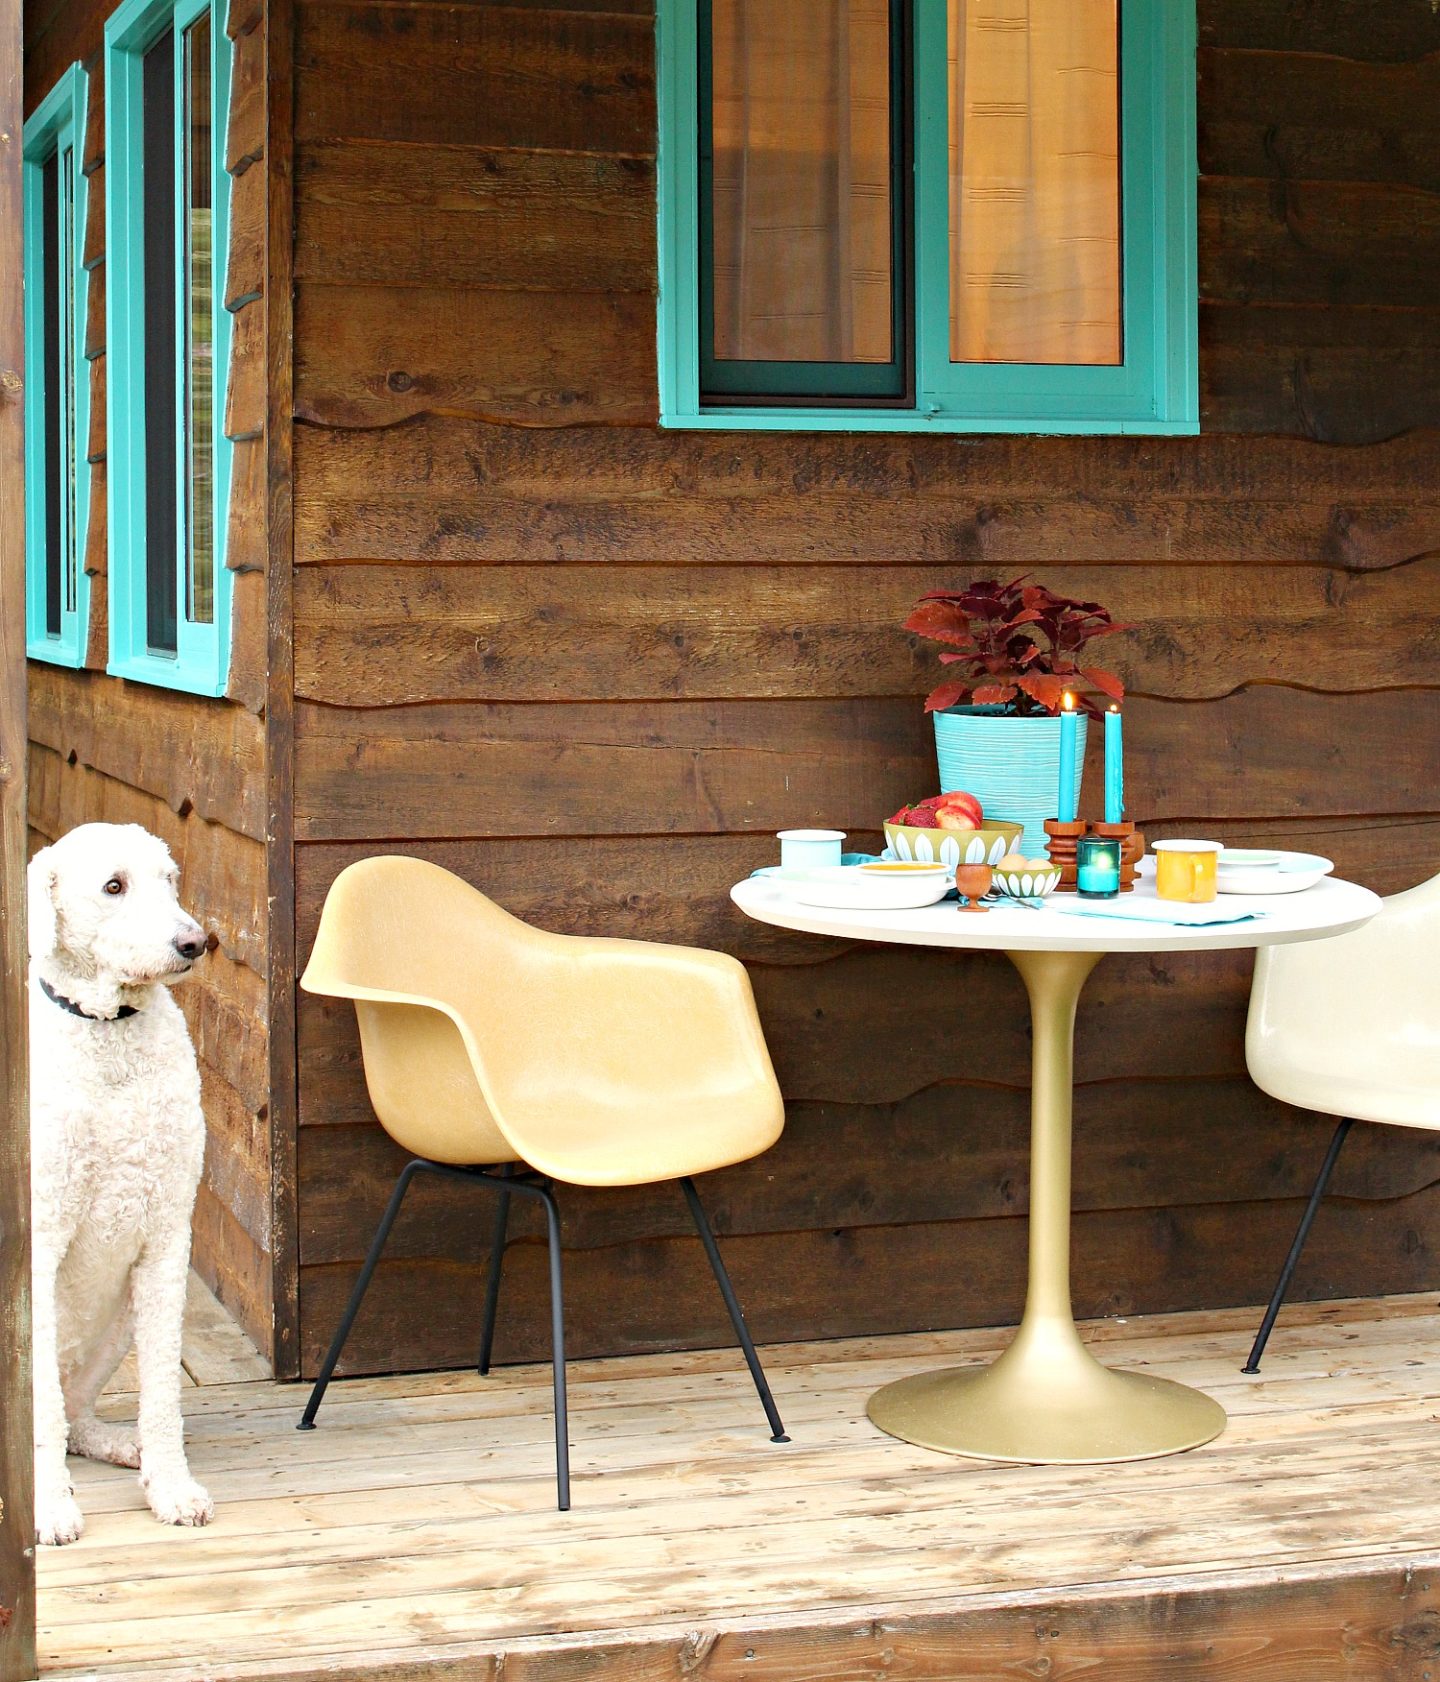

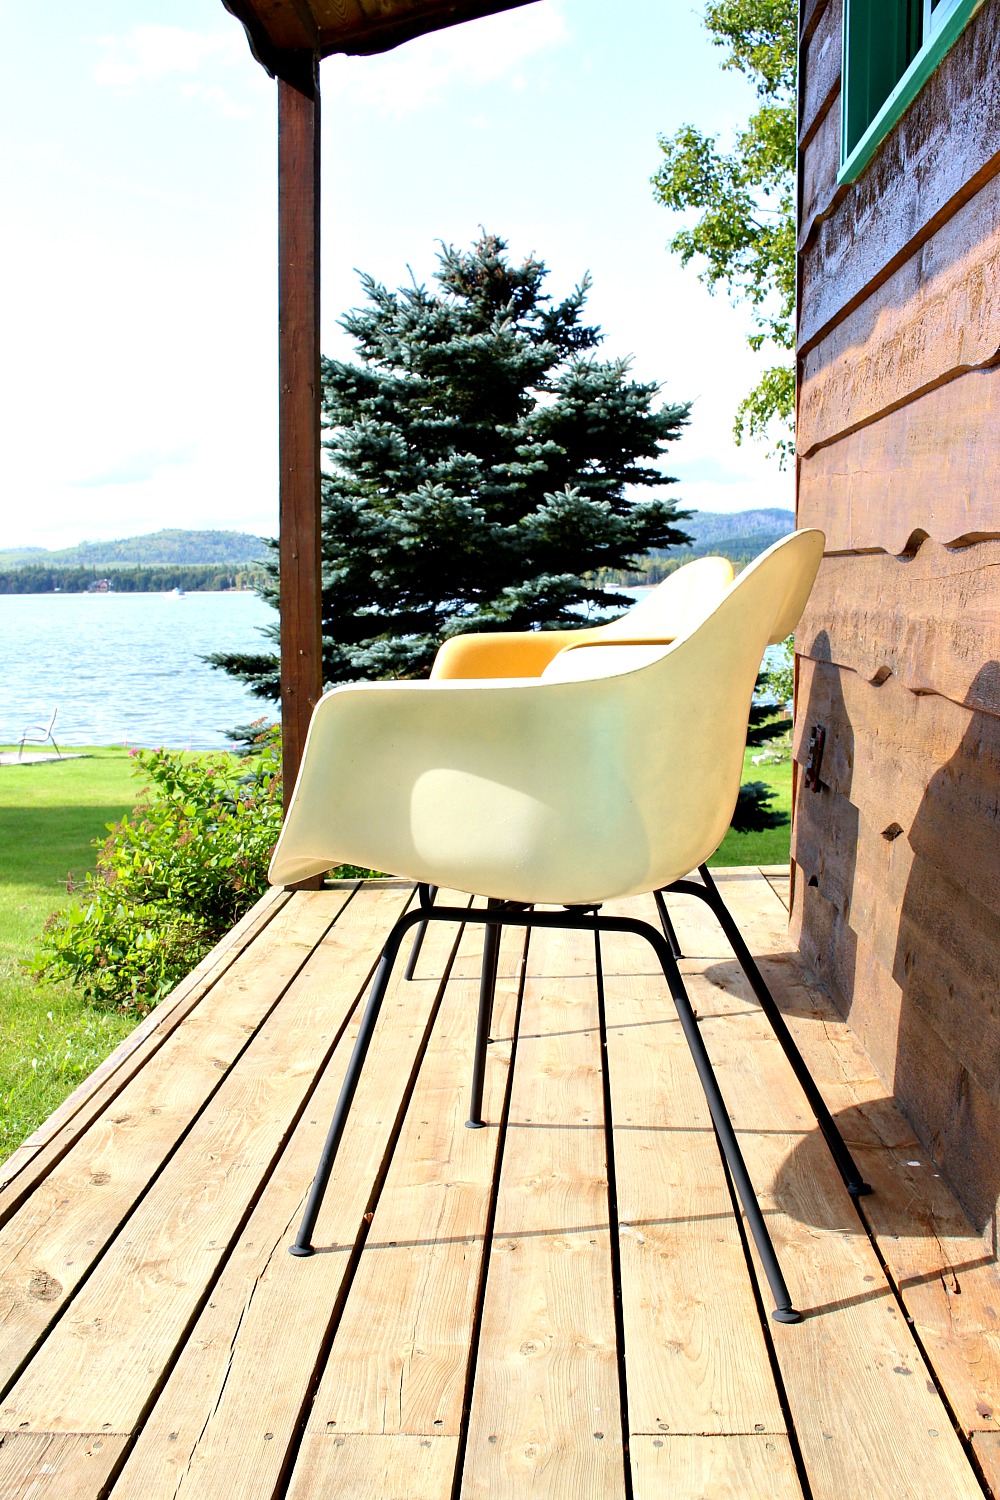
DIY PAINTED TRIM & DOOR | TULIP TABLE HACK
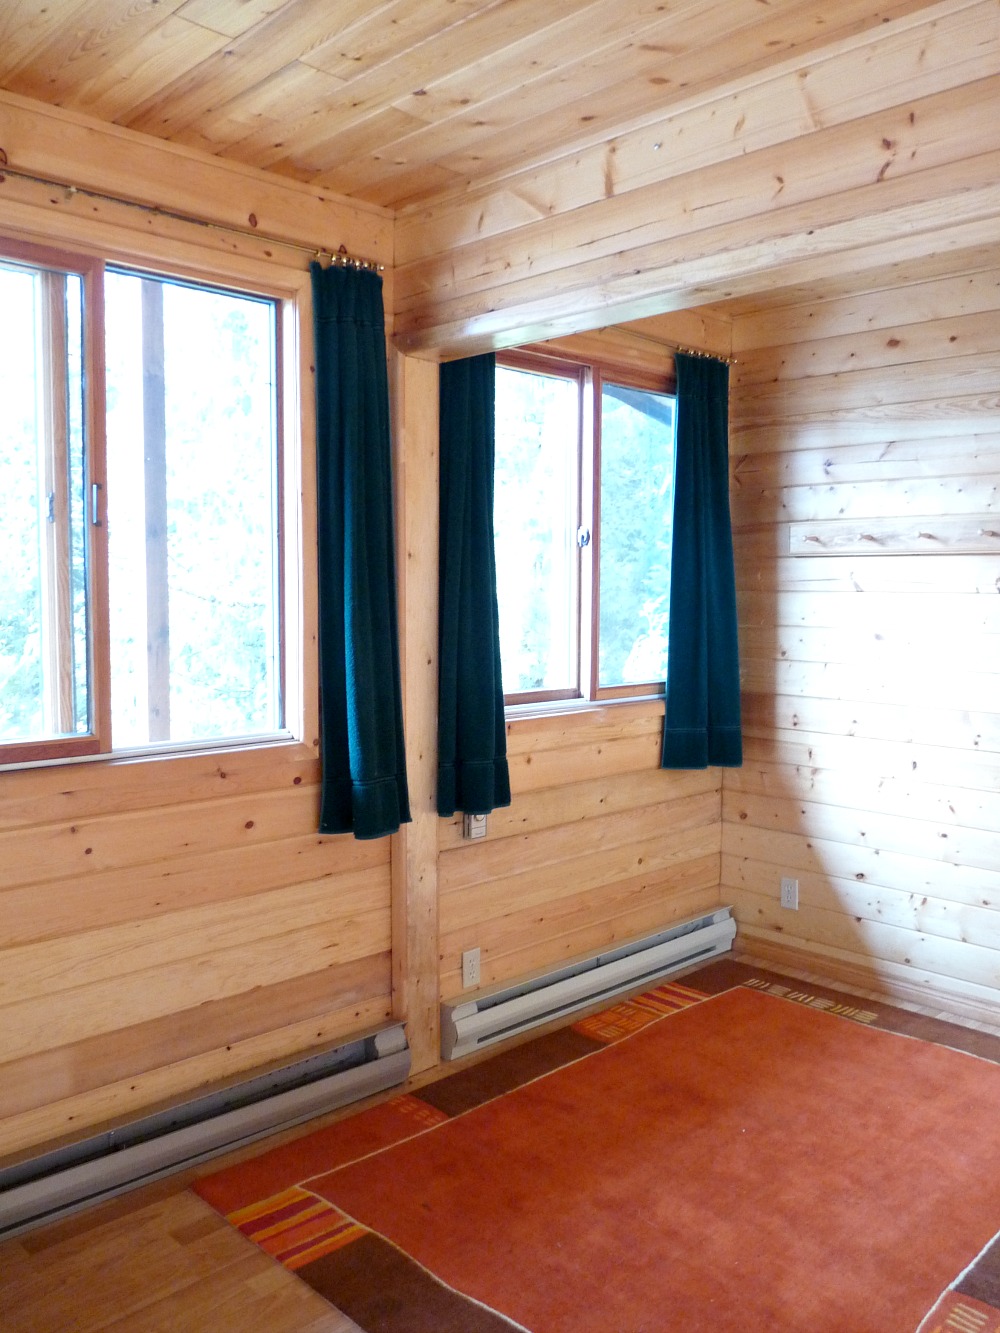
THE GUESTHOUSE INTERIOR – BEFORE
Before
Before

Before
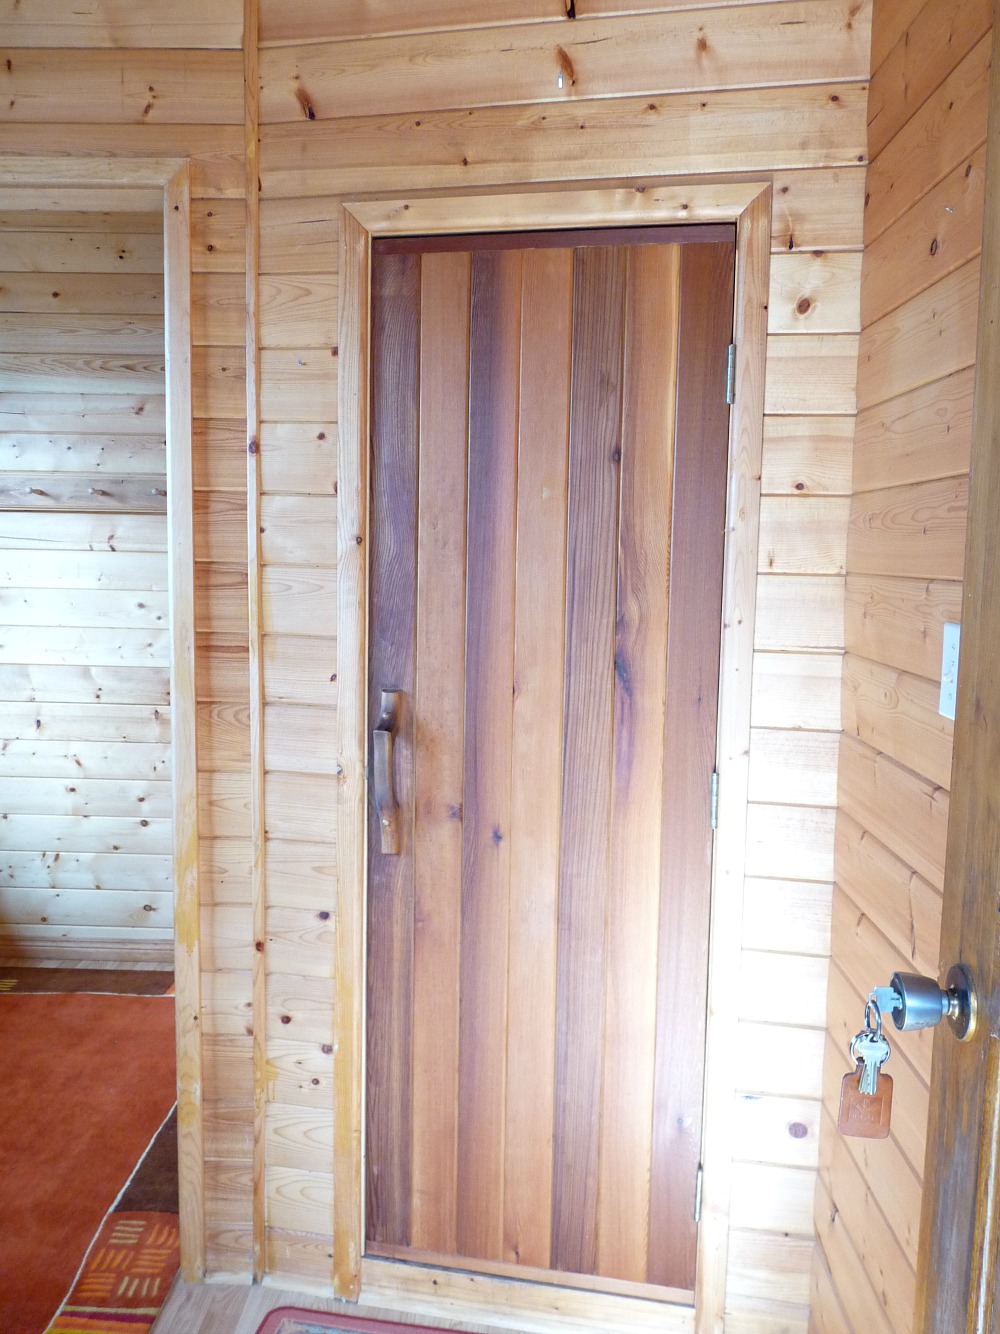
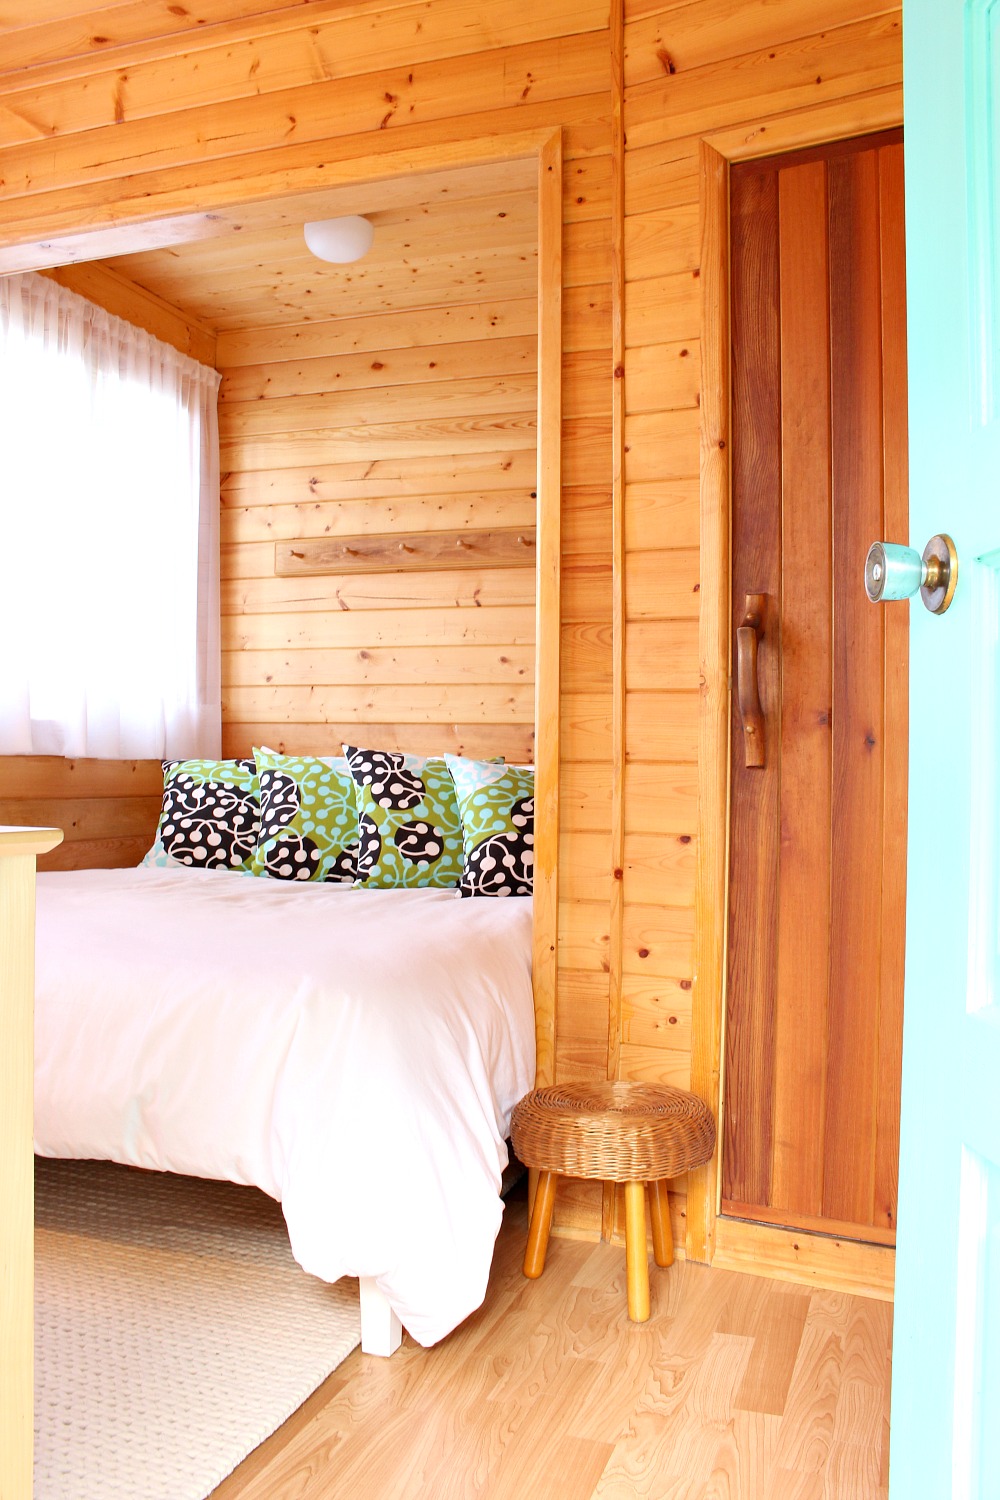
THE GUESTHOUSE INTERIOR – AFTER
Inside the guesthouse bunkie, I shopped the lakehouse, using a dresser Mom gave me, the old DIY living room pillows, the old DIY bathroom art, the old office lamp, and a plush new wool rug to create a cozy space for guests. Then we sewed some simple DIY sheer curtains. I really waffled about painting/not painting the pine and – thanks to the excellent advice from readers – I kept it natural and am SO glad I did!

DIY MARIMEKKO PILLOWS | DIY ABSTRACT ART | IDY SIMPLE SHEERS
THE GUESTHOUSE BATHROOM – BEFORE
We’re so lucky that the bunkie guesthouse came with a bathroom too! Guests love the convenience (although they hated that the shower door hit the vanity and the main door hit the shower – there was no where to move inside! Plus the shower had started to fall apart and caused major leaking, so we decided to renovate it top to bottom. Unlike the main bath, we didn’t hire any of the work out and did all of the work ourselves, from tiling to creating a DIY stock tank shower!
Before
Before
THE GUESTHOUSE BATHROOM – AFTER
You can get the full scoop on the DIY bunkie bath reno right here.
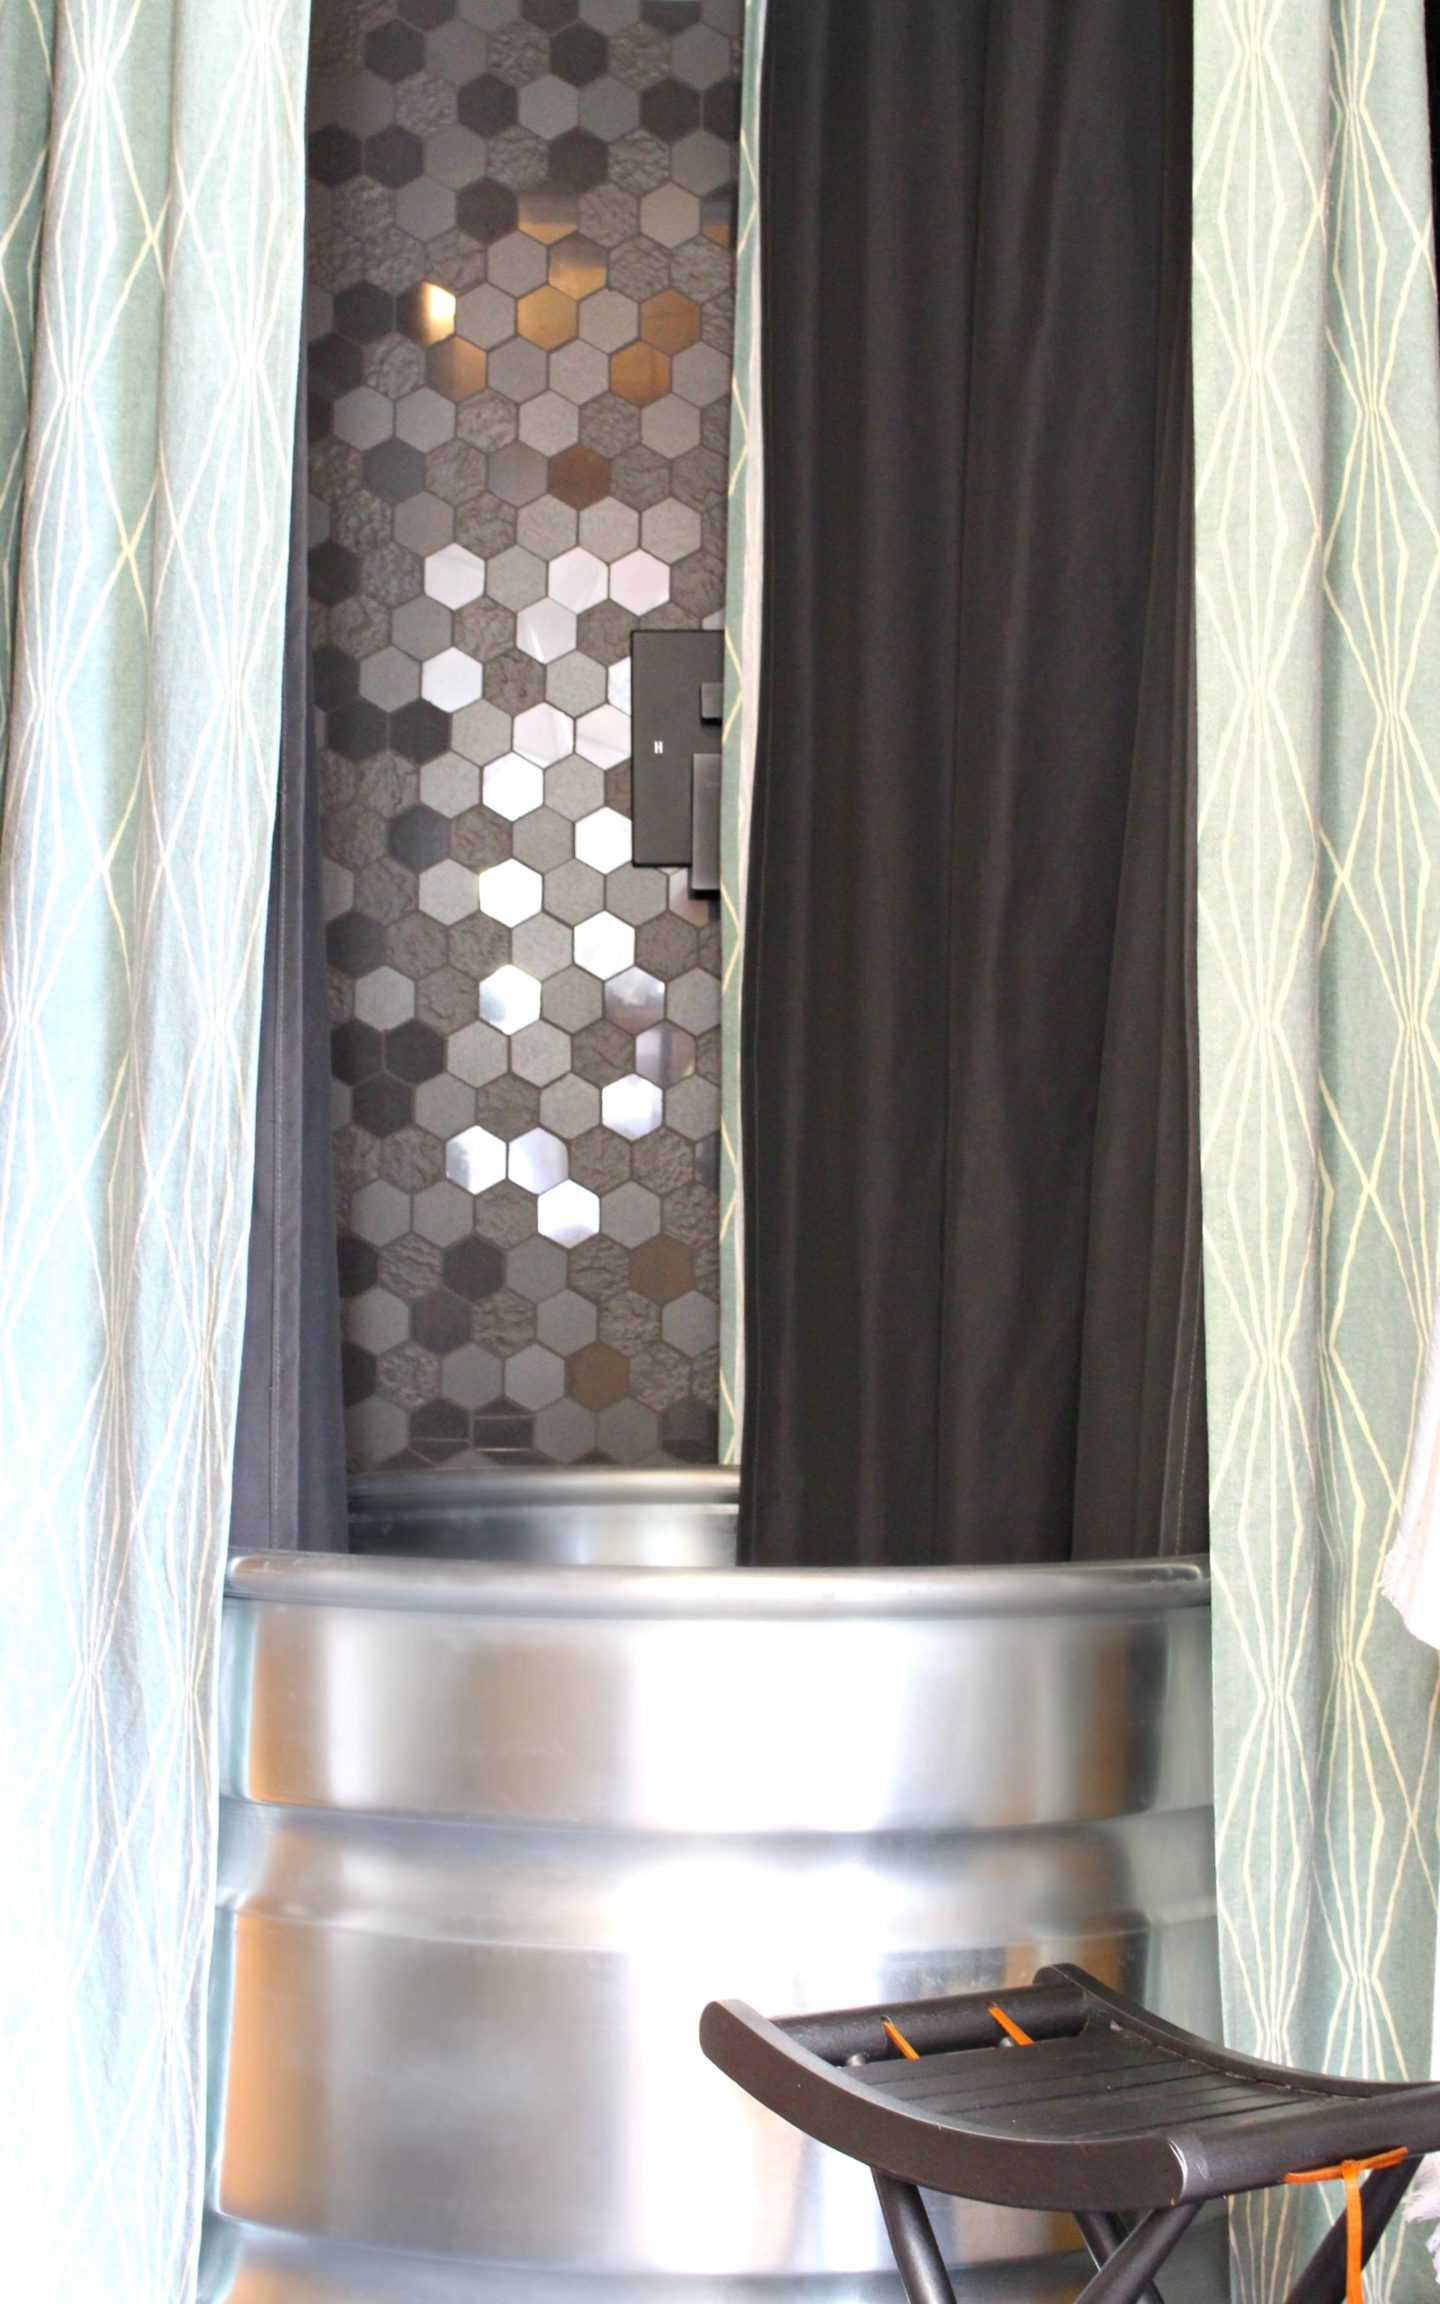
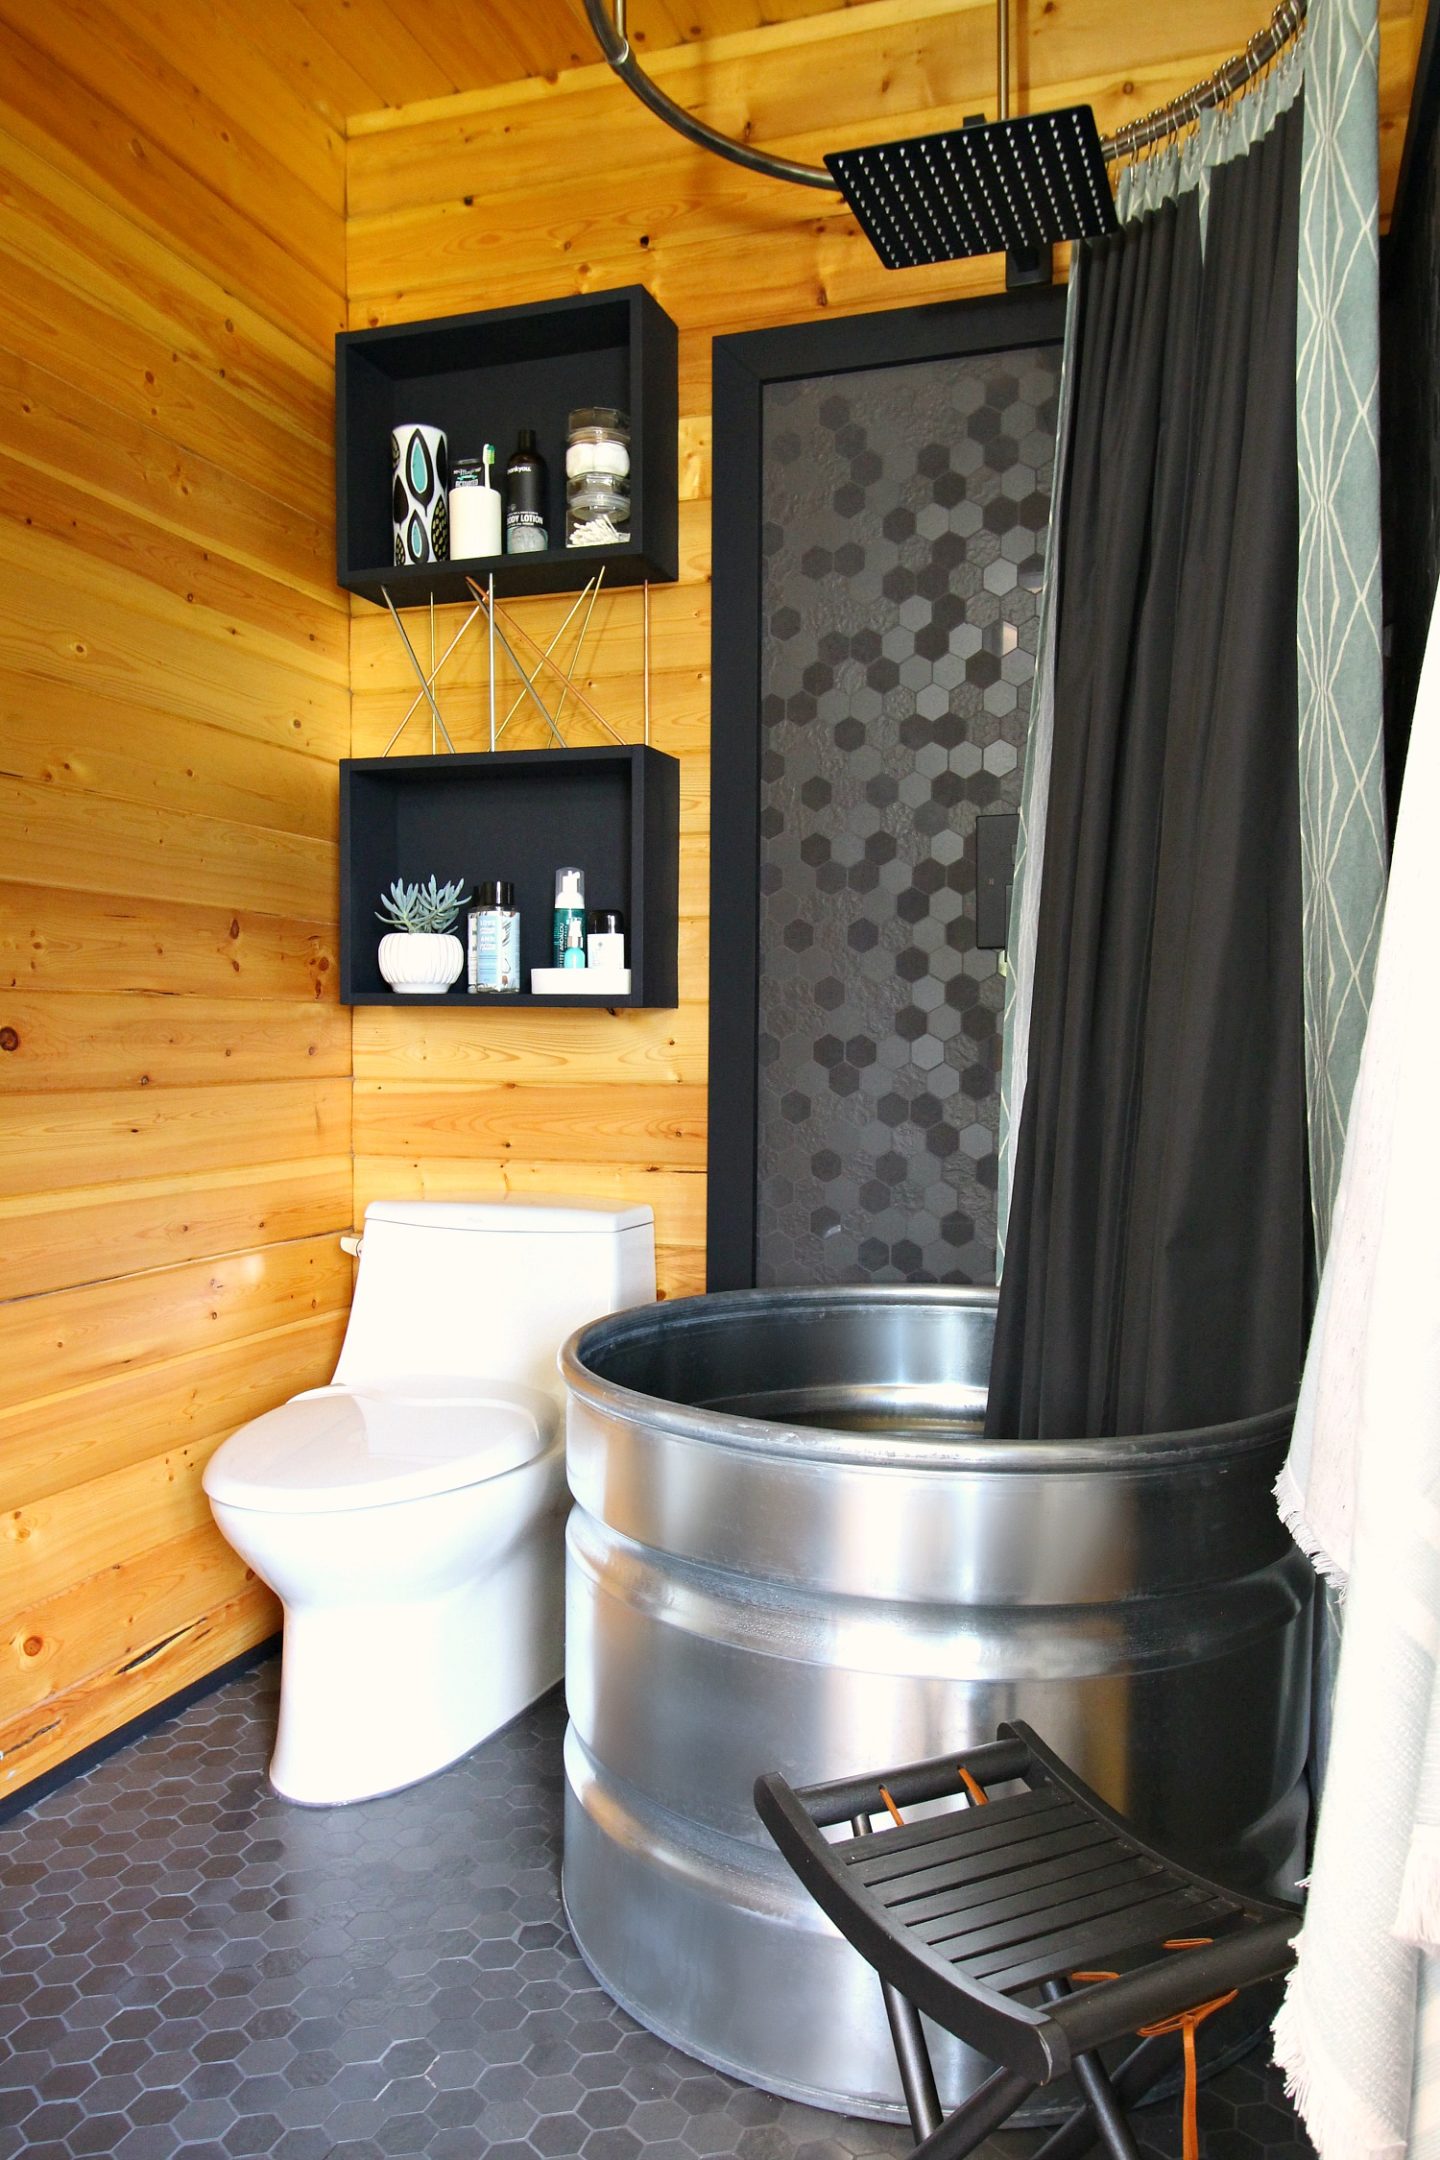
DIY BUNKIE BATH RENO BEFORE/AFTER | DIY MCM STORAGE CUBBIES | DIY STOCK TANK SHOWER | DIY SHOWER CURTAIN | DIY RETRO FOLDING STOOL MAKEOVER
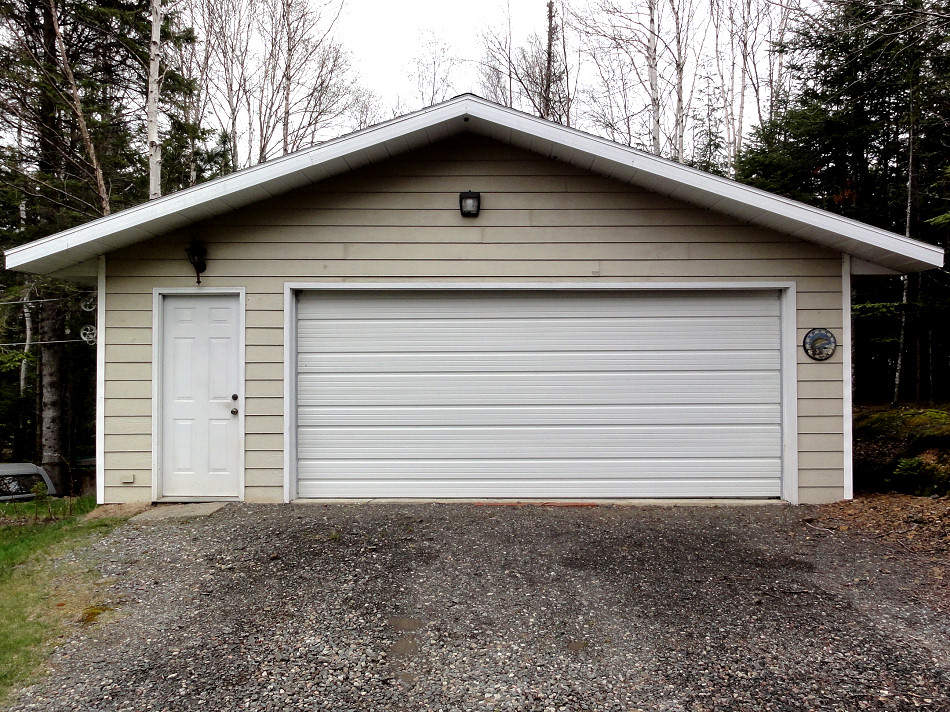
THE GARAGE – BEFORE
Before
THE GARAGE – AFTER
To help the garage look more like the house exterior (without the price tag!) we have it a DIY makeover! We painted the soffit and fascia, painted the siding – I even did a coastal inspired DIY mural on the garage door to tie in my love of blues and added a copper ferry light to match the house.
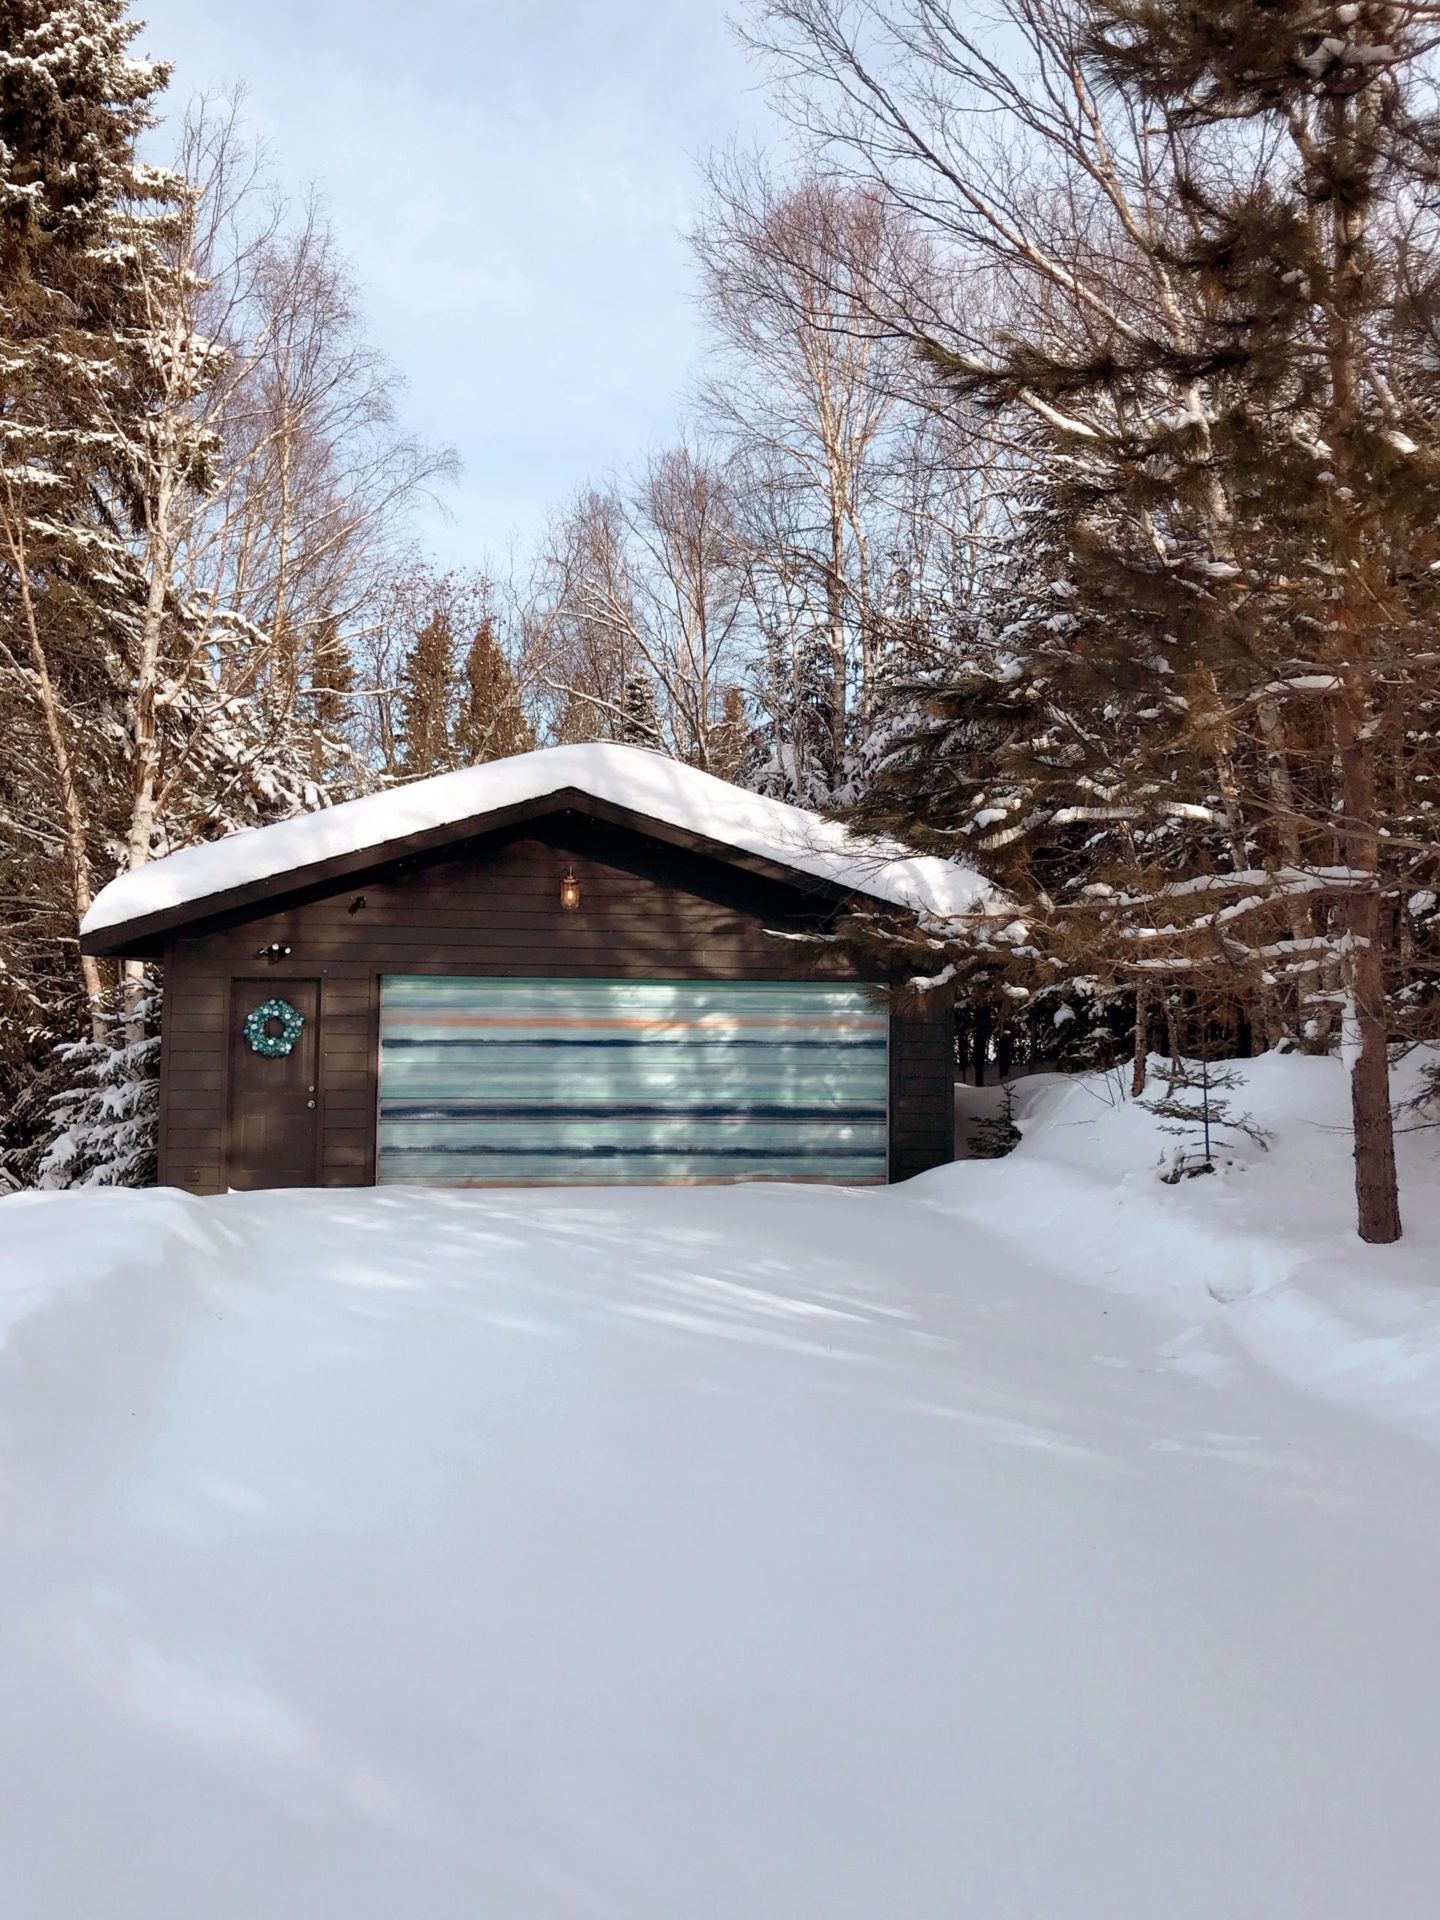
DIY PAINTED SOFFIT & FASCIA | DIY PAINTED SIDING | DIY GARAGE MURAL
DIY CHICKEN COOP
We’ve also added to the property! We built this mod little chicken coop and sheltered run for our flock of turquoise-egg laying chooks!
There is always a new craft, DIY project, or room makeover happening in the lake house. Follow Dans le Lakehouse on Instagram or Pinterest (or sign up for the newsletter) to stay in the loop and get inspired for your next DIY!
A bunky…you were holding out!
The little guest house is quite atrocious. Wait until I snap a photo of the sauna and the three piece bathroom! Something right out of Criminal Minds, super spooky! Right now there's too much snow to get in there, lol. SO much potential, though. I want to do all black, white and bleached wood – super Scandinavian. But maybe by the time I get around to it I'll change my mind.
I like your dinning chairs and would only recover. Everything looks fresh. Love the fireplace and surround. I agree with hubby, don't give out too much info! Enjoy your new home.
Can we get a floor plan? Kinda hard to visualize the space when you can't figure out the layout
Sorry, but no 🙁 I had one ready but Hubby wasn't comfortable with me publishing it. He really struggles with my sharing so many details, which is why I don't post my last name or even his first (his request). Most days he thinks the blog is neat, but sometimes a specific detail will make him uncomfortable and he'll ask me not to share. If he ever changes his mind about posting a floor plan I promise to include one right away. Until then, I have to respect his wishes because it's his home too. But I agree, a floor plan is always nice to see to better visualize a space.
Totally understandable. I'm the same with posting about my child on FB…..no mention of what school he goes to, I don't use my last name on there and rarely use his first name. Even though my profile is private, with how often FB changes their settings you never know what is out there. Usually over time on a blog one can figure out where things are and curiosities are fulfilled. I was just mostly curious where the fish room was located and the main bathroom because it seems like the powder room off the laundry room would only be feet away from the main bathroom if they all come off the hall way……actually was more curious if my detective skills were right or not lol.
It's a shame we need to be so cautious. Hubby is protective of the fishroom – won't let me say where it is on the floor plan but it's a doozy. We were totally wrong about it when we saw the home for the first time, after pouring over listing photos. It's our little secret space, lol. The powder room/laundry room are separated from the main bathroom by a bedroom.
Lol @ protective of a fishroom. Yeah it is a shame but there is too many loonies out there just waiting for an opportunity I guess.
Hubby is strangely protective of it. Lol indeed.I hope he doesn't read your comment confirming that there ARE loonies out there, haha. I keep telling him the blog will prevent us from being targeted because it's so obvious we have nothing worthy – it's all DIY and thrift store scores.
Hahaha! Hope you rename the blog something similar cause I will sure miss saying Dans le Townhouse like Phoebe on Friends does Nestle Tollhouse (nes-lay toll-ouse)
You always make me laugh with that!! How about Dans le Lakehouse?? Then I'll be kicking myself if we move again, lol.
Dans le Ourhouse
Cute!
Hi Tanya, nice job you have done in your home. I like the fireplace the best.
Hi Tanya,Your house is looking great, I am enjoying the transformations, especially the living room, looks fabulous. Quick query about the turquoise chair – I have one nearly identical that I found on the street but it desperately needs reupholstering. I have been hemming and hawing on what fabric to use. What is the fabric used on yours? Seriously, it looks fantastic – it was a sort of houndstooth before? Mine is a silk brocade that is probably 50 years old and is fraying like crazy. Definitely shabby chic, but more shabby, lol.Cheers,Alana
Thanks Alana! Funny enough: I found mine of the street too, lol!! The velvet fabric is: Elite Textile Renaissance, the colour is 760. It was a black and white check before. Actually a nice print, but in absolutely horrible condition. Here is a comparison of the before & after:http://dans-le-townhouse.blogspot.ca/2013/09/the-velvet-chair-is-done.html.I had it professionally re-done, but I tackled the arms and legs myself. So far, I've been happy with the quality of the fabric. Even with a move and an exceptionally large and dirty puppy, it looks brand new! It looks different as the light changes, sometimes more green and sometimes more blue. It photographs bluer and paler, no matter what I do.Good luck with your chair.! Are you planning to DIY or bring it to a pro? If you say DIY I am completely in awe of your skills. I'd love to see the makeover, whatever you decide to do.
Tanya, thanks so much for the details. That is so funny you rescued yours from the side of the road too!I am going to be brave and give the chair a go myself. If it ends up looking horrid (which is a distinct possibility), I have a good friend who is a crack upholsterer, she'll make it sparkle. I have a blog so when the chair is finished, I'll send you the link, k?Cheers,Alana
Happy to help! I just checked out your blog – I love that other chair you have too, from your family. Such great arms on it! I'll keep checking back, but definitely send me the link. It will be neat to see my chair's twin get a makeover. Poor little abandoned fellas. Happy upholstering!
I adore your grey painted brick wall! Usually I am not a fan of painted brick, but i think you did a beautiful job on it. Such an inspiration!Janieohsweetjane.com
Thank you! I'm relieved it turned out so well. My sister in law loved it so much she wants to paint hers too.
Could you please tell me the brand of that wonderful yellow crossbody purse in your closet. I have been looking for a new summer purse and if that is leather it just might fit the bill, assuming I can find one on ebay.
Of course! It's from Danier Leather. It's lime green inside 🙂
I looooove your lake house. My favorites: the fireplace, the credenza and the painting above it, the open shelves in the kitchen, the curtain fabric in the laundry room, the pillow fabric on the couch, the brightness of every room, and of course everything turquoise. I found your site through House of Turquoise. I'm so happy right now! Thank you so much.
Thanks Bernadine! I'm so happy you said hello 🙂 Thank you so much for your kind words. I love connecting with people who love turquoise as much as me!!
Wow! I love your style! My friend, Shavonda (ahomefullofcolor) told me about your blog and I just spent way too much time exploring it 😉
Thanks Kristin! I'm so flattered – I've been following you and Shavonda for awhile and you both have such great style.
You turned an outdated lake house into a beautiful cosy home. I absolutely love it.
Thank you! I'm just getting started 🙂
Hi Tanya,great handicraft skills of yours, wow and awe! I must admit I'd be freezingly cold in all this white and turquose out there in the Canadian winter. I think this decor would be more suitable for an Caribbean island. And while I absolutely do understand why you've removed those horrible mirror doors in the bedroom, it's a pity inner organisation war replaced with bits and pieces that look very chaotic to me. Last but not least, the sofa in the living room faces the TV instead of what must be an absolutely spectacular lake view… Having said all this, I see your home is in progress and wish you all the luck with the ongoing renovation. Cheers, Jelena
Hi Jelena,It's always nice to read a comment from someone who is so interested in what's going on inside. The closet fitting, as I'm sure you read, is not meant to be showcased. We replaced the broken one with a nice new system and as soon as we can afford it, will be adding shiny new doors to replace the cracked mirror. While placing the sofa facing the lake would be ideal, truthfully we don't plonk down on the sofa until after dark anyway – and we definitely won't be giving up television anytime soon, lol. We enjoy the lake while we're outside, while we're cooking in the kitchen, while we're dining at the table…don't worry, we ogle it enough. We make decisions based on how we live, even though it might look funny in pictures! Same goes for the colour choices. I love the cool colours because it really brings the outside in – the sparkling lake, the glittering snow, the cloudless winter skies. I like how the boundaries between inside and outside – especially with the huge windows and cool palette – are blurred. Even our deck stain mimics the colour of the lake and makes it seem like we're even closer to the water. I love where I live and intentionally chose colours that reflect the beautiful place we call home. But, to each their own, and perhaps someone else would choose a warmer, spicier palette. But that's the joy of decorating: doing what makes YOU happy 🙂
I absolutely love your blog and your house. I have looked through your site all evening. I had pinned your DIY art on Pinterest some time ago but never looked at your blog. Everything is just gorgeous. There is nothing about it even remotely like anything I would or have done in my own decorating – would have to start over completely. But I love, love, love what you've done with the white and turquoise and the gorgeous art and decorating. Realistically, who sits and stares out from the couch ever?? I always wonder at these photos of rooms with the furniture arranged for visiting or whatever with no TV in sight… honestly? Where does the TV go? That's always what I wonder. I can't wait to see more of what you are doing with your lake house. Love it! I am going to steal some ideas for my craft room in our garage/shop building – mainly the use of white for trim and walls and the pops of color you have everywhere.
Thanks Sandy! I totally understand: there are so many blogs I follow that are a really different style than mine, but it's just fun to look at. Every now and then I'll steal an idea but make it over to suit my style. I also always wonder how people use the spaces featured in magazines. Sometimes you see the TV but it's behind all the seating or at an uncomfortable angle. That's why I started reading blog: I liked seeing how people actually use a space.I'm happy some of my ideas are steal-able for you! White is such a great backdrop, especially for a colourful craft room. Good luck with the makeover! It sounds like such a fun space to decorate.
Tanya this is a beautiful house in a gorgeous location. The white theme gives many of the rooms a modern edge. Wishing you many years of happiness here, with your husband and dog!
Thank you so much for your kind words. I hope this is our forever home 🙂
Hi Tanya,I found a link to your blog while browsing some old AT posts. I am thrilled by your lakehouse – it's gorgeous! I recognize the picture of the LR makeover from AT, too. I am very happy for you and it makes me happy that you are a fellow Canuck. :-)Keep up the good work.Oh, and I also love your ombre hair (on the blog's home page).CanadianMango
I'm so happy you hopped over from AT to leave such a sweet comment. It's seriously awesome when people take the time to leave a comment, especially a nice one. Thank you! The house is a work in progress, and I have a great bath reno in the works. Fingers crossed! Is CanadiaMango your AT user name? I am certain I've seen your comments on posts over there. It sounds so familiar!
Hi Tanya,I'm the Picture Editor at House Beautiful magazine UK. We would like to use one of your images for an article we are doing on storage. Please can you contact me asap?Thanks and regards, anita.isaacs@hearst.co.uk
Hi Anita, sure thing!
Beautiful!!! Where are you getting your art?
Thanks! Much of it is by my hubby's grandfather, Bert Weir (bertweir.com). Some is DIY. We also pick up inexpensive pieces traveling (like the water colour chairs).
Hello from a fellow Michigander! I stumbled across your blog when I googled "what kind of paint to use on cement basement floor" and may I tell you I have spend the better part of my evening enjoying your lovely home. I absolutely love your style…excellent job on your renovations! I will definitely be bookmarking your site!
Hello! I'm not actually in Michigan but we're neighbors! Sort of. I live just north of MN in Canada. Thank you so much for taking the time to leave such a nice comment. I'm so glad you enjoyed the house tour. It's a work in progress but we're getting there. Hopefully I was able to help with your cement question… 🙂
You took something dated and turned it into an amazing space! Blown away. I bet you also increased the value of that property by a ton by the wonderful choices you made. Well done.
Thank you! It's still a work in progress: one day we'll do a real kitchen makeover, and also tackle the weird fish room and renovate the guest house. And the exterior needs some help! But we just wanted it to look more like "us" while we worked. We're definitely comfortable here now.
Cant believe a Finn would want to tear out a sauna! Perhaps it could be relocated?
I know, right? So far we've only removed the benches, which smelled. It's really just a poorly built room with the sauna stove (which we could sell) – nothing special. I'd love to reinforce the floor and expand the guest space but, for now, it's just a storage room with a sauna stove and no benches! One project at a time…
I love your floating credenza but the artwork over it blows me away! Wherever did you find it?
Thank you! My hubby's grandpa is an artist and he made it. His website is http://www.bertweir.ca. I believe it's from a 2010-ish series he did, so there are similar ones. It's called Joy's Rock so if you inquire about it they can tell you what's available for sale from the same series.